Printable Version of Topic
Click here to view this topic in its original format
6G Celicas Forums _ My Project _ Safari Rally inspired build
Posted by: Roodwerks Jul 23, 2018 - 12:26 PM
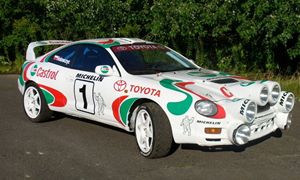
I haven't ironed out all the plans, most project cars are open to constant change right. I will be converting this very cheap, high mileage car into another dual sport toy. If you dig around on the internet, you can find my other two Toyotas, 1984 Expedition Celica ( https://www.youtube.com/watch?v=PSNS9-qponY&t=16s ) and 1993 Lexus SC400 RX. This time around, pulling from my favorite sport of rallying, and favorite event, East African Safari Rally for all my inspiration, with maybe a little bit of Dakar thrown in. I purchased the car for $700, 278K miles on the clock but with a newer head installed not too long ago. With the help of this Forum, lots of research from various sources and encouragement from friends, the project is off to a good start. The red wheels, just not my style and 17" rims aren't going to cut it in the dirt...
Current work finished:
-Maintenance on fuel and ignition system
-debugged wiring to clean up the engine bay and get the cooling fans working properly
-built custom SS header with race CAT and 2-1/2" dump pipe (to pass emissions)
-tossed original struts and cut springs
-installed 1997 Avalon struts and springs for travel and lift (rears are bolt on, front not really at all, used Rav4 tops, etc..)
-2 of 4 custom engine mounts to replace broken OEM versions with Polyurethane
-Jon
http://s265.photobucket.com/user/jrally/media/20180429_140516.jpg.html
http://s265.photobucket.com/user/jrally/media/20180719_091534.jpg.html
http://s265.photobucket.com/user/jrally/media/20180616_174624.jpg.html
http://s265.photobucket.com/user/jrally/media/20180616_191216_1.jpg.html
http://s265.photobucket.com/user/jrally/media/20180708_123852.jpg.html
http://s265.photobucket.com/user/jrally/media/RearMnt2.jpg.html
Posted by: SwissFerdi Jul 24, 2018 - 12:30 AM
Love the suspension setup, great work. I wouldn't paint a future set of wheels orange (in profile) or yellow again, but I liked it at the time and always thought of it as kind of a rally touch. Maybe you should keep them, although if they are indeed red I wouldn't like that either. Looking forward to progress.
Posted by: Roodwerks Jul 24, 2018 - 12:38 PM

Those wheels are factory powder coated in red. I'm planning on spray painting them a bronze color soon, paint already bought.
Posted by: Roodwerks Jul 30, 2018 - 11:53 AM
Third mount built and installed. That mount was TRASHED... A bit less vibration while driving, hardly noticeable on the highway, around town it's still a bit harsh.
http://s265.photobucket.com/user/jrally/media/20180728_170528.jpg.html
http://s265.photobucket.com/user/jrally/media/20180728_170701.jpg.html
Posted by: cheela Aug 6, 2018 - 5:00 PM
That 84 Celica is badass!
Interested to see how this turns out. Haven't seen a project like this done on a 6th gen yet so it's pretty cool to read on here.
Posted by: Box Aug 7, 2018 - 1:09 AM
Engine NVH, because racecar yo!
Posted by: SwissFerdi Aug 7, 2018 - 1:39 PM
I tried burnt copper engine enamel several years ago. Came out pretty well, will have to dig up pics, other than the last one in my profile where the lighting sucks.
Posted by: Tigawoods Aug 7, 2018 - 1:52 PM
more. MORE. MOOOOORE. Hit that fast forward button. I want to see the finished project ASAP
Posted by: Roodwerks Aug 9, 2018 - 10:29 AM
You and me both... Unfortunately getting motivated to work in the shop when it's 113 deg outside!! I'm holding off on a few things since I have a busy 2 months ahead. But, I'm hoping to keep progress steady, on some detail pieces. In a couple of months, the really cool stuff for me should be happening. Brake upgrades on the cheap, along with bolt pattern change to fit cool wheels and 27" tires. Glad to see other people besides myself are excited about this project.
-Jon
Posted by: Roodwerks Aug 13, 2018 - 12:01 PM
http://s265.photobucket.com/user/jrally/media/BB1.jpg.html
Some pieces followed me home from the salvage yard this weekend, parts I think that will make for a great brake system upgrade. '97 Avalon brakes from all 4 corners, including the rear hubs. This will give me beefier parts, bigger brakes, 2 pot calipers up front, etc.. I was shopping for pieces to fix my Lexus off road car, goofy hydraulic cooling fan system. Figured while I was there sweating in the 100 degree plus weather, might was grab things for the near future. I'll let everyone know how the rear hub assembly works out.
Posted by: richee3 Aug 16, 2018 - 9:30 PM
I vote some rally style lighting for this car. 
Posted by: Roodwerks Aug 17, 2018 - 10:54 AM
Something I started sketching up a while ago.
http://s265.photobucket.com/user/jrally/media/LightSkeleton.jpg.html
Posted by: cheela Aug 17, 2018 - 3:14 PM
I say you even throw the rally decals right on top of your faded paint to give it an even more rugged look.
Posted by: GuYun14 Sep 13, 2018 - 9:10 PM
This is awesome! Was thinking of doing a similar build to my car. Need more info on the Avalon struts, how does it fit and ride height? And is the swap easy?
Posted by: Roodwerks Sep 14, 2018 - 11:25 AM
http://s265.photobucket.com/user/jrally/media/CruizeCntrl.jpg.html
Sorry it's been a little while, I've been busy with other projects, trying to sell my DualSport Lexus SC400 to help fund the Celica, plus I'm the organizer of a rally in the SW which takes up a LOT of time.
Anyways, last night I installed the cruize control actuator that I bought about a month ago. The previous owner had hacked it out of my car. It gave me a chance to clean up the body/chassis under the
battery a little while things were out. I got it all bolted back together nicely, pull cable hooked up and no plug. The harness plug on the chassis is completely missing. I'm assuming it was a break off
from the main bundle that runs over the top of the tranny. Good thing I clipped the harness on the salvage yard car. Hopefully I can find the wires and splice in the connector I have. What's a good toy
without cruize control..?
Posted by: Roodwerks Sep 14, 2018 - 6:38 PM
I'll certainly post any issues as I go along. But, if you just like the ride height, the rear struts just bolted on with a tiny amount of top mount reclocking. I loosened the top nut just enough to allow me to rotate the mount something like 5 degrees. The front struts likely could be assembled with the Celica top mount, I just chose to go a different route based on experience with my early Celica. One of the mounting flange holes has to be slotted to match the 6G upright mounting pattern and bolts. I'd suggest using washers added to these bolts, both sides to spread the load.
Posted by: Roodwerks Sep 20, 2018 - 10:16 AM
Progress on the lightbar mounting set-up for the nose.
http://s265.photobucket.com/user/jrally/media/LB3.jpg.html
Posted by: SwissFerdi Sep 20, 2018 - 8:06 PM
Posted by: richee3 Sep 20, 2018 - 9:47 PM
Cant wait to see how it turns out!
Posted by: Roodwerks Sep 21, 2018 - 3:31 PM
Sooooo much round-ness... Lovin it!!
http://s265.photobucket.com/user/jrally/media/LB5.jpg.html
Posted by: BonzaiCelica Sep 23, 2018 - 1:14 AM
oh wow modern. the led surely make everything much lighter!!! fanstastic
Posted by: cheela Sep 25, 2018 - 8:51 AM
now you need a pic/video to show us how blindingly bright it's gonna be. 
Posted by: Box Sep 25, 2018 - 5:30 PM
There's just something about mosquito melting 130 watt Hella lamps though that LED or HID can never give you. 
Posted by: Roodwerks Sep 25, 2018 - 5:53 PM
True, but the tiny amount of current/amperage used vs incandescents makes it worth the change.
http://s265.photobucket.com/user/jrally/media/LB7.jpg.html
http://s265.photobucket.com/user/jrally/media/LB8.jpg.html
Posted by: Bitter Sep 25, 2018 - 8:07 PM
Who are the light pods from? Specs? What emitters? I need answers!
Posted by: Roodwerks Sep 26, 2018 - 10:23 AM
They are just cheap Ebay lights with amber/yellow halo outer ring to give them multiple options for output. The outer two are flood lenses and the inner two are spot lenses.
I think they were about $30 a pair shipped. I was after size and color output then maximum brightness.
https://www.ebay.com/itm/2X-5-60W-5D-Amber-LED-Pods-Light-Bar-Spot-Off-Road-4X4-Truck-Fog-Driving-Round/192552791372?ssPageName=STRK%3AMEBIDX%3AIT&_trksid=p2060353.m2749.l2649
Posted by: Roodwerks Oct 2, 2018 - 4:43 PM
Past weekends work...
Cruise control wiring harness found, on the right front corner. What is it doing over there? I had to extend the harness 18-20" to reach back across the radiator to the actuator. It's working like a charm, so I'm happy.
http://s265.photobucket.com/user/jrally/media/CruiseWire1.jpg.html
http://s265.photobucket.com/user/jrally/media/CruiseWire2.jpg.html
Pulled the light pod mount back apart for final welding and painting. Got it all bolted back together, wires run through the skin of the bumper and lights wired into the car via various means. The outer lights halos' are now also extra turn signals. Floods and Spots are on two separate switches just below the instrument cluster dimmer knob.
http://s265.photobucket.com/user/jrally/media/LB12.jpg.html
http://s265.photobucket.com/user/jrally/media/LB10.jpg.html
Posted by: SwissFerdi Oct 3, 2018 - 12:09 PM
Sick.
Posted by: Nial Oct 11, 2018 - 11:00 AM
Thats certainly a unique take on a lamp pod design, i like it.
Posted by: Roodwerks Oct 12, 2018 - 12:27 PM
Excited to have bought some better looking rims. I think this is only the 4th time in my life I've owned a car with aftermarket rims. These weren't my 1st choice, but cost, strength, right size and looks made it the choice for me at this time. I was hoping they'd be a bit lighter then they are, but should be fine. Can't wait to get the tires mounted on them, so I can see how it'll all look once I get the brakes and hubs changed out.
http://s265.photobucket.com/user/jrally/media/20181011_192921.jpg.html
http://s265.photobucket.com/user/jrally/media/20181011_192946.jpg.html
Posted by: msk59 Oct 14, 2018 - 5:27 PM
Very Nice build thus far. I love the way you made the frame and attached the lights. IMO better than the original safari car.
The cruise control actuator was located on the RHS (passenger and the wiring was then run all the way to the left and inside driver side fender into the car. I have the leftover actuator and some wiring and cables if you need those. I sold my 96 Celica and some parts are left over. I also have the rear disc conversion kit (most of it). PM me if you need these parts. I dont have the car anymore.
QUESTION: How are you supporting the foglights frame on the inside? Are you running flat metal to support the front bumper? Otherwise the vibration may break the plastic Just a thought.
Posted by: Roodwerks Oct 15, 2018 - 10:15 AM
Thanks for the offer, but I've got the cruise control sorted and working.
I also have rear brakes for upgrading in hand, it's the entire rear hub assembly from an Avalon.
For now the lights and mount are only supported by the bumper skin itself. I plan on running strips under the skin and back to the core support at some point. For now, they don't bounce or vibrate at all while driving.
Posted by: cheela Oct 15, 2018 - 10:41 AM
I don't care much for aftermarket rims either but I will say, those definitely match your build.
Posted by: Box Oct 15, 2018 - 3:04 PM
I feel like knobby mud tires are incoming.
Posted by: Roodwerks Oct 15, 2018 - 4:55 PM
Tires are getting mounted today. General Grabber AT2s, the size is going obsolete, but I was able to source a full set plus 1 lightly used spare. It'll be interesting to see it all fitted together.
I also fixed a bad TPS yesterday. Last week, all of a sudden I couldn't go full throttle, 3/4 maybe. Prior to this when the engine was cold, it would have a similar issue. Ever since I've owned the car it never went more than roughly 5000 rpms, figured, like my '84 Celica that the engine just couldn't breathe anymore. I was wrong, saw it go up to 5500 rpms after the new TPS was fitted.
Posted by: GuYun14 Oct 15, 2018 - 8:34 PM
Definitely looking forward to the wheel and tire setup. What size tire are you planning on running? And regarding the suspension, how much higher are you sitting compare to stock?
Posted by: Roodwerks Oct 16, 2018 - 1:45 PM
The tires I'm planning on make fit are 215/65R16 (that's a 27" tall tire). They won't just bolt on to any old Celica. It's going to require some major changes, bodywork most likely, possibly chopping into the firewall, etc..
I got the car while it was lowered, so I have no reference for how much higher from stock it's going. If I had to guess, just the suspension will be about 2-3" taller than stock. The tires are another 1-1/2" taller in the radius (out of center, 3" taller than stock in diameter). The final stance will certainly be higher than pretty much any rally car Celica that has been built. My reference is less rally car, more Dakar car from the early 90's. If you've never seen the cars built for the Paris to Dakar Rally back in the later 80's early 90's, dig around the internet for pictures.
Posted by: njccmd2002 Oct 23, 2018 - 8:46 AM
how much if you start selling those lamp pods, without lights?
Posted by: Roodwerks Oct 23, 2018 - 10:28 AM
Not really interested in trying to hand make these light pods. It's a time consuming, hand fitted process, so without a jig to form them to,
it would take too long and I'd have to use the nose of my own car to work from. So, unless it was something nearly EVERY 6G Celica owner
wanted, it just isn't worth the time. If it was for one person, the cost would be in the ballpark of $350-400.
Well, I finally got back to trying to fit the new wheels and tires. (after trying to get the engine back to shape, high-idle turned out to be a
crap handmade TB to manifold gasket leak, it was made out of a piece of thick paper, not gasket material.) I can confirm that the rear hub
assemblies I got from a '97 Avalon bolt into place, giving me bigger brakes and the 5x114.3 (4.5") bolt pattern I wanted. For my particular
suspension height, I did have to lengthen the trailing rod by 1" for now. This centered the tire back in the wheel well, caused by lifting so it
so high. This is a short-term solution, eventually the chassis side mount will get a custom dropped pivot point.
http://s265.photobucket.com/user/jrally/media/20181022_202806.jpg.html
http://s265.photobucket.com/user/jrally/media/20181022_202826.jpg.html
Posted by: richee3 Oct 23, 2018 - 2:28 PM
Love this build. I used to want to buy another 6th gen to build as a rally replica so this is awesome to me.
Posted by: Box Oct 23, 2018 - 3:14 PM
YESSSS. Now it just needs some awesome mudflaps to finish it off.
Posted by: Roodwerks Oct 23, 2018 - 4:20 PM
Plenty of more work to do; front hubs have to be converted with the Rav4 pieces, Camry rotor and two pot calipers. The front might need sheet metal work to properly fit the tires, possibly a strut top spacer along with spacing the subframe and engine/tranny down an equal amount to not stress the axles. Hopefully all four corners will be fitted with the 5x114.3 hubs by the end of this next weekend.
Posted by: SwissFerdi Oct 24, 2018 - 9:06 PM
Really cool. I agree with Daniel, I think if I kept mine forever and said YOLO I'd do the same. Some of my favorite driving moments were sliding on dirt. 
Posted by: Roodwerks Oct 25, 2018 - 1:20 PM
Love a lifted rear!!
http://s265.photobucket.com/user/jrally/media/20181025_073557.jpg.html
Posted by: Roodwerks Oct 29, 2018 - 3:42 PM
This change -
http://s265.photobucket.com/user/jrally/media/20181028_172435.jpg.html
Made this change possible -
http://s265.photobucket.com/user/jrally/media/20181028_173630.jpg.html
Posted by: GuYun14 Oct 29, 2018 - 9:45 PM
Looking awesome! Can't wait to see when the front is done so we can see the whole car.
Posted by: Roodwerks Oct 31, 2018 - 11:59 AM
And now it's on the road again...
I call this one "Coffee Time"
http://s265.photobucket.com/user/jrally/media/20181031_073224.jpg.html
http://s265.photobucket.com/user/jrally/media/20181031_074320.jpg.html
Posted by: Box Oct 31, 2018 - 1:46 PM
All I see is a vape shop and PT, no coffee.
Jokes aside it's coming along nicely. Now it just needs some kind of rally car livery, and mudflaps.
Posted by: Tigawoods Oct 31, 2018 - 5:43 PM
ugh I wish I were closer to do a photoshoot. that looks great
Posted by: bloodMoney Nov 1, 2018 - 9:39 AM
Are you seeing any issues with axle length/CV angle?
I love this different build. Makes me wish I had the funds to do a UZ/RWD drift build.
Posted by: Roodwerks Nov 1, 2018 - 10:53 AM
I love this different build. Makes me wish I had the funds to do a UZ/RWD drift build.
How about this, my last dual sport build, lifted SC400, 1UZ-FE, Lexus quality...
http://s265.photobucket.com/user/jrally/media/Lexi_1st.jpg.html
Posted by: Roodwerks Nov 1, 2018 - 10:53 AM
I love this different build. Makes me wish I had the funds to do a UZ/RWD drift build.
No axle binding or length issues.
Posted by: cheela Nov 1, 2018 - 1:06 PM
that looks awesome!
what's next? mudflaps, bull bar, and WRC color scheme? lol
Posted by: TimeslideZ Nov 1, 2018 - 1:23 PM
Make it brighter... ROOF LIGHTS
Posted by: Box Nov 1, 2018 - 3:11 PM
what's next? mudflaps, bull bar, and WRC color scheme? lol
#TeamMudflaps
Posted by: bloodMoney Nov 2, 2018 - 10:19 AM
http://s265.photobucket.com/user/jrally/media/Lexi_1st.jpg.html
That's so coooooooooolllll!!!!
I'm wanting to chop up a 6GC for that V8/RWD drift machine though. Can you imagine the sound of a cammed LS coming out of a slammed 6g? I want to do it, just to mess with people.
Posted by: Nial Nov 4, 2018 - 1:38 AM
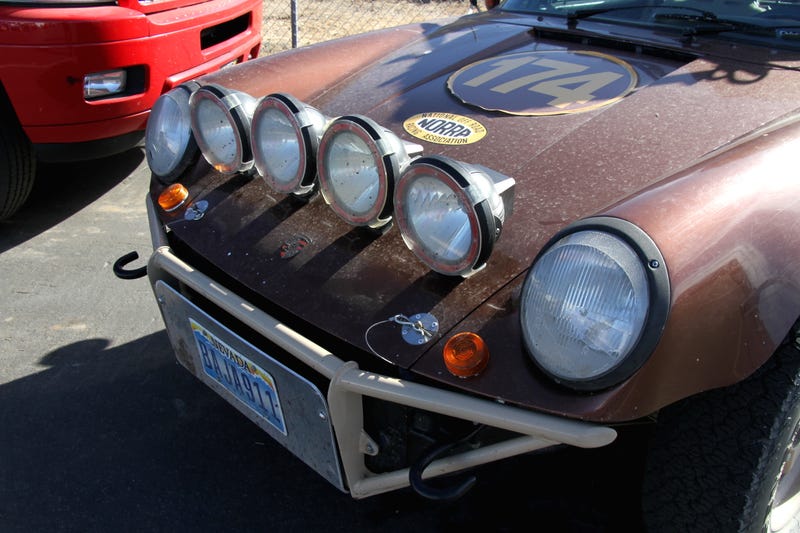
Thinking along these lines, the Safari rally cars had extra spot lights on the front wings/fenders just in front of the mirrors, the bracket looks simple enough to make.
Also the snorkel, it would be interesting to see how you tackled that, thought about making one once, gave up, found a genuine one for sale, would have cost more than 2 GT4S.
Posted by: SwissFerdi Nov 4, 2018 - 9:51 AM
I would love to see a snorkel, wouldn't use a genuine one for fear of damage. I really like this build: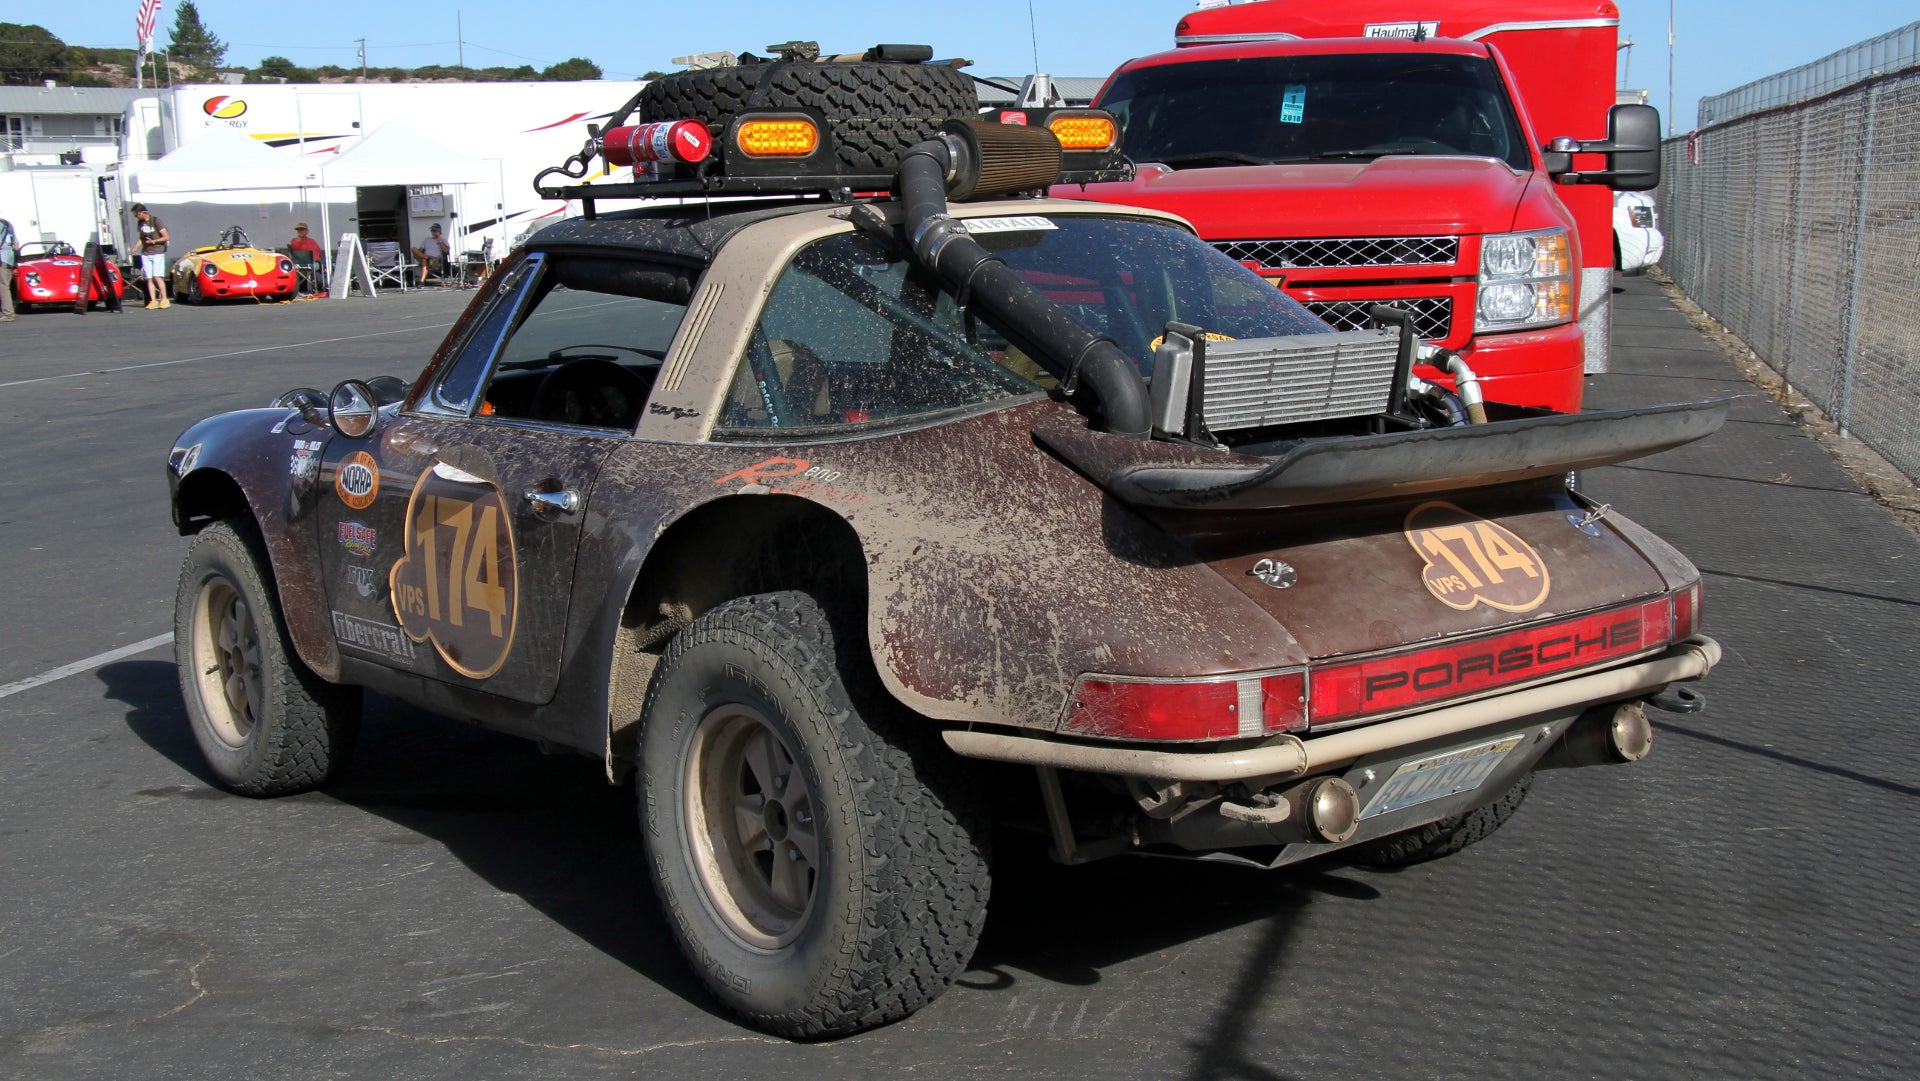
Posted by: Roodwerks Nov 5, 2018 - 12:32 PM
I feel like the car wouldn't complete the WRC Safari Celica without a snorkle. I've got a few ideas about how to make it and make it work, but we'll see. It's probably one of the later pieces I'll tackle, as it isn't needed right away. That Porsche is looking BA!! I think it was used to run the NORRA 1000 in Mexico if memory serves me right. I took the car to do a little off roading this weekend, easy does it at first, to find more fender clearance issues, see where to trim or completely cut away. I don't want to cut too much off yet, as I still plan on correcting suspension geometry to help with some of the fitment and clearance. I'll post a few nice pics of the adventure later.
Posted by: GuYun14 Nov 6, 2018 - 4:50 PM
This car is coming along nicely. This was something I thought about doing but didn't have the guts or knowledge so now I'll live my dream through you lol
Posted by: Roodwerks Nov 13, 2018 - 10:31 AM
Thanks, I'm here to build dream cars for myself and anyone that cares to enjoy it...
So, Photobucket has decided to revamp their hosting of photos, apparently by adding in dynamic links, jerks.
Posted by: cheela Nov 14, 2018 - 2:54 PM
yeah, I stopped using photobucket after their first fiasco. I've been using flickr ever since.
Posted by: Nial Nov 29, 2018 - 12:33 PM
Dont know if it will ever come to pass, but i an working with a pal of mine to design and get 3d printed a safari rally type snorkel. I am sure if it works out he would sell you the design which you can then send off to a local 3d printers to get produced.?
Posted by: Roodwerks Nov 29, 2018 - 3:32 PM
That would be fantastic. Funny, I never even considered designing a snorkel in a 3d cad program and then sending it out to be made. The original WRC design would be pretty cool, but the flex tubing seems like it could have been out a bit further to the outside, to take up less driver view out the windshield.
Posted by: Roodwerks Nov 29, 2018 - 4:21 PM
https://s265.photobucket.com/user/jrally/71be2cbf-dd7d-4330-bb53-2554c5a7ed87-original.jpg%5b/IMG
Another full failure with Photobucket's latest update...
Try it again...
https://beta.photobucket.com/u/jrally/p/71be2cbf-dd7d-4330-bb53-2554c5a7ed87/IMG
Posted by: Nial Nov 30, 2018 - 1:31 AM
I guess the bonus of the flexi bit is that it will go more or less where you want, although being in the uk its on the passenger side for us so not really something i have considered.
Posted by: Roodwerks Dec 13, 2018 - 12:56 PM
http://s265.photobucket.com/user/jrally/media/20181025_073557.jpg.html
Will this work..? Guess not...
Posted by: GuYun14 Jan 28, 2019 - 2:44 PM
Any updates?
Posted by: Roodwerks Feb 12, 2019 - 4:29 PM
No pics, but you can find pictures of this project and a few others on my Instagram - roodwerks
I've mostly been trying to track down a rough running issue when it's warming up in colder weather. It runs fine at first start up, 1-2 minutes later it starts misfiring under acceleration, a few minutes after that, sometimes up to 15 minutes later it will start running fine..? It's a weird issue with NO CEL at all. It's been doing it for a few months.
I did buy and mount a new set of center LED flood lights on the front pod, about 3 times brighter than the first pair. I've also been gathering pieces to build a custom rear subframe and arms to fix the lifted geometry and make room for a possible future rear diff..
https://flic.kr/p/SPrgVyhttps://flic.kr/p/SPrgVy by https://www.flickr.com/photos/168664146@N06/, on Flickr
https://flic.kr/p/2dRDJWshttps://flic.kr/p/2dRDJWs by https://www.flickr.com/photos/168664146@N06/, on Flickr
Posted by: Roodwerks Feb 25, 2019 - 3:54 PM
I finally figured out my poor running issue when cold, bad igniter. The engine pulls easily to 6K rpms now. Of course now the harmonic balancer had to de-bond and start coming apart. If it's not one thing it's another...
-Jon
Posted by: Roodwerks Feb 28, 2019 - 11:38 AM
This past weekend, it was half off at the salvage yard I spend a lot of time shopping at. So, while grabbing parts, I scored a pair of rear speakers with the crazy large plastic brackets, a left-hand high beam housing plus a few other small items. While installing the speakers, I decided to go ahead and use a cheap hot-rodders trick, installed roofing repair adhesive tar tape on the inside of the panels. It's more about changing the sheet metal density then getting even coverage. The back of the car is a good bit less droney now. I've removed the back seat and don't have the cover in the rear luggage area obviously, so it had gotten a bit noisy.
https://flic.kr/p/SQaiYhhttps://flic.kr/p/SQaiYh by https://www.flickr.com/photos/168664146@N06/, on Flickr
https://flic.kr/p/SQaiXAhttps://flic.kr/p/SQaiXA by https://www.flickr.com/photos/168664146@N06/, on Flickr
https://flic.kr/p/SQaiTshttps://flic.kr/p/SQaiTs by https://www.flickr.com/photos/168664146@N06/, on Flickr
Posted by: GuYun14 Mar 1, 2019 - 11:52 PM
I've mostly been trying to track down a rough running issue when it's warming up in colder weather. It runs fine at first start up, 1-2 minutes later it starts misfiring under acceleration, a few minutes after that, sometimes up to 15 minutes later it will start running fine..? It's a weird issue with NO CEL at all. It's been doing it for a few months.
I did buy and mount a new set of center LED flood lights on the front pod, about 3 times brighter than the first pair. I've also been gathering pieces to build a custom rear subframe and arms to fix the lifted geometry and make room for a possible future rear diff..
https://flic.kr/p/SPrgVyhttps://flic.kr/p/SPrgVy by https://www.flickr.com/photos/168664146@N06/, on Flickr
https://flic.kr/p/2dRDJWshttps://flic.kr/p/2dRDJWs by https://www.flickr.com/photos/168664146@N06/, on Flickr
That thing looks so beastly. How does it handle so far? Any rubbing/suspension issues?
Posted by: Roodwerks Mar 4, 2019 - 10:57 AM
The handling is really pretty decent since I was able to retain the swaybar front and back. As for rubbing, yes, hard turns the front tires are contacting the back of the wheel well / firewall area. Under compression, the rear tires move back so far that they contact the backside of the body. It's not enough to worry about daily driving, but all issues will be corrected in the near future with custom rear suspension, probably cutting and moving the front wheel well further back into the cabin area.
Posted by: Roodwerks Mar 7, 2019 - 5:46 PM
Now that I found a decent, free, photo host I will probably start sharing more progress. This past weekend I installed an "Oh-****" Handle, as you know, our cars didn't come with any passenger side grab handle.
https://flic.kr/p/24toppzhttps://flic.kr/p/24toppz by https://www.flickr.com/photos/168664146@N06/, on Flickr
Posted by: bloodMoney Mar 8, 2019 - 10:54 AM
Did you bolt into the A-Pillar structure behind the trim, or is it just bolted into the trim itself?
Posted by: Roodwerks Mar 8, 2019 - 12:12 PM
I used one existing round hole (top one) and drilled the other to insert M8 rivet nuts. So they are bolted into the A-pillar, securely. I made the tool to install the rivet nuts, pretty simple set-up, but rivet nut tools usually aren't too pricey, I'm just cheap I guess.
Posted by: bloodMoney Mar 8, 2019 - 3:43 PM
Gotcha. I like that it's functional.
Posted by: Roodwerks Mar 20, 2019 - 4:30 PM
I've replaced just about everything on the engine that could cause my now 2000rpm idle. I've replaced or checked every hose. The important sensors are new or reman; IAC, MAP, CTS, ATS, O2, etc.. Anyone else run across this with the age of our cars and possibly as high a mileage as I have, 280K..? The engine runs great, just a horribly high idle. Ggguuuuurrrrr.......
Posted by: richee3 Mar 21, 2019 - 8:32 AM
Might be a dumb question but have you checked the throttle cable? It may need adjustment or it might have a slight burr on the cable. Its been forever since Ive had a 5S but I believe theres an adjustment screw on the throttle body as well, although I think I remember that being addressed already.
Posted by: Roodwerks Mar 21, 2019 - 10:25 AM
No dumb questions in my book. But, yes, the throttle cable is adjusted, if anyting, a bit too loose. The only adjustment screw is the butterfly stop screw, which is properly adjusted, the plate couldn't get any more closed.
Posted by: TimeslideZ Mar 21, 2019 - 8:57 PM
Imagine if he didn't, call it the "SURPRISE MOTHERF*****".
Posted by: bloodMoney Mar 22, 2019 - 11:11 AM
Imagine if he didn't, call it the "SURPRISE MOTHERF*****".
BAHAHHAAHA Right!?!
Posted by: Roodwerks Apr 4, 2019 - 1:36 PM
I gave up for now chasing my high idle issue. Last night I made up a restrictor gasket to go between the IAC and throttle body. It allows air into the IAC and out to the A/C idle up tube but totally blocks air from going into the intake manifold just behind the throttle plate. This is giving it a pretty steady idle between 700 and 800rpms, mostly between 700 and 750. This is only after the engine has warmed up though, it takes slight throttle pedal input until then to keep it from stalling.
Posted by: Roodwerks Apr 23, 2019 - 1:54 PM
UPDATE: I ended up cutting a small hole on the other side of the gasket to bypass a small amount of air. Now idling between 900-1000, starts up fine now and runs without any stumbling with the A/C on. I did order another ECU, haven't installed it yet though.
Posted by: bloodMoney Apr 24, 2019 - 11:40 AM
Clever solution. I like it.
Posted by: Roodwerks Jun 7, 2020 - 6:32 PM
So, it's been a VERY long time since I've posted an update on this car. Last year I changed jobs that took a lot of my interest away from doing too much on the car for a while, then trying to upload pictures got too frustrating. For those that have followed me on Instagram know that the flood gates opened up on the modifications since mid March, working from home now. The back end is looking WOW!! The car handles great and the addition of Nissan Skyline R32 seats help hold me in place on and off road.
-Jon
Posted by: Roodwerks Sep 10, 2020 - 12:57 PM
A friend and I attempted an epic journey this past week. We got from Phoenix AZ to Capitan NM without issue, via all back highways, no interstates. We then clawed over the mountain to the north of town and down the other side. About 5 miles from the end of the trail/dirt/rock road, the engine started giving up the ghost. We patched, refilled with water and gave the engine time to cool down several times, giving us the forward momentum to make it another 15-20 miles, maybe more. Finally 12 miles from Roswell, I gave up and we got a hold of a tow truck service. 2 days at the local Toyota dealership finally got us the answer, blown head gasket, very worn out engine that won't even start now.
SO - I'm thinking about pushing the changes up a notch. I've been gather the pieces to convert it to AWD anyways. Now I need to figure out which engine swap might be right for me... How cool would a BEAMS on an AWD box be? Or, what about a V6, 1MZ-FE on an AWD box?
Anyone know of a free photo host, would love to share pictures once again??
Posted by: richee3 Sep 11, 2020 - 11:14 PM
Honestly Id suggest something with more torque than a BEAMS for an AWD conversion. The BEAMS is fun in FWD guise but at only 154 lb ft of torque, youd have more fun with any other swap. 2GR comes to mind as one that would be great for AWD but I dont know if theres room for the exhaust and trans in a 6gc bay. Norberto would have more insight into that.
I currently use Imgur for image hosting/sharing. It gets the job done. Im sure there are better solutions out there but Imgur works and thats all I really need.
Posted by: TimeslideZ Sep 12, 2020 - 12:38 AM
^ 2GR would be the way to go for V6, the 1MZ/3MZ wouldn't be bad either. But it's hard to beat the swap of the 3SGTE with power mods to cover for the AWD.
Posted by: njccmd2002 Sep 12, 2020 - 6:25 PM
awd 2gr could be possible. i studied the possibility with a smaller transfer case on the e153, there are several out there. gave up on the ideal once the gt4 were to expensive. hate the idea to buy one and toss the engine out...
some info here
https://www.newcelica.org/threads/celica-awd-build-thread.394209/
but there are several threads..
you will have to fab your exhaust or use the ones from a awd 2gr...
Posted by: Roodwerks Sep 18, 2020 - 10:34 AM
I've done the research and the math and already started collecting what I think I'll need. Here's my plan as of now; 3S-GE BEAMS (Red or Grey Top), E250F tranny out of a '99 Rav4, get rid of the vacuum actuator for center diff lock replacing it with something simpler and smaller, mod'd prop shaft to the rear, possibly grafting Rav4 gas tank into the body, full custom rear subframe already built, RX300 rear diff, axles and drive hubs/brakes. Hear me out on this combo. Pull up the gearing on that gearbox, it's built for low to moderate torque figures and high RPMs, which should match nicely to the 3S-GE engine. I need reliability first, power second. If I have to change engines, might as well get a power upgrade over the 5S-FE. I love the possibilities of the 3S-GTE, but I can't trust a turbo engine not to overheat in the worse times. I live in the desert where I'm already battling heat just by going outside. I already picked up the donor Rav4, 1999 with a bad engine for $300. This gives me the time to pick all the pieces I want or think I might need without having to search salvage yards and pay a lot of extra money.
Posted by: bloodMoney Sep 21, 2020 - 8:29 AM
I would go with an MZ for a build like this. You want reliability, but you can't go to Autozone and pick up replacement parts for a BEAMS.
Plus, with what you are planning to do, it seems like your formula is backwards: you'll need more TQ than HP. BEAMS are rev happy, but not so torque-y, you may have issue with the extra drag of a 4WD drivetrain.
In the end, it's your car, your $$, and a cool build either way. I can't wait to see which direction you go!
Posted by: Roodwerks Sep 28, 2020 - 5:47 PM
I think I'm pretty set on sticking with the 3sge. It's basically a bolt in, so that's a bonus. It actually came bolted to the tranny I have acquired, in Japan. With the very low final drive, a high reving engine will do very well. As for not getting parts in the US, in stores, that should be fine. The basic maintenance items can be, hoses, filters, etc., the long term items are available, just not quickly. I don't put a ton of miles on my toys, so all major maintenance on the engine will be before its' installed; water pump, timing belt, clutch, etc..
Powered by Invision Power Board (http://www.invisionboard.com)
© Invision Power Services (http://www.invisionpower.com)