Help - Search - Members - Calendar
Full Version: 7AFE Turbo kit install by DCW
6G Celicas Forums > 6th Generation Celica > Forced Induction
Pages: 1, 2, 3, 4
doGGy
Well guy and girls - i can proudly present another project witch i will try to document / write-up / expain to a smallest details as posible. The project is install of a Turbo kit to a Martin (malpaso) 96' ST celica.

Works begin tomorow - so i will try to write up every single day of work i will be spending on his car, all the jobs what was done, and what things are installed and WHY they are installed + how they work and etc. Hoping to make this write up to be usefull to a people who will be doing the same thing later, and for the people to understand better how things work and etc.

Keep and eye on this topic - cuz it will have lots of info and pics in the long run biggrin.gif

As for now - Martin celica is securly standing in my yeard - and Martin is traveling back home with the bus (20h drive oh man.... frown.gif ), so lets hope the owner will give his response in this topic later biggrin.gif

Romas

Kadett
20H drive?!?! Damnz.... then.. the car is now left with the European genius smile.gif
Really interested in this Topic and already bookmarked it in Firefox.
doGGy
QUOTE(Kadett @ Jan 9, 2007 - 12:24 PM) [snapback]516417[/snapback]

European genius smile.gif


LMAO - you know what came to my head reading these words (European genius smile.gif ) - This:
IPB Image

Lol sorry just had to post it biggrin.gif Im not a genius at all, im just a guy whos extremly (even stupidly) intrested in celicas biggrin.gif

Thanks Kadett
OOBE
Subscribing...
trd94
i will be keeping a eye on this, i want to see a pro at work!
Drew-887
I can't wait to see this project finished. Maybe it will give me some ideas.
Fate
watching this thread to the fullest, please don't leave us hangin' once you begin.
snapshotgt
Martin, you have a nice, clean Celica -- i'm sure you're looking forward to this new-found power. thumbsup.gif

Good luck with the waiting...it is the worst part -- trust me, i know. wink.gif
presure2
looking forward to your results romas!
TomPoz
I had a pleasure to meet Martin on his way to Romas. Car looks (and sounds!) like GT, at least. With "T" in its engine this will be a killer. Hopefully I will be able to see the car (maybe test drive?). Also, we might be able to give it a test run vs. 3SGTE. biggrin.gif

Romas, don't forget to label it with DCW sticker. Everybody is asking me what they are about on my GT4. The answer is: this is the label of the most exclusive tuning workshop that Celica could be worked on in. wink.gif
WH95TE
In for later. biggrin.gif
malpaso
Back from death at last biggrin.gif. Fell a sleep for many hrs when I got back home (details about my journey here wink.gif). Thanks for nice topic Romas, I'll keep my eye on it for sure biggrin.gif
doGGy
Well - tomorow is the day when everything starts. First thing from early morning - Martin's Celica will take a trip of 60miles to get the Leak Down test done and to see what we have inside of his 7A. Engine from outside seem a bit too oil'y, but this might be cuz our little friend removed the Valve cover for painting and after removal it leaks - so valve cover gaskets are already ordered biggrin.gif

If leak down test will show good results - saturday works will be started.. So lets all pray for his engine - cuz if no good news - i will have to source the long block of the 7A for a quick change up - cuz i do have the perfect 7A head with only 4K km on it...

So tomorow first info will be posted, and first pics will come up smile.gif

shin
def looking forward to it.
Bitter
QUOTE(doGGy @ Jan 11, 2007 - 1:14 PM) [snapback]517051[/snapback]

Well - tomorow is the day when everything starts. First thing from early morning - Martin's Celica will take a trip of 60miles to get the Leak Down test done and to see what we have inside of his 7A. Engine from outside seem a bit too oil'y, but this might be cuz our little friend removed the Valve cover for painting and after removal it leaks - so valve cover gaskets are already ordered biggrin.gif

If leak down test will show good results - saturday works will be started.. So lets all pray for his engine - cuz if no good news - i will have to source the long block of the 7A for a quick change up - cuz i do have the perfect 7A head with only 4K km on it...

So tomorow first info will be posted, and first pics will come up smile.gif

bigport G head swap ftw! tongue.gif a little out of the budget perhaps.
snapshotgt
With your setup in mind, how much hp are you going to try to go for?
doGGy
Just got back from GroundZero (company who did Leakdown and company who will do a Dyno tune) with some good news biggrin.gif Martin already knows the good news, cuz i Sms'ed him on the road back.

Well the leak down showed some good results, i was expecting worse, cuz Martin was talling me what previous owner had put some Oversize pistons and etc etc for the better performance biggrin.gif But it seems like the engine was not opened and still in a original shape, so it might be what the prev owner was just braging about this to "better" sell the car biggrin.gif

IPB Image
IPB Image

So the leak down showed what on the 1 cilinder we have 90% of life still left, on the second 80% on the third 85 and on the forth 80. So it seems like the engine is still in pritty good shape as it has done about 80K miles, and its almost normal wear for a 11 years old engine smile.gif

So we wount need to find a new long block biggrin.gif This will let the Martin to save up some penies wink.gif

While i was walking around in the GZ garage, i saw one thing what couth my eye:

IPB Image
IPB Image
IPB Image

i thought Hmmm, maybe we should swap this one instead of turboing the poor 7A? I bet it would be fun to drive celi with this engine biggrin.gif biggrin.gif biggrin.gif

Some one can guess from what car this engine came biggrin.gif all i can say what it has 860Whp biggrin.gif

6strngs
subscribing...
doGGy
oooooook smile.gif 4 hours of work - and my old ST turbo kit got removed finally from the engine. Cleaned everything out, diched few things out - cuz some things will need to be made from new, already ordered all the new flanges for the inlet / outlet for the oil to turbine, for a downpipe and etc. Here are few pics of the stuff what will be put on the 7A to squizze some power smile.gif

Whole kit placed together on the ground, still there are no silicone houses for the vacums, lots of small stuff is still not in the pics:

IPB Image

As for now - i will try to describe all the stuff what is included in thi Turbo kit and what they do and how they work:

1.In this setup im using Rising rate FPR (fuel pressure regulator) from Mallory, it is needed to inclease fuels pressure over the stock cuz you will be using bigger injectors and Turbo engine need more fuel:

IPB Image

How it works: WEB site how it works and what are the types of them >>>

2. Blow Off valve from Greddy, its a Type-S model. It is needed to reliese the pressure in the intercooler pipes when you let the gas pedal off and trottle buterfly is closed.

IPB Image

How it works and what are the types of them: Blow Off Valve >>>

3. Gauges im using in this setup are from SLM manufacture. Im gonna be using Boost pressure / Oil Pressure / Oil temp / and EGT (exhaust gas temp gauge).

IPB Image

I think most of us know how they work and why they needed smile.gif

4. Exhaust manifold what i will be using was custom build by me smile.gif Its hard to find one for the 7A block, so as we all know some people managed to use Honda B16 manifold with 7A exhaust manifold flange welded on it - so this is i think most cheap and best solution.

IPB Image

5. Turbine what will be used is from Garett, its a T3 turbine witch was build specialy for the my 7A setup.

IPB Image

Here is some info on the Turbine / Manifold and all related stuff: Info >>>

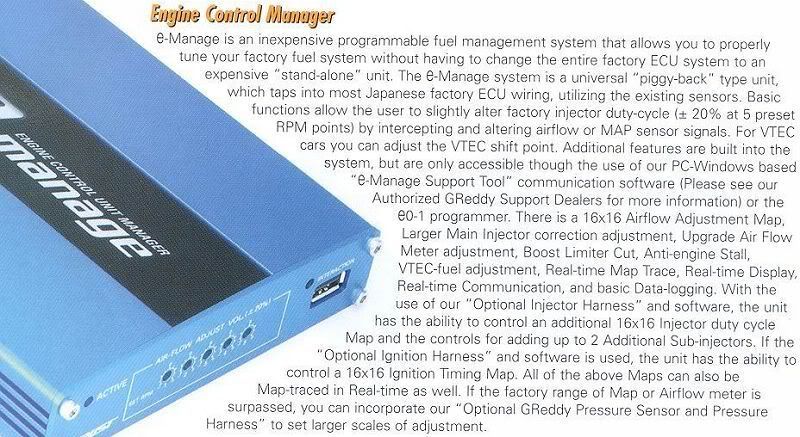
6. For the managment of the Fuel / Ignition - im gonna be using Greddy Emanage. This is one of the best PiggyBack Ecu's IMHO for the priece (now it is availible to get Emanage Ultimate witch is better, but a bit too pricey...). The major thing using this Emanage over all other piggybacks - si what you can correct Injectors setings (When using bigger injectors) doing this at the same time you will Fool yuor MAP sensor and it wound be seeing boost.

IPB Image

7. Injectors are from Ford Probe Turbo / Mazda MX5 Turbo - 330cc. 330cc is good enouth for about 220hp. If you are aiming for more - go with somthing bigger. The main thing to know is what 7A uses TOP FEED injectors what are HIGH impedance (16 ohm).

IPB Image

8. Boost controller is from Greddy, it is Profec B II (actually i was impressed with the easy to use Greddy Profec B - and i upgraded to Profec B II witch IMHO isnt worth the money cuz it is a bit too dificult to set it up...) Ofcorse if you want cheaper option - you can just go with a simple manual boost controler. But i chosed Electronic one to have 2 setings (hi Boost and Low Boost) witch can be set from drivers position and what there was options to avoid Boost spikes.

IPB Image

9. Intercooler is from Mitsubishi Starion, i rewelded inled and outlet on it, what it was easyer to make the piping on the Celica setup. Intercooler can be used from all the different cars, or universal use. All you wount need before buing intercooler - is to know what piping you will use, way too big piping diameter will give you a bit bigger lag (witch imho isnt so noticible...)

IPB Image

10. If you gonna be placing gauges on your setup (like Oil temp / oil pressure) you will definantly need some sort of distributor for the gauge sender to place in. In my case - i made my own simply taking aluminium piece and drilling one hole straight on it and one hle from top. In the pic you will see how i made it smile.gif One thing needs to be noted if you gonna go with somthing like i did - you have to mount it on the Chasis of the car - and not on the engine - cuz engine vibrates, and it might be a change what you will be loosing the bolts and etc...

IPB Image

11. Downpipe is obviusly custom piece - witch can be made at any exhaust shop. all you would need is flanges. In my case - i went with totaly custom exhaust + i made my self a down pipe too. Be sure to heatwrap the downpipe - cuz its the main source of heat (along with the header) so it is good to wrap it to avoid some heat in the engine bay.

IPB Image

12. Catch can is from Greddy.

IPB Image

Why it is needed? It collects the oil witch goes from valve cover breather to the intake manifold - instead of letting the oil straight to the intake - you connect the catch can between the breather and valve cover, so this way all the oil sits in the can. You get the cleaner A/F mixture.

For today whats all biggrin.gif I will be taking pics of every step while installing all the stuff. If some one can add or correct me (i know i will need to be corected biggrin.gif) please add - im trying to make this tread as usefull as posible!

Manny - i know you know 5x times more then i do - feel free to correct / add info on all the stuff!!! THANK YOU biggrin.gif
GTSOwner
QUOTE(doGGy @ Jan 13, 2007 - 11:38 AM) [snapback]517592[/snapback]
2. Blow Off valve from Greddy, its a Type-S model. It is needed to reliese the pressure in the intercooler pipes when you let the gas pedal off and trottle buterfly is closed.

IPB Image


Sweetest sounding BOV, ever. Had it in the DSM... *drool*

Malpaso, I hope the wait won't be too painful. tongue.gif
6strngs
QUOTE(doGGy @ Jan 13, 2007 - 8:38 AM) [snapback]517592[/snapback]
12. Catch can is from Greddy.

[img]

Why it is needed? It collects the oil witch goes from valve cover breather to the intake manifold - instead of letting the oil straight to the intake - you connect the catch can between the breather and valve cover, so this way all the oil sits in the can. You get the cleaner A/F mixture.

sorry, a little off-topic, but is oil supposed to come out of the valve cover breather? it was doing it on mine and I thought something was wrong.
doGGy
QUOTE(6strngs @ Jan 13, 2007 - 10:39 AM) [snapback]517604[/snapback]

QUOTE(doGGy @ Jan 13, 2007 - 8:38 AM) [snapback]517592[/snapback]
12. Catch can is from Greddy.

[img]

Why it is needed? It collects the oil witch goes from valve cover breather to the intake manifold - instead of letting the oil straight to the intake - you connect the catch can between the breather and valve cover, so this way all the oil sits in the can. You get the cleaner A/F mixture.

sorry, a little off-topic, but is oil supposed to come out of the valve cover breather? it was doing it on mine and I thought something was wrong.


Its not what its pure oil - its a mixture of a oil and water (i dont know how this thing is called in english biggrin.gif ) this consentrate always gets in the valve cover and its supose to go to the intake manifold, and get burn along with your air/fuel mixture in the cilinders. Under high load, if your engine has some wear, its ussualy some some pressure goes through your piston rings and gets into oilpan, and from there - the pressure lifts up some oil through the oilpan breather canal to the valve cover. So if you are on the boost - the chance of letting some pressure to the oilpan is x2.

Same goes on the naturaly aspirated engine - on high rpms you get the same thing.

Alan
Is a boost retarder included in Martins kit, he is gonna need one !
trd94
so are you wiring in the emanage your self or having a shop do it as i have one i want to put in my 7afte but i dont want to messup anything tongue.gif
doGGy
QUOTE(Alan @ Jan 13, 2007 - 1:19 PM) [snapback]517629[/snapback]

Is a boost retarder included in Martins kit, he is gonna need one !


Boost retarder? If you mean Boost controller - then yes, its a Greddy Profec BII.

As for Emanae - im wiring it my self, so i can post wiring diagram.


Alan
QUOTE(doGGy @ Jan 14, 2007 - 5:04 AM) [snapback]517719[/snapback]

QUOTE(Alan @ Jan 13, 2007 - 1:19 PM) [snapback]517629[/snapback]

Is a boost retarder included in Martins kit, he is gonna need one !


Boost retarder? If you mean Boost controller - then yes, its a Greddy Profec BII.

As for Emanae - im wiring it my self, so i can post wiring diagram.


A boost retarder is a device that retards the engine ignition as the boost enters its treshold, you never used one?
with out it, there can be a chance of preigniton ect. have you never used one???
trd94
thanks doGGy the wiring diagram would be great, as far as a boost retarder i have seen them in turbo mustangs and such but i did not know you could use them in a celica , besides the emange should help with that, am i right? doGGy
GTSOwner
QUOTE(Alan @ Jan 14, 2007 - 7:21 AM) [snapback]517722[/snapback]

QUOTE(doGGy @ Jan 14, 2007 - 5:04 AM) [snapback]517719[/snapback]

QUOTE(Alan @ Jan 13, 2007 - 1:19 PM) [snapback]517629[/snapback]

Is a boost retarder included in Martins kit, he is gonna need one !


Boost retarder? If you mean Boost controller - then yes, its a Greddy Profec BII.

As for Emanae - im wiring it my self, so i can post wiring diagram.


A boost retarder is a device that retards the engine ignition as the boost enters its treshold, you never used one?
with out it, there can be a chance of preigniton ect. have you never used one???


I *think* the emanage takes care of that.
doGGy
QUOTE(Alan @ Jan 14, 2007 - 5:21 AM) [snapback]517722[/snapback]

QUOTE(doGGy @ Jan 14, 2007 - 5:04 AM) [snapback]517719[/snapback]

QUOTE(Alan @ Jan 13, 2007 - 1:19 PM) [snapback]517629[/snapback]

Is a boost retarder included in Martins kit, he is gonna need one !


Boost retarder? If you mean Boost controller - then yes, its a Greddy Profec BII.

As for Emanae - im wiring it my self, so i can post wiring diagram.


A boost retarder is a device that retards the engine ignition as the boost enters its treshold, you never used one?
with out it, there can be a chance of preigniton ect. have you never used one???


Why the hell do i need such thing when i have Emanage and i can fully adjust Ignition / Air/fuel maps in any place at any conditions.

Never used such thing - cuz i always try to have as much control over the stock ECU as posible, so instead using somthing like you offered - i ussualy use EMS or somthing like Emanage PiggyBack to have full control.

Bitter
no megasquirt2? its a full standalone for 1/3 the cost of the EMS.
Alan
QUOTE(doGGy @ Jan 14, 2007 - 11:48 AM) [snapback]517746[/snapback]

QUOTE(Alan @ Jan 14, 2007 - 5:21 AM) [snapback]517722[/snapback]

QUOTE(doGGy @ Jan 14, 2007 - 5:04 AM) [snapback]517719[/snapback]

QUOTE(Alan @ Jan 13, 2007 - 1:19 PM) [snapback]517629[/snapback]

Is a boost retarder included in Martins kit, he is gonna need one !


Boost retarder? If you mean Boost controller - then yes, its a Greddy Profec BII.

As for Emanae - im wiring it my self, so i can post wiring diagram.


A boost retarder is a device that retards the engine ignition as the boost enters its treshold, you never used one?
with out it, there can be a chance of preigniton ect. have you never used one???


Why the hell do i need such thing when i have Emanage and i can fully adjust Ignition / Air/fuel maps in any place at any conditions.

Never used such thing - cuz i always try to have as much control over the stock ECU as posible, so instead using somthing like you offered - i ussualy use EMS or somthing like Emanage PiggyBack to have full control.


Ok didnt know it can be used as a stand alone wink.gif gl then ill be seeing the progress guys
doGGy
QUOTE(Bitter @ Jan 14, 2007 - 10:26 AM) [snapback]517755[/snapback]

no megasquirt2? its a full standalone for 1/3 the cost of the EMS.


In this case - no MegaSquirt. Ussualy - for all the bigger setups MSQ is the first choise over all the Stand alones. But the problem is what there is only 1 guy who is able to setup MSQ here in Lith propertly. As i said before - i ussualy dont do any tune-ups cuz i know like 3% about tuning all the ecu's biggrin.gif So im leaving this operaion to a pros.

In the 7A setup (on a stock internals) there is no need for a Stand Alone at all - cuz 200hp is almost a limit for a 7A, and for 200hp tune up - Emanage is the way to go - Cheap and good to tune up.
presure2
QUOTE(doGGy @ Jan 14, 2007 - 12:59 PM) [snapback]517760[/snapback]

QUOTE(Bitter @ Jan 14, 2007 - 10:26 AM) [snapback]517755[/snapback]

no megasquirt2? its a full standalone for 1/3 the cost of the EMS.


In this case - no MegaSquirt. Ussualy - for all the bigger setups MSQ is the first choise over all the Stand alones. But the problem is what there is only 1 guy who is able to setup MSQ here in Lith propertly. As i said before - i ussualy dont do any tune-ups cuz i know like 3% about tuning all the ecu's biggrin.gif So im leaving this operaion to a pros.

In the 7A setup (on a stock internals) there is no need for a Stand Alone at all - cuz 200hp is almost a limit for a 7A, and for 200hp tune up - Emanage is the way to go - Cheap and good to tune up.

good call doggy.
megasquirt is nice, but it can be a bit of a pain to get up and running properly..
good to see the leakdown test results were in order, that is always a good thing. wink.gif
good work on the fabrication on the ic and stuff!
cant wait to see the results!
malpaso
I would agree that unit can handle that "boost business". Although I don't know about that much (what I don't find on web I don't know biggrin.gif), I believe text below answering a lot...

IPB Image

QUOTE(presure2 @ Jan 14, 2007 - 9:30 PM) [snapback]517788[/snapback]

...
cant wait to see the results!


Tell me about that laugh.gif laugh.gif laugh.gif
doGGy
Update biggrin.gif Got the Valve cover gaskets, still waiting on the main seal where the camshaft and ignition module connects... Still waiting on the Flanges for all the stuff what will need to be fabricated. I think everything will be started tomorow - or at worst case wednesday...

RoadDawg
Hey, nice project smile.gif Is the turbo kit from one of your machines doggy ? I wouldn't mind to get my 7afe turbocharged by you guys, afterall it's only a 8 hour drive for me wink.gif
doGGy
QUOTE(RoadDawg @ Jan 16, 2007 - 6:14 AM) [snapback]518167[/snapback]

Hey, nice project smile.gif Is the turbo kit from one of your machines doggy ? I wouldn't mind to get my 7afe turbocharged by you guys, afterall it's only a 8 hour drive for me wink.gif


Hey biggrin.gif Nice to see my old Front bumper wink.gif

Yes the turbokit came from my Old ST. But it would be easy to build another kit for me actually. So its not a problem at all if you would be intrested, the main problem is time smile.gif


doGGy
OooOoOOK - here we go biggrin.gif Finally.

Got all the stuff what i was waiting one, so i thought its about damn time to start works.

Here are all the flanges / oil supply fitting / Fuel Rail:
IPB Image

All these where machined by my friend, so i got them kinda cheap for all the stuff and works i paid like 28$ smile.gif

I decided to rework the fuel rail what the outlet of it had the fitting for the hose, instead of leaving the stock FPR in place and connecting the new FPR from it. SO fuel rail had been rescrewed and new fitting made for it:
IPB Image
IPB Image

Got the fitting for the oil supplie witch goes to the block (stock oil pressure sensor place), it has the place for the stock sensor to bolt in, so the stock sensor will work like it was working before:
IPB Image

All the flanges for the oil supply / oil return from turbo / Downpipe flange / and Bov flange. Still i will need to weld the bungs for the oil supply / return flanges - but this is and easy job smile.gif
IPB Image

Some piping what i bought at local exhaust shop for the intercooler and downpipe (20$ smile.gif ) :
IPB Image

Valve cover gasket set (new) cuz valve cover is leaking like crazy on Martins car:
IPB Image

And here is the victim biggrin.gif Still just sitting in garage and having no idea what will gonna happen biggrin.gif
IPB Image

Ooook as for the start - i removed airfilter box:
IPB Image
IPB Image
It wount be needed anymore - so it goes into the trunk biggrin.gif

Next thing was to remove the bumper / inner fender plastics / under plastics (what are under the engine) and the front safty bar (witch is "bent" a little biggrin.gif ):
IPB Image

After all was removed - next thing is to remove the header / alternator (alternator removal is a good thing cuz it will give you lots of free space to work with the oil supply fitting and it will be easyer to remove the header)
IPB Image

After header found a place on the ground of my garage here is another target what i was aiming at smile.gif :
IPB Image


Screwed it out and placed my new fitting in the place:
IPB Image

And put the stock one back into the new fitting:
IPB Image

Oil supply was ready smile.gif
Next thing was to drain the oil out from the engine and remove the oil pan:
IPB Image

Once the oil pan was out it was clearly visible what some one before me removed it (hmmm maybe somthing was done to the engine before....)

Next target was to clear some space around the Turbo, and the main problem was this box with the relays (US 7A might not have this...):
IPB Image

Well after some thinking - this box found her new place near the ABS module:
IPB Image

Now was time to test fit the Turbo header and Turbine itself:
IPB Image

Hmm it sits in the place biggrin.gif Still to make it sit in the place and have some room around i had to make some changes to the Radiator, and to the upper radiator brackets. As you can see in the pics below, on the radiator there are bolting places for the A/C fan, they where hitting turbine cold part, so i just had to go and cut them out (hope marting wount be putting A/C in his car pretty soon biggrin.gif)
IPB Image

And i had to redrill the moutning holes on the upper radiator brackets to move the radiator more in front of the car:
IPB Image
IPB Image

And i was reaby for the next step, mount the oil distributor along with the oil supply hoses... But then my wife walked into garage - and said ENOUTH biggrin.gif so yea... i had to go out and leave everything as is biggrin.gif Anyway, still its a friday - so i have to spend some time outside biggrin.gif Keep you updated - cuz tomorow i will be working again on this beast. For now whats it.


OrbitalGT95
not to hijack this thread but, has anyone ever sent you, or have you ever done any work to any nissan's Romas?
doGGy
QUOTE(OrbitalGT95 @ Jan 19, 2007 - 11:21 AM) [snapback]519280[/snapback]

not to hijack this thread but, has anyone ever sent you, or have you ever done any work to any nissan's Romas?


Is this would be good enouth biggrin.gif Nissan Pulsar GTR 550hp >>> (last summer this Nissan saw a 720hp with NOS and when the main aluminium pulley cracked at 7400rpm on a dyne and went out along with the half of the block...) On this car i'v done most of the interior stuff / exterior stuff. I aint ussualy work with the engines (Only Toyota Engines ), but im working along with the biggest Tuning Company in Lithuania (GroundZero) so i think they can build / help on everything..
Fate
lookin' good, can't wait to see it finished.
TomPoz
Good stuff, Romas - as usual. Keeping fingers crossed for this setup. BTW- don't remove windshield washer tank. wink.gif
doGGy
Back to buissnes - its sunday (ussualy i start my week at sunda biggrin.gif) so im gonna be working whole week again biggrin.gif Got alot of stuff done today (basicly all the freeing space / mounting stuff work).
Well here we go again:
First step today was to free some space in the engine bay, so some stuff had to be removed and relocated. First thing was radiator fan - it gets in the way there the downpipe will be - so i aint wanted to leave it there and melt down from the heat - so, there he goes biggrin.gif
IPB Image
IPB Image

Once it was removed - i had to make some space in front of the radiator, cuz i was gonna place on the left side in front of the turbine, so it will not only cool down the radiator - but at the same time blow some air from header and turbine. I did the same setup on my Old ST, and it worked pretty fine, cuz Fan fits in front of the radiator like it was meant to fit there smile.gif But to fit it there - i had to remove the Oilcooler radiator from the old place, cuz it gets in the way there the Intercooler will be mounted.
IPB Image

After half hour here hows the front of the Celica was looking (can you say - Naked biggrin.gif):
IPB Image

Fan was fit in the place:
IPB Image
IPB Image
IPB Image

After some time spent making brackets for the fan, finally - it was fully bolted in the place:
IPB Image

NOTICE - if some one will try to install fan like this - the important thing is to Switch the WIRES of the motor places - When it is installed BEHIND the radiator - it sucks the air in - once you get it in front - you have to make it BLOW the air.


Now was the time for some cutting biggrin.gif To run the intercooler pipes, i use different route when most of the people do, so i just cut 2 holes in the front support, this way i make the piping shorter, and easyer to run (different intercooler sizes might need different route, i do my setup like this cuz my Intercooler sizes lets me route the pipes this way). To make everything more understandible - take a look at the pics:
Left side:
IPB Image
Right side:
IPB Image
After i cut the holes i used simple rubber hose, i cut one side of the hose and wrap it on sharp edges of the metal to avoid chatering sound if the pipes will be hitting sides of the holes. After the hose was fitted, i drilled some small holes in all the corners and used some Zippies to hold the hose in place.

Once the holes where done - was time to install custom front support bar what i made long time ago:
IPB Image

After the front support was in place, was time for Intercooler mounting and some messuring for the new IC piping:
IPB Image

After this, next step was to find a place where to mount the Oil Cooler. It was kinda hard to find a place for it where it will get some air, cuz Martin uses Fog lights in the bumper so i couldnt install it in the p0lace where the side opening on the bumper are, so... I found a place for it in the fender, right there the Washer fluid tank is (Tomasz - i left the Fluid tank untouched biggrin.gif biggrin.gif biggrin.gif):
IPB Image
Its still a permament mount, cuz i will need to make another bracket for it to hold nice and tight + tomorow im getting all the hoses for the Fuel / oil.

Everything installed in the places:
IPB Image
IPB Image

And the last thing for today was mounting the new FPR, so i just made simple bracket for it, and drilled 2 holes in the firewall - and whoala biggrin.gif
IPB Image

Tomorow i will start all the welding jobs (IC piping / Downpipe) and will be running some hoses to all the places and etc biggrin.gif My plan is to start this beast by Tusday if everything will be ok smile.gif And then - DYNO tune biggrin.gif I cant wait....
j0e_p3t
awesome work romas. can't wait to see the final product. martin's a lucky guy.
Kadett
Nice work Romas.

Isn't it possible to mount the Oil cooler behind the IC? Because from the looks of it it doesn't get that much cooling this way?!
doGGy
update... Was working like crazy to days in a row - and honestly forgot to take pics of the process... Cuz i was all focused to finish this beast today (but i could not do this... its still needs IC piping..)

Well - here are the pics what i took today of the finished stuff:

Downpipe - had to build my own one from the pipes what i bought:
IPB Image
IPB Image

Finally mounted the oil block with the Oil pressure - so now the oil lines are finally finished:
IPB Image

FPR, Boost controller solenoid installed in the place and all hosed up smile.gif :
IPB Image
IPB Image

Turbine / Header / Heatsheald is 100% fitted and everything connected:
IPB Image

GT-Four fuel pump installed and goes into its home:
IPB Image

Soldering Injectors plugs + installing injectors (valne cover and intake plenum are removed.)
IPB Image

Finally solved the damn Emanage puzzle - cuz i only had wiring for OBD I, but after some research OBD II has the same wiring pinout, only the wire colors are different from OBD I:
IPB Image

Boost controller found its home in the ashtray biggrin.gif :
IPB Image

And the finall shot (blurry a bit - i was a bit shaking cuz it got cold somehow in my garage (some one left doors not closed fully...)
IPB Image

Started the engine, everything works perfectly exept i have one major leak in the Turbo oil supply flange... So i already ordered the new one - tomorow will put it in and finish the IC piping... Friday is the Dyno Day - already ordered a place there... So smile.gif Its getting to the end finally smile.gif


playr158
nice doggy, but no clamps on the vaccum hose for wastegate/bc/turbo ?
doGGy
QUOTE(playr158 @ Jan 23, 2007 - 12:58 PM) [snapback]520471[/snapback]

nice doggy, but no clamps on the vaccum hose for wastegate/bc/turbo ?


No clamps cuz its only a test connection wink.gif To see if everythign is ok. Will fit all the small things / blots / clamps / and etc once i will see what i woulnt need to remove anything from the engine bay. Btw - its almost imposible to remove this hose, i ussualy cut it out if i want to remove them biggrin.gif They are heated there.

celica47
You should try to get a kit together and sell them for the 7afe, i would be in line for one!
doGGy
QUOTE(celica47 @ Jan 23, 2007 - 1:17 PM) [snapback]520476[/snapback]

You should try to get a kit together and sell them for the 7afe, i would be in line for one!


The kit like this would cost around the same $ as 3SGTE swap wink.gif Its better to just build a kit for eveyone by them self - this way you could just source all the needed parts as cheap as posible. And there would only be few small custom things left what would need to be manufactured.


This is a "lo-fi" version of our main content. To view the full version with more information, formatting and images, please click here.
Invision Power Board © 2001-2024 Invision Power Services, Inc.