
| Dec 26, 2010 - 9:15 AM | Forum: General Discussion · Post Preview: #891953 · Replies: 6 · Views: 2,062 |
 Enthusiast  Joined Jan 10, '06 From Mozambique, Africa Currently Offline |
The truth, the upkeep of the car was getting costly. Even though it wasn't my daily drive, the roads here are so bad and the mechanics are not of the best quality, especially with Japanese imported cars, I kept putting more and more money into it. I was hoping to keep it around long enough to pass it down to my kid, but no kids yet.  |


| Dec 26, 2010 - 8:19 AM | Forum: General Discussion · Post Preview: #891949 · Replies: 6 · Views: 2,062 |
|
Enthusiast Joined Jan 10, '06 From Mozambique, Africa Currently Offline |
The last pic of my celica just before the new owner drove away with it. The guy was so happy with it that he didn't even want to negotiate, he wanted it as is. I knew i should've asked for more! When I asked him what he plans to do to it, he said "nothing. It's perfect the way it is." I swear, the tears were from the dusty wind that day.  That was a week ago. I was lucky enough to see him cruising this morning when I was by the beach today. He pulled over and other than minor labelings, he was true to his word and she was looking as good as ever. I couldn't have done it without the help of 6GC. Thanks, guys! If you guys don't mind, i'll be hanging around a bit until either my mourning phase passes or I spot another project Celi in need of love.   |
| Sep 18, 2010 - 4:08 PM | Forum: General Discussion · Post Preview: #875994 · Replies: 20 · Views: 3,623 |
|
Enthusiast Joined Jan 10, '06 From Mozambique, Africa Currently Offline |
Congratulations Martin! |
| Apr 9, 2010 - 4:21 PM | Forum: Interior/Audio/Electrical/Wiring · Post Preview: #845868 · Replies: 10 · Views: 6,744 |
|
Enthusiast Joined Jan 10, '06 From Mozambique, Africa Currently Offline |
I'd be interested after seeing the first prototype. |
| Mar 21, 2010 - 12:52 PM | Forum: Interior/Audio/Electrical/Wiring · Post Preview: #841511 · Replies: 4 · Views: 2,001 |
|
Enthusiast Joined Jan 10, '06 From Mozambique, Africa Currently Offline |
QUOTE (delusionz @ Mar 21, 2010 - 7:27 PM)  you need 4 gauges on an NA with no mods?? jesus... does that mean i need 8 gauges cuz i have turbs??  I've only got 1 lol No, I don't NEED 4, I WANT 4. I plan to make some engine mods later (turbo) but I don't know when that will be and I don't want to see the pods sitting in the back of my seat anymore.Which gauges do you have? |
| Mar 21, 2010 - 12:04 PM | Forum: Interior/Audio/Electrical/Wiring · Post Preview: #841498 · Replies: 4 · Views: 2,001 |
|
Enthusiast Joined Jan 10, '06 From Mozambique, Africa Currently Offline |
I have YCM gauge pods and now I need some suggestions. My 3SGE is not turbo'd, nor have I made an major modifications to the engine other than air filter, and freeflow exhaust. I need to get 4 gauges. Any ideas? |
| Mar 21, 2010 - 5:44 AM | Forum: Interior/Audio/Electrical/Wiring · Post Preview: #841460 · Replies: 1 · Views: 1,109 |
|
Enthusiast Joined Jan 10, '06 From Mozambique, Africa Currently Offline |
pretty good. any close up shots? |
| Jan 17, 2010 - 5:22 AM | Forum: Interior/Audio/Electrical/Wiring · Post Preview: #828111 · Replies: 26 · Views: 17,858 |
|
Enthusiast Joined Jan 10, '06 From Mozambique, Africa Currently Offline |
Nice write up. Where did you get the gauges? Are there any available for JDM celicas? |
| Jan 11, 2010 - 3:34 AM | Forum: Buying/Selling · Post Preview: #826580 · Replies: 253 · Views: 62,070 |
|
Enthusiast Joined Jan 10, '06 From Mozambique, Africa Currently Offline |
Woo hoo! I got mine! It's amazing how the pattern of the pods resembles the actuall dash. Good work, YCM! |
| Dec 23, 2009 - 2:51 AM | Forum: Buying/Selling · Post Preview: #822453 · Replies: 253 · Views: 62,070 |
|
Enthusiast Joined Jan 10, '06 From Mozambique, Africa Currently Offline |
Hey YCM, did you have any tracking numbers? |
| Dec 17, 2009 - 12:27 AM | Forum: Interior/Audio/Electrical/Wiring · Post Preview: #821166 · Replies: 26 · Views: 16,017 |
|
Enthusiast Joined Jan 10, '06 From Mozambique, Africa Currently Offline |
QUOTE (yagamius @ Dec 16, 2009 - 10:46 PM) you know if its work with a after market car alarm? Yep, definately. QUOTE (azian_advanced @ Dec 16, 2009 - 11:39 PM) this would go great with this mod   but it's a bit overpriced That looks awesome! I didn't know that TRD had one! |
| Dec 5, 2009 - 9:27 AM | Forum: Off Topic · Post Preview: #818043 · Replies: 23 · Views: 5,176 |
|
Enthusiast Joined Jan 10, '06 From Mozambique, Africa Currently Offline |
The buzz here is unbeleivable. There is so much construction going on that this whole region looks a mess. But it will be spectacular once its done. My brother's flying over next year from WA and besides taking him on some sight seeing, we're going to check out at least 3 games while he's here and I'll see 3 more after he leaves! |
| Dec 5, 2009 - 1:56 AM | Forum: Interior/Audio/Electrical/Wiring · Post Preview: #818004 · Replies: 26 · Views: 16,017 |
|
Enthusiast Joined Jan 10, '06 From Mozambique, Africa Currently Offline |
QUOTE (vile_v @ Dec 4, 2009 - 1:37 AM) is there a way to wire it up so you only use the start button? like no key. just push and go? Besides what SF stated, why would you want to? It would be a security liability if anyone can break into your car and just push and go. QUOTE (JustinCapps @ Dec 4, 2009 - 6:53 AM) momentary like a push button Do you mean both start and stop the engine? Possibly. But I don't have the know how. Sorry. |
| Dec 4, 2009 - 11:37 PM | Forum: Off Topic · Post Preview: #817980 · Replies: 23 · Views: 5,176 |
|
Enthusiast Joined Jan 10, '06 From Mozambique, Africa Currently Offline |
No worries guys. I'm already here and I'll make sure to find the England Team's hotel and drive the celi by it all night blasting the radio and honking my horn all night so that they don't get any sleep. |
| Dec 3, 2009 - 6:07 PM | Forum: Interior/Audio/Electrical/Wiring · Post Preview: #817653 · Replies: 26 · Views: 16,017 |
|
Enthusiast Joined Jan 10, '06 From Mozambique, Africa Currently Offline |
QUOTE (tomazws @ Dec 4, 2009 - 12:08 AM) Awesome write up! Now, can you still crank the car using the key? If so, is there anyway we can disable key start? The instructions that I provided disable the key start. But there is a way to have both the key start and the button start operational. I just didn't do enough research. |
| Dec 1, 2009 - 3:06 PM | Forum: Buying/Selling · Post Preview: #816961 · Replies: 253 · Views: 62,070 |
|
Enthusiast Joined Jan 10, '06 From Mozambique, Africa Currently Offline |
YCM, payment sent for shipping! Oops. I just realized I didn't send you me address. |
| Dec 1, 2009 - 12:41 PM | Forum: Interior/Audio/Electrical/Wiring · Post Preview: #816903 · Replies: 26 · Views: 16,017 |
|
Enthusiast Joined Jan 10, '06 From Mozambique, Africa Currently Offline |
QUOTE (JustinCapps @ Dec 1, 2009 - 6:48 PM) One more question what did you do with the dimmer knob?? Re locate or just tucked it in the back of the switch?? Also instaed of installing at momentarie switch could you wire a kill switch to those same wires? My celi didn't come with a dimmer switch, although I wished it did. I'm not sure what you mean by momentary (sp?) switch, but I'm sure you could if you were adept enough. |
| Dec 1, 2009 - 1:33 AM | Forum: Buying/Selling · Post Preview: #816821 · Replies: 253 · Views: 62,070 |
|
Enthusiast Joined Jan 10, '06 From Mozambique, Africa Currently Offline |
Ok. So we can go ahead and send YCM the shipping money now? Thanks, DB! |
| Dec 1, 2009 - 1:17 AM | Forum: Interior/Audio/Electrical/Wiring · Post Preview: #816817 · Replies: 26 · Views: 16,017 |
|
Enthusiast Joined Jan 10, '06 From Mozambique, Africa Currently Offline |
QUOTE (SwissFerdi @ Nov 30, 2009 - 11:41 PM) ^ Key is still used to start the car, it has to be in accessories mode. ^^Correct. You still need the key. I don't know about the US versions but mine has to be placed in the "on" position. |
| Nov 30, 2009 - 4:14 PM | Forum: Buying/Selling · Post Preview: #816709 · Replies: 253 · Views: 62,070 |
|
Enthusiast Joined Jan 10, '06 From Mozambique, Africa Currently Offline |
Any update, gents? The pods are the last of my projects for this year. I have a whole set of new ones for the next year.  |
| Nov 30, 2009 - 2:08 AM | Forum: Interior/Audio/Electrical/Wiring · Post Preview: #816578 · Replies: 11 · Views: 3,493 |
|
Enthusiast Joined Jan 10, '06 From Mozambique, Africa Currently Offline |
QUOTE (azian_advanced @ Nov 30, 2009 - 9:04 AM) question: how do you turn it off? With the key. You just turn the key to the off position as you normally would. The button only starts the engine. If you hit the button again while the car is running, it would be like you turning the key to start the car when the car is already running. Not good. |
| Nov 30, 2009 - 2:05 AM | Forum: Interior/Audio/Electrical/Wiring · Post Preview: #816577 · Replies: 26 · Views: 16,017 |
|
Enthusiast Joined Jan 10, '06 From Mozambique, Africa Currently Offline |
QUOTE (SPID33 @ Nov 30, 2009 - 8:09 AM) awsome now where did you get the kit nd how much $$$ are we talking? I spent about $80 only because I bought stuff that I ended up not using. The button is about $40 and the odds and ends are less than $10. Try Ebay for the button. Here's one. S2000 Start button |
| Nov 29, 2009 - 10:40 AM | Forum: Interior/Audio/Electrical/Wiring · Post Preview: #816387 · Replies: 11 · Views: 3,493 |
|
Enthusiast Joined Jan 10, '06 From Mozambique, Africa Currently Offline |
QUOTE (k-weaver @ Nov 29, 2009 - 2:52 AM) Very nice, does it require anything special to work? Like does the key have to be in and in the on position? Yes, you need the key and in the start position. QUOTE (SPID33 @ Nov 29, 2009 - 7:45 AM) AWSOM!!!!!!! deff a diy thread plzzz Done. DIY Engine Start Button installation QUOTE (808celica @ Nov 29, 2009 - 11:14 AM) key in ignition turned to acc? then push button?? i wired my 77 celica with 2 switches and a push button, Nice job  Yep. It works great! |
| Nov 29, 2009 - 10:37 AM | Forum: Interior/Audio/Electrical/Wiring · Post Preview: #816385 · Replies: 26 · Views: 16,017 |
|
Enthusiast Joined Jan 10, '06 From Mozambique, Africa Currently Offline |
Well, here's my first attempt at a write up. I apologize in advance for any information that I may have left out. Although this installation can be done without disconnecting the battery, as a precaution, disconnect the negative terminal from your battery. This write up is for the installation of a Honda S2000 Starter button. I chose this one so the color would go with my interior. I'm sure you can use a different button but I don't have information on that. 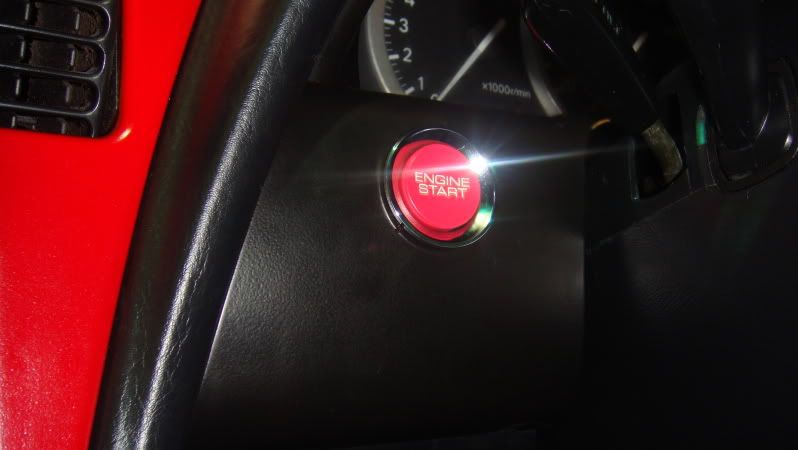 After doing several searches, I compiled this information from other forums (Mazda, MR2) and the MR2 instructions were more in line with the celica. When the installation is complete the engine start will only function with the key in the ignition in the start position. No key, no start. So no carjack. Things you'll need: hand drill with extended bit (or a regular screwdriver for you younger guys), wire cutters/crimping tool/wire stripper, dremel tool with grinding attachments, male and female 12 gauge insulated bullet-style crimp connectors, one 12 guage ring or hook type terminal connector, one 3.5in internal computer power cable (my IT guy at the office had some spare parts laying around), 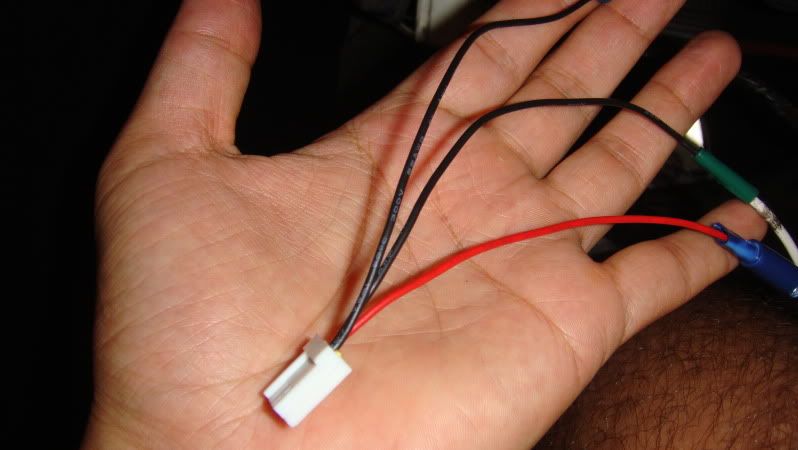 extra gauge wire, electrical tape, plenty of light, and of course the button. 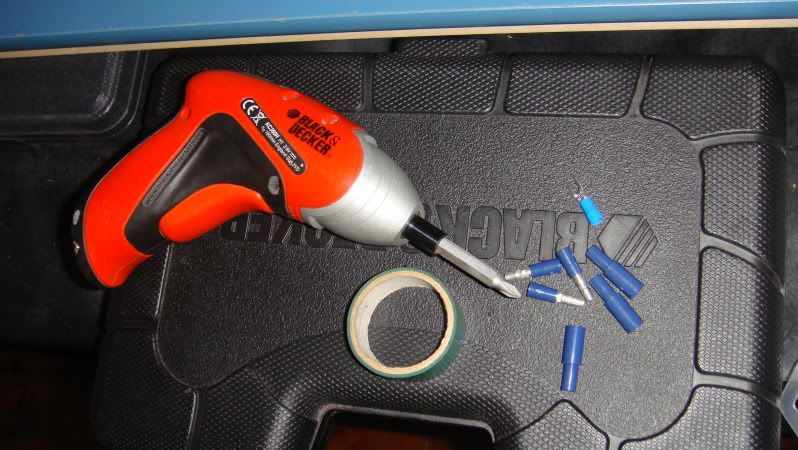 There was also some information about the requirement of a relay. However, according to the MR2 forum, "A relay is just wasted time for the install on the MKII mainly because the wires being tapped into are on the "coil" side of the starter relay, meaning that the amperes running through the switch are far less than what the switch is rated for. If you want a relay for peace of mind, have at it." I tried the relay route for "peace of mind" but it didn't work. First decide the location of the button. I chose to install the button on the bezel trim next to the steering wheel. Some may chose to place it in the lighter hole. Just make sure that you have enough wire to reach the area that you choose. Next, expose the work area. Once you pop off the bezel trim there are 5 screws and one plug to remove. You'll have to remove the plug and some floor trim to expose the 5th screw. They simply pop off: 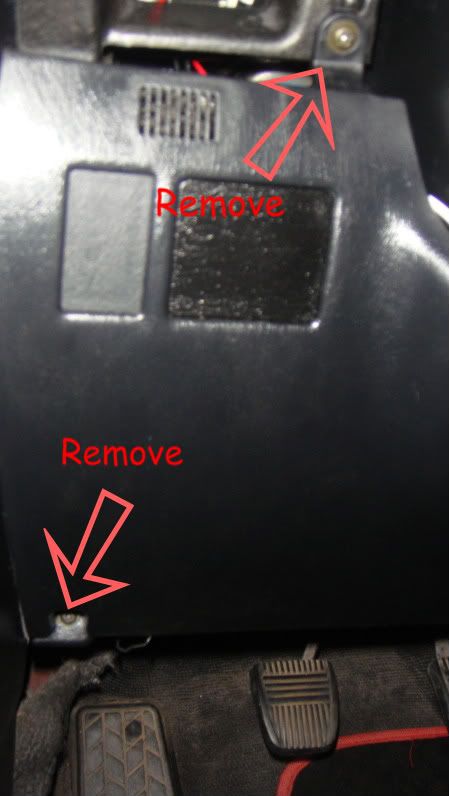 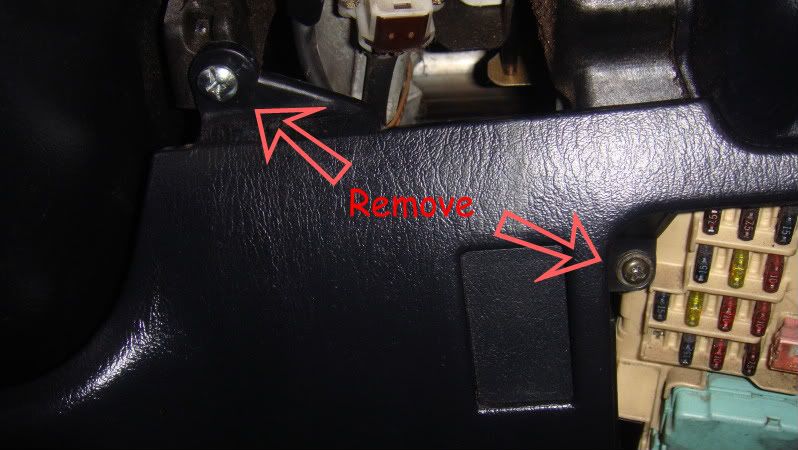 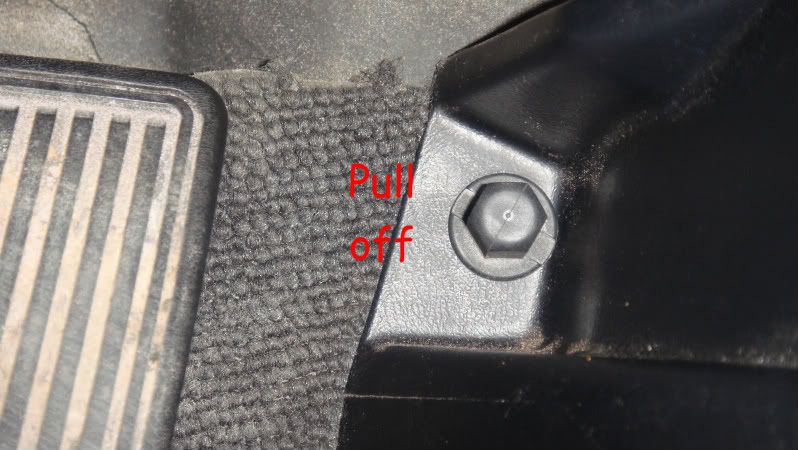 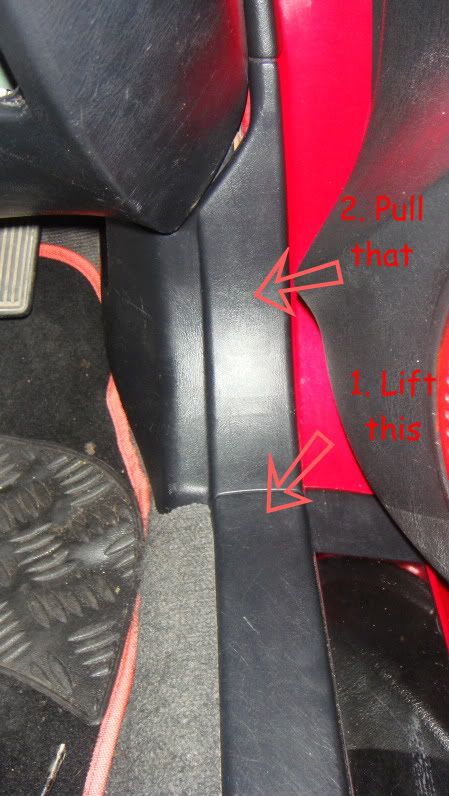 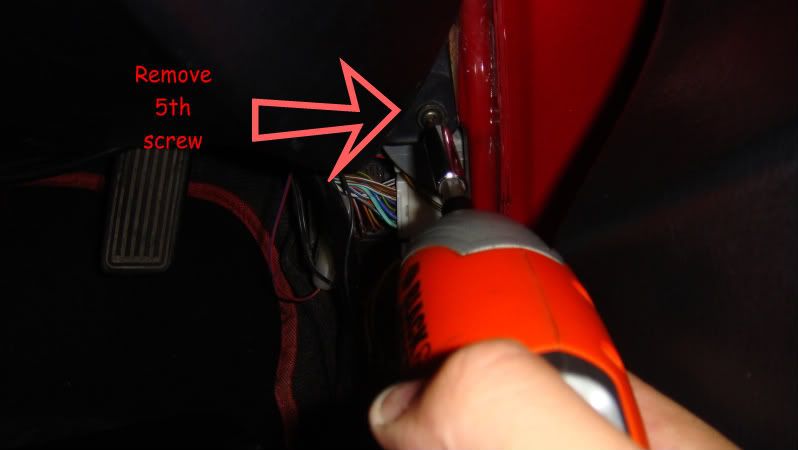 Once you have the wire panel removed, unless you disconnected the hood release cable, lay the panel at your feet and make sure its out of your stepping area. 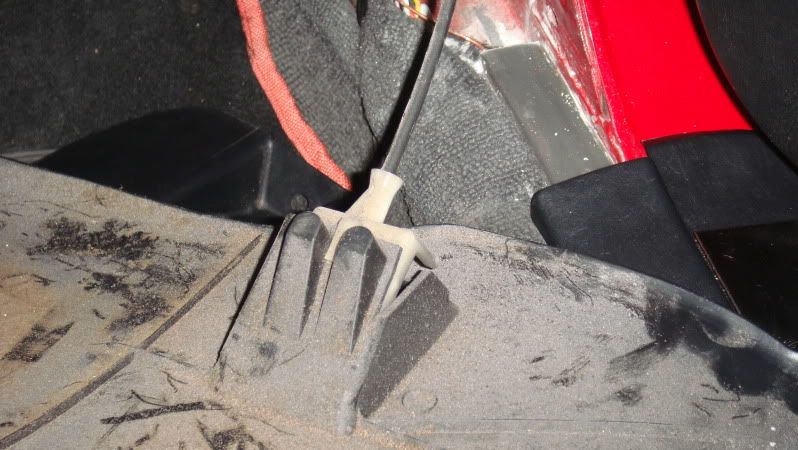 Locate the ignition wiring assembly. My Celi is a RHD so mine was on the right side of the steering wheel connected to the back of the key ignition tube (pictured). You'll note some lettering on the assembly. The ones that are important are at the back and I was only able to find them using a mirror. But i'll save you the trouble by identifying the right wires on the picture. There are only two wires that you have to mess with and is easier (but not necessary) to do the work if you detach the assembly from its connector. 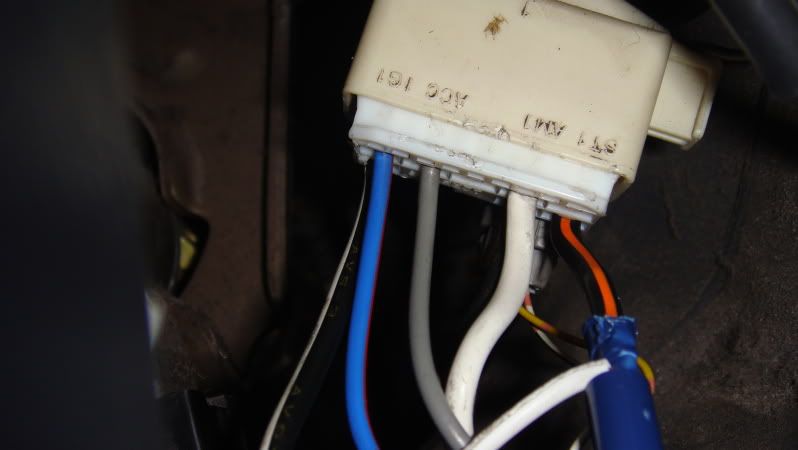 Now to prepare the computer cable for the button. At the back of the button there are 5 pins. The computer cable has 4 connections but only three of them will be used. I cut the yellow cable off at the connector. You can also try to cut one of the pins from the button but its not necessary. Once you apply some pressure on the computer cable connector when connecting it to the button, the 5th pin will move out of the way and will not be an issue. The pictures identify the connections. Make sure that you add enough spare wire to the cables in order to reach the desired location of the engine start button placement.  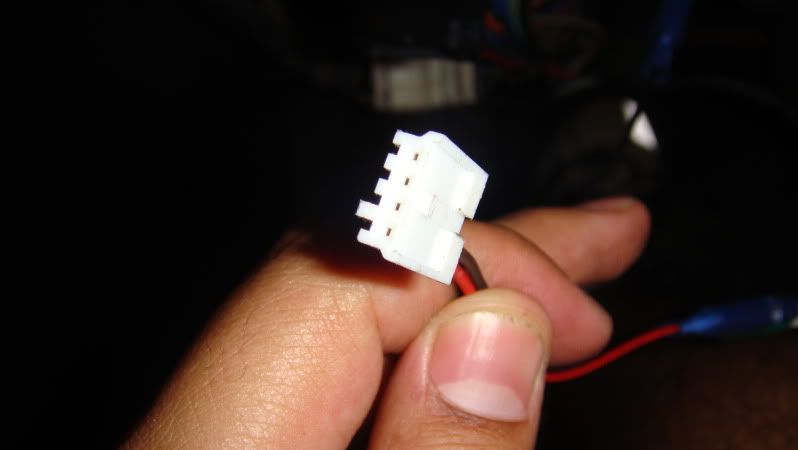 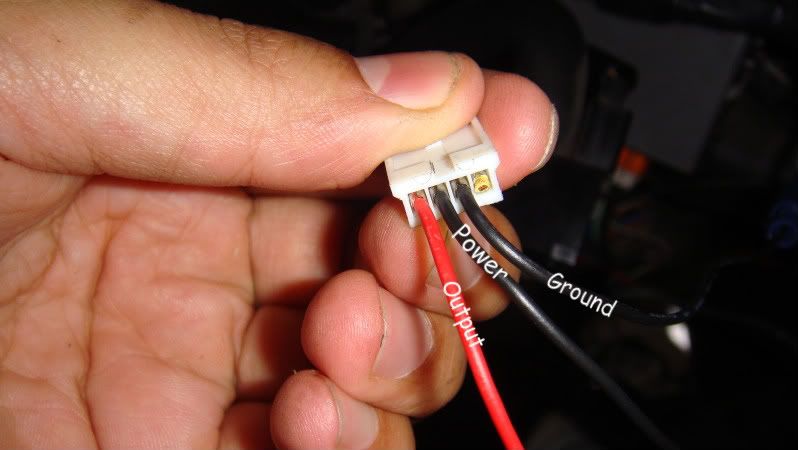 Now to modify the wiring harness of the car. I opted to use the bullet connectors for terminals so that you can go back to factory start without having to re-splice. Again, this is not necessary and will work just as good with twist-tie/electric tape. Just make sure they are properly insulated. 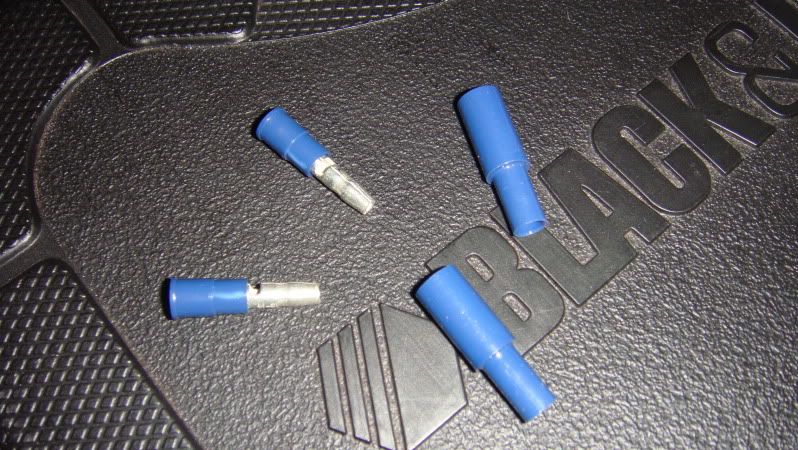 First splice into the "ST2" wire (white/black) and crimp on male and female connectors. On the "output" wire of the computer cable crimp a connector and connect to the "ST2" wire end "B". End "A" will not be connected to anything thus the insulated connector (female) will protect it from any metal contact. You can apply some additional insulation if you so desire but keep the connector on for future use. 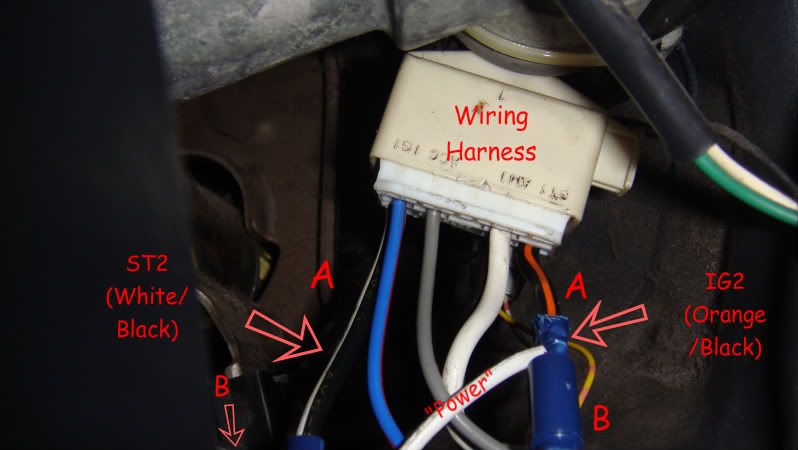 The "IG2" wire (orange/black) will be tapped into. The ideal method would be to use a vampire tap but since I didn't have any at the moment and our hardware stores in country are pretty much nonexistent, I simply placed connectors on both ends of the cut wire and tied in the "power" cable of the computer cable in between the two connectors (pictured). 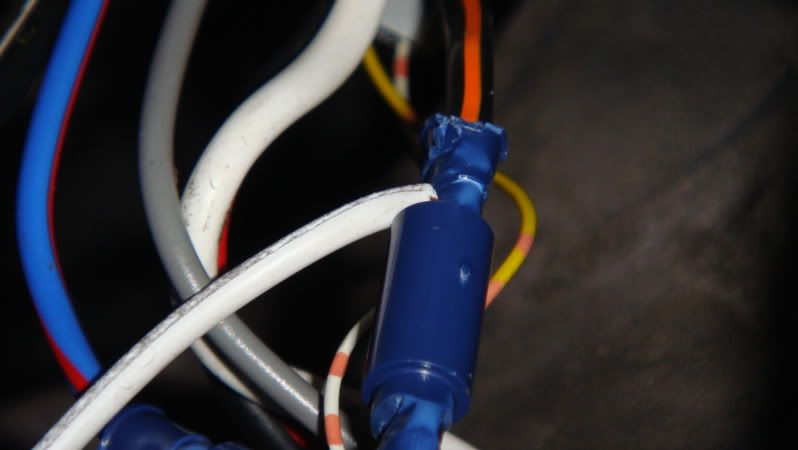 The "ground" wire of the computer cable will then be connected to a screw underneath the steering wheel column using the hook style connector. I simply loosened the bolt, slipped the hook underneath the washer and retightened. 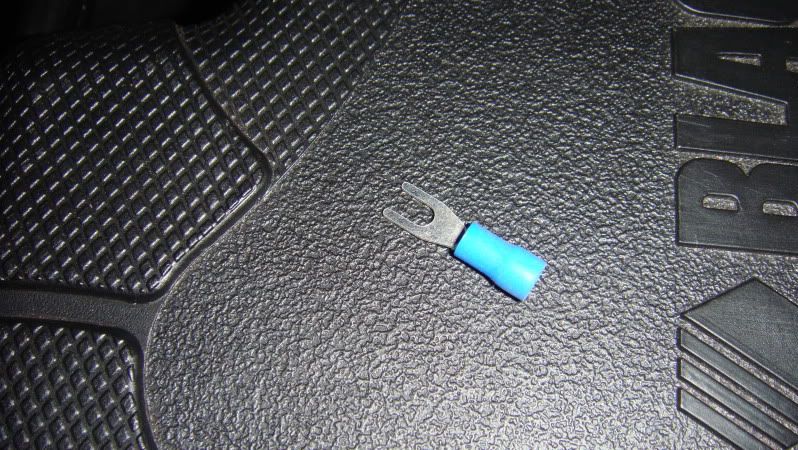 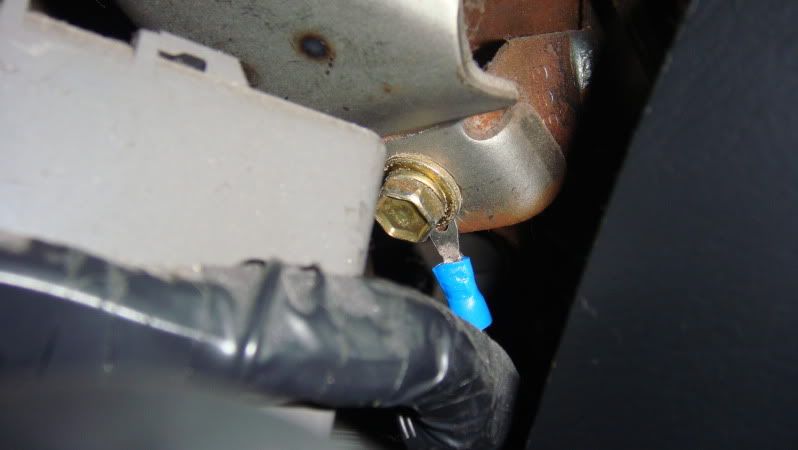 Now all the cables and wires should be connected. Connect the computer cable to the engine start button. Make sure the pins and connector are properly aligned. Before going further, I recommend testing the button. Reconnect the negative terminal on your battery, insert the key in the ignition and turn the key to attempt to start the car. The engine should not start. Leaving the key in the start position, press the engine start button. The car should start.  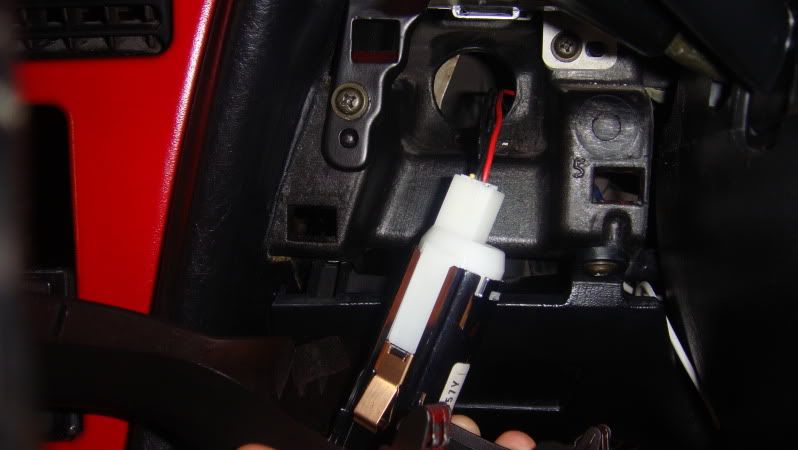 Once the test is done, unplug the the engine start button from the computer cable. You don't need to disconnect the negative terminal from the battery again since you will not be messing with the wires anymore. To prepare the bezel trim for the button you'll need to use a dremel to widen the spare accessory hole. The cover button simply pops out and you can use the dremel to widen it by cutting a steady circle and then use the sanding wheel attachment to smooth out a clean circle. Use your best judgement on the size but the button should fit snug halfway up the button shaft where it will then stop at the protruding edges. What I did was to line up the button so that the button as level and then marked with a pencil on the bezel trim where the edges are. I then removed the button and dremeled slits where I had marked with the pencil (pictured). It will take several fitment tests but go slow so that you don't mess up and leave a disfigured appearance on your dash. Once that is done, the button should slide in smoothly and then snap into place using the new slits. 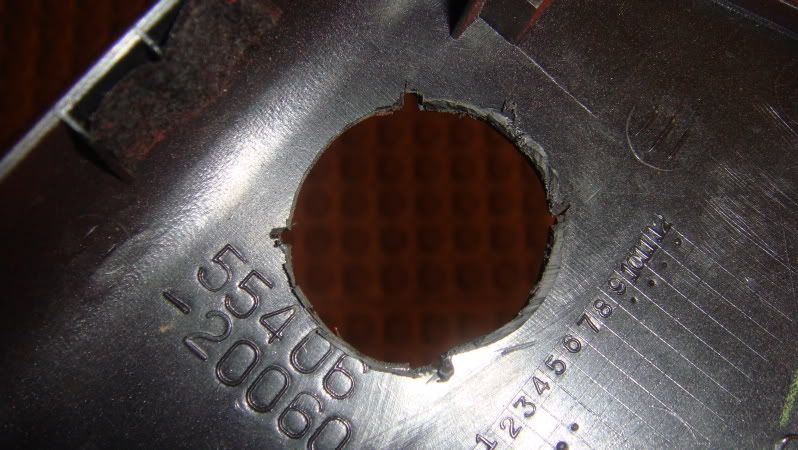 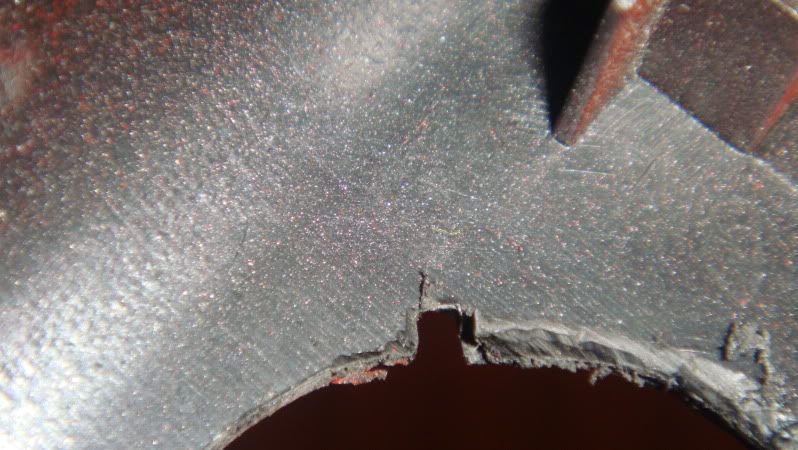 The next part was tricky for me since I didn't leave enough slack on the wires to connect the computer cable to the back of the button. From under the dash, push the computer cable through the back of the hole as pictured below. 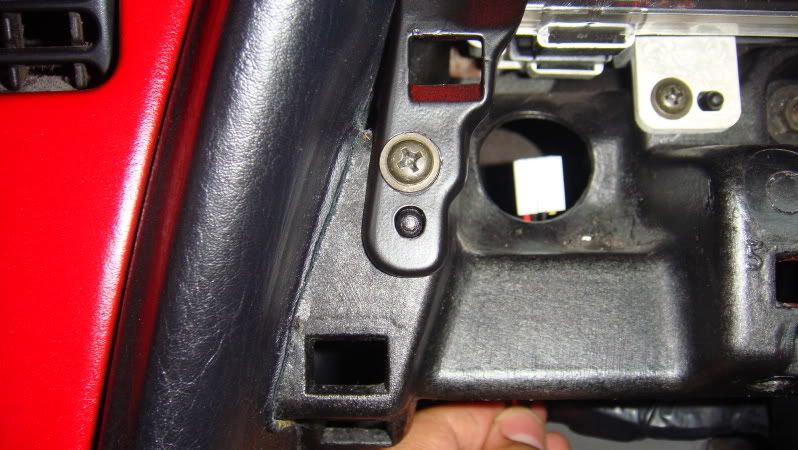 If possible connect the computer cable to the back of the button and let the bezel trim rest on top the steering wheel. If the cable is not long enough, pull the cable through the hole and anchor it somewhere so that it doesn't fall back down. The reason is that you'll have to put back the wire panel before mounting the bezel trim back onto the dash. So put the panel back on in reverse order of the steps mentioned previously, connect the computer cable to the button (if not already done) and snap the bezel trim back into place. Clean up your mess and then push the button til your heart's content! Feel free to add any tips or methods for things that can be done better. |
| Nov 28, 2009 - 6:17 PM | Forum: Interior/Audio/Electrical/Wiring · Post Preview: #816251 · Replies: 11 · Views: 3,493 |
|
Enthusiast Joined Jan 10, '06 From Mozambique, Africa Currently Offline |
While I wait for my guage pods to arrive, I finally worked up the nerve to install this. Circuitry is not my forte but I read up enough on it to give it a shot. It took me all afternoon but it not only works, it looks good! You can tell a little from the picture but the "Engine Start" lights up in a dim red. I plan on changing the bulb to a bright white led. Some other weekend maybe. 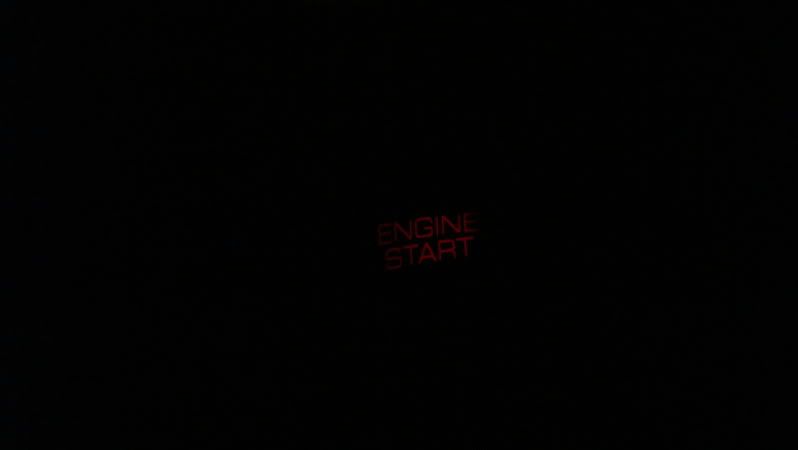 |
 New Replies New Replies No New Replies No New Replies Hot Topic (New) Hot Topic (New) Hot Topic (No New) Hot Topic (No New) |
 Poll (New) Poll (New) Poll (No New) Poll (No New) Locked Topic Locked Topic Moved Topic Moved Topic |
| Lo-Fi Version | Time is now: July 12th, 2026 - 5:50 AM |