
| Mar 25, 2008 - 9:44 AM | Forum: Off Topic · Post Preview: #657681 · Replies: 21 · Views: 4,557 |
 Enthusiast  Joined Jan 31, '08 From Canada Currently Offline |
that sucks, i have always been worried about a car falling on me therefore I NEVER go undera car unless it is secured by jack stands and the jack itself...its just too scary ive already seen a car fall off the jack cause the weight the jack was supposed to with hold was too great and i was like um, i coulda been under that :S sorry about your loss, it really sucks that its things like this that makes us realize to be a bit safer and not before hand so we can prevent the outcome. feen |


| Mar 25, 2008 - 9:37 AM | Forum: Off Topic · Post Preview: #657679 · Replies: 5 · Views: 2,028 |
|
Enthusiast Joined Jan 31, '08 From Canada Currently Offline |
BETRAYAL feen |
| Mar 25, 2008 - 9:32 AM | Forum: Exterior Styling · Post Preview: #657676 · Replies: 15 · Views: 3,902 |
|
Enthusiast Joined Jan 31, '08 From Canada Currently Offline |
well i hear now that the date for this has been pushed to January 2010, instead of the previous arrangement of Jan 2009 anyone hear about that?? feen |
| Mar 25, 2008 - 9:24 AM | Forum: Exterior Styling · Post Preview: #657670 · Replies: 17 · Views: 4,219 |
|
Enthusiast Joined Jan 31, '08 From Canada Currently Offline |
hot glue? wtf? lol heat warps panels, i would never put any sort of glue on my car... that looks like a place where i had a dent before, move the interior in the trunk and access it that way, use a dolly and body hammer to lightly tap to get it back into place, the metal is not stretched looks just distorted, therefore it doesnt looked creased and would be an easy fix, try the plunger too and see if that works, other than that thats all i can give you.... but about that glue....im not so sure... but remember kids that IMO feen |
| Mar 21, 2008 - 4:49 PM | Forum: Off Topic · Post Preview: #656530 · Replies: 116 · Views: 61,301 |
|
Enthusiast Joined Jan 31, '08 From Canada Currently Offline |
FeenFD3S Forza 2 NSF: Most Wanted Burnout Paradise feen |
| Mar 21, 2008 - 12:35 PM | Forum: Off Topic · Post Preview: #656444 · Replies: 12 · Views: 3,027 |
|
Enthusiast Joined Jan 31, '08 From Canada Currently Offline |
we got forza 2 and can play online if anyone wants to rip up some **** let me know lol |
| Mar 20, 2008 - 6:31 PM | Forum: Exterior Styling · Post Preview: #656148 · Replies: 16 · Views: 4,251 |
|
Enthusiast Joined Jan 31, '08 From Canada Currently Offline |
then dont do it yourself.... MICKEY MOUSE...is done fast and cheap and WRONG.... if you want it done you NEED those items and need to know how to weld... get it done at a shop...or come my way and ill do it lol  feen |
| Mar 20, 2008 - 3:57 PM | Forum: Exterior Styling · Post Preview: #656101 · Replies: 16 · Views: 4,251 |
|
Enthusiast Joined Jan 31, '08 From Canada Currently Offline |
not the right way....mickey mouse??? sure but im a tech i dont do the mickey mouse sh*t....sorry... feen |
| Mar 20, 2008 - 12:56 PM | Forum: Exterior Styling · Post Preview: #656050 · Replies: 8 · Views: 2,484 |
|
Enthusiast Joined Jan 31, '08 From Canada Currently Offline |
for flake and a brand new car.OOPS I THOUGHT IT SAID 2007..my bad.....do it right and expect 3-4 grand IF DONE right with the engine bay and stuff painted... the flake is expensive! like i say to everyone call and get some guestimates feen |
| Mar 20, 2008 - 12:53 PM | Forum: Off Topic · Post Preview: #656049 · Replies: 5 · Views: 2,024 |
|
Enthusiast Joined Jan 31, '08 From Canada Currently Offline |
see that it was i was looking for... i am willing to do whatever it takes and well there is the moncton coll. i can try to partner with....could be an idea thanks for your advice and the event doesnt have to be free either alot of ppl would pay a couple for an event like that and im frm the country thats why i figured closing a road lolfeen |
| Mar 20, 2008 - 12:26 PM | Forum: Off Topic · Post Preview: #656040 · Replies: 5 · Views: 2,024 |
|
Enthusiast Joined Jan 31, '08 From Canada Currently Offline |
thats the thing tho down here we dont have one...and there is alot more street racing happening and lots of kids doing stupid things...so if i can get one organized and have a petition signed and have maybe ONE good event then they might let us build a track were from canada remember...worse than that the maritimes feen |
| Mar 20, 2008 - 11:28 AM | Forum: Off Topic · Post Preview: #656022 · Replies: 5 · Views: 2,024 |
|
Enthusiast Joined Jan 31, '08 From Canada Currently Offline |
SO as the title states I want to organize a meet where all the silly ricers, and enthusiasts can get together to talk cars, drag and o0gle the beauty they are surrounded with... the problem... IM not not so sure I would get permission to close down a peice of road in town or on the outskirts for this idea. I would have to get every "dragger" to sign a liability form saying if i die its my fault kind of thing. You know what I mean. BUT if they decline my idea is ruined...so I might do a petition to open a drag strip or something using the line, well you wanna get the street racers off the road right? Has anyone ever organized a meet and had to go through this? Any insight or ideas to help me and if I have to put a petition together how do i do that? THANKS peeps, feen |
| Mar 20, 2008 - 11:09 AM | Forum: Off Topic · Post Preview: #656005 · Replies: 49 · Views: 6,707 |
|
Enthusiast Joined Jan 31, '08 From Canada Currently Offline |
where are the pics? feen |
| Mar 20, 2008 - 10:57 AM | Forum: Exterior Styling · Post Preview: #655994 · Replies: 16 · Views: 4,251 |
|
Enthusiast Joined Jan 31, '08 From Canada Currently Offline |
QUOTE(6strngs @ Mar 19, 2008 - 3:54 PM) [snapback]655658[/snapback] how about a right up on shaving emblem holes or repairing small door-ding sized dents. I'm going to be doing that to my car soon but I've never done it before so I'm looking for all the help I can get. Shave the symbol holes and trunk lock and/or antennae... Remove the antennae and the lock cylinder and the badges. Make a patch for the antennae and lock hole. Weld in the badge holes since they are so small... you need to grind all the paint off then weld...then grind your welds smooth then use fill. Sand your fill flush to the panel and then use putty for any minor defects. After that...you prep and paint. And voila its done...example... 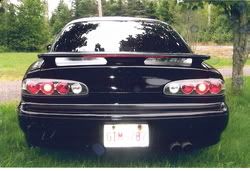 not a celica but it shows my work and whats quoted above.... |
| Mar 19, 2008 - 9:07 PM | Forum: Exterior Styling · Post Preview: #655798 · Replies: 16 · Views: 4,251 |
|
Enthusiast Joined Jan 31, '08 From Canada Currently Offline |
i wont have many pics BUT i will write one up tomorrow at work k bud? i haev done it before feen |
| Mar 19, 2008 - 3:17 PM | Forum: Exterior Styling · Post Preview: #655637 · Replies: 16 · Views: 4,251 |
|
Enthusiast Joined Jan 31, '08 From Canada Currently Offline |
| Mar 19, 2008 - 1:19 PM | Forum: Exterior Styling · Post Preview: #655586 · Replies: 15 · Views: 3,902 |
|
Enthusiast Joined Jan 31, '08 From Canada Currently Offline |
if you knwo about urethane and read my first post that is the differences and for the fact of the matter, it does seem thinner you just have to learn how to spray it since themethod and everything is different!! I find it holds up better than urethane.... BECAUSE as i stated above about the silver spraying hte blue and it covered with one spray....that WILL NEVER WORK with urethane....try painting a dark blue panel with silver paint using urethane and see how many coats it takes to cover the panel.... everyone has their own oppinions BUT we have NO CHOUCE to embrace this....and plus IMO i like it much better.... im being monitored at work right so ill leave and write more later feen |
| Mar 19, 2008 - 11:36 AM | Forum: Website Discussion · Post Preview: #655534 · Replies: 6 · Views: 2,367 |
|
Enthusiast Joined Jan 31, '08 From Canada Currently Offline |
same thing i did but i word things differently and sometimes talk in codes lolfeen |
| Mar 19, 2008 - 10:32 AM | Forum: Website Discussion · Post Preview: #655510 · Replies: 6 · Views: 2,367 |
|
Enthusiast Joined Jan 31, '08 From Canada Currently Offline |
i agree but i did up my whole post...spilt it, posted it...then copy and cut and paste and then when I was all done it posted it into a whole post but then if i wanted to change something in it then i go to complete edit it says ..... too many pics i was like ARGH! and just left it with no change ..... it took me like an hour at least to JUST re-arrange my patch thread .... feen |
| Mar 19, 2008 - 10:25 AM | Forum: Exterior Styling · Post Preview: #655507 · Replies: 16 · Views: 4,251 |
|
Enthusiast Joined Jan 31, '08 From Canada Currently Offline |
QUOTE(presure2 @ Mar 18, 2008 - 5:47 PM) [snapback]655244[/snapback] great work. i would really like to see some work on a 6th gen tho. i love the example shown, and how the work is done, but technicly this thread "should" be moved to off topic. ill leave it, just because of the excellent example it shows. (just make the pics bigger!) it wouldnt let me post all my pics :S but i can post my photobucket so you can see all the pics, some bigger some smaller hows that? ALTHOUGH the rockers need to be replaced on the car...and when I do that I will post lost of pics feen |
| Mar 19, 2008 - 10:21 AM | Forum: Exterior Styling · Post Preview: #655503 · Replies: 15 · Views: 3,902 |
|
Enthusiast Joined Jan 31, '08 From Canada Currently Offline |
QUOTE(celicaGT96 @ Mar 18, 2008 - 6:27 PM) [snapback]655261[/snapback] so can this be sprayed with an original hvlp gun? yes you can you will however need to purchase new guns for this paint HOWEVER for the change the costs range anywheres from 30,000$ to convert to 100,000$ to convert... IF i can get a chance there is a shop in town that has switched already and i will see if i can get in and take pics of whats new.....AND these ppl need to hire some new ppl..... im going to put my resume in again cause the guy that was in my college course did work there but he quit.....but its crappy money so we'll have to see....cause at this point its about the money....maybe in a couple months it wont be but well see...if i can get some pics of this shop to show you guys i will.... thanks for some of the compliments ..... Presure2 it does have its advantages as it does disadvantages but what doesnt? Once you spray you will have your own thoughts about this product...hopefully good ones...your a bodyman? You still use urethane? feen |
| Mar 18, 2008 - 3:59 PM | Forum: Exterior Styling · Post Preview: #655212 · Replies: 15 · Views: 3,902 |
|
Enthusiast Joined Jan 31, '08 From Canada Currently Offline |
Well, some of you may know (mostly the bodymen and automotive painters) that by January 1st, 2009, Waterbourne paint is going to be introduced to Canada to replace our Urethane Bases (color). This is not yet written in stone, but when the law passes EVERYONE will have to change their shops way of cleaning, disposing, spraying, and drying methods for the new Waterbourne Paint. The reason why they are changing it is du eot High VOC's. Car Manufacturers produce the MOST VOC's in the world. You know whos next? The bodyshops! Now some are against it and some are for it. Most are against it because they believe that old technology is the way and always will be. The one thing that they see, against all others is the fact that they will have to pay to change their booth. A down-draft booth with enough air, flow can be converted, others have to be replaced due to lack of air flow. Therefore, you will no longer see back yard shops painting vehicles. I just have to say that I was present at a seminar to introduce Waterbourne paints with BASF's Glasurit 90 Line Waterbourne Paint, yesterday. IT WAS NUTS! The guy can have a whole car flashed in 2-3 minutes! Thats nuts! Their primers can be left forever and be sanded without screwing up. You can wait a month if u wanted before you put clear on. The paint matches are better, it lays better, easier to spray, not as time consuming as Urethane, and there are endless possibilities. Now nothing will change with the paint. Pearls, metallics, and flakes can be used still. To clean the gun, you shoot distelled water through it, thats it! The guy smudged his finger ont he paint before it flashed and with the second coat, YOU couldnt even see his smudge! It takes 2 layers to complete a paint job. One mist coat, one heavy coat and one 1/2 coat. The 90 Line, doesnt even Smell! Safer for the techs to paint too. Air flashes it. Thats why u need better airflow and the nozzles that dissipate air better. I can go on with this for days! This is the best innovative way for paint with less VOC! Now before I go asking for oppinions, I want to say that California has been using Waterbourne paints for a while. Over seas in Europe have been suing them since the 80's! So its been around. If anyone has sprayed share with me ur experiances. I am very excited to see it come here. The legislation just has to pass the law then EVERYONE has to change. ANd by the way for those in the states, besides Cali, by 2010, the States will have to make this change too. So its coming no matter if you like it or not! Whats your pros and cons on the subject....be great to hear about them! feen |
| Mar 18, 2008 - 2:30 PM | Forum: Exterior Styling · Post Preview: #655191 · Replies: 16 · Views: 4,251 |
|
Enthusiast Joined Jan 31, '08 From Canada Currently Offline |
thank you feen |
| Mar 18, 2008 - 1:16 PM | Forum: Exterior Styling · Post Preview: #655165 · Replies: 16 · Views: 4,251 |
|
Enthusiast Joined Jan 31, '08 From Canada Currently Offline |
First things first. If you are going to have an accurate patch you must first MEASURE what you are cutting out and mark it down.  2. Cut out rusted area with tin snips, and grind off the really sharp edges. Make sure any wiring or sound deadener is clear of your working area. In this case I had to remove the sound deadner and tape up the wiring while I held it in place with a block of wood. Grind the area clean of rust or debris as this will not weld good and cause a lot of porosity in the welds. 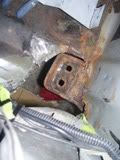 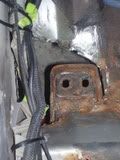 3. Before you go cutting random peices of metal make yourself a patch pattern, this way when you go to bend the piece of metal you are not running back and forth to see if it fits, which is more efficent.  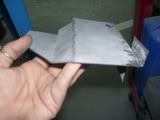 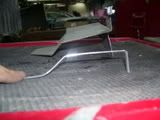 4. Make your patches to fit within 1/8 of an inch for accuracy. Use a pick hammer, anvil. dolly to make the edges accurate. This was one of the hardest patches to make as there were so many twists to it. Took maybe 1 to 2 hours to make the patch fit perfect! Tack weld them into place. Now be careful where you are welding. Depending on the area if you weld too fast, you will warp the panel, in this case, we are working with 16 gauge steel and 3 layers thick on the floor panel, not too much warping will happen. Weld around 8 tack welds then wait for it to cool and so forth. Keep them secured with clamps, patch holder or anything you can get your hands on. Remember your welds don't have to extra pretty, inmost cases you end up grinding them anyways. On a note if you have any holes in your patches try to do them first and as accurately in the right place as possible. Thats where the die grinder comes in. Clean the patches with wax and silicon remover to remove any substances on the metal. The white stuff around the welds is the galvonized coating on the metal. (Galvonized will help keep the metal from rusting out in the future). 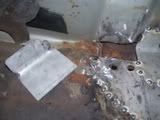 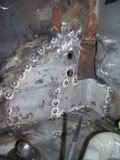 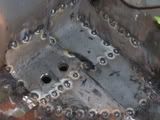 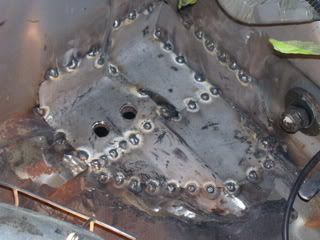 Touch-ups can be made to the holes after they have been welded in. Final welded patches. Includes 4-5 patches. 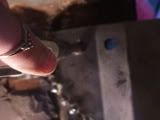 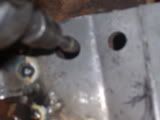 Let it cool down, then apply epoxy primer. Epoxy is a rust inhibitor, allows the life time of the metal to increase without the damage of rust. It seals it and it is waterproof. Epoxy is expensive so only use when needed. 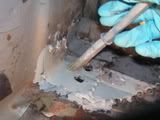  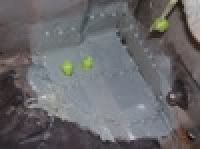 This epoxy is suppose to cure with in 40 minutes so follow the instructions to get the quality of the product. Now because we are dealing with the floor we do not need to grind the welds. Once the epoxy dries, apply sealer to it for an even better seal! In the holes, there are bolts so in case I get sealer in the holes and it dries, I put the bolts in and taped them so they would stay in place then sealed around them. Make sure you get al around the welds to cover the spaces between the tacks. 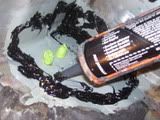  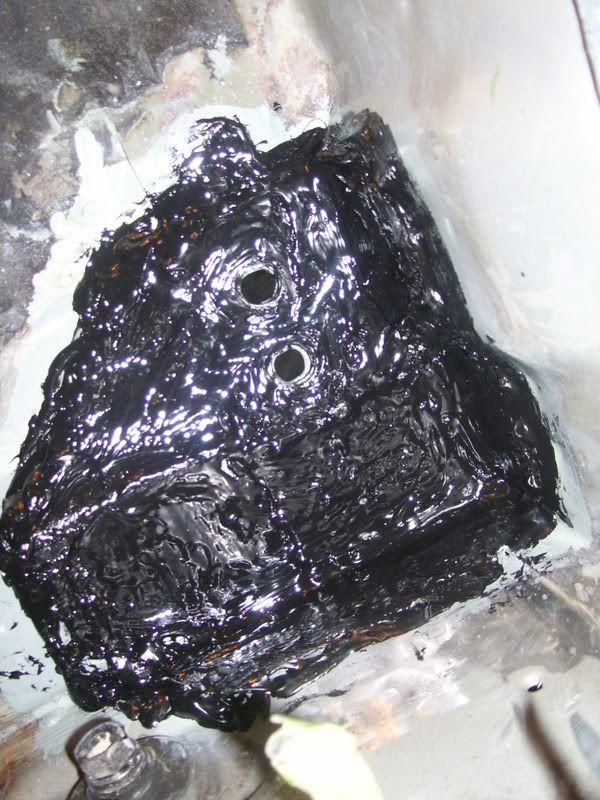 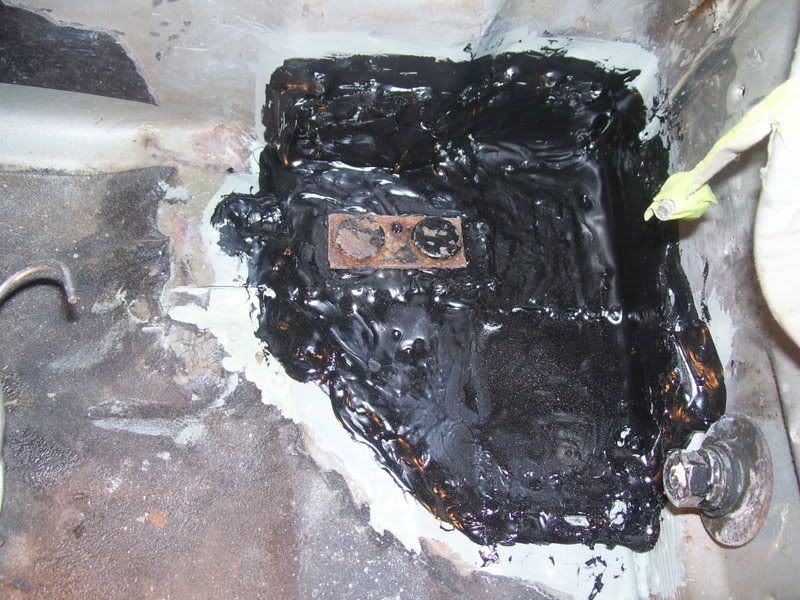 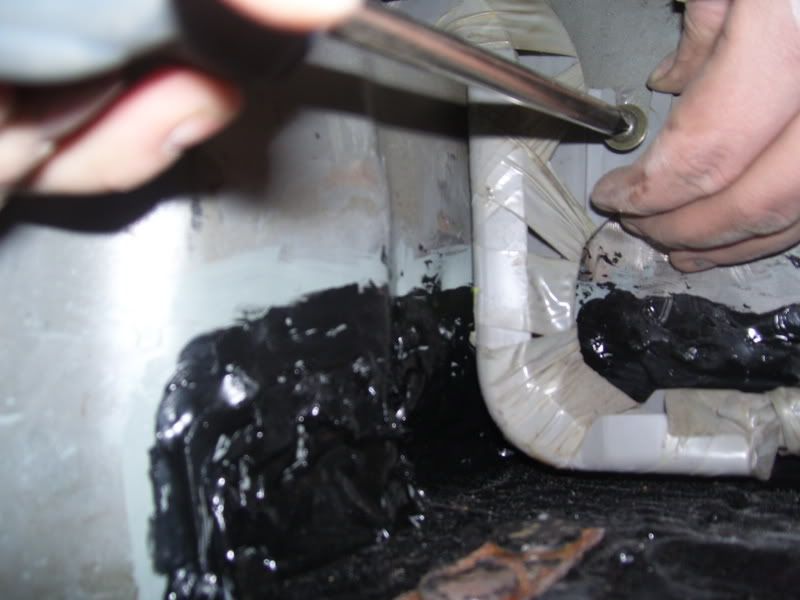 And voila! You have patched a floor of a (in this case an 87 300 ZX) floor! Let the sealer finish it's working time then remove the bolts. Let it cure completely before you re-install the sound deadener and wiring. Final result.... http://i84.photobucket.com/albums/k11/tige...rk/Mazda012.jpg Some other patches I did on the car 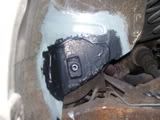 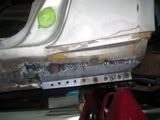  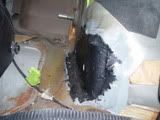 Well I hoped this helped, if you have any questions about this or any other body work, I'll answer it to the best of my knowledge, now remember I am an apprentice not a journeyman! Thanks for lookin! FEEN |
| Mar 18, 2008 - 1:06 PM | Forum: Exterior Styling · Post Preview: #655162 · Replies: 16 · Views: 4,251 |
|
Enthusiast Joined Jan 31, '08 From Canada Currently Offline |
In this case the hole is in the floor 3 layers deep, including a re-inforcement piece for the rocker! Alright before you start cutting out and getting ready for a patch you have to make sure you have the right tools for job as well as equipment! A welder , welding gloves, shield/blanket & helmet, fire extinguisher (in case you light something on fire ), safety glasses, clamps, pencil & paper to write down your measurements(or in my case paper towel), sheet metal (20 & 16 gauge), side cutters, grinder, non-latex gloves, pick hammer, light (if needed), tin snips, epoxy primer, sealer, die grinder, measuring tape, tape, dolly or anvil, and whatever else you may think you'll need.       |
 New Replies New Replies No New Replies No New Replies Hot Topic (New) Hot Topic (New) Hot Topic (No New) Hot Topic (No New) |
 Poll (New) Poll (New) Poll (No New) Poll (No New) Locked Topic Locked Topic Moved Topic Moved Topic |
| Lo-Fi Version | Time is now: July 6th, 2026 - 12:46 PM |