  |

 Jul 22, 2006 - 6:55 AM Jul 22, 2006 - 6:55 AM
|
 
|
 Enthusiast  Joined Feb 3, '05 From USA/Virginia Currently Offline Reputation: 2 (100%) |
are there now prefab replacements for the climate control unit bulbs??
check this out, go here http://autolumination.com/74.htm search for: Neo - Wedge those messurements of 10mm x 13mm are damn close to the special toyota bulbs that back-light the climate control unit. (i get 9.5mm daimeter and 14mm height) is there anyone out there getting ready to do their cc unit who wants to try these out? This post has been edited by Zimluura: Jul 22, 2006 - 6:56 AM |

|
Jul 26, 2006 - 9:06 PM
|
|
|
Enthusiast Joined Feb 26, '06 From Illinois Currently Offline Reputation: 1 (100%) |
i need to do my cc i might have to try this, how many would i need?
This post has been edited by fanboy95: Jul 26, 2006 - 9:09 PM --------------------  |
|
Jul 26, 2006 - 10:50 PM
|
|
|
Enthusiast Joined Oct 12, '05 From Texas Currently Offline Reputation: 59 (100%) |
I don't think this type of LED will spread enough light placed where the stock ones go. My 2 cents. But someone should try for the heck of it. I just know by trying tons and tons of different LEDs that those "wedge" ones don't really spread the light very well.
~snap -------------------- Past: V6 Swapped 6G Celica, E46 BMW M3, Jeep Wrangler TJ
Current: 850rwhp C6 Corvette Grandsport, Gen1 6.2L Ford Raptor |
|
Jul 27, 2006 - 3:30 AM
|
|
|
Enthusiast Joined Feb 3, '05 From USA/Virginia Currently Offline Reputation: 2 (100%) |
the heat/ac unit has 3 bulbs for back lighting.
i did mine with the num74 leds on that site. the top one had to be bent a little to shine directly into the top-button-row clear plastic part. the only thing that doesn't light well is the AC button at the bottom. (and the rear window defrost button, which wasn't back-lit in the first place.) |
|
Jul 27, 2006 - 12:41 PM
|
|
|
Enthusiast Joined Oct 12, '05 From Texas Currently Offline Reputation: 59 (100%) |
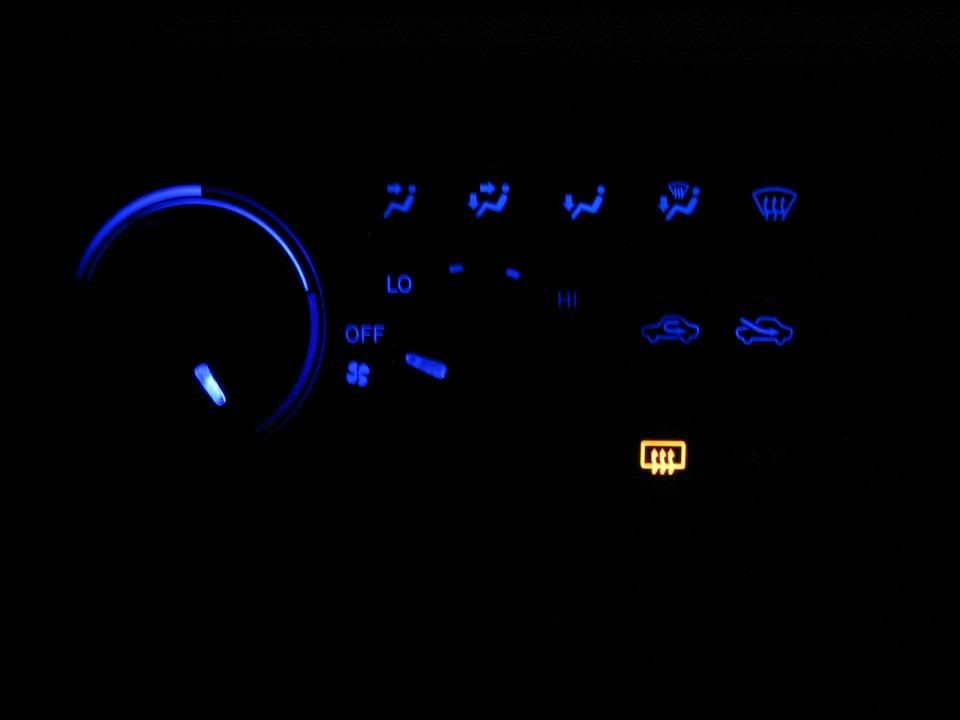
For my AC button, I drilled a little hole for a 74 type LED to slip in there -- so my AC button is A++.
You can see the AC button bottom right on the cc unit here in this bad cell phone pic...lol  ~snap This post has been edited by snapshotgt: Jul 27, 2006 - 12:42 PM -------------------- Past: V6 Swapped 6G Celica, E46 BMW M3, Jeep Wrangler TJ
Current: 850rwhp C6 Corvette Grandsport, Gen1 6.2L Ford Raptor |
|
Jul 27, 2006 - 10:13 PM
|
|
|
Enthusiast Joined Feb 3, '05 From USA/Virginia Currently Offline Reputation: 2 (100%) |
nice!!
my bottom 74 led is probably too high (too close into the vent open/close button) to hit much of the ac button. |
|
Jul 27, 2006 - 11:15 PM
|
|
|
Enthusiast Joined Dec 19, '05 From new jersey Currently Offline Reputation: 0 (0%) |
well because of my crash i got a spare cc and well i did want to make the lights blue so i'lll give it a shot. now i gotta take the cc off my car lol
--------------------  |
|
Jul 27, 2006 - 11:19 PM
|
|
 Enthusiast Joined Mar 8, '04 From Newport, RI Currently Offline Reputation: 63 (99%) |
-------------------- |

|
Jul 27, 2006 - 11:20 PM
|
|
|
Enthusiast Joined Apr 17, '06 From New Jersey Currently Offline Reputation: 105 (100%) |
^^^ what did you use Batman ?
--------------------  |
|
Jul 27, 2006 - 11:58 PM
|
|
 Enthusiast Joined Feb 5, '05 From pineapple under the sea Currently Offline Reputation: 9 (100%) |
I really need to do my CC. the 4 bottom right corner lights (Air direction deal, Rear defrost, AC) are out unless I slam the side of the center console, then it comes back on. I want to do everything in blue, but I don't trust myself to take it all apart by myself.

-------------------- 1991 MR2 - T-tops - Crimson Red - Gen3 3SGTE - Lots of money
 I'm not really an asshole, but I play one on the internet. **** Photobucket |
|
Jul 28, 2006 - 2:58 AM
|
|
|
Enthusiast Joined Feb 3, '05 From USA/Virginia Currently Offline Reputation: 2 (100%) |
i wrote up a massive very very detailed howto on getting the cc unit out. and effective ways to dis-assemble it. there was one month i took it out like 4 times.
i emailed coomer asking him if he wanted it, but i got no response (must've been really busy). anyways, if you want my ultra detailed writeup i can send it to you. i've still gotta resize a few images, but that's won't take me long. |
|
Jul 28, 2006 - 6:14 AM
|
|
|
Enthusiast Joined Apr 17, '06 From New Jersey Currently Offline Reputation: 105 (100%) |
^^ if you don't mind just post it here so more people can see it.
-------------------- |
|
Jul 28, 2006 - 7:49 AM
|
|
 Enthusiast Joined Feb 3, '06 From Czech Republic (Europe) Currently Offline Reputation: 56 (100%) |
I played with mine for about month make look them like this:
 it's only LEDs (6x red, 3x blue)... This post has been edited by malpaso: Jul 28, 2006 - 7:53 AM -------------------- No more replicas... This is evolution... This is SS-four :)
 ________[Featured Celica of 6gc.net @ 2010]_________ |
|
Jul 28, 2006 - 11:21 AM
|
|
|
Enthusiast Joined Feb 3, '05 From USA/Virginia Currently Offline Reputation: 2 (100%) |
here goes (no pictures)
How-To: Getting the Unit Out Required Tools: Philips-head screw-driver. ideally you want a very short one as well as a regular sized one. Required Parts: None. The first part of this howto is just a very detailed description on how to get the Heat/AC unit (often refered to as a Climate Control or CC Unit (where the context makes it obvious we're not talking about Cruise Control)) out of the 6th gen Celica. I've only done this to my 1999 Celica GT, which is an American car, some of the instructions may need to be adjusted if your car is right-hand drive. This howto borrows allot of wording from Coomer's howto. And allot of design from DmVinney's howto. Lets do the most indimidating step first. The Two Control Wires (no current flows through these, they're like bicycle brakes). Go under the hood and locate the black control wire. It should be near the top of the driver's side firewall. To get that wire off of it's peg you'll need to pop that clip up first. I recomend needle nose plyers. After you get the clip off, the end of the wire should be able to just be lifted off the peg. Now lets move on to the blue control wire. If you shove your head under the dashboard by your pedals you should be able to see this to the *right* of the accelerator. First free the cable from it's little clip (this is probably best done with your fingers). Then pinch the top of the little peg while sliding the end of the cable up over it. Ok, now for easier stuff. Remove the panel around the shifter (you may need to put the car in neutral to get this out of the way, please remember your hand brake), this panel is held in by four clips and pulls out relatively easily, the cigarette lighter is attached to it i would recomend just letting it hang over the *left* side (but be SURE not to klutz out and jerk on it). Then you remove the really big panel above. First take out the two screws on the bottom of the panel, then you can pull the panel out (i start at the bottom and finish with the top *left* side, which always wants to come out last). There are 2 wire harnesses up at the top of this panel. One is to the hazard light, the other the clock. Remove them and set this panel in the back seat. Now the climate control unit is nearly free. There are two screws holding it in (unscrew them). There are three wiring harnesses that are attached to the climate control. Slide the entire unit out a little bit, so you can un-hook the wire harnesses. Then, before sliding the unit out of the car, try to note the white tube and funnel that the black control wire is sliding out of. It may also help to note where the blue wire is sliding from (i forgot to make note of this but had no problems getting it back together later). Then slide the entire box out of the car. Now you can take it inside to dis-assemble it. The rear-window-defrost is basically an entirely seperate module (one of the wire harnesses was for it alone). locate it's sub-structure behind the C.C. Unit and pull it out (it's held in by a single plastic snap, pull the tab back a little, then slide it out). Next there is a the top wire-harness socket (this is one that hooks up to the circuit board and controls all the lights), you should unscrew the black guard on this and set it somewhere. Now pull the knobs off the Fan and Blue->Red knob. the back of the fan knob (which also had it's own wire-harness) must now be unscrewed and set somewhere. There about 5 screws that need to be taken out from the sides of the CC unit. now finally you can pull the white and black pieces apart. I recoment holding it like this. There are about 2 screws holding the cicuit board in (unscrew them). Then take the circuit board out. It may help to pry here with a small screwdriver. How-To: Lighting Ovewview The 6th Gen Celica's CC unit is lit in the following ways. * The Back-Light is provided by 3 special toyota bulbs (Toyota part number is 84999-70007). These are incandescent and have little green condoms on them to make them a nasty shade of yellow-green. * Under each button (except the rear-window-defroster) there is a small LED. * The rear-window-defrost is another strange toyota incandescent bulb w/ green condom (different than the others maybe). How-To: Changing the indicator lights Required Tools: Pliers, Bastard-File Required Parts: 8x 3mm LEDs (in whatever color you like) First remove the black pieces from over each row of LEDs. The black piece on the biggest row (the top buttons) has a melted clip in place, i grabbed this with my needle-nose and ripped it off. The black piece can then be removed without too much work, and it will still hold plenty well. Each 3mm LED will have to be filed down a little bit. it's very important to file the LED lense down in a way that won't damage the diode inside it. To safely do this make sure the legs are side by side as you look down at the LED sitting on the file. Then, with your pliers, swipe the LED lense across the File (i used a big file). after 2-4 swipes (on each side) it should fit into the black piece with no hassle. Then desolder the old LEDs, and solder in the new ones. Remember, with LEDs the polarity matters! the longer leg of an LED is the anode(positive) the shorter leg is the cathode(negative). if you cut the legs already look at this image. To test your creation you can take the circuit board out to your car, plug it into the appropriate wire harness, and switch the lights on. You don't even have to plug it in all the way, i usually plug it in until it first starts hitting the clip. How-To: Back Lighting: Modify the Toyota Bulbs Required Tools: Drill (something small, cordless, and not-so-dangerous is best), asorted bits (1mm & 2mm bits) Required Parts: 3x num 74 LEDs (i got mine from here http://autolumination.com/74.htm) It's important to do each bulb one at a time. Take one of the Toyota Bulbs out of the CC Unit. Then remove the bulb from it's little plastic twist-in housing. The way i did this was to crush the bulb with needle-nose-pliers (shut your eyes just in case), then yank the + and - leads out of the housing with the pliers. The next step is to remove the plastic base from the num74 LED. To do this bend the contact wires at the bottom downward (so they extend past the base. Then grip the LED lense in your pliers and then twist just a little bit on the base with your hand, once it's moved just a tiny tiny bit stop. Then pull the base off-of the LED. Now you should have an LED with a resistor on one leg and some other type of tube thing on the other. These will need to go down into those tiny holes on the black-plastic bulb base. but they won't fit until we widen the holes. first i'd recomend using a 1mm drill bit to widen the holes. Those weren't wide enough for my LED legs but the 1mm holes made drilling into the plastic with a 2mm bit much easier. you also might want to bore-out the top of the bulb-base a little to let the led lense sit nicer. Now bend the legs of the led apart just a little bit. just wide enough for the resistors to be guided into the holes we've drilled. If you get the LED lense flush with the top of the base, or just a little bit further in you're good. Now take out one of the other toyota bulbs. take a look at how the contact wires are wrapped on it. with you're needle nose pliers you should be able to wrap the legs of your led the exact same way. Now you want to insert this bulb into the CC unit. it should twist in just like the original bulb but it might take a little more force the first time. turn it with the pliers if you have to. since you still have one of the originals in there take a look at it's orientation if you want to know when to stop twisting. ok, you should have one of the original bulbs in there, and one LED bulb in there. take the circuit board out to your car. plug it most-of-the-way into the appropriate wiring harness (not enough to snap in because that will be a pain to get back out). and turn on your dash lights. LEDs must be plugged in with the correct polarity!! If the LED you just made doesn't work you'll need to turn it around. (so remove the circuit board from the car. Take the bulb back out, rotate it 180 degrees, and plug it back in. then test again.) When you've confirmed that the first one is working just repeat the appropriate steps for the next 2. After you've got them all plugged in and they all test out ok here's what you need to do. snap the circuit board back into the front of the CC-Unit. check your lights now. Odds are the top row of buttons isn't lighting up much. this is because there's a piece of clear plastic that the led needs to be angled towards. it was pretty easy for me to bend that one led a little bit to the side (aimed into the plastic piece) and then all my buttons lit up great. The AC button is a bit of a pain. mine lights up faintly, but not well enough. what i think will work is to take a bastard file and grind a 45 degree angle on that peticular led. then it will hopefully get more light to the clear plastic piece that lights up the AC button. How-To: Back Lighting: LED Series Required Tools: Soldering iron, Needle-nose, 2 sets of Helping Hands (strongly recomended) Required Parts: 3x 5mm LEDs (3.6V,20mA), Resistor (68ohm,1/4W), bendable, but strong insulated wire. here's how i did mine at first. I've since had lots of problems with these and don't really recomend them. First untwist all three Toyota bulbs If you look at the back of the circuit board you can match the polarity up with this. bend a resistor end so that it will hang down through the bulb hole to the front of the board, then solder it to the negative lead of that hole. Now messure up some insulated wire (stripping the rubber some 4-6mm at each end) so that it can make it over to where the next bulb was. now solder the cathode of the LED onto that wire. Solder the anode LED leg onto the next wire segment (which should reach over to the next bulb location). And then solder that wire end to the next LED cathode. anyways, after you have all 3 LEDs and the resistor soldered up in a series circuit you solder the anode of the last LED to the positive lead of the first bulb-socket (right beside the resistor you started with). always run the wire between the black pieces that cover up each button, and it will help you position each LED if the wire has some rigidity to it (braided wire isn't so good for this). This post has been edited by Zimluura: Jul 28, 2006 - 11:22 AM |
|
Aug 6, 2006 - 1:58 PM
|
|
|
Enthusiast Joined Jan 29, '04 From Brooklyn moved to Miramar Florida Currently Offline Reputation: 2 (100%) |
this should be a sticky.
|
|
Aug 6, 2006 - 2:01 PM
|
|
|
Enthusiast Joined Jan 29, '04 From Brooklyn moved to Miramar Florida Currently Offline Reputation: 2 (100%) |
i wrote up a massive very very detailed howto on getting the cc unit out. and effective ways to dis-assemble it. there was one month i took it out like 4 times.
i emailed coomer asking him if he wanted it, but i got no response (must've been really busy). anyways, if you want my ultra detailed writeup i can send it to you. i've still gotta resize a few images, but that's won't take me can you send it to me... |
|
Aug 9, 2006 - 11:04 AM
|
|
|
Enthusiast Joined Apr 25, '05 From nyc Currently Offline Reputation: 4 (100%) |
QUOTE(Batman722 @ Jul 28, 2006 - 12:19 AM) [snapback]462233[/snapback] what did batman use here? i need to know. |
|
Aug 9, 2006 - 3:32 PM
|
|
|
Enthusiast Joined Sep 19, '05 Currently Offline Reputation: 3 (100%) |
Zimluura, I tried the #74's from autolumination. Two of them were great, they had removable bases. The third had the base integrated into it; I'll have to see if it will fit sometime when I put them in.
-------------------- |
|
Aug 10, 2006 - 1:35 AM
|
|
|
Enthusiast Joined Mar 8, '04 From Newport, RI Currently Offline Reputation: 63 (99%) |
what I did was follow the how-tos in these links
 http://www.celica-club.info/forum/index.php?showtopic=35274 http://www.celica-club.info/forum/index.php?showtopic=23723 http://www.celica-club.info/forum/index.php?showtopic=22410 ^^ just a reminder, you need to register (it's free) to veiw their forum -------------------- |
|
Aug 10, 2006 - 9:49 AM
|
|
|
Enthusiast Joined Mar 29, '06 From Regina, SK, Canada Currently Offline Reputation: 38 (100%) |
Thanks Dustin,
Will print them out and have a look at them later. -------------------- |

|
1 User(s) are reading this topic (1 Guests and 0 Anonymous Users)
0 Members:
| Lo-Fi Version | Time is now: May 27th, 2026 - 1:34 PM |