
 Jun 7, 2012 - 2:00 PM Jun 7, 2012 - 2:00 PM
|
 
|
|
Enthusiast  Joined May 16, '10 From Raleigh Currently Offline Reputation: 12 (100%) |
I initially had trouble calibrating my Symtech map clamp(also known as a FCD or Fuel Cut Defender) that I ordered for my 3rd gen 3sgte WRC edition, but through communications with Symtech I was able to get it all figured out. So I decided to make a write up for anyone else who is interested in boosting beyond the factory fuel cut.
RECOMMENDATIONS: Do NOT ATTEMPT WITHOUT A WIDEBAND GAUGE!!!! ADDITIONS: I will be running, and highly recommend using, a form of water injection for added safety from detonation. DISCLAIMER: I am just a normal guy! I am not an electrical engineer or a large company with the insurance to back up any damage to your car that may result in YOU mis-properly hooking up this map clamp! This is just a write up of what I did. I will accept ZERO liability for YOUR vehicle. Proceed with caution! Map clamps can be a great thing, but extreme care should be taken when using a device like this. First of all you want to locate a nice cool spot in your engine bay to mount the map clamp so that it doesn't get exposed to too much heat. Here is a picture of mine after the install to show you what I did. 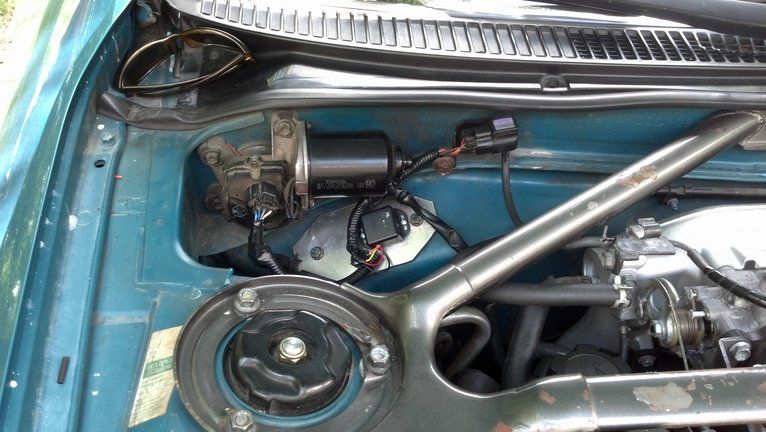 I plumbed my engine wiring harness through the middle of the fire wall instead of extending it completely. So i've installed my map clamp on the aluminum block off plate that I made to cover the factory wiring harness hole. This spot in the engine doesn't get too hot, so it should be a safe location for my map clamp. Below is a picture of how you should hook up your map clamp initially for calibration after you've found a suitable location for the map clamp in your engine bay. (note: I connected the green wire that goes to 12v to a 12v wire that comes out of the harness that connects to my windshield wiper motor. I used a multimeter to find which one of the wires on this harness received 12v when the key is in the ON and START position. The wire that you choose for your 12v source should be OFF when the key is not in the ignition.) 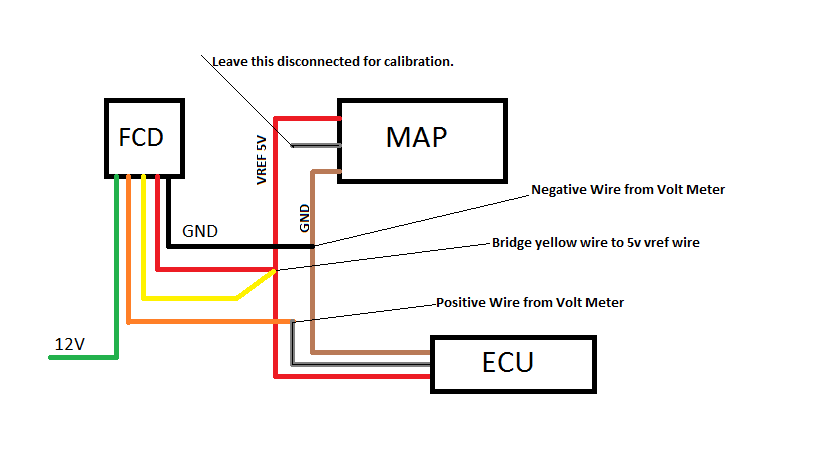 This is a method that I used, which was successful to calibrate the map clamp WITHOUT having to pressurize your intake manifold, or shoot compressed air into your map sensor hose. Turn the key to the ON position, and you simply watch the volt meter as you turn the adjustment screw until it reads between 4.10v-4.17v (I set mine at 4.12). After you're comfortable with your settings get some clear nail polish and put it on the adjustment screw so that vibration during driving does not vibrate the adjustment screw to an undesirable volt output. (I chose to do this because I can use acetone to remove the nail polish if my setting were undesirable). Let the nail polish dry for a few minutes....then you need to reconnect you wires as shown in the picture below. 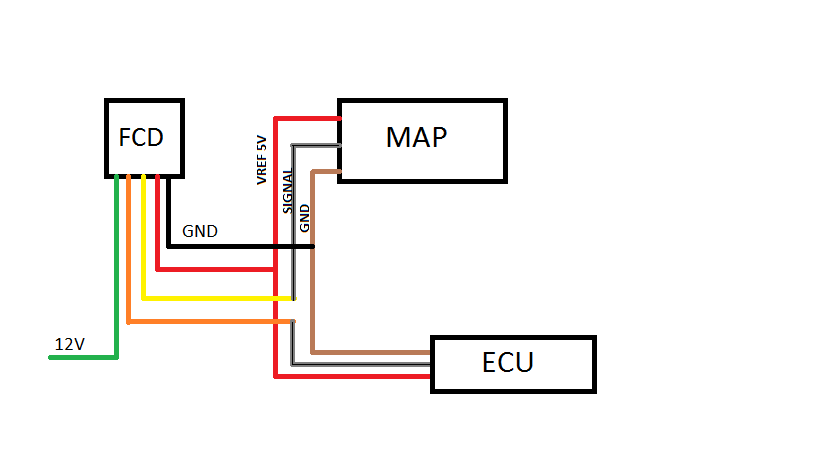 Now take the time to solder all of your joints and cover them with heat shrink tape. After you're satisfied with your work it's time to go for a ride! So crank the boost, and watch your wideband gauge as you boost to make sure that you don't lean out. If you boost beyond 18psi and you don't lean out or hit fuel cut then you are done! This post has been edited by bsamps4: Jun 7, 2012 - 2:26 PM --------------------  |

Posts in this topic
 bsamps4 Symtech Map Clamp How-to Jun 7, 2012 - 2:00 PM
 celica74 QUOTE (bsamps4 @ Jun 7, 2012 - 3:00 ... Jun 7, 2012 - 2:33 PM
 Ted95 i guess i should get a wideband now huh.. i have m... Jun 14, 2012 - 9:46 PM
  |
1 User(s) are reading this topic (1 Guests and 0 Anonymous Users)
0 Members:
| Lo-Fi Version | Time is now: May 18th, 2026 - 1:37 AM |