![]() |
![]() ![]() |
![]() |
![]() |
|
Enthusiast ![]() ![]() ![]() Joined Jan 9, '05 From Under the car Currently Offline Reputation: 0 (0%) ![]() |
GT4 & 3sgte quick fixes and pointers, usefull to all Celica owners.
Having been on this Forum for a while now, and seeing many questions repeated over and over again I thought I’d take a bit of time to produce this to help out and return the favour for all the help I have received from this site. Focusing on GT4s (ST205`s) and 3sgte engines (standard) but I’m sure the info can be adapted to most of the 3sgte family. Will start with finding Error codes (this will only work if you have the standard ECU running things). Error codes will crop up for a number of reasons and will cover most of the cars systems, the most common error code is the code 54, coming from the Coolant level sensor on the Top mounted water to Air charge cooler (sometimes called the intercooler but this is strictly not correct terminology) also comes from problems with the water pump that circulates water around the charge cooler to the radiator (rad) on the front of the car. The sensor is prone to problems as it is sensitive and can misread a low level too easily. To check your Error codes – a) Do not disconnect the battery or pull the ECU fuse before doing this or you will loose all stored error codes. b) Locate the Diagnostics port, on right hand drive cars this is on the top right corner of the engine bay as you look at it. It is connected to a bunch of wires but is movable by undoing the clip on the inside for ease of access, but not necessary to move it. ![]() 
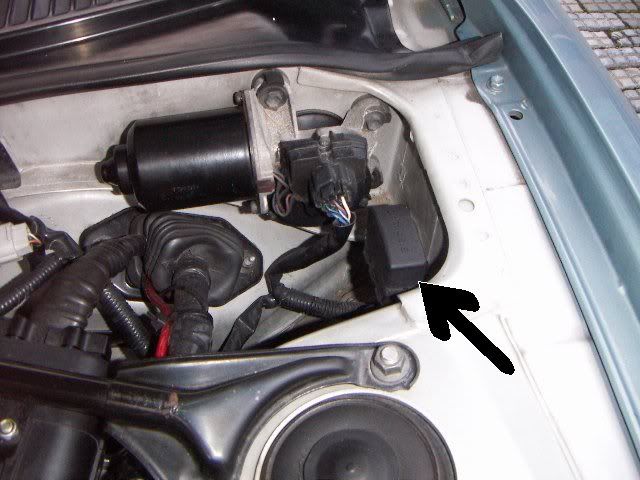
Once you have located this diagnostics port you will need to bridge two of the connectors together marked “E1” and “TE1”, you can use a small piece of wire or a paperclip, whatever is closest to hand. (As a side note:- when adjusting the timing on a 3sgte engine, you should connect E1 & TE1 together to get a steady reading, haven’t got a clue why, just something I have been told) ![]() Having bridged these together you are ready to read error codes. Return to the drivers seat and turn the key to the “On” position, this will light up the engine check light and it will start flashing. Constant uninterrupted flashing means that there are no problems. To find out which error code you have if any, count the flashes and pauses. Flash, flash, flash, flash, flash, pause, flash, flash, flash, flash would indicate an error code 54 Flash, flash, pause, flash, flash, flash, flash would indicate an error code 24. ![]() 
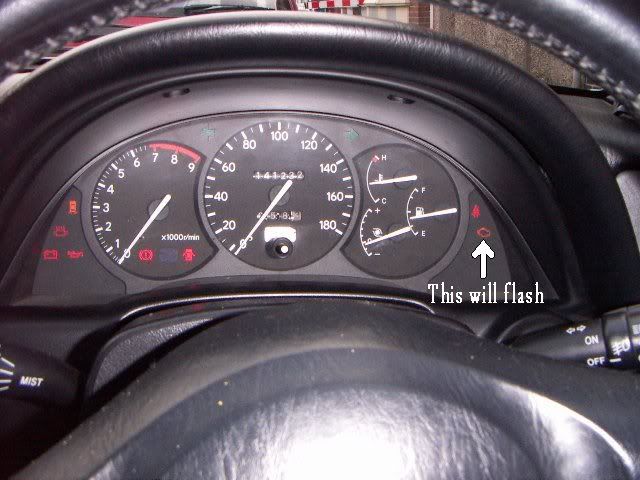
Once you error codes have been established, disconnect E1 and TE1 and return the diagnostics port to its home. Most Error codes will effect the engine management system in such a way that it will retard the timing, and sometimes reduce boost. Retarded timings worst effect other than making the car slower is to make your fuel consumption bad. The best way to get rid of the error 54 (it must be the level sensor and not the pump, if the pump is a fault replace it) is to bridge the sensor, you “can” replace the sensor and its not that expensive as things go, but its a lot of money for a simple sensor.
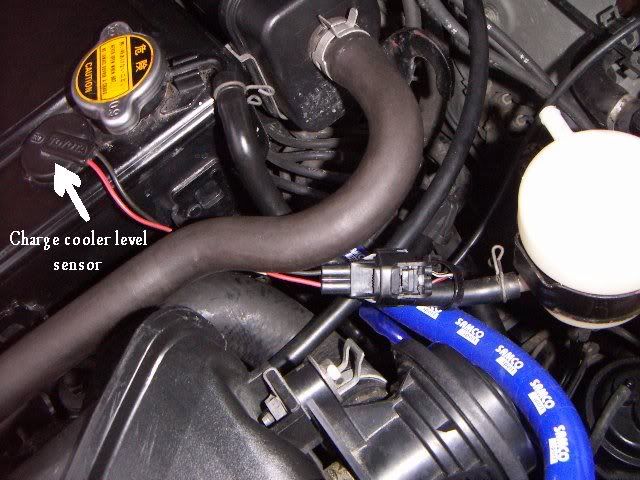
 ![]() Bridging the sensor ![]() 
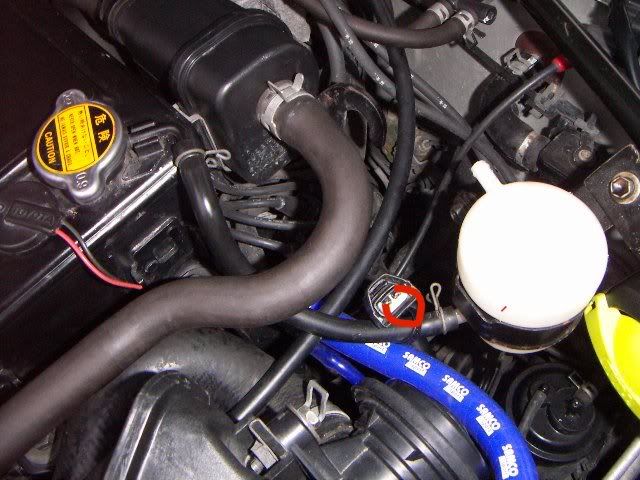
It may not look fantastic, but I have had my charge cooler bridged for over six months now with no problems, just remember to make those regular fluid level checks. No fluid in your charge cooler is not good at all. The next common mistake on the gt4 mostly but also on the 3sgte engine is where you tap into the vacuum line to put in a Boost gauge. Boost gauges are a good after market mod and should be your first purchase, when you have a boost gauge, be it mechanical or electric, you will realise how slow and crap the standard boost gauge is. Incorrect boost levels are a good indication of problems with the engine and can help diagnose a lot of problems. Most people tap into the vacuum from the inlet manifold from this vacuum line.
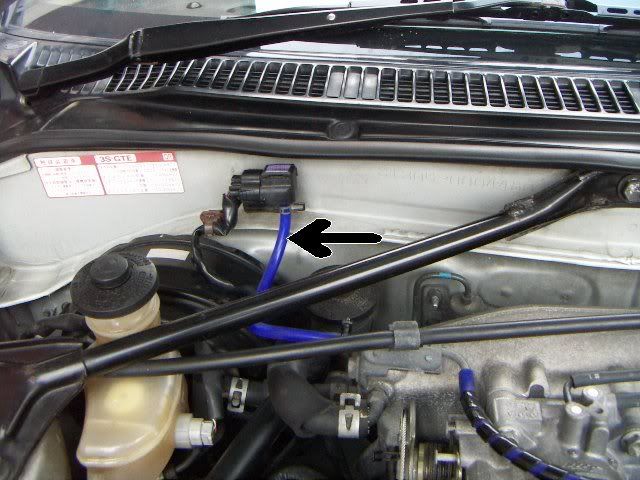
 ![]() DON’T DO IT, this feeds info to a small transmitter which not only gives a reading for your standard boost gauge, it also supplies information to the ECU, should this line split, your gauge have a leak etc then incorrect information will be sent to your ECU and will/can cause lots of damage to your engine. Instead a safe line to tap into would be your dump valve line or this line here for the best results ![]() 
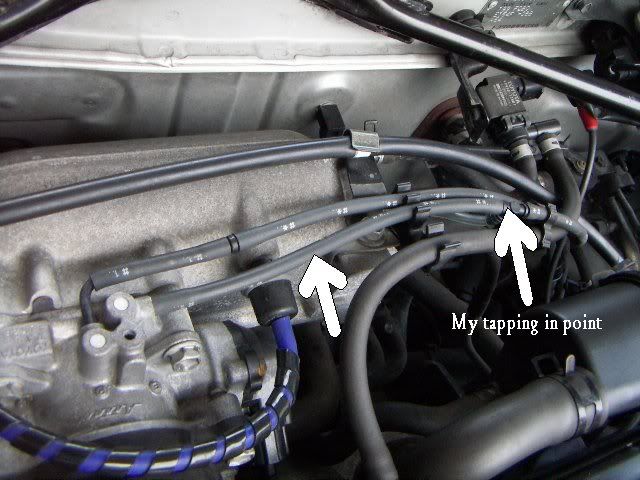
Dump valve vacuum line, good place to tap into for your boost gauge (caution needed, “can” effect the dump valve function) ![]() 
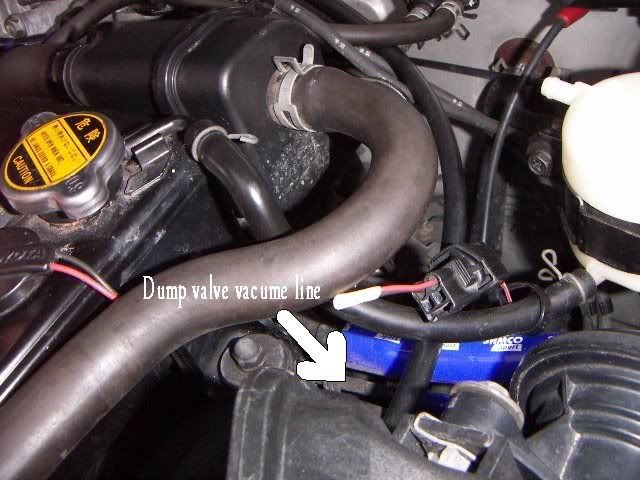
Next on my list of cheap mods is to do with the Induction system, A lot of people go down the route of fitting an aftermarket kit, with a GT4 you also have to upgrade the dump valve, (standard one is fixed to the airbox) This can cost a lot of money. I got this little lot all brand new from the internet for £120 ($200) with only a little bit a searching around. ![]() 
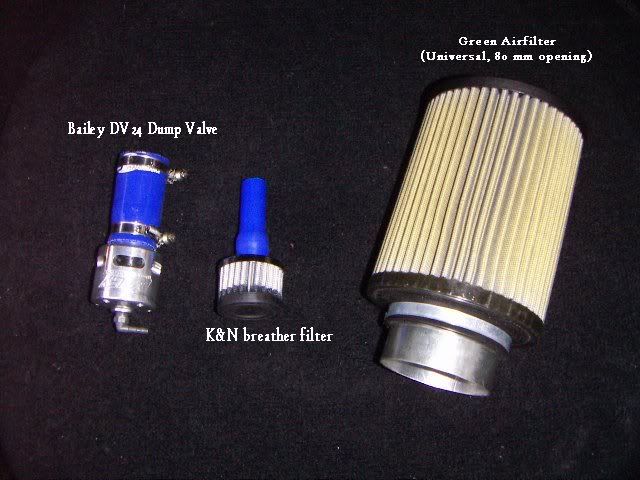
To be honest, I would advise against a Bailey dump valve, a) they aren’t fast enough in there action and b) the suck in unfiltered air when not closed (only closed under boost) After trying this set up for less than a week I discovered a few disappointing things, firstly the fuel economy worse than it had ever been and there was a loss of power. So I returned to the original set up with a few mods, the first been a K&N panel filter which is great, (you still get the induction noise with it. The second mod being the removal of the resonator box, the purpose of this is to reduce induction noise and to even out the airflow into the engine. Personally I think it’s a complete waist of space as it is just a box, with 4 very small holes to let air in, when I say small, I mean less than a mm across. ![]() 
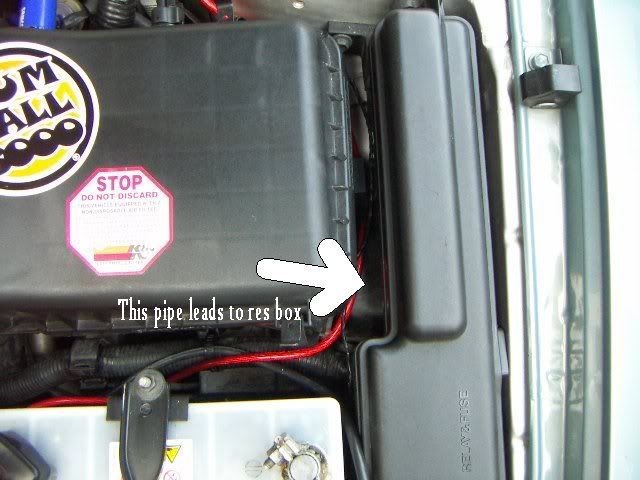
To remove the resonator box you have to remove the plastic wheel arch liner (12 screws or so) and the indicator (1 screw), there are 3 or 4 bolts holding the box in place, all pretty easy to get to (One via the hole where the indicator lives) ![]() 
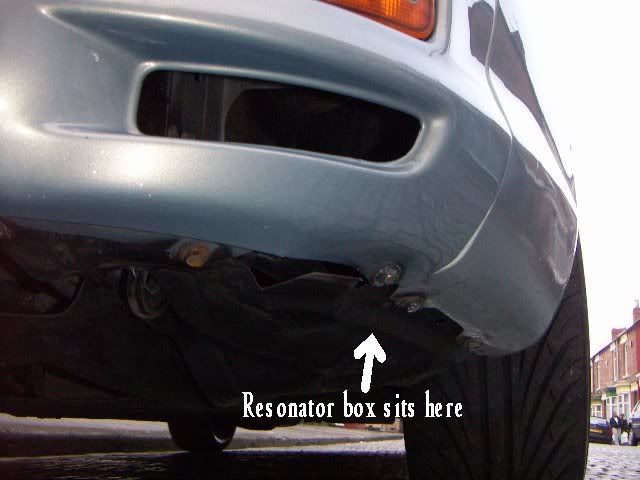
This is what you should pull out. ![]() 
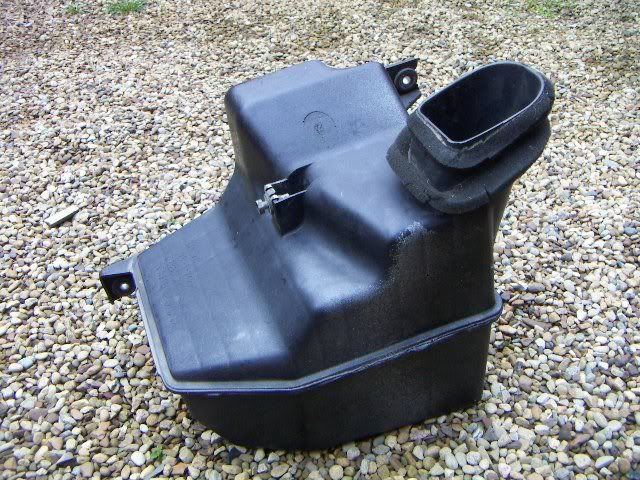
After doing this I noticed two things, more low down power, and more induction noise (YEY), worth doing this job. Next up should be your fuel filter replacement, unbelievable difference in my car after doing this and should be well up there on your list of things to do. It’s a bit of a bitch of a job and will take about an hour if your lucky, remove the airbox for ease of access, remove the pipes first, bolted to the filter, mine had been cross threaded by a previous owner and was a right pain in the arse to undo, next up is to remove the two bolts that hold the fuel filter to the engine bay wall. Fitting is reverse of removal. Jobs a good un! ![]() 
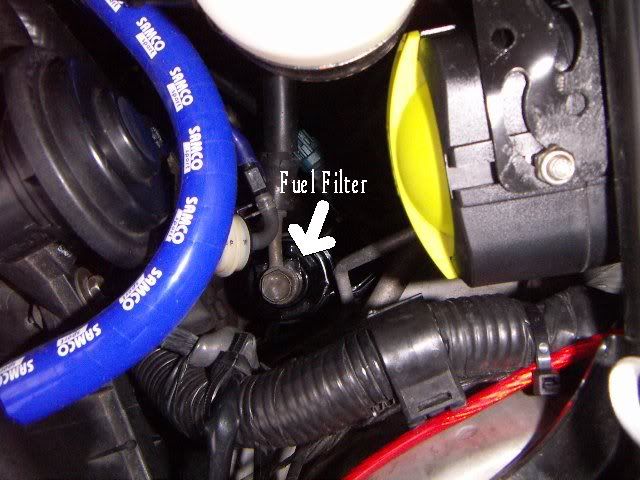
Couple of usefull tips Lagging the charge cooler can help prevent heat soak from heating the charge air. I used heat reflective tape and some insulating material, easy job, half hour max, removing the chargecooler can be a bit difficult. Twisting it away from both the turbo and inlet manifold is the easiest way. While your at it run some petrol through the charge cooler to get rid of any dirt and oil deposits that have built up inside. (CAUTION needed when using petrol, do it outside with a bucket of sand handy just in case) You can just see the silver tape on the bottom of the chargecooler ![]() 
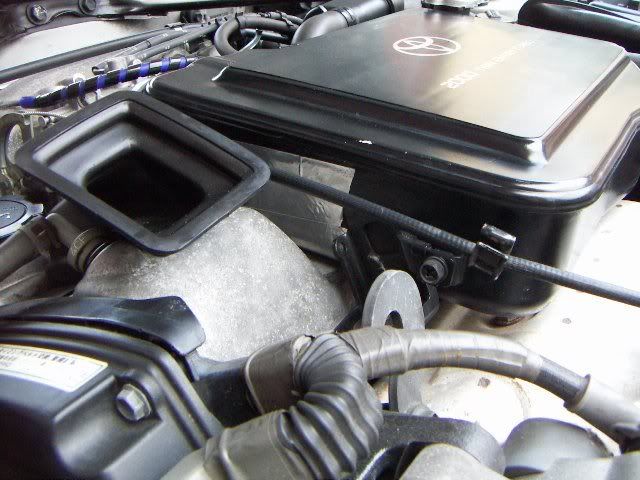
ECU fuse location. Use this to reset Error codes and to reset ECU after any repair work. ![]() For any of you wanting to install some tweeters to your front doors, inside of the door card there is a small socket already wired up and running to attach Tweeters to (thanks Mr Toyota) just about where my stubby finger is pointing, removing the door card is easy, takes about 10 mins, don’t forget there is a screw behind the door latch finger plate, and under the door grab arm. ![]() 
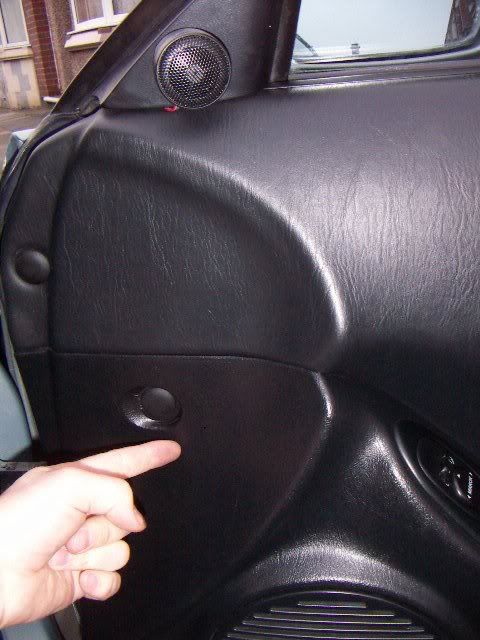
And last but not least, if anyone ever tells you not to put the GT4 raiser blocks on your car cause you wont see anything out the back……well, make your own mind up, heres what you`ll see. ![]() 
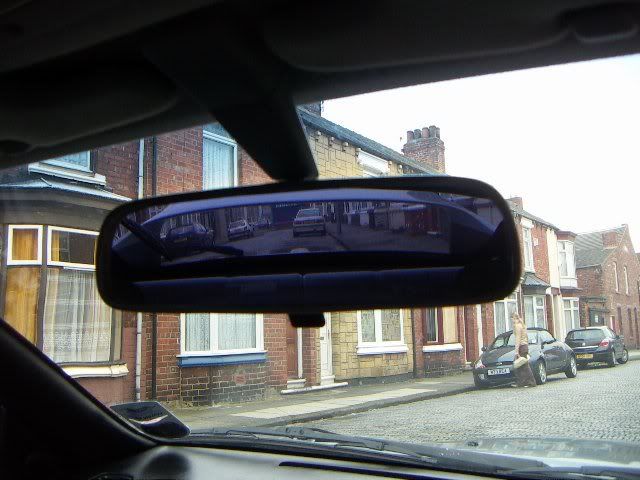
Suspension and the infamous Fig 8`s A Common problem with the super strut suspension is the Fig 8`s, these are little links that coonect the forward lower arm to the bottom of the shock absorber. They will go at around 60,000 miles I believe, and will need replacing at some point, Heres what and where they are. (please excuse the grease and mess, my CV boot went last week and I havnt had a chance to clean up after it yet) ![]() 
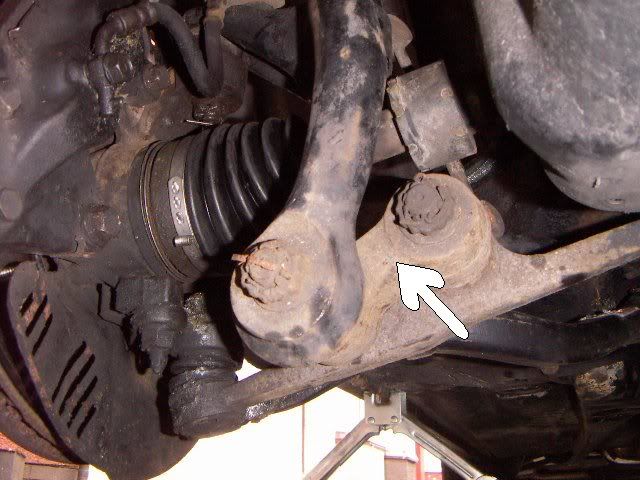
An indication that your fig 8`s have gone is a deep knocking sound when you go over bumps, or try to rotate the wheel of the car when its on the ground as normal, if they are really bad you will be able to rotate the wheel slightly, and it will move back and forth within the wheel arch. Not such a bad job to do yourself as long as you have the correct tools. Toyota unfortunately have twigged on to the fact that these “Go” and are quite expensive for what you get. Another question I have seen asked, not just here but on other forums is “where`s my track rod ends” In the picture below I have labelled all the important bits, once again replacing the track rod ends isn’t difficult. You will need a ball joint splitter, which looks like a big tuning fork, some spanners and a tape measure. ![]() 
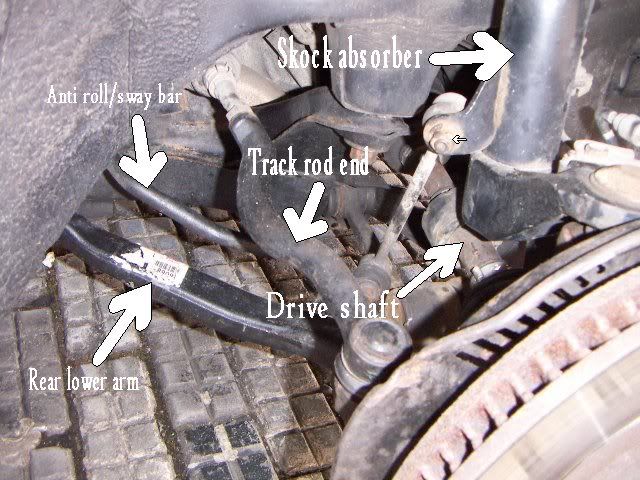
When replacing the TRE remember to measure the distance from the ball joint to a convenient immovable point on the track rod, if these distances are not the same before and after fitting a new track rod, the tracking will be out on your car and you will scrub away valuable rubber, not to mention have less car control. ![]() 
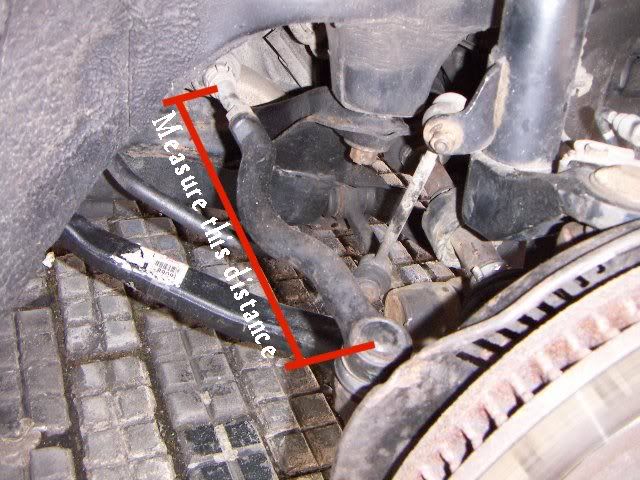
It apears that I cant post any more pics so thats all folks REMEMBER, WHEN WORKING ON CARS YOUR SAFTY IS PARRAMOUNT, NEVER WORK UNDER A CAR WITH JUST A HYDRAULIC JACK FOR SUPPORT, ALWAYS USE AN AXEL STAND. WHEN WORKING WITH FLAMABLE LIQUIDS HAVE A FIRE EXTINGUISHER HANDY, OR AT THE VERY LEAST A BUCKET OF SAND. LET SOMEONE KNOW YOU ARE WORKING ON YOUR CAR (IF ALONE) AND GET THEM TO CHECK UP ON YOU FROM TIME TO TIME. AND THE RIGHT TOOLS FOR THE JOB MAKES LIFE A LOT EASYER. HAPPY FIXING FOLKS. INSANITY. AKA NIAL. Hope that was helpful and didn’t bore you all to death. This post has been edited by Insanity-74: Apr 3, 2005 - 3:31 AM |
![]() |
|
![]() Moderator ![]() ![]() ![]() ![]() ![]() Joined Oct 1, '02 From fall river, ma Currently Offline Reputation: 13 (100%) ![]() |
great post man!
-------------------- Former Team 5SFTE pro member ;)
![]() 13.6@108MPH, 5SFTE Powered |
![]() |
|
![]() Enthusiast ![]() ![]() Joined Oct 11, '04 From Silver Spring Maryland Currently Offline Reputation: 0 (0%) ![]() |
hey quick question what does the vent right next the the intercooler that goes thourgh he engine do?
|
![]() |
|
Enthusiast ![]() ![]() ![]() Joined Dec 11, '04 From USA Currently Offline Reputation: 12 (83%) ![]() |
it cools the timing belt .. it was used in racing ..
-------------------- Old guy with the toys
95 ST205 WRC (the real deal) 94 MR2 HARDTOP Supercharged 2GR/6SPD 22 owned ![]() |
![]() |
|
![]() Enthusiast ![]() ![]() ![]() ![]() ![]() Joined Aug 30, '02 From Maryland Currently Offline Reputation: 8 (100%) ![]() |
This actually is helpfull for any celica owner. VERY good post!!!!
-------------------- Member of Team 5sfTe
|
![]() |
|
![]() Enthusiast ![]() ![]() ![]() ![]() ![]() Joined Aug 31, '02 From Philadelphia, PA Currently Offline Reputation: 8 (100%) ![]() |
someone lock this thread and sticky it!!!
-------------------- 15PSI - 30MPG - Megasquirt Tuned
|
![]() |
|
![]() Enthusiast ![]() ![]() ![]() ![]() ![]() Joined Oct 3, '02 From Va Team 6gc Currently Offline Reputation: 1 (100%) ![]() |
very informative bro, good job and thanx for taking time to do that.
-------------------- ![]() All I have in this world is my Balls and my Word and I'm not breaking em for no one,- Tony Montana Team 6gc 2005 |
![]() |
|
Enthusiast ![]() ![]() ![]() Joined Jan 9, '05 From Under the car Currently Offline Reputation: 0 (0%) ![]() |
Cheers everyone, I get alot of help and info from these forums, I thought it was about time I gave something back
![]() There will be more to follow, but I have had enough for one day. |
![]() |
|
![]() Enthusiast ![]() ![]() ![]() ![]() Joined Nov 16, '04 From UK Currently Offline Reputation: 0 (0%) ![]() |
:applause:
QUOTE(FORGMANN @ Apr 1, 2005 - 10:09 AM) it cools the timing belt .. it was used in racing .. [right][snapback]265108[/snapback][/right] Yup. Cambelt cooler. It's active on the road car as well. -------------------- JDM ST205
Blitz Spec NUR Exhaust, somewhere over $1000 Needing another one 18000 miles later, bloody annoying. |
![]() |
|
![]() Enthusiast ![]() ![]() ![]() ![]() ![]() Joined Aug 31, '02 From Philadelphia, PA Currently Offline Reputation: 8 (100%) ![]() |
timing belt cooler? i thought that was for getting cool air between the valve cover and the intercooler
-------------------- 15PSI - 30MPG - Megasquirt Tuned
|
![]() |
|
![]() Enthusiast ![]() ![]() ![]() ![]() Joined Nov 16, '04 From UK Currently Offline Reputation: 0 (0%) ![]() |
QUOTE(lagos @ Apr 1, 2005 - 6:35 PM) timing belt cooler? i thought that was for getting cool air between the valve cover and the intercooler [right][snapback]265391[/snapback][/right] Nope. Runs to a little rubber thingy that then goes to the cam belt. Odd really. -------------------- JDM ST205
Blitz Spec NUR Exhaust, somewhere over $1000 Needing another one 18000 miles later, bloody annoying. |
![]() |
|
![]() Enthusiast ![]() ![]() ![]() Joined Mar 17, '05 From Auckland, New Zealand Currently Offline Reputation: 0 (0%) ![]() |
QUOTE(lagos @ Apr 1, 2005 - 6:35 PM) timing belt cooler? i thought that was for getting cool air between the valve cover and the intercooler [right][snapback]265391[/snapback][/right] Nope. Definately cambelt. Gary -------------------- ![]() 1994 ST205 Celica GT-FOUR Group A WRC - running in new engine 1993 Rover 220 GTi tarmac rally car (under construction) 3SGE power here we come.... GT-Four spec list |
![]() |
|
![]() Enthusiast ![]() ![]() ![]() Joined Mar 17, '05 From Auckland, New Zealand Currently Offline Reputation: 0 (0%) ![]() |
...and as for the resonator box. Easy to see why it is so restrictive.
Those 4 small holes are all that allow air into the box and then on into the airbox itself. No wonder why the car goes so much better with it removed. Well worth doing whether n/a or turbo. Gary -------------------- ![]() 1994 ST205 Celica GT-FOUR Group A WRC - running in new engine 1993 Rover 220 GTi tarmac rally car (under construction) 3SGE power here we come.... GT-Four spec list |
![]() |
|
![]() Enthusiast ![]() ![]() ![]() Joined Mar 17, '05 From Auckland, New Zealand Currently Offline Reputation: 0 (0%) ![]() |
BTW Insanity - why was your car resprayed?
Gary -------------------- ![]() 1994 ST205 Celica GT-FOUR Group A WRC - running in new engine 1993 Rover 220 GTi tarmac rally car (under construction) 3SGE power here we come.... GT-Four spec list |
![]() |
|
Enthusiast ![]() ![]() ![]() Joined Jan 9, '05 From Under the car Currently Offline Reputation: 0 (0%) ![]() |
QUOTE(GT4WRC @ Apr 1, 2005 - 8:45 PM) BTW Insanity - why was your car resprayed? Gary [right][snapback]265450[/snapback][/right] It was resprayed doe to arseholes with a key. and the origional Silver paint had some discolouration |
![]() |
|
![]() Enthusiast ![]() ![]() ![]() ![]() ![]() Joined Apr 14, '03 From Long Island, N.Y. Currently Offline Reputation: 1 (100%) ![]() |
definite sticky, good stuff...thanks a lot insanity
|
![]() |
|
Enthusiast ![]() ![]() ![]() Joined Jan 9, '05 From Under the car Currently Offline Reputation: 0 (0%) ![]() |
I`ve added some more stuff about suspension. enjoy.
"Edit" - Its a shame really that this post has been left to disapear without a trace, Oh well, you live and learn. ![]() This post has been edited by Insanity-74: Apr 4, 2005 - 3:59 AM |
![]() |
|
Enthusiast ![]() ![]() Joined May 1, '04 From England Currently Offline Reputation: 0 (0%) ![]() |
Deff make this post a sticky. Look @ the time & trouble Nial has gone to to do this!
Oh, & thanks for lending your Music Maker cd ![]() ![]() Couldn't copy it though ![]() Richard -------------------- |
![]() |
|
![]() Enthusiast ![]() ![]() ![]() ![]() Joined Nov 16, '04 From UK Currently Offline Reputation: 0 (0%) ![]() |
If you want a picture of suspension parts......
![]() -------------------- JDM ST205
Blitz Spec NUR Exhaust, somewhere over $1000 Needing another one 18000 miles later, bloody annoying. |
![]() |
|
Enthusiast ![]() ![]() ![]() Joined Jan 9, '05 From Under the car Currently Offline Reputation: 0 (0%) ![]() |
QUOTE(richgt4 @ Apr 11, 2005 - 5:34 PM) Deff make this post a sticky. Look @ the time & trouble Nial has gone to to do this! Oh, & thanks for lending your Music Maker cd ![]() ![]() Couldn't copy it though ![]() Richard [right][snapback]269683[/snapback][/right] No worries mate, whenever your ready, it`ll take a while to learn all the in`s and out`s of the prog, glad it got to you OK. |
![]() |
|
Enthusiast ![]() ![]() ![]() Joined Jan 9, '05 From Under the car Currently Offline Reputation: 0 (0%) ![]() |
QUOTE(Mr_E @ Apr 11, 2005 - 6:17 PM) If you want a picture of suspension parts...... [right][snapback]269701[/snapback][/right] Hmmmmmmmm.....shiny. Next on my list of mods. |
![]() |
|
![]() Enthusiast ![]() ![]() ![]() ![]() ![]() Joined Mar 8, '04 From Newport, RI Currently Offline Reputation: 63 (99%) ![]() |
great info. Keep it comming
-------------------- |
![]() |
|
![]() Enthusiast ![]() ![]() ![]() ![]() Joined Nov 16, '04 From UK Currently Offline Reputation: 0 (0%) ![]() |
QUOTE(Insanity-74 @ Apr 12, 2005 - 2:12 AM) QUOTE(Mr_E @ Apr 11, 2005 - 6:17 PM) If you want a picture of suspension parts...... [right][snapback]269701[/snapback][/right] Hmmmmmmmm.....shiny. Next on my list of mods. [right][snapback]269915[/snapback][/right] Start saving. That bill *hurt* -------------------- JDM ST205
Blitz Spec NUR Exhaust, somewhere over $1000 Needing another one 18000 miles later, bloody annoying. |
![]() |
|
![]() Enthusiast ![]() ![]() ![]() Joined Nov 24, '04 From Moscow, russia Currently Offline Reputation: 0 (0%) ![]() |
Blin! spot on info mate
![]() but now i know what the knocking sound is from the front right when i'm in full lock (parking) and maybe my squeeking problem as well ![]() do you think that a dodgy fig 8, could account for the half inch drop i posted about the other week ? -------------------- ![]() Life is for living, and you don't get a second chance Take care now !! |
![]() |
|
Enthusiast ![]() ![]() ![]() Joined Jan 9, '05 From Under the car Currently Offline Reputation: 0 (0%) ![]() |
QUOTE(popstar @ Apr 12, 2005 - 11:52 PM) Blin! spot on info mate ![]() but now i know what the knocking sound is from the front right when i'm in full lock (parking) and maybe my squeeking problem as well ![]() do you think that a dodgy fig 8, could account for the half inch drop i posted about the other week ? [right][snapback]270334[/snapback][/right] Could be mate, havnt you managed to get that sorted yet? You`ll know if the fig 8`s are bust, you`ll be able to see movement if you get someone to rock the wheel while you stick your head under and have a look. Or youll get the knocking sound. Another cause of knocking on the st205 is the brake pads, there is a little stainless steel cross that sould be on the front of the brake caliper which holds the pads secure, these sometimes rust through and drop off, just happened on mine, took me ages to locate the knocking sound. ![]() ![]() ![]() |
![]() |
|
![]() Enthusiast ![]() ![]() ![]() Joined Nov 24, '04 From Moscow, russia Currently Offline Reputation: 0 (0%) ![]() |
Mate i hope to get it seen to this weekend !
what with work, partying and the young ladied of Moscow to keep happy..... ![]() but serously mate, i hate just go to a garage and in my bad russian try to explain about a noise, and what i think is the problem, i much prefur to go in knowing the problem and just get it fixed...... -------------------- ![]() Life is for living, and you don't get a second chance Take care now !! |
![]() |
|
![]() Enthusiast ![]() ![]() ![]() ![]() Joined Jul 19, '04 From Los Angeles, CA Currently Offline Reputation: 2 (100%) ![]() |
nice info! sticky fo sho
|
![]() |
|
Enthusiast ![]() ![]() ![]() Joined Jan 9, '05 From Under the car Currently Offline Reputation: 0 (0%) ![]() |
Fitting a Down pipe / DeCat pipe
Well here we go again….more work on the Faff. this time, how to fit a down pipe/DeCat pipe. Not sure about how many companies make Down pipes for the GT4 or whether they are interchangeable between the various models, st185/205 etc but the model in particular is the now infamous Tipo Blue ST205, the down pipe in question is one of JJ`s. (Cheers Bud) 1. My first task after receiving the FedEx tracking form (via internet) was a day in advance, liberally coat all the bolts with WD40 or GT85, whichever you prefer. Now the whole job will have been made a lot easier by the fact that not long ago (less than a week) I had a Full stainless system fitted so the down pipe to exhaust bolts shouldn’t be too hard to shift, the rest however look like age and water have joined forces to rust the bolts solid and could be a right pain in the arse. ![]() Don’t forget down the front either ![]() Whilst I’m at it, I’m going to use this opportunity to paint/polish the heat shield as well which hasn’t looked to good since the day I bought the car. I’m also going to replace all the missing/broken bolts that hold the plastic shielding under the car in place as well as check the radiator out and give the turbo a quick once over and clean. The front most radiator which cools the charge cooler water is bent out of shape and will have to be replaced at a later date. Also I’m going to re-lag the chargecooler and clean it as mentioned earlier on the original post, now that I’m getting more confident I will also clean out the intake and polish up the throttle body internals. Right after a few days of letting the WD40 do its stuff and JJ`s down pipe arrived I was ready, (WD40 produces a lot of smoke on the manifold when you forget that its soaked in the stuff, can also be quite scary too) First job was to drain the charge cooler, did this by removing one of the feed pipes from the back. Undo the 3 bolts that secure the CC to the engine, undo the vacuum pipes and level sensor wires and undo the jubilee clips on the intake. Now getting this off is a nightmare, I found the best method was to pull the front up out of the rubber `charge cooler to turbo` connector then pull towards you. While its off you may as well clean it out internally and lag the underneath, I used alloy tape from Halfrauds and several layers of fibreglass matting, costs next to nothing and is a good insulator. Put it somewhere safe out of the way. Next I removed the air box to turbo pipe and cleaned it out, cleaned the compressor side of the turbo with some carb cleaner and blocked of the holes to prevent foreign object damage to the blades etc. Now its time to remove the turbo heat shield, one of the several that there is, It is held on by 3 bolts, one right at the front and two on the top, the front one came undone no trouble at all, both the top ones sheared off. (I drilled and retapped them) With the heat shield removed I used this opportunity to polish it up, after trying several methods I decided that the best was to use a wire brush fitment for an electric drill, worked in a diagonal direction at a constant angle, this gives a really good brushed steel effect and looks quite smart, not as bling as the chromed efforts. (Not sure how long it will last before it goes rusty? Only time and bad weather will tell. ![]() ![]() Next job was to remove the radiator; I’m sure it’s not essential to do this but it makes working a lot easier and adds a surprising amount of room to the workspace. Catch all the water/coolant that comes out, as you’ll be working under the car next and its not nice stuff to lie in for several hours. To remove the radiator, start by jacking the car up, both sides and supporting on good axel stands. Remove the drivers side under tray, its held on by about 6 bolts/self tapping screws two of which are behind the front wheel, but are accessible without removing the front wheel. Here too you will find the Oil filter which is surprisingly small (if you wanted you could change the oil at this point as the filter is very easy to remove etc and everything is at hand.) Now drain the rad, the drain plug is on the driver’s side corner of the rad or you could do what I did and just remove the bottom feed pipe (you’ll require at least 4L of coolant to refill the engine later) Remove the remaining feed pipes, unclip the two fan power supplies (one on each side). Remove the small fuse box on the left of the rad (held on by 2 10mm bolts if I remember correctly) Undo the two top brackets that hold the rad in place. Now simply pull the radiator upwards, you might catch the battery tray a little on the fan housing, but it’s soft and gives way pretty easily. Store somewhere very safe (we all know how easy it is to damage a radiator.) To aid removing the rad you can also remove the snorkel to the alternator, (throw this a long way away as it’s the most pointless piece of crap I have ever seen in a car engine bay) Next remove the Lambda sensor and put it somewhere safe (they are expensive) Remove the dipstick Sit back have a beer or a coffee at this point as this is where things start getting annoying. As you can see, a fare amount of space has been created to work in. Next job is to remove some more of the heat shielding to the left of the CAT held in place by about 4 bolts, getting the bolts off wasn’t a problem, getting the heat shielding away was a proper pain in the ass, took me about 30 mins of cussing, swearing, bending and hammering to get this thing away. Be very careful as there is a sensor near the dipstick that could be damaged by this process. ![]() Now that the heat shielding is off it is time to start the process of removing the CAT itself, start by undoing the CAT to turbo bolts. There is one down the back that is a pain in the butt to get to, I had to make a special tool to remove it. Now I aint no expert at tool making so it was nothing flash but the access to the bottom most stud is very limited, couldn’t get a ring spanner or and open spanner onto it, not enough room for a socket and ratchet, after half an hour or so of head scratching and feeling like I should jack this in for a bad job, I discovered one of my old sump plug tools (from my Peugeot 205 Gti owning days) It was basically a big alan key, ground down so that the little end has a square head, this happened to fit perfectly into one of the quarter inch drive sockets that I had lying around (the 14mm one to be precise) I fashioned a little extension bar (good old bench grinder) slotted the three together and hey presto, the perfect tool to access the bottom most nut…….success. Before removing there nuts you have to disconnect the exhaust and remove the sensor from the CAT, now mine was stuck solid, I had to disconnect the cable end from the loom and remove it later, lots of WD40 and a pipe wrench needed. Now I was ready to disconnect the CAT from the car…………..bugger me this thing weighs a tonne, without a word of a lie it must weigh in at 20Kg`s if not more……..this is what you`ll be removing ![]() Carefull of them fingers when your removing it from the car. Not sure about anyone else but the CAT Conv material inside the CAT was not discoloured or damaged at all, it looks almost brand new, anyway, it`ll be kept to one side ready for reversing this job come MOT time, unless I fit a sports high flow CAT, which will be the most likely option. I don’t wanna have to do this job again. Heres the big void that`ll be left behind, don’t worry, you`ll soon fill it ![]() ![]() Now your ready for the good stuff, putting on the bling and getting it all back together again. Time for another beer. Right, as I found, putting this thing back together was a right pain in the arse. First of put the studs onto the turbo manifold, put the supporting braket onto the right side lower most bolt that secured the origional DP to the engine block but dont tighten any of the bolts up (you will probably need to modify the holes in the braket, I enlarged the right side one by about 4mm to get it to fit. Next put the downpipe on to the turbo along with its gasket, put the bolts onto the DP to exhaust flange (with the exhaust in place too) dont forget the gasket, but again, dont tighten them up. Right, now tighten up the turbo manifold studs, then the exhaust bolts and finally the braket bolts. It will probably take a bit of giggery pokery but it will fit eventually. Now your all ready to start putting everything else back together. Put the radiator back in and secure it back up, Dont foget the little fuse box. Fill it up with coolant. Put the sensor back into the bottom of the DP, I had to use a little exhaust sealant cause it `blew` ever so slightly. Connect it back up. Now carefully put the Lambda sensor back on and secure it, You`ll need to remove the little heat shield that goes around it as it obstructs the main heat shield from fitting back correctly. Put the main heatshield back on, and the Chargecooler, connect up the pipes (the two on the right hand side, and fill with more coolant. Not forgetting the little vacume pipe at the back of it. Now your pretty much ready to go. Reset the ECU as I got an error code at first. Jobs a good un. Kinda rushed through the last bit, If anyone requires any help then feel free to PM me and I`ll go through in more detail what to do. Happy downpipe fitting...Insanity. 8) The finished article ![]() & With one of Davest205`s(from the GT4oc) carbon rad panels ![]() This post has been edited by Insanity-74: Sep 16, 2005 - 10:16 AM |
![]() |
|
![]() Enthusiast ![]() Joined Jul 20, '04 From Russia, Moscow Currently Offline Reputation: 0 (0%) ![]() |
Thanks for all the info. Very useful. Great job and keep it comming.
|
![]() |
|
![]() Enthusiast ![]() ![]() ![]() Joined Nov 24, '04 From Moscow, russia Currently Offline Reputation: 0 (0%) ![]() |
Hmmm
that looks like something i can do, with a bit of help (busy Zhenya) and with no MOT i don't have to save the cat ![]() another outstanding bit of info thanks mate -------------------- ![]() Life is for living, and you don't get a second chance Take care now !! |
![]() |
|
Enthusiast ![]() Joined Nov 20, '06 From Auckland, New Zealand Currently Offline Reputation: 0 (0%) ![]() |
I just removed the intake resonator box. It seems to have made a slight improvement in acceleration, and the extra noise u can hear from the turbo spooling is awesome.
Would have been better though if the lil guide to do it, stated that the wheel had to be removed etc. It took me 1 hour to do it, from taking the wheel off, pulling off the plastic wheel arch, removing the box and then putting the wheel arch back on and the tyre back on and goin for a quick boost to make sure its fine. Good tip either way though ![]() |
![]() |
|
Enthusiast ![]() ![]() ![]() Joined Jan 9, '05 From Under the car Currently Offline Reputation: 0 (0%) ![]() |
you dont need to take the wheel off, just jack the car up a bit.
|
![]() |
|
![]() Enthusiast ![]() ![]() ![]() ![]() ![]() Joined Feb 1, '05 From Charlotte NC Currently Offline Reputation: 14 (100%) ![]() |
ACKHEM...STICKY??
![]() -------------------- |
![]() |
|
![]() Moderator ![]() ![]() ![]() ![]() ![]() Joined Oct 1, '02 From fall river, ma Currently Offline Reputation: 13 (100%) ![]() |
QUOTE(easternpiro1 @ Jan 5, 2007 - 5:46 PM) [snapback]515468[/snapback] ACKHEM...STICKY?? ![]() ....read the stickys before you post this. ![]() ![]() -------------------- Former Team 5SFTE pro member ;)
![]() 13.6@108MPH, 5SFTE Powered |
![]() |
|
Enthusiast ![]() Joined Nov 20, '06 From Auckland, New Zealand Currently Offline Reputation: 0 (0%) ![]() |
QUOTE(Insanity-74 @ Jan 5, 2007 - 10:13 PM) [snapback]515459[/snapback] you dont need to take the wheel off, just jack the car up a bit. Ive got 18" chrome mags and the cars lowered on super lows, not much clearance for me hehe. check my profile, ull see what I mean. |
![]() |
|
Enthusiast ![]() ![]() ![]() Joined Jan 9, '05 From Under the car Currently Offline Reputation: 0 (0%) ![]() |
Yep...I have 18`s aswell, and Eibach lowered suspension.....when you jack the car up, the wheel drops enough to get a stubby screwdriver in.
|
![]() |
|
Enthusiast ![]() Joined Nov 20, '06 From Auckland, New Zealand Currently Offline Reputation: 0 (0%) ![]() |
ah thats where i went wrong, the screwdriver i was using was about.. a foot long.
|
![]() |
|
![]() Enthusiast ![]() ![]() ![]() Joined Sep 29, '09 From Prince George, BC CANADA EH! Currently Offline Reputation: 8 (100%) ![]() |
SO you still think the aftermarket dump valve and breather filter are good just stay away from the bailey valve?
-------------------- ST205 Crew represent
![]() Challenge Accepted |
![]() |
|
![]() Enthusiast ![]() ![]() ![]() ![]() Joined May 4, '09 From coral springs florida US Currently Offline Reputation: 21 (100%) ![]() |
Ok so i have my engine light on and i tried to figure out the code by connecting E1 & TE1 but my check engine light didnt blink like it was supposed to. My car is a st with obd2 and the 3s obd1 this coukd be causing the light not to flash is there a differ method to read the check engine light codes? Because i tried the ecu scanner and couldnt detect any codes.
-------------------- ![]() |
![]() |
|
![]() Enthusiast ![]() ![]() ![]() ![]() ![]() Joined Oct 10, '03 From Wichita, KS Currently Offline Reputation: 5 (100%) ![]() |
Ok so i have my engine light on and i tried to figure out the code by connecting E1 & TE1 but my check engine light didnt blink like it was supposed to. My car is a st with obd2 and the 3s obd1 this coukd be causing the light not to flash is there a differ method to read the check engine light codes? Because i tried the ecu scanner and couldnt detect any codes. Sounds like whoever did your swap wiring didn't wire in the diagnostic connector correctly. You won't be able to use the code reader either. You can put a switch on the te1 and e1 wires coming out of the ECU instead... Someone here did a write up a few years back. It might be in the stickies. -------------------- ![]() Project ST204.5 99.88946% complete... |
![]() |
|
![]() Moderator ![]() ![]() ![]() ![]() ![]() Joined Oct 1, '02 From fall river, ma Currently Offline Reputation: 13 (100%) ![]() |
Ok so i have my engine light on and i tried to figure out the code by connecting E1 & TE1 but my check engine light didnt blink like it was supposed to. My car is a st with obd2 and the 3s obd1 this coukd be causing the light not to flash is there a differ method to read the check engine light codes? Because i tried the ecu scanner and couldnt detect any codes. Sounds like whoever did your swap wiring didn't wire in the diagnostic connector correctly. You won't be able to use the code reader either. You can put a switch on the te1 and e1 wires coming out of the ECU instead... Someone here did a write up a few years back. It might be in the stickies. yup, it was art. (lagos) http://www.6gc.net/forums/index.php?showtopic=37471&hl= unfortunately, he dont do it at the ecu, but in the engine bay. the idea is the same though, and would work exactly the same doing it near the ecu. just use the 3rd gen pinout diagram, and ground out the TE1 signal. -------------------- Former Team 5SFTE pro member ;)
![]() 13.6@108MPH, 5SFTE Powered |
![]() |
|
Enthusiast Joined Oct 22, '14 From Ireland Currently Offline Reputation: 0 (0%) ![]() |
If you want a picture of suspension parts...... ![]() Hi Lads, Is it possible to replace the bushing only on the front lower control arm ? The arm pictured with one bush and two ball joints ? If there is no direct replacement (Polyeuethen or spurious) is there a retro fit equivalent from and make / model ? I've an ST205 going through the equivalent of the MOT in Ireland and badly stuck to change this out, but a replacement arm is 600 !! Thanks for any help Tom |
![]() |
|
Enthusiast ![]() Joined Nov 14, '14 From greece Currently Offline Reputation: 0 (0%) ![]() |
I just did a 3sgte swap everything is OK but the ECU won't let the engine start, the engine shooting right even electrical even the fuel but the ECU probably cut it off. Why? Or maybe plus that the right cooler fan starts alone when I turn the key to ignition , does count if I don't have dumb valve plugged and I have only the anti lag valve (wrc version)
|
![]() |
|
Enthusiast ![]() Joined Feb 23, '10 From Vancouver, BC Currently Offline Reputation: 0 (0%) ![]() |
Hi Lads, Is it possible to replace the bushing only on the front lower control arm ? The arm pictured with one bush and two ball joints ? If there is no direct replacement (Polyeuethen or spurious) is there a retro fit equivalent from and make / model ? I've an ST205 going through the equivalent of the MOT in Ireland and badly stuck to change this out, but a replacement arm is 600 !! Thanks for any help Tom Cheapest way is to order them through this guy. He seems legit and I think a lot of people are using them. If you do happen to find out how to just swap the bushes/balljoints PLEASE let the rest of us know. http://gt4-racing.eu/ Hope that helps a bit. |
![]() ![]() |
Lo-Fi Version | Time is now: September 14th, 2025 - 2:35 PM |