  |

 May 10, 2009 - 1:17 PM May 10, 2009 - 1:17 PM
|
 
|
|
Enthusiast  Joined Jun 16, '07 From Vancouver, Canada Currently Offline Reputation: 14 (100%) |
A DIY FOR REPLACING YOUR DRIVER SIDE CV AXLE on a GT
(I am not a mechanic so used this guide at your own risk!) The reason why I changed my CV axle is because the boot was ripped and it made a loud clicking noise on small turns. This was done on a 1995 GT Convertible and it took me about 3 hours to do. Good luck, and I hope this helps! TOOLS & PARTS LIST - jack + jack tools - wheel block - jack stand - 1/2 ratchet + extension - 3/8 ratchet + extension - torque wrench - 14mm, 17mm, 24mm, 30mm socket - gloves - gear oil (SAE 75W-90; 2.6 litres:2.7 US qts) - cv axle (i'll get the toyota part number later because i used a aftermarket axle) - transmission seal (90311-35019) - Toyota manual - hammer (rubber preferred) - smally pry bar - pliers - two prong puller removal tool - 5mm allen key - 2 medium sizer cotter pins - towel - *a friend to help you SETUP & PREPARATION 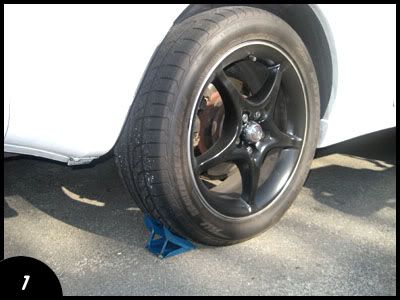 1. setup a wheel blocker (actually wheel blocker or a nice 2x4 is fine) 2. loosen wheel lug nuts with a 21mm socket 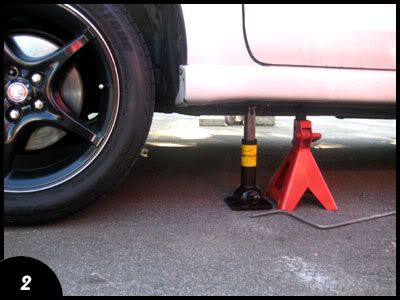 3. raise car with jack, and place a jack stand under the car for safety reasons *if you have a convertible you should unlatch your top to avoid any extra pressure that happens from jacking up your car* 4. remove lug nuts and than the wheel REMOVAL 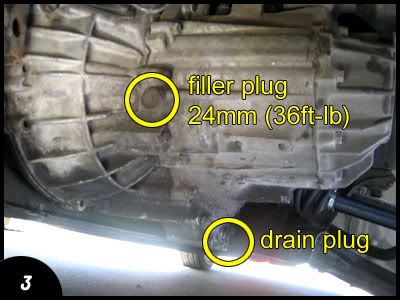 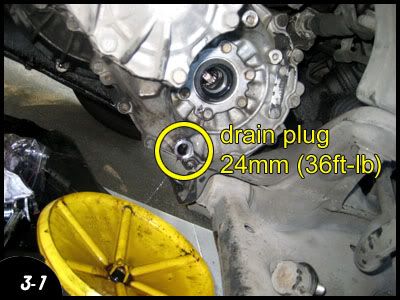 5. remove transmission drain plug with a 24mm socket and drain the fluid out 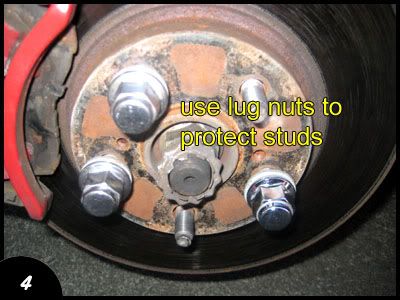 6. use your lug nuts to protect your wheel studs 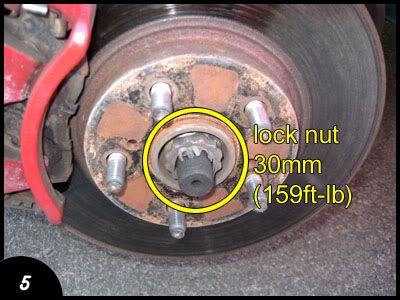 7. remove cotter pin with side cutters or pliers and than lock cap 8. loosen the bearing lock nut * I had my friend step on the brakes as i was removing the nut. I was using a 30mm socket on a 1/2 ratchet, i position the ratchet up straight and just whacked it with a rubber mallet 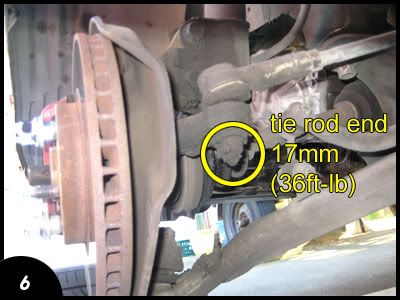 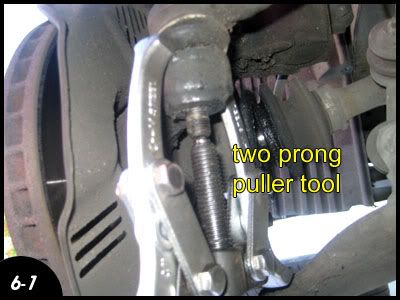 9. remove cotter pin than remove tie rod end nut from steering knuckle *using a two prong pulley removal tool I held onto the sides past the ball joints and spun the tool upwards to push out the tie rod end (picture 6-1) 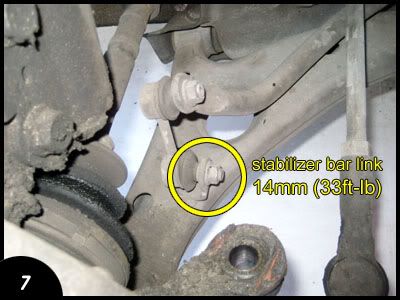 10. remove stabilizer bar link from lower suspension arm * I was able to remove the the lower one because mine is shot. I ended up removing the top one instead * I did not know this but, to remove the nut you need to first loosen the nut and than put a 5mm Allen key inside the stud to help prevent it from turning and than you remove the nut (thanks to Coomer's DIY) 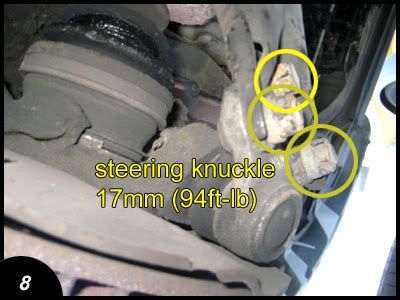 12. removing the lower ball joints nuts and bolt from the steering knuckle, remove the lock bearing nut and move the assembly to the right to have better access to the CV axle 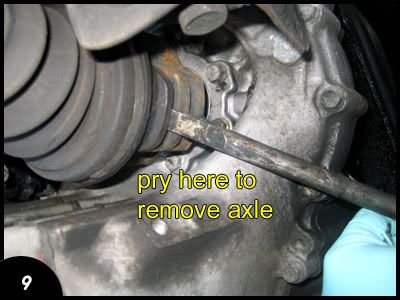 13. remove CV axle * The manual shows this is the area where your suppose to pry the CV axle to remove it. Unfortunately I wasn't able to remove it the axle with their method. I ended up prying behind the dust cover it will damage the dust cover and seal but those were going to be replaced so it didn't matter to me. *next remove the seal INSTALLATION 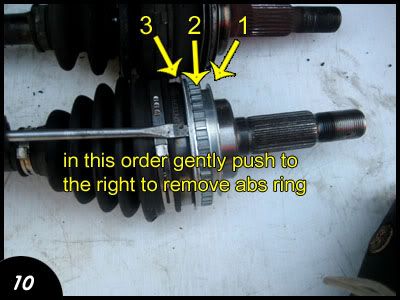 13. I dont have abs on my car so i had to remove the abs ring prior to installation (ABS RING CAN BE LEFT ON FOR INSTALLATION FOR NON ABS CELICAs) *remember to replace the dust cover once you remove the abs ring (I used the same dust ring on the original CV because it was much stronger) 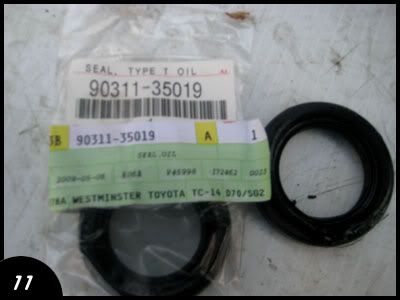 15. install new transmission seal (make sure it sits flush or just a little bit deeper, and make sure you dont twist the bead inside or else it will leak!) 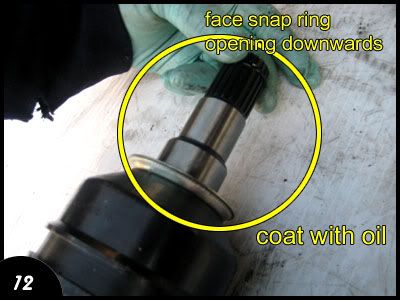 16. coat gear oil to the inboard joint tulip and differential case sliding surface 17. set the snap ring opening side facing downwards when installing the CV axle 18. install lower ball joints nuts and bolt (94ft-lbs) 19. install stabilizer bar link nut (14ft-lbs) * use can jack up your lower control arm up a bit to help make this easier to install 20. tie rod end nut (36ft-lbs), than install new cotter pin 21. install bearing lock nut (159ft-lbs), than lock and new cotter pin * same procedure as the removal, I used my friend to hold down the brakes 22. fill up your transmission fluid through the fill plug (75w-90; 2.6 litres: 2.7 US qts) (36ft-lbs) 23. take your car for a 5 min drive with lots of slow turns, check if it still clicking or any weird noises. It everything sounds good park it, and check for transmission seal leak. If that's not leaking YOUR ARE GOOD TO GO! CONGRATULATIONS! YOU JUST DID A CV AXLE REPLACEMENT!!! and you also did these along the way: transmission fluid drain and fill and a transmission seal lol FUNNY SIDE NOTES: 1. I was using Royal Purple in my transmission, I tried to remove the axle hoping that not a lot of the fluid would come out. In the end a lot came out and I ended up changing the fluid. The fluid cost 50 dollars for 3 litres. I had the Purple Royal for less than a year. 2. This time I used regular 75w-90. My opinion on Royal Purple is that it is a big waste of money because I had bought it originally to help with my 3rd gear grind. It stopped for a bit and eventually came back. Its funny because this regular gear oil has almost stopped the grind  (i can shift into 3rd A LOT easier now) (i can shift into 3rd A LOT easier now)3. This DIY took just as long to write and post as to changing my CV axle  This post has been edited by vile_v: Feb 28, 2010 - 1:24 AM --------------------  |

|
May 10, 2009 - 1:45 PM
|
|
|
Enthusiast Joined Dec 8, '08 From Australia/Hong Kong Currently Offline Reputation: 1 (100%) |
nice job .
but i think i need find a professional to do this.. |
|
May 10, 2009 - 3:15 PM
|
|
 Enthusiast Joined Apr 18, '05 From Calgary Currently Offline Reputation: 20 (100%) |
good stuff. another way to do it is to skip the removal of the stabilizer link and tie rod, but remove the caliper and the 2 lower strut bolts. i just find it easier that way..
-------------------- -------------------------------------------------------------------------------- -------------------------------------------------------------------------------- |
|
May 10, 2009 - 5:22 PM
|
|
|
Moderator Joined Oct 1, '02 From fall river, ma Currently Offline Reputation: 13 (100%) |
you can remove the axle once the wheel is off with just doing step#5 then #8, and #9 and moving the whole strut assy twoard the rear of the car to get the axle out.
other than that, great write up! -------------------- Former Team 5SFTE pro member ;)
 13.6@108MPH, 5SFTE Powered |
|
May 10, 2009 - 6:32 PM
|
|
|
Enthusiast Joined Jun 16, '07 From Vancouver, Canada Currently Offline Reputation: 14 (100%) |
The reason why I did it this way is because its easier to maneuver the whole assembly with the tie rod out and its also easier to move the lower control arm once the stabilizer bar is disconnected.
This is also the way its done by the Toyota book, but yeah both way work just as well. -------------------- |
|
May 10, 2009 - 7:08 PM
|
|
|
Enthusiast Joined Feb 11, '09 From south chi burbs Currently Offline Reputation: 0 (0%) |
wow thanks alot man, perfect timing.
I JUST ordered my driverside cv axle. And JUST realized my passenger side is busted too... lol... |
|
May 10, 2009 - 9:46 PM
|
|
|
Enthusiast Joined Apr 24, '08 From Orange County, CA Currently Offline Reputation: 33 (100%) |
nice write up. and what presure 2 said you dont really need to unconnect the tie rod, or sway bar link to get the axle out.
i have st sway bars, and you have stock. So you could probably push down the lower arm by urself. Its harder though if you have st sway bars, cause they so stiff it makes it hard to push down the arm by urself. You can also use a crow bar to hold the wheel from moving around when you take off the bearing lock nut. -------------------- Group buy to replicate Narrow E series transaxle parts
http://www.6gc.net/forums/index.php?showto...p;#entry1107514 Items for Sale: http://www.6gc.net/forums/index.php?showto...p;#entry1107572 |
|
May 11, 2009 - 4:40 PM
|
|
 Enthusiast Joined May 6, '05 From PA Currently Offline Reputation: 4 (100%) |
nice write up, this could have saved me a lot of trouble
-------------------- |
|
May 13, 2009 - 9:52 AM
|
|
|
Enthusiast Joined Mar 15, '07 From Tennessee Currently Offline Reputation: 52 (100%) |
when i did 5 and 6, iended up messing the lug nuts.
now i just havge somebody depresse the brakes, and is doable this way. -------------------- Learned a lot in 10 years... I hardly log in anymore, last login Today Sept 6 2019, and I was forced just to clarify a post. LOL
If you PM me and I dont respond, dont fret or cry. Im alive, better post your questions in the thread below, maybe I log back in 2grfe Swapped... Why I chose the 2GR, before you ask read here... A great civilization is not conquered from without until it has destroyed itself from within. @llamaraxing in Instagram is the best way to find me. I hardly log here anymore. |
|
May 21, 2009 - 10:21 AM
|
|
|
Enthusiast Joined Feb 18, '07 From Calgary, Alberta Currently Offline Reputation: 0 (0%) |
what makes it so hard to pry these axles, i had the same problem with not being able to pry that way. good write up, i was looking for one of these like a year ago when i did mine. has anyone found a better way to pry at it? i need to do mine today to get ready for my 1998 5SFE, woot!
|
|
May 21, 2009 - 12:07 PM
|
|
|
Enthusiast Joined Oct 23, '08 Currently Offline Reputation: 24 (100%) |
the only way i was able to get mine out was to pry in 2 places at once. i think when you pry in just the one spot you tweak the cv to the side just enough that it gets stuck.
This post has been edited by bmj67: May 21, 2009 - 12:08 PM |
|
May 21, 2009 - 12:23 PM
|
|
 Enthusiast Joined Feb 7, '07 From Portland, Oregon Currently Offline Reputation: 67 (96%) |
While you're in there, it's a good idea to replace the oil seal on your tranny - ask for the Axle Shaft Seal when getting the part. I learned the hard way that this should be replaced while you've got it all apart. When I went to replace it just this past weekend because my tranny's been leaking since I did my clutch a few months ago, I drained literally less than half a bottle of tranny fluid out. Bad times.
Turns out the part is easy to find thoughToyota sold me the ENTIRELY wrong seal, of course I only realized this once everything was all apart, but NAPA had one in stock. This was also a great time to learn that Synchromesh IS DEFINITELY the way to go for transmission fluid. I bought the NAPA Premium fluid because I didn't have time to run around to another place for Synchromesh, and I'm THOROUGHLY unhappy with the notchiness of the shifter now. I will be draining it and replacing it w/Synchromesh the first chance I get. It shifted SO much more smoothly when I had it in there. --------------------  |
|
May 21, 2009 - 8:05 PM
|
|
|
Enthusiast Joined Apr 24, '08 From Orange County, CA Currently Offline Reputation: 33 (100%) |
i bought motul 75-90 $10 a bottle st only takes 2.7 quarts to the tranny. that stuff is expensive....
-------------------- Group buy to replicate Narrow E series transaxle parts
http://www.6gc.net/forums/index.php?showto...p;#entry1107514 Items for Sale: http://www.6gc.net/forums/index.php?showto...p;#entry1107572 |
|
May 22, 2009 - 2:43 PM
|
|
|
Enthusiast Joined Jan 25, '06 From MN Currently Offline Reputation: 19 (100%) |
Royal Purple Tranny fluid $18 a bottle I bought 5 just in case almost $100 DIY tranny flush w/new axle I also broke 2 pry bars going at it. It'll come out it just might take awhile thats all lol.
Edit: New axle seals are a must if you plan on prying it out just a FYI. 
This post has been edited by Remy: May 22, 2009 - 2:43 PM -------------------- "To Protect And To Serve The Wealthy" -POLICE
|
|
May 22, 2009 - 10:48 PM
|
|
|
Enthusiast Joined Jun 16, '07 From Vancouver, Canada Currently Offline Reputation: 14 (100%) |
QUOTE (Remy @ May 22, 2009 - 12:43 PM)  Royal Purple Tranny fluid $18 a bottle I bought 5 just in case almost $100 DIY tranny flush w/new axle I also broke 2 pry bars going at it. It'll come out it just might take awhile thats all lol. Edit: New axle seals are a must if you plan on prying it out just a FYI. You only need 3 bottles. and wow the price has gone up =S I was using royal purple when I did my tranny drain and fill. I noticed a improvement in the shifting smoothness in the 2nd month and after that my tranny was grinding in 3rd gear every time I shifted and I could barely down gear. This time I used regular 75w-90, well I got it free from work and you know what its sooo much smoother! I think royal purple is crap. -------------------- |
|
May 25, 2009 - 10:31 AM
|
|
|
Enthusiast Joined Feb 18, '07 From Calgary, Alberta Currently Offline Reputation: 0 (0%) |
i couldnt get mine out by prying both sides. I pried on the side shown on the service menu and got my brother to hammer a bar into the opposite side to force it out. all you need is a pry bar one one side and a pipe to hammer out the shaft on the other. soo much faster.
|
|
Feb 23, 2010 - 9:56 PM
|
|
|
Enthusiast Joined Feb 19, '08 From Missouri Currently Offline Reputation: 0 (0%) |
Got the new shafts in. I only took off the three ball joint nuts/bolt and pried the lower arm down. I didn't need to disconnect the tie rod or sway bar so that saved a lot of time. I used a large pry bar set between the dust shield of the drivers side shaft and the tranny and with one hit of a mallet the shaft came right out. I did have a bit of a time getting the passenger side bearing to break free from the mount though. 2 and a half hours from start to finish minus putting the splash shields back on...I broke a few rusted bolts so those will stay off until I can get some new nut plates and machine bolts. Thanks for the DIY thread...helped a lot!!
|
|
Apr 12, 2010 - 5:54 PM
|
|
 Enthusiast Joined Mar 6, '04 From Charlotte, NC Currently Offline Reputation: 9 (100%) |
Alright guys, having a bit of trouble with replacing my Driver's Side CV Axle. I spent the better part of the afternoon fighting with the stupid thing and couldn't get it of the the hub even after disconnect the vast majority of the hub and surrounds. I finally gave up and started prying at the dust cover closest to the transmission and succeed in popping that off - only problem is the tulip joint is still in the tranny.
I've tried prying it out using the breaker bar that comes with the car, a long flat-head screwdriver, and various other long flat-ended tools to pry this stupid thing out. No dice. Any suggestions or am I just SOL? BTW, this is on an A140E auto tranny. -------------------- Has no more Celicas
|
|
Apr 12, 2010 - 6:14 PM
|
|
|
Enthusiast Joined Apr 18, '05 From Calgary Currently Offline Reputation: 20 (100%) |
it takes a bit of improvising to get the breaker bar/screw driver or whatever it is you're using.. in a position where you get good leverage. then hit the bar with a hammer with all you've got!
it just takes one fast hard pull and the axle will pop out
-------------------- -------------------------------------------------------------------------------- -------------------------------------------------------------------------------- |
|
Apr 12, 2010 - 6:29 PM
|
|
|
Enthusiast Joined Mar 6, '04 From Charlotte, NC Currently Offline Reputation: 9 (100%) |
You're so right azian.
I knocked it once real good with my prybar and rubber mallet then pulled it right out by hand. Guess it just took a little bit more patience. Also: for those of you with auto trannys, did you have to change your tranny seal? Mine will not come out... This post has been edited by Keiri: Apr 12, 2010 - 6:45 PM -------------------- Has no more Celicas
|
|
Apr 13, 2010 - 8:34 AM
|
|
|
Enthusiast Joined Feb 19, '08 From Missouri Currently Offline Reputation: 0 (0%) |
Change them with both trannys. You can borrow a seal puller from a local auto parts store. It looks like a "T" with a claw on one end. It takes a little prying but the hardest part is trying to find a way to get the handle to rotate over center with everything in the way. Don't use a flat head screwdriver or anything of the sort or you will scratch the housing. Talking to the tech, he said that you can cut the seal with a knife, pull the spring out, and yank on the seal that way...just be sure not to gouge the walls or you might have a leak later on.
|
|
Apr 13, 2010 - 9:36 AM
|
|
|
Enthusiast Joined Mar 6, '04 From Charlotte, NC Currently Offline Reputation: 9 (100%) |
Ok, bought a seal puller and got it out no problem this morning. I put the new one in and am attempting to put the new CV axle in but it just seems to enter just beyond the seal but no further. I have the snap ring facing downward as I try and slide the axle in but I'm afraid to shove hard on the boot for fear of tearing or ripping it. What's the best way to get this new axle in? Thanks for your patience and help guys...I know my ineptitude is irritating.
This post has been edited by Keiri: Apr 13, 2010 - 9:36 AM -------------------- Has no more Celicas
|
|
Apr 13, 2010 - 9:55 AM
|
|
 Enthusiast Joined Mar 8, '08 From Orlando, Florida Currently Offline Reputation: 14 (100%) |
QUOTE (Keiri @ Apr 13, 2010 - 10:36 AM) Ok, bought a seal puller and got it out no problem this morning. I put the new one in and am attempting to put the new CV axle in but it just seems to enter just beyond the seal but no further. I have the snap ring facing downward as I try and slide the axle in but I'm afraid to shove hard on the boot for fear of tearing or ripping it. What's the best way to get this new axle in? Thanks for your patience and help guys...I know my ineptitude is irritating. i had the same trouble. I used a big crow bar and put it on the inner .... metal thing with the grooves, lol. and then i wacked it really really hard with a heavy hammer on the crowbar and it began to go in. You gotta be really tough with it or it wont move. This post has been edited by samir0189: Apr 13, 2010 - 9:56 AM -------------------- ◊◊◊ My F/S Thread! ◊◊◊
QUOTE (14:19:21) Daniel: That was a JDM hole in the side of the box too. There was so much JDM trapped inside that box that they couldn't contain it, so they had to put a JDM hole in the box to let the JDM out. QUOTE Ferdi says (11:29) No, it looks like a hooker put her acid vag on your hood. Acid vag = bigger problem than a few dings. |
|
Apr 13, 2010 - 11:08 AM
|
|
|
Enthusiast Joined Dec 30, '09 From Wilmington, NC Currently Offline Reputation: 1 (100%) |
Here's a tip I used when pulling my axles, when removing my engine.
I also tried to pry the **** out of it and distorted the dust cover etc.. If you wrap a ratchet strap around the axle as close as u can to the trans, then wrap the other end around the strut, or something solid enough to hold tension. You just tighten up the strap a reasonable amount (you don't have to crank it down like crazy, just so u know there's tension on it) and then pry quickly or in my case use a screwdriver and give a little tap to push it outward. It'll pop right out. |
|
Apr 13, 2010 - 7:15 PM
|
|
|
Enthusiast Joined Feb 19, '08 From Missouri Currently Offline Reputation: 0 (0%) |
QUOTE (Keiri @ Apr 13, 2010 - 9:36 AM) Ok, bought a seal puller and got it out no problem this morning. I put the new one in and am attempting to put the new CV axle in but it just seems to enter just beyond the seal but no further. I have the snap ring facing downward as I try and slide the axle in but I'm afraid to shove hard on the boot for fear of tearing or ripping it. What's the best way to get this new axle in? Thanks for your patience and help guys...I know my ineptitude is irritating. I had to turn the pass side axle a little to get the splines to line up in the diff. It should slide in a little, then line up the splines and push hard. It will slide in some more and then I used a pry bar to force the snap ring in place. There is a definite pop that you will hear to be sure the snap ring is seated. |
|
Aug 30, 2011 - 8:01 PM
|
|
|
Enthusiast Joined Apr 29, '03 From lynn,ma Currently Offline Reputation: 0 (0%) |
quick questions,
Is the seal the same on both drivers and passenger side? and the seal listed in the DIY i noticed on champ toyota as a 1997-1999. it should be the same for the 94 right?? |
|
Aug 30, 2011 - 9:53 PM
|
|
|
Enthusiast Joined Jun 16, '07 From Vancouver, Canada Currently Offline Reputation: 14 (100%) |
Yes they should the same for both sides. The years should work throughout too! This is for the S54 Transmission though...
-------------------- |
|
Sep 15, 2011 - 5:49 PM
|
|
|
Enthusiast Joined Jul 24, '08 From Canoga Park CA. Currently Offline Reputation: 0 (0%) |
QUOTE (vile_v @ Aug 30, 2011 - 10:53 PM) Yes they should the same for both sides. The years should work throughout too! This is for the S54 Transmission though... I want to say gracias for this thread I just changed my passenger side manual trans cv axle on a 1997. I saved time by using azian's advice back in this thread and the darn thing came right off. Problem was on a 97 manual tranny you have to remove the holding bracket(support) off the engine in order to get your arm in to take out and replace the seal(the Toyo guy said left and right seals are different). I recommend the t shaped seal remover as it was only 10 bucks at orielys and the seal came out in 10 seconds. It took a longer to mess with the support bracket and clean than it took to get the axle off and on. With this method I did not have to take apart any ball joint. Also if you tip your car you will only loose 1 quart of fluid so you can still drive your car with 1.7 quarts in an emergency. I am waiting for the left side to go but it is ok for now. I am just throwing a few details of the passenger side since everyone talks about driver side. ps. Before pulling out the axle make sure to remove the two bolts holding the support bearing to the bracket. This post has been edited by xrav22: Sep 16, 2011 - 11:21 AM |
|
Sep 16, 2011 - 5:28 AM
|
|
|
Enthusiast Joined Apr 29, '03 From lynn,ma Currently Offline Reputation: 0 (0%) |
oh wellz, got the same seals for both side and it seem to fit fine. just waiting for my axle to come in from the pass side.... i think it got damage during shipping as the spindle came out of the housing lol..
|
|
Oct 29, 2011 - 1:59 PM
|
|
|
Enthusiast Joined Jul 26, '08 From Fort Bragg, NC Currently Offline Reputation: 2 (100%) |
so did we even get a resolution are the seals the same or different?
--------------------  |
|
Nov 4, 2011 - 10:20 PM
|
|
|
Enthusiast Joined Apr 29, '03 From lynn,ma Currently Offline Reputation: 0 (0%) |
QUOTE (foxcraze @ Oct 29, 2011 - 11:59 AM) so did we even get a resolution are the seals the same or different? fits well, so yea the same i guess |
|
Nov 9, 2012 - 8:33 PM
|
|
|
Enthusiast Joined Sep 19, '11 From TX Currently Offline Reputation: 0 (0%) |
Just wanted to say thank you for taking the time to make this how to article! I just changed the passenger side axle in a 98 GT convertible. The provided torque specs are a nice touch, considering I don't own a manual for this car.
This post has been edited by Pyrotechnic: Nov 9, 2012 - 8:33 PM |
|
Nov 27, 2012 - 5:28 PM
|
|
|
Enthusiast Joined Mar 8, '12 From Hanford/Fresno, Ca Currently Offline Reputation: 20 (100%) |
QUOTE (vile_v @ May 10, 2009 - 11:17 AM) 8. loosen the bearing lock nut * I had my friend step on the brakes as i was removing the nut. I was using a 30mm socket on a 1/2 ratchet, i position the ratchet up straight and just whacked it with a rubber mallet If you don't have a friend or another body to help out. Another method is to put the rim back on. Make sure you take off the center cap so you can have access to the axle nut with your axle socket. Put on at least three lug nuts(make sure they're tightened) in a "V" shape but it'll be safer with all 5. Put the car off the stands and break the axle nut loose(ONLY LOOSEN!!!). Loosen the lug nuts(ONLY LOOSEN!!!). Jack the car back up. Take the lug nuts and the rim off. Since the axle nut is loosen. You can either try to spin it with your hand or use the socket. What I did was got a 1/2" ratchet with an extension pipe as a breaker bar and I also used the 30mm axle socket which can be loaned from AutoZone. This post has been edited by ILoveMySilly97: Nov 27, 2012 - 5:30 PM -------------------- |

|
May 29, 2013 - 8:28 PM
|
|
|
Enthusiast Joined Mar 8, '12 From Hanford/Fresno, Ca Currently Offline Reputation: 20 (100%) |
Passenger side was easy but the driver side....I'm completly stuck. I have the same problem as this guy. Yes I ripped off my axle like he did too. I tried every trick and brute force I can think of. Already tored my seal and bent the crap out of my dust shield already.
http://www.youtube.com/watch?v=0GC8WS3KSD8 -------------------- |
|
May 30, 2013 - 7:34 AM
|
|
|
Enthusiast Joined Nov 29, '07 From Colorado Currently Offline Reputation: 4 (100%) |
For what it's worth, first time I did this involved several hours of prying.
Second time, I just got an axle puller set with the side hammer, and was able to use the bearing puller part of it to get enough of a grip on the axle, and got it out in a few 'hammers'. Recommended. I guess it's just that much better of an angle of attack. -------------------- 2019 M2, 2005 S2000, 1997 4Runne
|
|
May 30, 2013 - 1:02 PM
|
|
|
Enthusiast Joined Mar 8, '12 From Hanford/Fresno, Ca Currently Offline Reputation: 20 (100%) |
Yea. Now I'm waiting on the axle seal and the cv axle slide hammer attachment. -_-
-------------------- |
|
Nov 13, 2013 - 4:06 PM
|
|
|
Enthusiast Joined Sep 19, '11 From TX Currently Offline Reputation: 0 (0%) |
Once again, I'm checking in to say thanks for this article. About a year ago I changed my passenger side axle, and not too long after that the drivers side starting making noise. I finally got around to changing the drivers side yesterday and again this thread was a big help.
The one thing that was tough about the job was the snap ring. I tried prying it out, but like someone else said in this thread I think all that does it tweak it to side and then it gets stuck. I went to AutoZone and borrow their slide hammer and CV puller tool, but upon getting home I found out that because the cv joint is recessed into a pocket on the transmission, you can't get the puller tool behind it (1998 2.2L Automatic). I then watched this video http://www.youtube.com/watch?v=0GC8WS3KSD8 and I was sold on the idea. The problem is, I didn't have a welder and the job needed to get done in one day. So I came up with a much sloppier version of it. The pictures show it all. I found that the CV housing had some grooves near the edge which was the perfect place for the jaws of the vise grips to grab on to. Once it was clamped on, I found out that in the rear most part of the vise grip jaws, there's enough room to get a link of chain in there. I then rigged up the chain to the slide hammer using the useless claw tool as a big washer. A few solid whacks of the slide hammer and it came right out. I did place a thick towel over the chain so that if the whole thing went flying it would settle quickly. The only downside to this is it only works if you plan to replace the axle.   
This post has been edited by Pyrotechnic: Nov 13, 2013 - 4:07 PM |
|
1 User(s) are reading this topic (1 Guests and 0 Anonymous Users)
0 Members:
| Lo-Fi Version | Time is now: July 28th, 2026 - 10:23 PM |