  |
 Sep 28, 2010 - 9:23 AM Sep 28, 2010 - 9:23 AM
|
|
|
Enthusiast  Joined Sep 24, '10 From Maryland Currently Offline Reputation: 0 (0%) |
trying to start a thread on painting (all inclusive) and bodywork (removing dents, etc.) because, well I want to learn it and im sure there are tons of viewers wondering/wishing the same thing.
If you have bodywork/Paint know-how, share here! -------------------- same skidpad grip as a 2006 M3....stock. 'nuff said
|
 Sep 28, 2010 - 10:03 AM Sep 28, 2010 - 10:03 AM
|
|
|
Enthusiast      Joined May 10, '10 From MA Currently Offline Reputation: 37 (100%) |
to just add onto this thread;
does anyone know what would be good to use for molding on SS and rear splitters? |
 Sep 28, 2010 - 7:57 PM Sep 28, 2010 - 7:57 PM
|
|
|
Enthusiast   Joined Apr 23, '06 From Rochester, NY Currently Offline Reputation: 8 (100%) |
im going to be molding my duckbill spoiiler to my hatch in a week or so.
i would recommend using a fiberglass/resin type filler for the basic shape, then using a lightweight body filller (evercoat dynalite or such) or a glazing putty to finish it up. the fiberglass will just build up quicker, and its stronger. but it sands much harder. thats why i would use the glaze or regular body filler over the top..just my reccomendation. Erich |
 Sep 28, 2010 - 9:40 PM Sep 28, 2010 - 9:40 PM
|
|
|
Enthusiast    Joined Feb 14, '09 From Mid West Currently Offline Reputation: 7 (100%) |
The thought has come up lately--I think I will **try** to fix some rust-out with some fiberglass resin & " sheets " of 'glass
where the doors are getting bad. Recently, I did a project for another car using resin & 'glass sheets to repair a T-top headliner. Turned out pretty good! This post has been edited by Bigblock: Sep 28, 2010 - 9:41 PM |
 Sep 29, 2010 - 6:57 PM Sep 29, 2010 - 6:57 PM
|
|
|
Enthusiast   Joined Apr 23, '06 From Rochester, NY Currently Offline Reputation: 8 (100%) |
if the rust hasn't yet eaten through the metal, use a wire wheel to strip the rust/paint away, then start your repair. and before painting, use some self-etch/wash primer(has acid that will "bite" into the metal to prevent rusting later.
however, if it HAS rusted through the entire piece of metal, and your not planning on cutting/welding pieces to fill the hole, patch what you can with the fiberglass/resin, and hope for the best. Good luck. btw, my doors on my new 96 gt hatch are doing the same thing. right at the bottom. the 94 gt hatch is slowly becoming my parts car. so ill take them off of that. This post has been edited by Badkarma: Sep 29, 2010 - 6:58 PM |
 Sep 29, 2010 - 7:40 PM Sep 29, 2010 - 7:40 PM
|
|
|
Enthusiast      Joined May 10, '10 From MA Currently Offline Reputation: 37 (100%) |
I need to fix up the rust on my drivers quarter panel. I might get another piece of metal welded in and then line the inside and outside with fiberglass. That would make it pretty much rust proof, right?
|
 Sep 30, 2010 - 1:39 AM Sep 30, 2010 - 1:39 AM
|
|
 Enthusiast      Joined Mar 16, '09 From New York Currently Offline Reputation: 23 (100%) |
I agree with everything badkarma said, I recently sent someone a big huge Pm on some of the stuff and ill just copy and paste it, below.
Also ►Click here for my side skirt molding thread◄ And ►Click Here for my painting thread◄ Also keep in mind i had NO previous body work experience, so I showed and tried to explain exactly what i did, and dont do. ▼ Here is a PM I sent answering some of the questions as well ▼ Anyhow, its kind of dependent on the rust. When I molded my skirts, Bot my doors were rusted as well. The bottom "rear" of the door had a spot about the size of a quarter that was rusted right through, so I used a grinder and cut it right out (if its rusted through theres no real saving it) Then I used some bondo (its MUCH easier to "shape" than glass) The only thing with bondo is let it "cure" for at least a day before you paint it, because it shrinks ever so slightly as it cures. And if the paint is on it, it will not shrink totally with the bondo, so it will leave an "air bubble" behind it. Also do not let water (rain) come in contact with bondo.I know that sounds pretty complicated and what not, just let it dry a day and then paint. I didnt go to bare metal when i molded the skirts. I suppose it would technically be better, I just went to the primer as I did with the rest of the car. I molded the rear the same way in the beginning of the spring, and its been fine, so i can say its fine that way smile.gif And with the molding of my skirts, thats a HUGE process, with a ton! of fiberglass and bondo, because the gaps were 5"+ in some spots. But as far as molding a kit made for the celi, bondo is my recommendation. Its very easy to work with. You have about 10 mins to work with it, and its an easy clean up. Resin is like impossible to clean from brushes, accidental spills, the ground, and the containers you use. I heard people also say so use "plastic filler" (its like bondo, but i hate! using it, just not my thing) Because bondo can crack. But again mines been done for like 8 months on the rear and its been fine, just what ive heard. Any questions just ask man, ive made alot of mistakes thats why i can tell you what to do...and more importantly what not to do laugh.gif -------------------- |
 Sep 30, 2010 - 6:55 AM Sep 30, 2010 - 6:55 AM
|
|
 Enthusiast      Joined Oct 7, '09 From Northern kentucky Currently Offline Reputation: 8 (90%) |
as far as body work goes never ever use more than a 1/4 inch of bondo, that is just asking for trouble
-------------------- 1996 Toyota Celica Project Mean Green
3RD Gen 3SGTE WRC Edition W/LSD E153 - Love BOOST <3 2001 Solar yellow Lexus IS300 2001 Dodge ram 1500 Off-road edition |
 Sep 30, 2010 - 7:59 AM Sep 30, 2010 - 7:59 AM
|
|
|
Enthusiast  Joined Sep 24, '10 From Maryland Currently Offline Reputation: 0 (0%) |
I agree with everything badkarma said, I recently sent someone a big huge ..... I knew there had to be a thread where someone did this, but this is good stuff, and Im suprised how fast and how much info is already surfacing in this thread! Makes me wana just strip the car now and blow my paycheck on paint supplies...haha this will be another long term project. Ill start small for now, like a panel or bumper or something. Still have some rust I have to take care of too. A few dents in a few of the panels, do I just pull off the panel and hammer it out as best as I can? and with the plastic bumpers, is there any extra precautions I should take (since its not metal)? -------------------- same skidpad grip as a 2006 M3....stock. 'nuff said
|
 Sep 30, 2010 - 8:59 AM Sep 30, 2010 - 8:59 AM
|
|
 Enthusiast      Joined Oct 7, '09 From Northern kentucky Currently Offline Reputation: 8 (90%) |
as far as larger dents go you will need basic autobody tools, dollys, hammers etc, as well as a stud welder and a slide hammer to pull the dents
-------------------- 1996 Toyota Celica Project Mean Green
3RD Gen 3SGTE WRC Edition W/LSD E153 - Love BOOST <3 2001 Solar yellow Lexus IS300 2001 Dodge ram 1500 Off-road edition |
 Oct 12, 2010 - 11:34 AM Oct 12, 2010 - 11:34 AM
|
|
|
Enthusiast  Joined Aug 15, '10 From UK Currently Offline Reputation: 0 (0%) |
I think this should be relevant...I have got a quick DIY on how to remove the quarter side windows and window drip rail if it helps.
I shall post it in the extterior section for all to see asap. Cheers. |
 Oct 14, 2010 - 1:29 AM Oct 14, 2010 - 1:29 AM
|
|
|
Enthusiast      Joined Feb 1, '05 From Charlotte NC Currently Offline Reputation: 14 (100%) |
callmejb has some body work experience went to school for it for a bit maybe hit him up on here?
-------------------- |
 Oct 14, 2010 - 8:07 PM Oct 14, 2010 - 8:07 PM
|
|
|
Enthusiast  Joined Aug 15, '10 From UK Currently Offline Reputation: 0 (0%) |
I have alot of experience in terms of bodywork, spraying etc...I can put up a few write ups on small dent repair, radio antenna hole smoothing, bonnet road rash re-spray all with pictures.
The only problem is I work with HVLP spray guns, compressors, air fed masks, that maybe alot of people don't have...but is could give some information on how it's done and what's involved. |
 Oct 14, 2010 - 8:14 PM Oct 14, 2010 - 8:14 PM
|
|
|
Enthusiast      Joined May 10, '10 From MA Currently Offline Reputation: 37 (100%) |
I have alot of experience in terms of bodywork, spraying etc...I can put up a few write ups on small dent repair, radio antenna hole smoothing, bonnet road rash re-spray all with pictures. The only problem is I work with HVLP spray guns, compressors, air fed masks, that maybe alot of people don't have...but is could give some information on how it's done and what's involved. If you could do that, I would appreciate it so much! I think Coomer should make a section on the forum dedicated to just body work. Even though it is considered "Exterior Styling" it should have it's own section because exterior styling is leaning more towards hoods, bumpers, lights, and etc, but there is just so much about body work and I don't think exterior styling could handle it. Also, the fact that the site would be a little messier with it in there as well. That's just my thought on it though |
 Oct 15, 2010 - 10:06 AM Oct 15, 2010 - 10:06 AM
|
|
 Enthusiast      Joined Oct 7, '09 From Northern kentucky Currently Offline Reputation: 8 (90%) |
im actually going to do some fitting work on my front splitters now, should have pics up soon
-------------------- 1996 Toyota Celica Project Mean Green
3RD Gen 3SGTE WRC Edition W/LSD E153 - Love BOOST <3 2001 Solar yellow Lexus IS300 2001 Dodge ram 1500 Off-road edition |
 Oct 18, 2010 - 4:29 PM Oct 18, 2010 - 4:29 PM
|
|
 Enthusiast      Joined Oct 7, '09 From Northern kentucky Currently Offline Reputation: 8 (90%) |
So the Splitters have been fixed, only had real problems with both front splitters and the back driver side (not sure if rear is due to repair from accident or not. but molding your splitters does not have to mean that they are permanent attached to the car, i will tell you all exactly how i did all of this, i will be doing alot of work here soon relating to this thread, including painting as soon as money allows.
MOLDING SPLITTERS (im still out of town so pictures will soon follow) First is first, mark where the top of your splitters meet the body of your car, now remove your splitters then tape 2 inches above the splitter and up to 4 inches below Now take a look at your splitters and hold them up to the car and see how they line up when they are not attached, you may need to use a dremel or similar to grind away at the fiberglass of the splitter untill it looks like it sits flush in that area, or maybe your holes you orginally drilled did not work, check those and redrill if needed( i know mine needed alot removed on the the back so it would fit right) sand down the splitters with 100 grit sand paper where the bodyfiller will be in contact with the splitter to ensure it will stick Now bolt your splitters back up to the car making sure the tape covers enough area so you will not get bodyfiller on your paint Mix bodyfiller with hardner making sure you have a uniform color and no streaks Apply bodyfiller with plastic spatula or something similar to get in all the cracks you are trying to fill, but just remember bodyfiller is a big PITA, add more bodyfiller if needed Wait about 4 or 5 hours maybe more depending on how much filler you use, and carefully unbold splitters and slowly pull the splitter off trying to bring the tape with it, just remember if you break it you will have to go back and do it again so dont be in a hurry more to come..... -------------------- 1996 Toyota Celica Project Mean Green
3RD Gen 3SGTE WRC Edition W/LSD E153 - Love BOOST <3 2001 Solar yellow Lexus IS300 2001 Dodge ram 1500 Off-road edition |
 Oct 18, 2010 - 4:43 PM Oct 18, 2010 - 4:43 PM
|
|
|
Enthusiast      Joined May 10, '10 From MA Currently Offline Reputation: 37 (100%) |
So I do have a question, where is the best place to buy fiberglass and the resin, as well as bondo?
Edit: Also, what is the best type? I'm going to be molding my rear splitters on in the spring, and my skirts before winter, hopefully. This post has been edited by mkernz22: Oct 18, 2010 - 4:44 PM |
 Oct 18, 2010 - 4:50 PM Oct 18, 2010 - 4:50 PM
|
|
 Enthusiast      Joined Oct 7, '09 From Northern kentucky Currently Offline Reputation: 8 (90%) |
well you can buy it anywhere, i have seen it at home depot, walmart, most auto stores, bondo is not a bad brand, but go to an auto store that specializes in paint, you will pay a bit more, i have only used bondo brand though
-------------------- 1996 Toyota Celica Project Mean Green
3RD Gen 3SGTE WRC Edition W/LSD E153 - Love BOOST <3 2001 Solar yellow Lexus IS300 2001 Dodge ram 1500 Off-road edition |
 Oct 18, 2010 - 5:11 PM Oct 18, 2010 - 5:11 PM
|
|
|
Enthusiast      Joined May 10, '10 From MA Currently Offline Reputation: 37 (100%) |
ohh alrightt
what i'm thinking about doing is filling the gap with some putty, then fiberglass over that, and then put some putty or bondo down and sand it and shape it so that it's really flush. correct me if i'm wrong with that though. Also, I'll talke to Pressure2 (Manny) cause he works at Maaco and knows a lot about body work |
 Oct 18, 2010 - 5:30 PM Oct 18, 2010 - 5:30 PM
|
|
 Enthusiast      Joined Oct 7, '09 From Northern kentucky Currently Offline Reputation: 8 (90%) |
as long as it is not over a 1/4 in gap you should have no problem using bondo, and it is easier to work with and cheaper than fiber glass
-------------------- 1996 Toyota Celica Project Mean Green
3RD Gen 3SGTE WRC Edition W/LSD E153 - Love BOOST <3 2001 Solar yellow Lexus IS300 2001 Dodge ram 1500 Off-road edition |
 Oct 18, 2010 - 5:37 PM Oct 18, 2010 - 5:37 PM
|
|
|
Enthusiast      Joined May 10, '10 From MA Currently Offline Reputation: 37 (100%) |
could i use bondo to fill the small gaps, then fiberglass over it, then bondo over the fiberglass in the uneven spots to create a smooth, but strong area?
|
 Oct 18, 2010 - 5:47 PM Oct 18, 2010 - 5:47 PM
|
|
 Enthusiast      Joined Oct 7, '09 From Northern kentucky Currently Offline Reputation: 8 (90%) |
what gaps are you talking about
-------------------- 1996 Toyota Celica Project Mean Green
3RD Gen 3SGTE WRC Edition W/LSD E153 - Love BOOST <3 2001 Solar yellow Lexus IS300 2001 Dodge ram 1500 Off-road edition |
 Oct 18, 2010 - 5:52 PM Oct 18, 2010 - 5:52 PM
|
|
|
Enthusiast      Joined May 10, '10 From MA Currently Offline Reputation: 37 (100%) |
on the passenger side SS there's about a 1/4 to a 1/2 inch gap so I need to fill that in and there's a small one on the driver's side, but it's not as big
|
 Oct 18, 2010 - 6:01 PM Oct 18, 2010 - 6:01 PM
|
|
 Enthusiast      Joined Oct 7, '09 From Northern kentucky Currently Offline Reputation: 8 (90%) |
Try and use a heat gun first to fit it better, or it could be a problem with your mounting point, dont use bondo unless you absolutely have to
-------------------- 1996 Toyota Celica Project Mean Green
3RD Gen 3SGTE WRC Edition W/LSD E153 - Love BOOST <3 2001 Solar yellow Lexus IS300 2001 Dodge ram 1500 Off-road edition |
 Oct 18, 2010 - 6:11 PM Oct 18, 2010 - 6:11 PM
|
|
|
Enthusiast      Joined May 10, '10 From MA Currently Offline Reputation: 37 (100%) |
my holes that i drilled were a tad bit off
|
 Oct 18, 2010 - 9:59 PM Oct 18, 2010 - 9:59 PM
|
|
 Enthusiast      Joined Oct 7, '09 From Northern kentucky Currently Offline Reputation: 8 (90%) |
it will be easier to fix the holes, like i said you dont want to use body filler if you do not have to
Can anyone confirm the quailty of these buffing pads, and anyone have a favorite rubbing compound? http://cgi.ebay.com/ebaymotors/3-WAFFLE-FO...#ht_4185wt_1165 -------------------- 1996 Toyota Celica Project Mean Green
3RD Gen 3SGTE WRC Edition W/LSD E153 - Love BOOST <3 2001 Solar yellow Lexus IS300 2001 Dodge ram 1500 Off-road edition |
 Oct 19, 2010 - 6:10 AM Oct 19, 2010 - 6:10 AM
|
|
|
Enthusiast  Joined Aug 15, '10 From UK Currently Offline Reputation: 0 (0%) |
Having looked at the waffle pads on your EBay link...they look similar to the 3M pad system.
It terms of rubbing/polishing compounds I would try to use a quality system from a company like 3M, Meguirs or Menzerna. These quality items break down perfectly when using either a rotary or DA buffer. Just be careful using a compound as it is easy to burn through your paint and put deep swirl marks into your paint. It is always best to try the least aggressive option first...eg a polish like 3M Ultrafina. If that doesn't do the job then try a slightly more aggressive option like 3M Extra Fine compond...and then lastly the most aggressive option would be 3M Fast Cut. The Fast Cut is really only for heavily oxidised paintwork or after wet sanding bodywork. The Extra Fine is great for removing swirl marks or holograms in your paint. The Ultrafina is great for final finish. |
 Oct 19, 2010 - 7:01 AM Oct 19, 2010 - 7:01 AM
|
|
|
Enthusiast  Joined Aug 15, '10 From UK Currently Offline Reputation: 0 (0%) |
Just another quick note...unless you are in the detailing business, there is no need to buy large quantities either.
A lot of bodyshop items like this come in 1 litre sizes which is fine for the trade. You should be able to get a 250ml sample of the compound/polish which should be able to cover 3 or 4 cars worth. |
 Oct 19, 2010 - 10:34 PM Oct 19, 2010 - 10:34 PM
|
|
|
Enthusiast      Joined Jan 29, '07 From Hoyt Lakes, MN Currently Offline Reputation: 11 (100%) |
What do you guys do about them small dings then? Just fill it in with body filler?
-------------------- 98 Celica gt red- totaled deer
94 Celica st black DD (bad weather beater)- totaled deer 95 Celica gt silver- chassis sold 88 Celica All-Trac (Burned to a crisp) 94 Celica gt white (sold) In need of a rust free chassis!!!! |
 Oct 19, 2010 - 10:53 PM Oct 19, 2010 - 10:53 PM
|
|
 Enthusiast      Joined Oct 7, '09 From Northern kentucky Currently Offline Reputation: 8 (90%) |
just all depends on how bad they are, small dings just sand it wherever your going to put the filler in and then fill it with a body filler, larger dings you need to try and beat out or fiberglass then bondo, like i have said before, never use any body filler more than a 1/4 inch deep
-------------------- 1996 Toyota Celica Project Mean Green
3RD Gen 3SGTE WRC Edition W/LSD E153 - Love BOOST <3 2001 Solar yellow Lexus IS300 2001 Dodge ram 1500 Off-road edition |
 Oct 20, 2010 - 7:16 AM Oct 20, 2010 - 7:16 AM
|
|
|
Enthusiast  Joined Aug 15, '10 From UK Currently Offline Reputation: 0 (0%) |
Small Dings...tell me about them! lol
Here is an example of the small dents I had on my Celica prior to spraying primer...the passenger side was even worse. 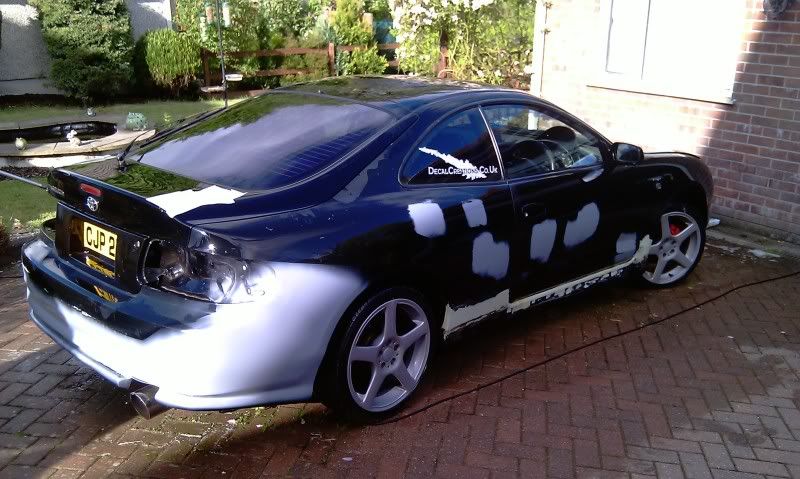
|
 Oct 20, 2010 - 7:55 AM Oct 20, 2010 - 7:55 AM
|
|
|
Enthusiast  Joined Aug 15, '10 From UK Currently Offline Reputation: 0 (0%) |
Here is the basic process of removing small dents and dings in your bodywork. Please excuse the photos...I have taken them from a couple of jobs I have done on my car. The first few are from my "deleting radio aerial hole" and progresses to some side shots of the car being sanded...but it shows you the process.
Basically it runs like this: 1. Use a de-greaser and remove surface contaminants....sand area down with 80 grit sandpaper. This creates the perfect key for bodyfiller. 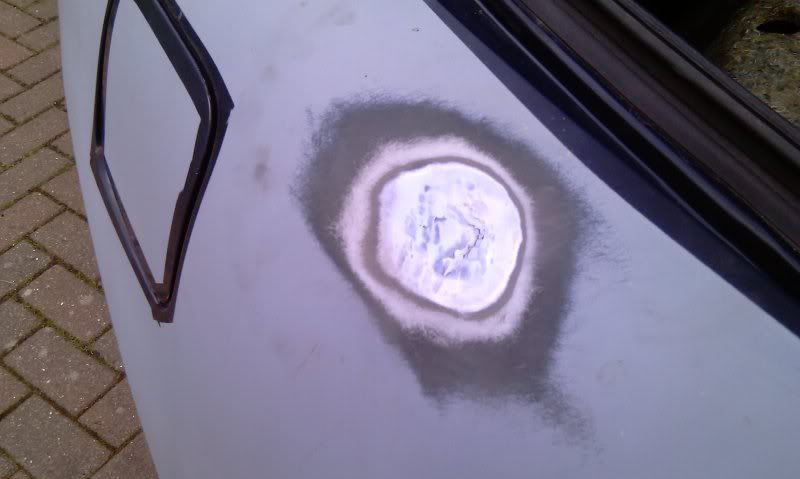 2. Again use a de-greaser to remove sanding dust. Apply bodyfiller over area and beyond the repair area to help feather it into body. 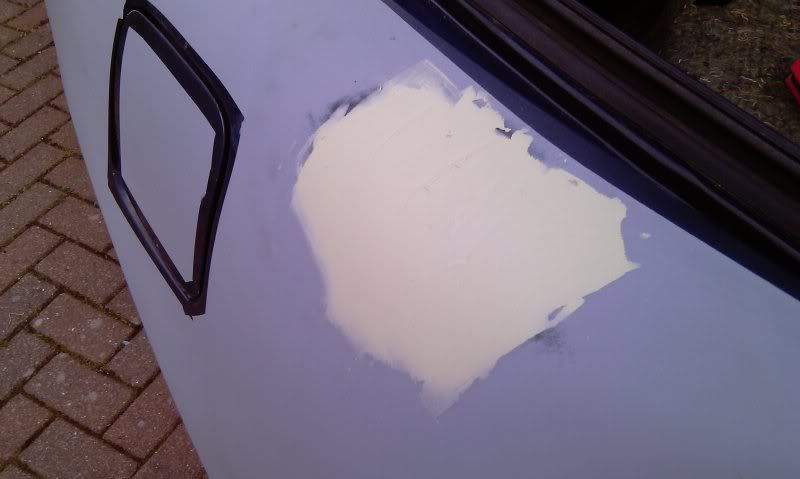 3. Start sanding with 80 Grit sandpaper to get bodyfiller roughly flat then progress into 120 sandpaper to feather out edges of bodyfiller. 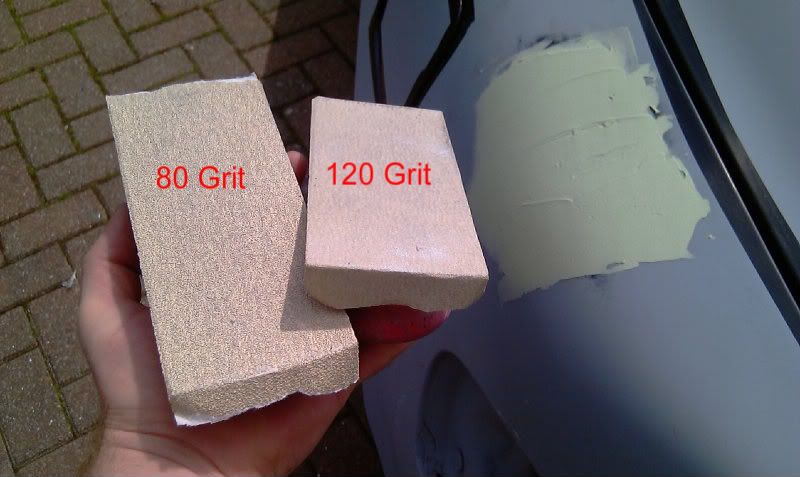 4. Here you can see the edges are feathered out nicely...the edges start to turn milky (you can see the underneath colour coming through). You can also see the slightly darker colour of the bodyfiller in the middle...this is a low spot in the repair area. 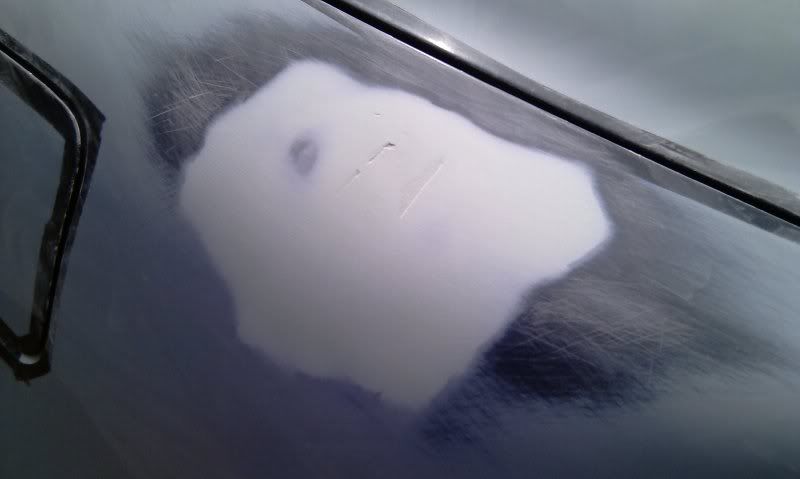 5. The low spot areas need another coat of bodyfiller. 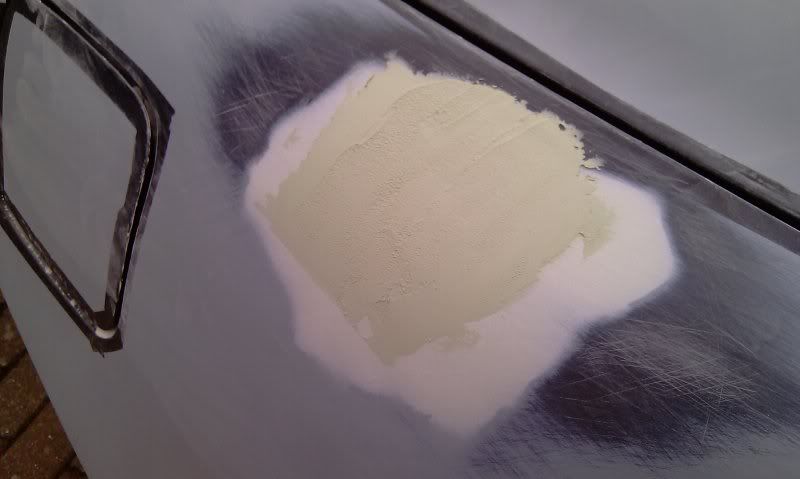 6. Repeat sanding with 80 grit then 120 grit as previous. 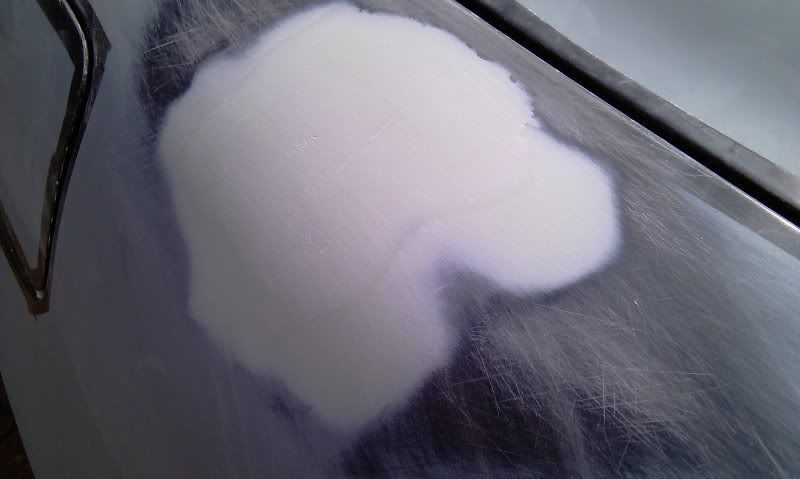 7. Next is to use a spot putty or pin hole bodyfiller...this is to fill in tiny little holes in the bodyfiller. These are caused by tiny pockets of air in the bodyfiller, which when sanded through leaves tiny holes. Normal bodyfiller would be too thick to fill without creating alot more sanding work. 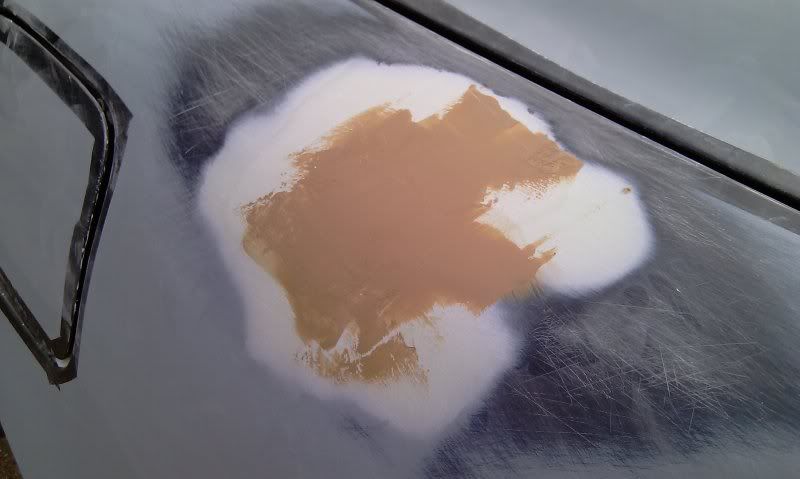 8. Progress with some more sanding...this time use 240 to 320 grit sandpaper which is perfect to get bodywork ready for spraying primer. Make sure the edges again turn milky to help blend repair area into existing body. 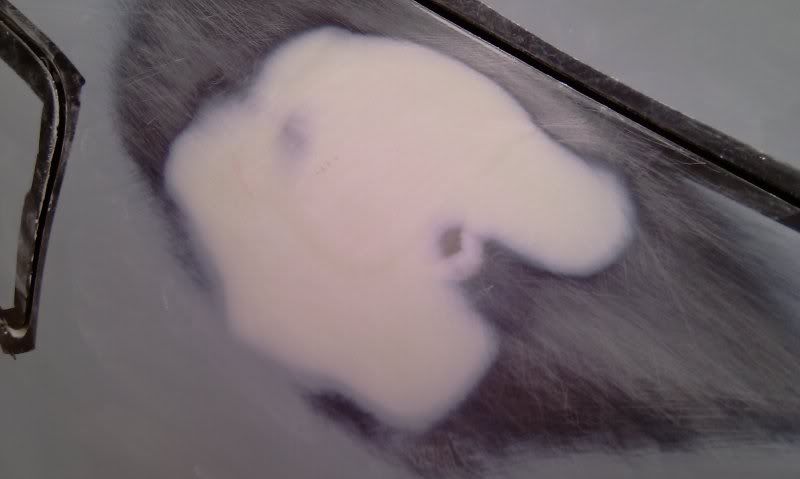 9. Here you can see the sanding to the surrounding area as well...this is done using 320 grit sandpaper. 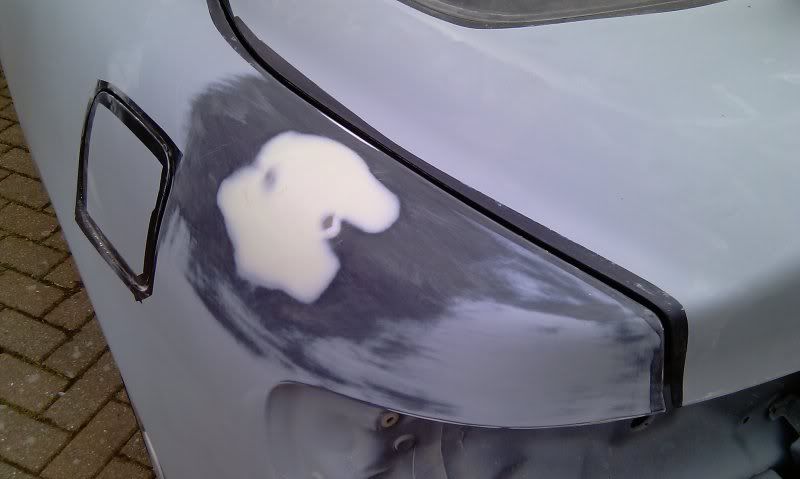 10. Tape off the area to be sprayed in primer. 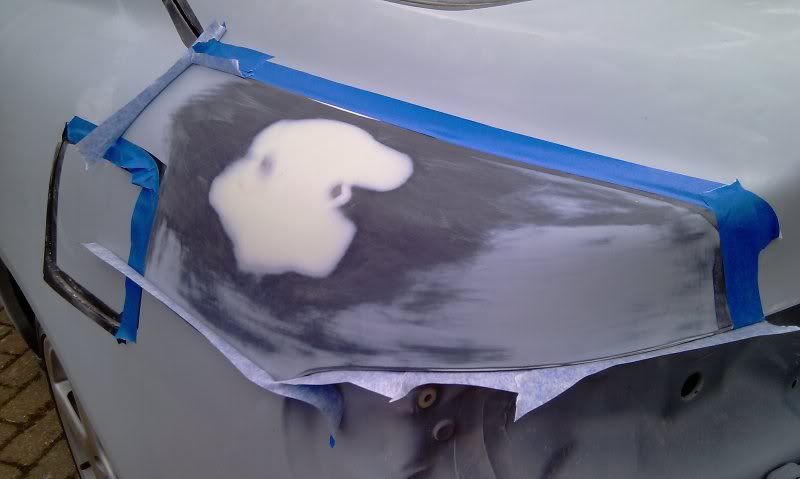 11. Take your time and spray 3 coats of primer...with about 10 mins in between to allow the solvents to flash off (evaporate off). Here you can see the bodywork is still seen under the first coat of primer. 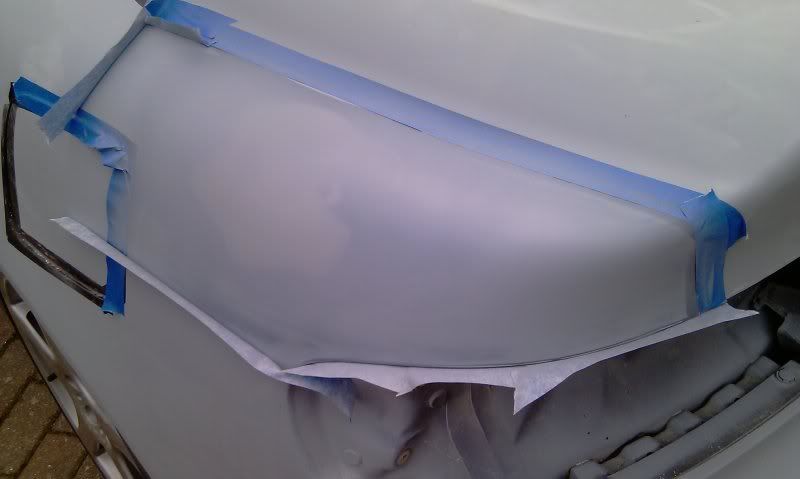 12. Here is the final area in full primer ready for next step. 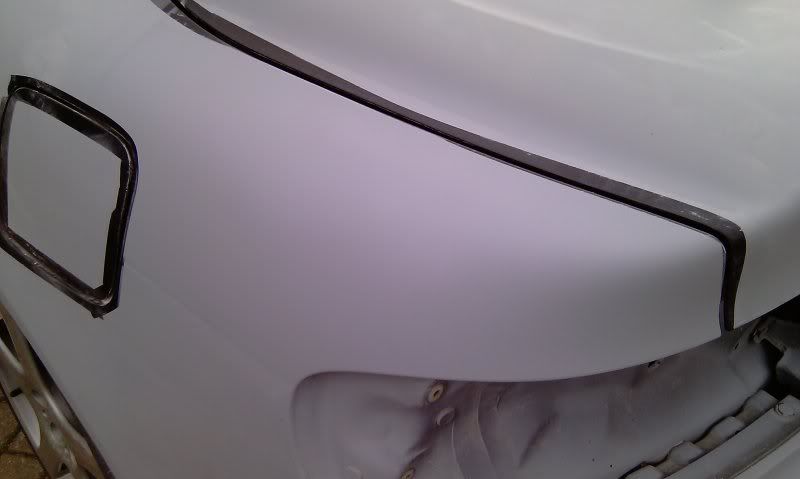 13. Right so the bodywork looks good and perfectly flat...but your eyes can lie. The next step is to use a "guide coat"...I use 3m guide coat but a light coat of black paint can be also used. Here is the guide coat applied to the area. 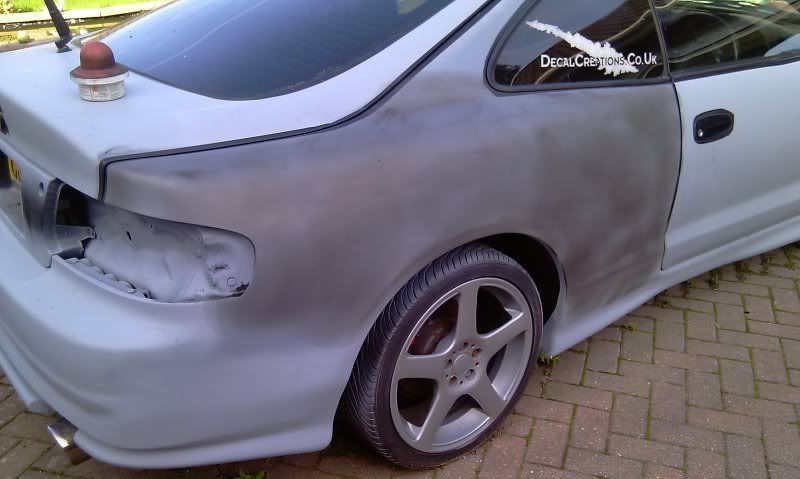 14. You need to use a sanding block to sand perfectly flat...sanding in an X pattern will help highlight any low spot. 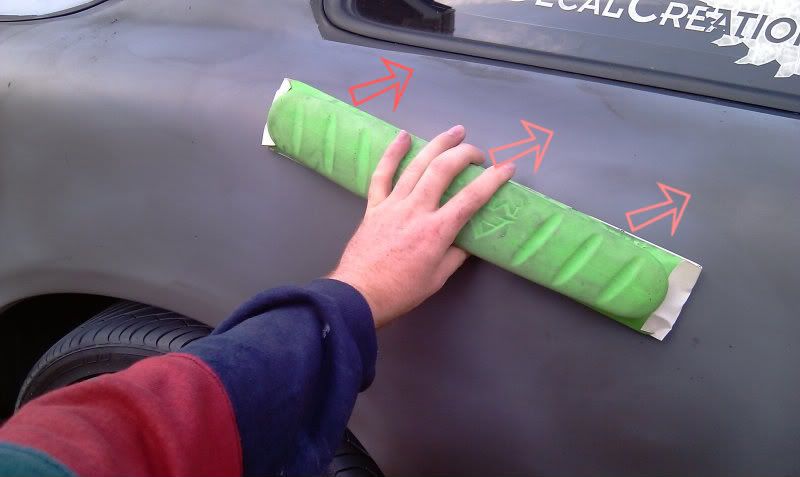 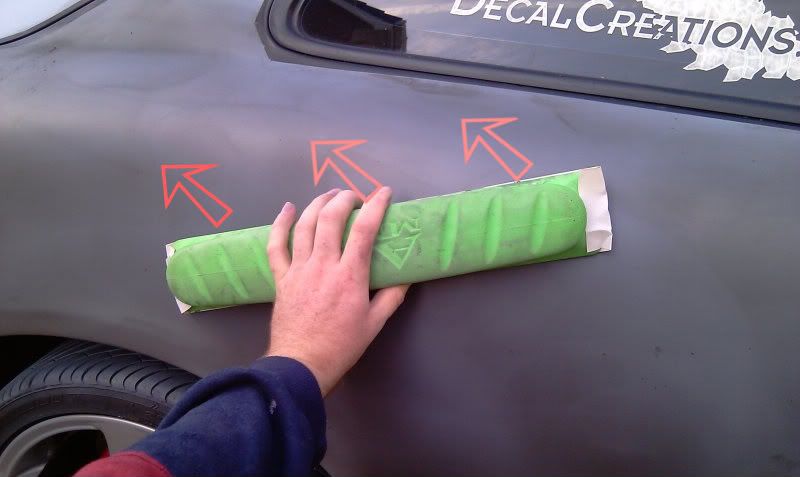 15. The guide coat is sanded off and you can just make out a low spot in the bodywork where the guide coat remains. 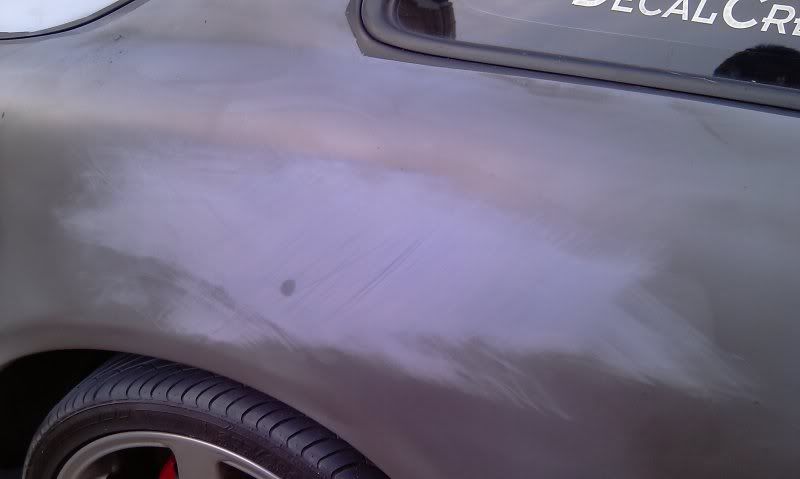 16. Another shot of the missed low spot in the bodywork. To repair this...you can apply a thin layer of spot putty, re-sand and re-prime it. 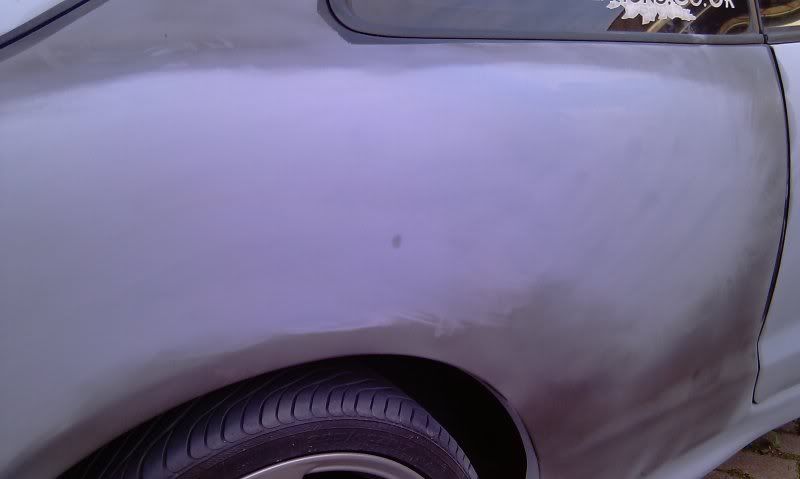
|
 Oct 20, 2010 - 7:43 PM Oct 20, 2010 - 7:43 PM
|
|
 Enthusiast      Joined Apr 20, '06 From Florida Currently Offline Reputation: 44 (100%) |
AWESOME^ write up and pics, I learned a few new tricks and I've done body work a few times. Thanks for the addition to the thread!
|
 Oct 20, 2010 - 9:19 PM Oct 20, 2010 - 9:19 PM
|
|
|
Enthusiast  Joined Aug 15, '10 From UK Currently Offline Reputation: 0 (0%) |
You are very welcome...I can put a number of DIY articles ranging from Scratch/Gouge repair, Paint blending, Bonnet Rock Chip fix to info on what grades of sandpaper to use on filler, primer, paint and clear etc etc.
The only problem is by adding onto this thread it is all going to get lost in one big thread. I think it has been mentioned previously by someone else, possible the best solution is adding a new section alongside Exterior Section so DIY articles can easily be added and searched easily. |
 Oct 21, 2010 - 8:33 AM Oct 21, 2010 - 8:33 AM
|
|
 Enthusiast      Joined Oct 7, '09 From Northern kentucky Currently Offline Reputation: 8 (90%) |
just go ahead and add it, we will just get it all together and then eventually we can close the thread, make a new one and hope for a sticky
-------------------- 1996 Toyota Celica Project Mean Green
3RD Gen 3SGTE WRC Edition W/LSD E153 - Love BOOST <3 2001 Solar yellow Lexus IS300 2001 Dodge ram 1500 Off-road edition |
 Oct 21, 2010 - 8:46 AM Oct 21, 2010 - 8:46 AM
|
|
|
Enthusiast      Joined May 10, '10 From MA Currently Offline Reputation: 37 (100%) |
would you be able to make a writeup on molding the Skirts on by chance?
Also, that is a great writeup on the dings and the antenna hole removal! |
 Oct 21, 2010 - 5:18 PM Oct 21, 2010 - 5:18 PM
|
|
|
Enthusiast  Joined Aug 15, '10 From UK Currently Offline Reputation: 0 (0%) |
would you be able to make a writeup on molding the Skirts on by chance? Also, that is a great writeup on the dings and the antenna hole removal! Thanks and you are welcome...I will have a look into my photos and see what I can find for the sideskirt blending. Just a note on the antenna hole removal...I welded a round piece of sheet metal to fit the hole perfectly. The first pic in the above write up shows my welding ground down to sit flush with the existing body. |
 Oct 21, 2010 - 5:46 PM Oct 21, 2010 - 5:46 PM
|
|
|
Enthusiast  Joined Aug 15, '10 From UK Currently Offline Reputation: 0 (0%) |
Additional photos for antenna hole smoothing....
1. Remove Antenna from boot interior side...cut out piece of sheet metal to fit JUST inside the antenna hole. 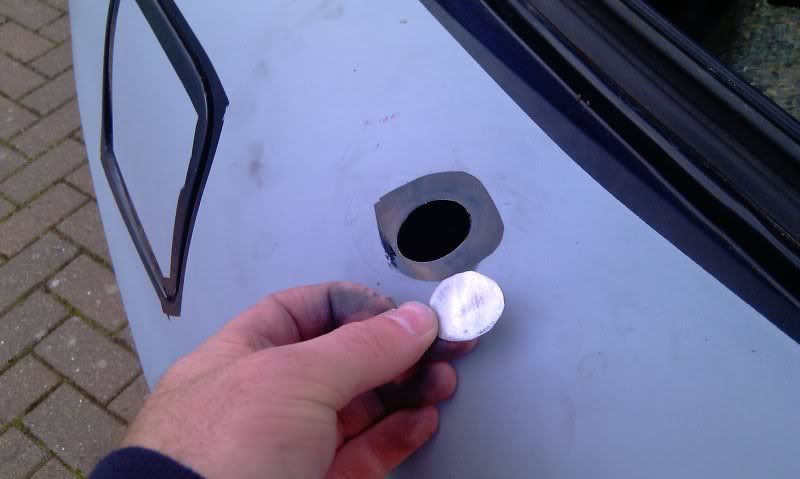 2. Prepare the antenna hole for welding by sanding edges with 80 Grit sandpaper. 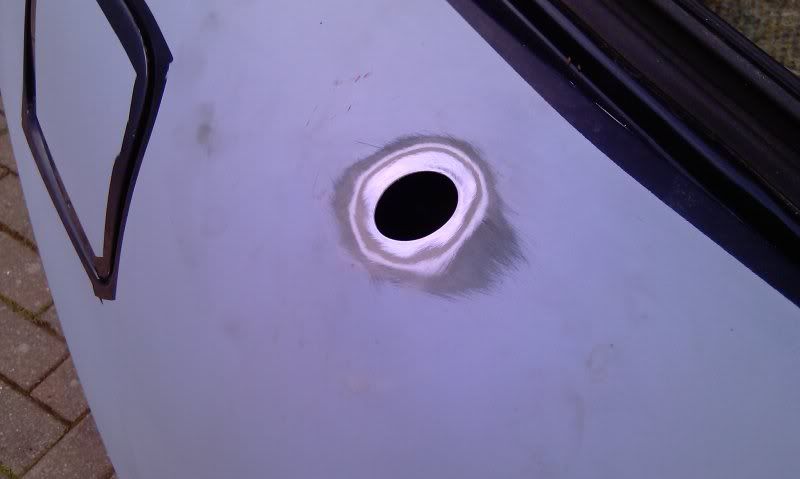 3. Using a Welding Magnet (or normal magent)...hold sheet metal into place ready to weld. 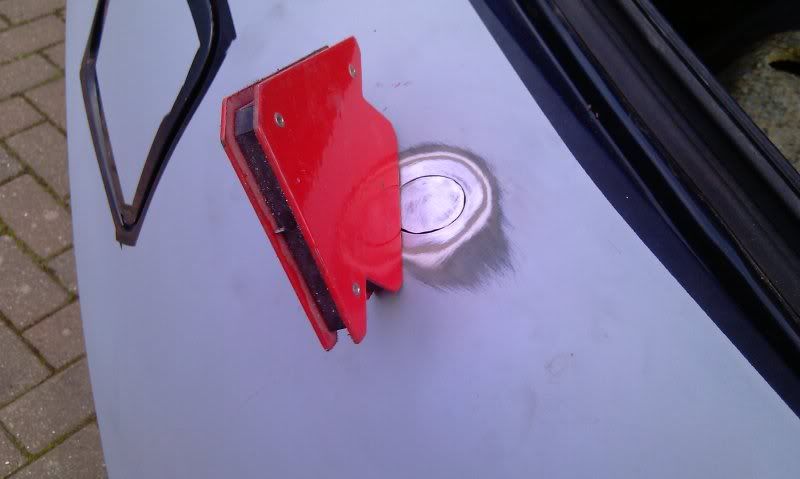 Then proceed to the bodywork procedure as above. |
 Oct 21, 2010 - 6:31 PM Oct 21, 2010 - 6:31 PM
|
|
|
Enthusiast  Joined Aug 15, '10 From UK Currently Offline Reputation: 0 (0%) |
Sorry but I couldn't find any photos of the process I used to blend the side skirts in...the following link is similar:
http://www.mx6.com/forums/2g-faq-appearanc...mpiliation.html Here is the outline of what I did: 1. Totally degrease the area where the side skirts hit the body. 2. Mount the side skirts underneath the car. 3. Where the side skirts hit the body...you need to sand the body with 80 Grit sandpaper...only to scuff the area...not to bare metal. 4. Degrease and sand the edges of the sideskirt that hit the body. 5. Apply some automotive adhesive to both the side skirts edges and the body...in the UK I use Tiger Body Sealant...it stays slightly flexible to prevent cracking in furture. 6. Press side skirt onto body...try to maintain pressure on the sideskirt and leave to set up for 24 hours. 7. Prepare the blending area on car body with 80 Grit sandpaper...again not to bare metal. 8. Using Fibreglass Bodyfiller, apply a layer starting from the top edge of sideskirt directly upwards until it hits the horizontal bodyline on the Celica. Hopefully you can see the bodylines I have blended the sideskirts onto. 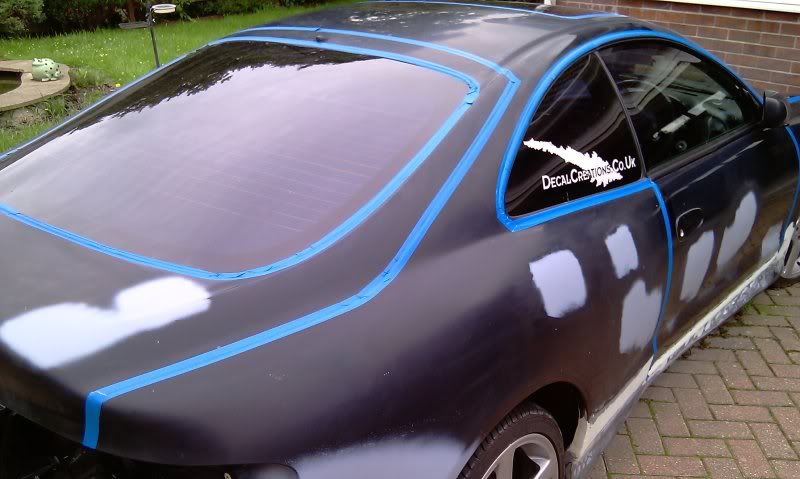 9. Once dry...sand using 80 Grit sandpaper....then apply normal bodyfiller over the whole blend area. 10. Once dry...sand using 80 Grit then 120 Grit sandpaper...you can follow the same process as above for spraying primer and sanding smooth.  11. Here are a couple of photos after spraying of primer. 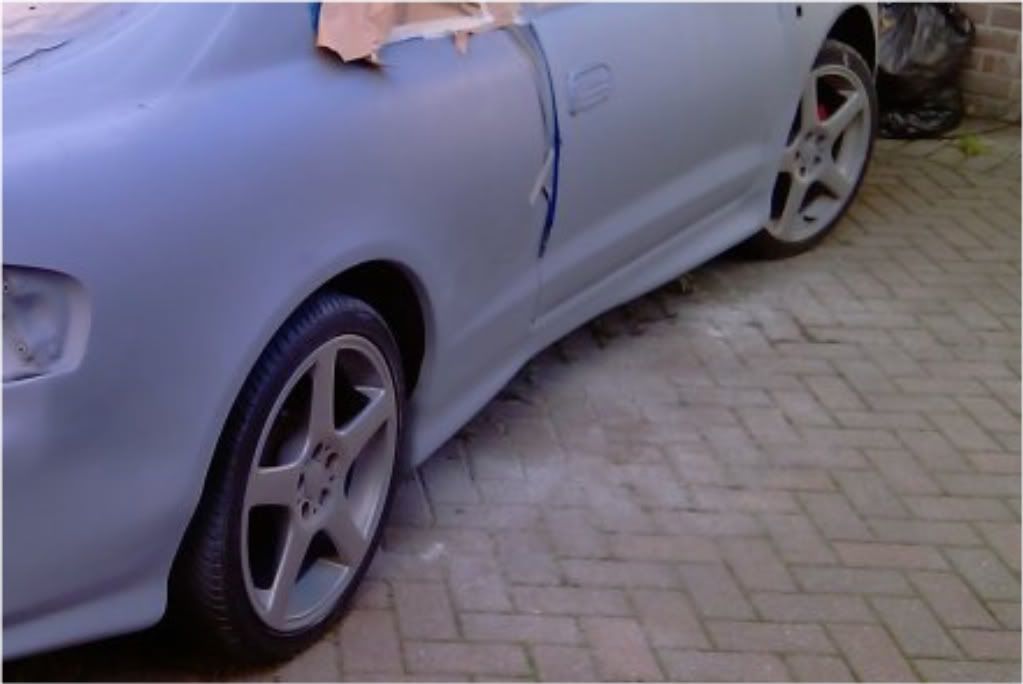 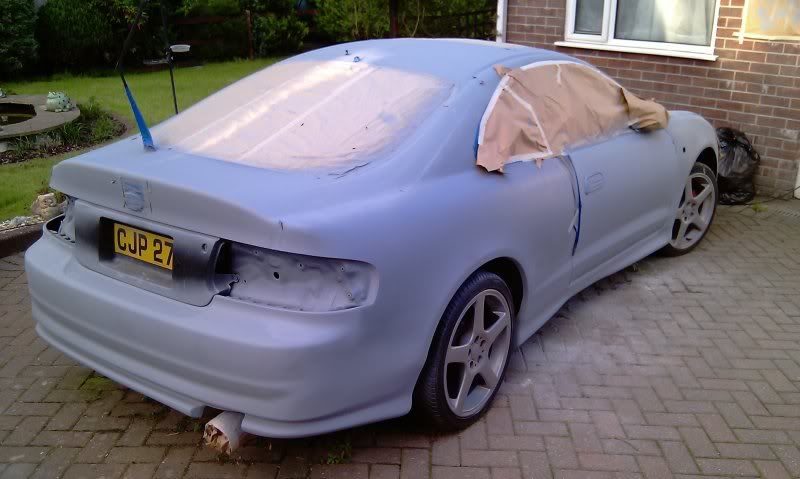
|
 Oct 21, 2010 - 8:43 PM Oct 21, 2010 - 8:43 PM
|
|
 Enthusiast      Joined Apr 20, '06 From Florida Currently Offline Reputation: 44 (100%) |
Again Awesome write ups and pictures, very helpful. Do you have a basic list of tools/items that should be on hand when doing this type of work?
|
 Nov 3, 2010 - 8:31 PM Nov 3, 2010 - 8:31 PM
|
|
 Enthusiast      Joined Oct 7, '09 From Northern kentucky Currently Offline Reputation: 8 (90%) |
Late addition to the thread but here is some help for ya
Basic tools Black Quality gloves, you dont want any oils on your hands to contact the surface your working on Varrying grades of wet/dry sand paper bowl for water, which should be changed often during wet sanding spray bottle for water sanding pads, specially made ones for autobody use are available Respirator, seriously keep it on at all times Good quality Automotive Primer, Personally i love duplicolor, get black for final, and red for first few layers, makes it easier to find imperfections Masking paper Green autobody tape, will give you sharper lines Body filler if needed, varies in quality, done be cheap here Glazing putty to fill in small pinholes left by air in the bondo lots and lots of lint free rags im sure there is more but im out for now -------------------- 1996 Toyota Celica Project Mean Green
3RD Gen 3SGTE WRC Edition W/LSD E153 - Love BOOST <3 2001 Solar yellow Lexus IS300 2001 Dodge ram 1500 Off-road edition |
  |
1 User(s) are reading this topic (1 Guests and 0 Anonymous Users)
0 Members:
| Lo-Fi Version | Time is now: December 8th, 2025 - 2:03 PM |


