
 Aug 28, 2005 - 10:09 PM Aug 28, 2005 - 10:09 PM
|
 
|
 Enthusiast  Joined Mar 8, '04 From Newport, RI Currently Offline Reputation: 63 (99%) |
this is for removing the front bumper from a 94-99 Celica ST,GT,GT-Four
Manny and I did this with his car (beautiful st205 front conversion) and I assure you the process is the exact same with the at200 (ST) and st204 (GT) Tools needed : flathead screwdriver phillips head screwdriver 10mm socket, rachet, a few extensions, swivel Time : 30min-45min depending on skill level first, open your hood and prop open - and remove registration plate (if applicable) 1 - remove 4 bolts (10mm) on the top of the bumper (the retainer) and put retainer aside 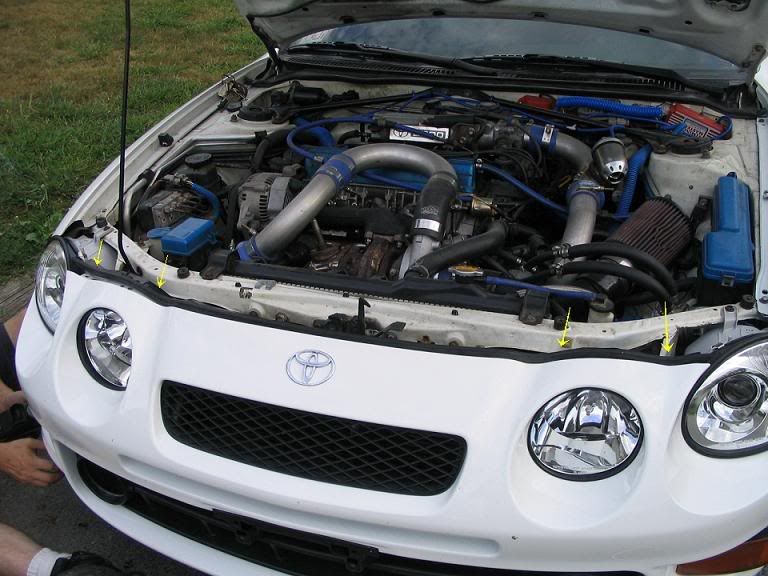 2 - remove 4 plastic drivers holding the bumper onto the re-bar (crash bar) with a flathead screwdriver 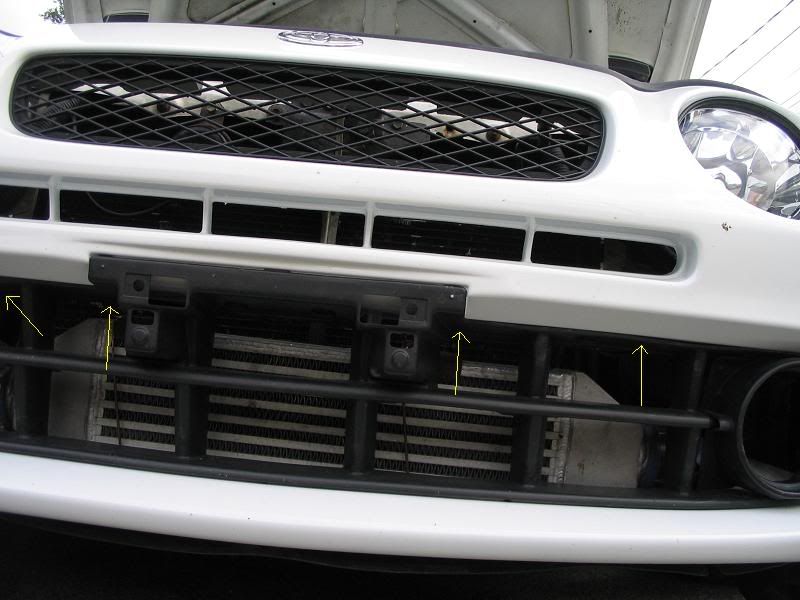 detailed view 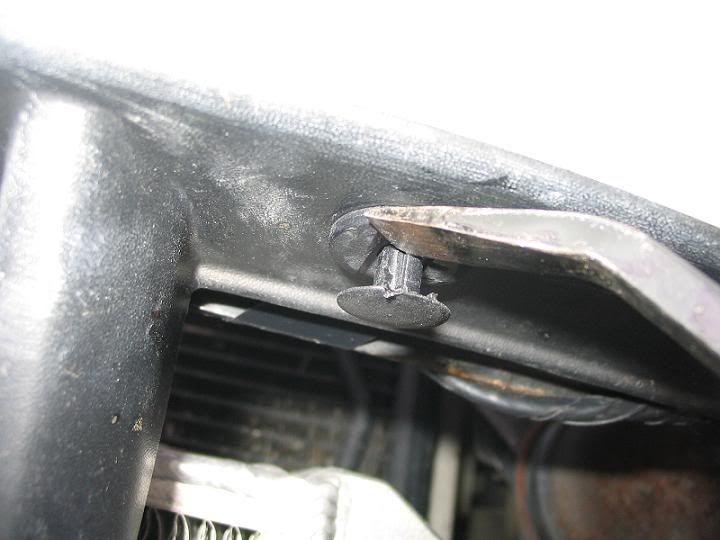 3 - remove 8 screws/bolts holding the bottom of the bumper to the under plastics 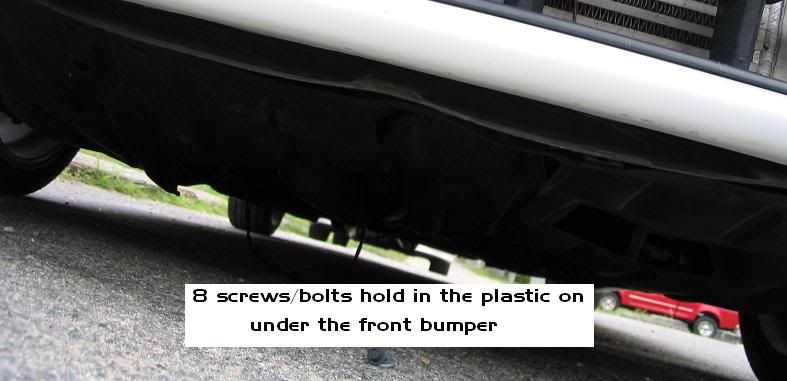 4 - unscrew turn signals (phillips head screw driver) and remove/disconnect housings (both sides) 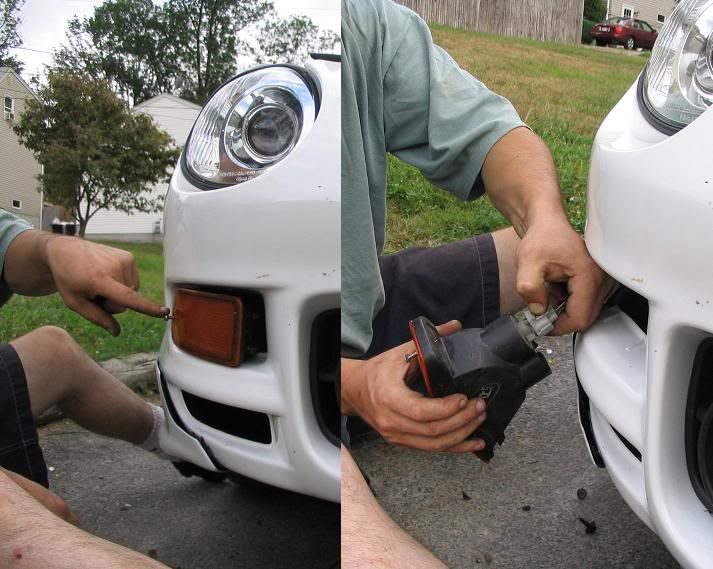 5 - next is the tricky part. There are 3 nuts (10mm) holding the bumper to the fender (on each side) - located here 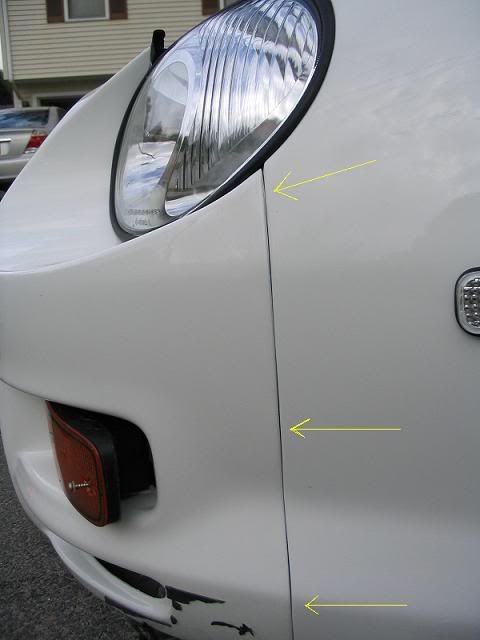 what I did was I pushed the wheel well plastic aside and stuck my hand/arm in to remove nuts 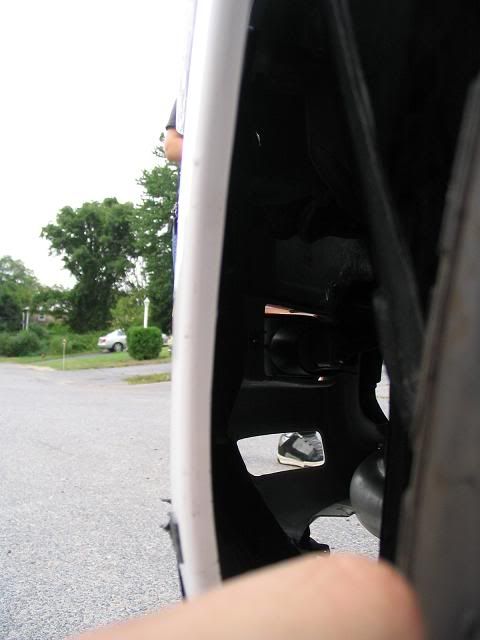 the bottom and the middle nuts are easy, the top nut is more difficult. To remove all 3 I used this 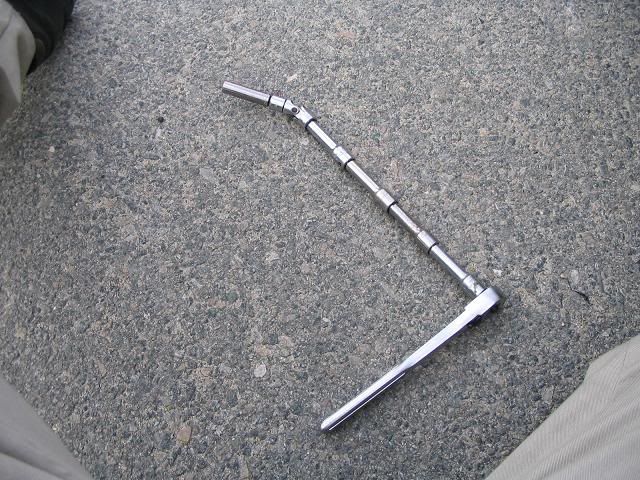 the top one is located right at the top of the inside of the fender close to the headlight, it is tight in there, I recommend you use a 10mm DEEP socket for more reach. 6 - once all 6 nuts (3 each side) are removed, pull the front bumper strait off toward the front of the car. You may need to wiggle it a little bit (it is easier to have someone help, one person on each side of the bumper) complete. To put the bumper back on, just reverse the directions  Notes/hints : make sure to keep all bolts/nuts ect clean and organized. You will need these again to put the bumper back on. I recommend putting them into baggies and labeling.  -------------------- |


 |
Replies
(1 - 19)
|
Aug 29, 2005 - 7:21 AM
|
|
|
Moderator Joined Oct 1, '02 From fall river, ma Currently Offline Reputation: 13 (100%) |
good job, hommie.
added to the sticky 
-------------------- Former Team 5SFTE pro member ;)
 13.6@108MPH, 5SFTE Powered |
|
Aug 29, 2005 - 9:24 AM
|
|
 Enthusiast Joined Dec 16, '02 From New York Currently Offline Reputation: 4 (100%) |
it's about time someone did this!
-------------------- Buy my Celica $2,500 - http://www.6gc.net/forums/index.php?showtopic=76562&st=0
|
|
Aug 29, 2005 - 10:07 AM
|
|
|
Enthusiast Joined Jan 17, '04 From Illinois Currently Offline Reputation: 0 (0%) |
nice how-to Batman. I heard you might be interested in some skirts?
-------------------- QUOTE(lagos @ Jul 10, 2006 - 1:55 PM) [snapback]454118[/snapback] i know your trying to do the right thing for your motor, but this is one of those times where you should just trust the guys who have had their swaps for a while and have done a ton of research into this. |
|
Aug 29, 2005 - 10:14 AM
|
|
|
Enthusiast Joined Mar 17, '05 From The Netherlands Currently Offline Reputation: 0 (0%) |
Even i thought it wasnt worth making a how-to for, with my 2 left hands!!
Its so straight forward and easy. Then again it can always be helpfull for the newcomers! -------------------- JDM Powerplant installed, BPU coming very soon!
 |
|
Aug 29, 2005 - 10:33 AM
|
|
 Enthusiast Joined Nov 13, '02 From So Cal Currently Offline Reputation: 3 (100%) |
awesome write up! ive done it so many times though i can do it in less than 10 minutes, lol.
--------------------  |
|
Aug 29, 2005 - 11:26 AM
|
|
 Enthusiast Joined Oct 10, '03 From Wichita, KS Currently Offline Reputation: 5 (100%) |
Never had I heard anyone mention the 4 plastic clips that attach to the crash bar. Very thorough job. Thanks Batman.
--------------------  Project ST204.5 99.88946% complete... |
|
Mar 24, 2006 - 3:13 AM
|
|
|
Enthusiast Joined Oct 25, '05 From down under Currently Offline Reputation: 0 (0%) |
thanks for the help batman
|
|
Mar 24, 2006 - 1:15 PM
|
|
|
Enthusiast Joined Apr 14, '03 From Long Island, N.Y. Currently Offline Reputation: 1 (100%) |
good stuff batman, great write-up
|
|
Mar 25, 2006 - 4:36 PM
|
|
 Enthusiast Joined May 13, '05 From Tipperary Ireland Currently Offline Reputation: 0 (0%) |
Very good and imformative ,i must use this when i'm fitting my projectors
-------------------- Cheer's
Mike (,") www.Toyota-irl.com |
|
Mar 25, 2006 - 4:41 PM
|
|
|
Enthusiast Joined Jun 13, '05 From Poughkeepsie, NY Currently Offline Reputation: 2 (100%) |
nicely done.
--------------------  Kawi Love |
|
Apr 8, 2006 - 10:12 PM
|
|
 Enthusiast Joined Aug 17, '03 From Bloomington, Indiana Currently Offline Reputation: 62 (98%) |
great write up! It really helped.... and i do have one correction i think.... on step #1... my car had 2 driver lpastic pieces that i had to pop out after removing the 4 bolts....
--------------------  |
|
Apr 8, 2006 - 10:30 PM
|
|
|
Enthusiast Joined Mar 8, '04 From Newport, RI Currently Offline Reputation: 63 (99%) |
QUOTE(dustin15brown @ Apr 8, 2006 - 11:12 PM) [snapback]419296[/snapback] great write up! It really helped.... and i do have one correction i think.... on step #1... my car had 2 driver lpastic pieces that i had to pop out after removing the 4 bolts.... you are correct. There are 2 plastic pins - (one on each end of the bumper retainer) They usually break or get deformed when removing so I don't think I have ever put them back in, so they weren't there when Manny and I did the how-to pics. -------------------- |
|
Apr 8, 2006 - 11:13 PM
|
|
|
Enthusiast Joined Jun 21, '05 From New york Currently Offline Reputation: 1 (100%) |
Good write up! that will help me alot in the coming weeks. And that was quite the socket...lol...thanks for the helpful DIY..and hopefully we can get some more on other things also.
Bigal -------------------- 1994 celica GT.....3sgte in a month! all helpers are welcome!!! i live in Plattsburgh, NY.
|
|
Apr 9, 2006 - 9:10 AM
|
|
|
Enthusiast Joined Aug 17, '03 From Bloomington, Indiana Currently Offline Reputation: 62 (98%) |
QUOTE(Batman722 @ Apr 9, 2006 - 3:30 AM) [snapback]419301[/snapback] QUOTE(dustin15brown @ Apr 8, 2006 - 11:12 PM) [snapback]419296[/snapback] great write up! It really helped.... and i do have one correction i think.... on step #1... my car had 2 driver lpastic pieces that i had to pop out after removing the 4 bolts.... you are correct. There are 2 plastic pins - (one on each end of the bumper retainer) They usually break or get deformed when removing so I don't think I have ever put them back in, so they weren't there when Manny and I did the how-to pics. O I totally understand that I just wasn't able to get that bar off in the first place and thought it might be frustrating for other members who were not aware of it so I just thought I would bring it to someones attention. Thanks again for the write up Dustin! -------------------- |
|
Jun 10, 2006 - 4:14 PM
|
|
|
Enthusiast Joined Jun 9, '06 From Vero Beach Fl. Currently Offline Reputation: 15 (100%) |
QUOTE(Batman722 @ Aug 28, 2005 - 10:09 PM) [snapback]328923[/snapback] this is for removing the front bumper from a 94-99 Celica ST,GT,GT-Four Manny and I did this with his car (beautiful st205 front conversion) and I assure you the process is the exact same with the at200 (ST) and st204 (GT) Tools needed : flathead screwdriver phillips head screwdriver 10mm socket, rachet, a few extensions, swivel Time : 30min-45min depending on skill level first, open your hood and prop open - and remove registration plate (if applicable) 1 - remove 4 bolts (10mm) on the top of the bumper (the retainer) and put retainer aside 2 - remove 4 plastic drivers holding the bumper onto the re-bar (crash bar) with a flathead screwdriver detailed view 3 - remove 8 screws/bolts holding the bottom of the bumper to the under plastics 4 - unscrew turn signals (phillips head screw driver) and remove/disconnect housings (both sides) 5 - next is the tricky part. There are 3 nuts (10mm) holding the bumper to the fender (on each side) - located here what I did was I pushed the wheel well plastic aside and stuck my hand/arm in to remove nuts the bottom and the middle nuts are easy, the top nut is more difficult. To remove all 3 I used this the top one is located right at the top of the inside of the fender close to the headlight, it is tight in there, I recommend you use a 10mm DEEP socket for more reach. 6 - once all 6 nuts (3 each side) are removed, pull the front bumper strait off toward the front of the car. You may need to wiggle it a little bit (it is easier to have someone help, one person on each side of the bumper) complete. To put the bumper back on, just reverse the directions Notes/hints : make sure to keep all bolts/nuts ect clean and organized. You will need these again to put the bumper back on. I recommend putting them into baggies and labeling. Great job, really well done. Thanks --------------------  |
|
Jun 11, 2006 - 7:40 PM
|
|
 Enthusiast Joined Jun 28, '05 From MB, Canada Currently Offline Reputation: 1 (100%) |
good timing, I'm planning on doing this very soon, thanks for the pointers.
|
|
Aug 21, 2006 - 1:13 PM
|
|
 Enthusiast Joined Jul 20, '06 From St. Thomas, Virgin Islands Currently Offline Reputation: 0 (0%) |
This is going to be such a huge help when I replace my totally deformed bumper
--------------------  "I bet you drive a standard." "You could make some money off that bet." :D |
|
Sep 21, 2006 - 2:34 AM
|
|
|
Enthusiast Joined Dec 9, '05 From Bedford, TX Currently Offline Reputation: 11 (100%) |
man that was a pita. especially that one bolt under the high beam. but done. but the guide was very usefull A++
This post has been edited by My2Celi: Sep 21, 2006 - 2:35 AM --------------------  <--- I miss :'' ( <--- I miss :'' ( |
|
Sep 22, 2006 - 12:58 PM
|
|
 Enthusiast Joined Feb 18, '06 From NB, Canada Currently Offline Reputation: 12 (100%) |
If I were to remove teh low beams, would that give me access to the bolts on the side?
I removed teh fender wells 2 times already and I HATE doing it lol --------------------  -Rémy 02 SiR, 08 250R |
 |
1 User(s) are reading this topic (1 Guests and 0 Anonymous Users)
0 Members:
| Lo-Fi Version | Time is now: July 6th, 2026 - 3:18 AM |