
 Oct 20, 2006 - 1:26 PM Oct 20, 2006 - 1:26 PM
|
 
|
|
Enthusiast  Joined Jan 28, '05 From Redondo Beach, CA Currently Offline Reputation: 86 (100%) |
Special thanks goes to first my gf (Becky) who bought these for my birthday..and everyones favorite: John aka Myzneyes and Chanh
Disconnect the positive terminal... First was getting the bulbs in: have the blue piece go in the side slot. bulb slides in easy.  save your plastic washer that comes with the bulb and this is why...without this your bulb isnt secure but i used the plastic washer and cut it into a C shape:  next put washer behind bulb harness like this:  should be nice and secure like this:  next hook up the connectors thats with the relay, use the existing H1 harness (pop off the exisitng rubber piece) and plug in the 2 connectors from relay...do this on the drivers side. next mount the relay and the ballast somewhere...heres where i did mine. plug in rest of wires, negative and positive, etc etc  next is the passenger side: because i have abs, i wedged it between the abs and in the frame.  plug positive back on...should be easy from here..heres my finished results, night pics will be on later: 
This post has been edited by LewFX: Oct 20, 2006 - 2:21 PM --------------------  |

 |
Replies
(1 - 19)
|
Oct 20, 2006 - 1:30 PM
|
|
|
Enthusiast Joined Jun 29, '03 Currently Offline Reputation: 0 (0%) |
Looking good!
|
|
Oct 20, 2006 - 1:31 PM
|
|
 Enthusiast Joined Aug 29, '02 From Franklin/Nashville, TN Currently Offline Reputation: 16 (100%) |
w00t! good job man. I'll add some of the pictures I took when I get home. I need to step away from my desk and go out in the parking lot and try that washer idea...
-------------------- AIM==Mynzeyes
 |
|
Oct 20, 2006 - 1:37 PM
|
|
 Enthusiast Joined Oct 30, '04 From So Cal Currently Offline Reputation: 13 (100%) |
Nice! I didn't do it side ways because the 2 dots on the HID bulb doesn't match up with the original slot... so I took a different approach at it...
First I made the hole bigger with drills....   Now the bulb fits vertically in, with the 2 dots on the bulb matching the slot's...  Then I take this little rubber thingy from my work place...  And clamp on the bulb. Tight and secure.  With the rubber cover on.  The rest, just follow Lew's or CelicaGT04's instruction...  :-D This post has been edited by tomazws: Oct 20, 2006 - 1:37 PM -------------------- |

|
Oct 20, 2006 - 2:20 PM
|
|
|
Enthusiast Joined Jan 28, '05 From Redondo Beach, CA Currently Offline Reputation: 86 (100%) |
more pics!!!
        -------------------- |
|
Oct 20, 2006 - 3:08 PM
|
|
|
Enthusiast Joined Jun 29, '03 Currently Offline Reputation: 0 (0%) |
Whoa sexy!
|
|
Oct 20, 2006 - 3:14 PM
|
|
|
Enthusiast Joined Apr 17, '06 From New Jersey Currently Offline Reputation: 105 (100%) |
Nice !! I hope this helps others to install their H1 HIDs
very nice pictures ! --------------------  |
|
Oct 20, 2006 - 3:17 PM
|
|
|
Enthusiast Joined Oct 30, '04 From So Cal Currently Offline Reputation: 13 (100%) |
Lew you're funny... you actually went to a parking lot to take pics lololol I don't think there's any underground parking in Walnut, so I'll have to wait till nite time.
Anyway, thank you Culpable04 for this group buy. I have to say the shipping was very speedy, and the whole process was very professionally handled. -------------------- |
|
Oct 20, 2006 - 4:05 PM
|
|
 Enthusiast Joined Apr 18, '05 From Calgary Currently Offline Reputation: 20 (100%) |
QUOTE(LewFX @ Oct 20, 2006 - 2:20 PM) [snapback]494197[/snapback] whoa... i like this pic! -------------------- -------------------------------------------------------------------------------- -------------------------------------------------------------------------------- |
|
Oct 24, 2006 - 2:09 AM
|
|
|
Enthusiast Joined Apr 29, '03 From lynn,ma Currently Offline Reputation: 0 (0%) |
wont it be find if the white touch the plastic? because i slided my in, a very tight squeeze, but the two notch were in, it was a pretty good fit i guess.
|
|
Oct 24, 2006 - 8:17 AM
|
|
|
Moderator Joined Oct 1, '02 From fall river, ma Currently Offline Reputation: 13 (100%) |
good job man! added to the stickys!
-------------------- Former Team 5SFTE pro member ;)
 13.6@108MPH, 5SFTE Powered |
|
Feb 10, 2007 - 6:00 PM
|
|
 Enthusiast Joined Jan 22, '06 From Melbourne, Australia Currently Offline Reputation: 0 (0%) |
I wouldn't recommend putting the ballast on the ABS module... I put mine on the verical metal support between the two headlights. Looks much more stock
 I'm oldschool HID. Been using HID for about three years now  been there done that a lot of times. been there done that a lot of times.Here is a photo of the HID cutoff. Notice the bleeding (aka alien lights) above the cutoff point.  I will be taking more pics of the cutoff soon, when I change my HID kit. -------------------- www.tangcla.com - photography
Canon EOS 5D Mark II | EOS 1D Mark II N | 16-35mm f/2.8L |24-70mm f/2.8L | 70-200mm f/2.8L IS 15mm f/2.8 fisheye | 85mm f/1.8 | 100mm f/2.8 macro | 580EX-II x2 |
|
Feb 13, 2007 - 6:34 PM
|
|
|
Enthusiast Joined Feb 4, '03 From Rome Currently Offline Reputation: 0 (0%) |
QUOTE(tangcla @ Feb 10, 2007 - 4:00 PM) [snapback]525771[/snapback] I wouldn't recommend putting the ballast on the ABS module... I put mine on the verical metal support between the two headlights. Looks much more stock I'm oldschool HID. Been using HID for about three years now been there done that a lot of times.Here is a photo of the HID cutoff. Notice the bleeding (aka alien lights) above the cutoff point. I will be taking more pics of the cutoff soon, when I change my HID kit. Very nice......... Have You more photos of your car with HID??? I have some problems with xenon bulbs......... Probably they not fit very well............If i put the car in front of a wall, the left light seems good, the right light is less concetrate............. Sorry for my english...........but, if you have more photos, probably you can help me.......... 
-------------------- CELICUME
Celica ST202 (dic.'98) 2.0 GT plus black Ostia (RM) E-MAIL: fabrizios79@katamail.com MSN: fabrizios79@hotmail.it   Click for my Celica |
|
Feb 13, 2007 - 6:49 PM
|
|
|
Enthusiast Joined Jan 22, '06 From Melbourne, Australia Currently Offline Reputation: 0 (0%) |
The way I secured my globe was just to bend the retaining clip wire, so that it pushes against the globe. I recently changed HID kits (went from 35W 8000K to 50W 6000K = teh winnar!) and I tried the plastic clip method, but the biggest problem I see with that would be heat. With my method, the globe isn't going anywhere any time soon
celicume: Have you tried swapping the globes around? Sometimes the globes fail and you get light/dark spots. That's what I found with my old kit. -------------------- www.tangcla.com - photography
Canon EOS 5D Mark II | EOS 1D Mark II N | 16-35mm f/2.8L |24-70mm f/2.8L | 70-200mm f/2.8L IS 15mm f/2.8 fisheye | 85mm f/1.8 | 100mm f/2.8 macro | 580EX-II x2 |
|
Feb 13, 2007 - 7:12 PM
|
|
|
Enthusiast Joined Feb 4, '03 From Rome Currently Offline Reputation: 0 (0%) |
QUOTE(tangcla @ Feb 13, 2007 - 4:49 PM) [snapback]526587[/snapback] The way I secured my globe was just to bend the retaining clip wire, so that it pushes against the globe. I recently changed HID kits (went from 35W 8000K to 50W 6000K = teh winnar!) and I tried the plastic clip method, but the biggest problem I see with that would be heat. With my method, the globe isn't going anywhere any time soon celicume: Have you tried swapping the globes around? Sometimes the globes fail and you get light/dark spots. That's what I found with my old kit. The left globe ( how you said) i think fit good because if i touch it, its firm! The right instead, i secured in the same moods............the globe seems firm but the light reflects on a wall make another design compared to the left!!! Its normal??? Probably the globe have some problems? I will try to exchange left with right.............
-------------------- CELICUME
Celica ST202 (dic.'98) 2.0 GT plus black Ostia (RM) E-MAIL: fabrizios79@katamail.com MSN: fabrizios79@hotmail.it Click for my Celica |
|
Feb 13, 2007 - 7:58 PM
|
|
|
Enthusiast Joined Jan 22, '06 From Melbourne, Australia Currently Offline Reputation: 0 (0%) |
Park it close to a wall, you see the circle mark on the glass? YOu should be able to see that, it should be on the cutoff horizon.
-------------------- www.tangcla.com - photography
Canon EOS 5D Mark II | EOS 1D Mark II N | 16-35mm f/2.8L |24-70mm f/2.8L | 70-200mm f/2.8L IS 15mm f/2.8 fisheye | 85mm f/1.8 | 100mm f/2.8 macro | 580EX-II x2 |
|
Feb 14, 2007 - 7:45 AM
|
|
|
Enthusiast Joined Oct 31, '03 From Orlando, Florida Currently Offline Reputation: 0 (0%) |
wow those are bright... can hardly tell theyre the projectors when theyre on
good work
|
|
Feb 17, 2007 - 9:18 PM
|
|
 Enthusiast Joined May 15, '05 From Toronto Currently Offline Reputation: 4 (100%) |
Jeff, your gf bought em for u for ur b-day?...can i have ur gf??

|
|
Oct 24, 2007 - 12:05 AM
|
|
|
Enthusiast Joined Mar 9, '05 From Oakland, Cali Currently Offline Reputation: 46 (100%) |
bringing this back....
 so u guys didnt use the h1 bulb harness from the projectors?...the h1 bulb jus pops out from the connector.....like this here: 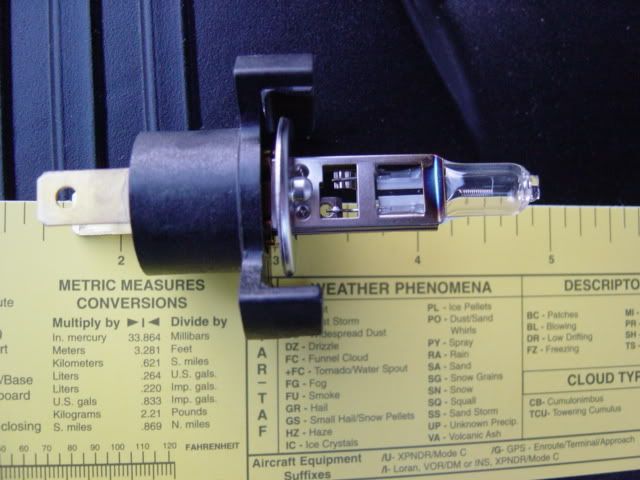 from the pics ive seen above i dont see u guys using the "cross" shaped connector, any pics u guys can share that has the wiring of teh h1 HIDs? This post has been edited by DeW_H0e_GT: Oct 24, 2007 - 12:07 AM --------------------  |
|
Oct 24, 2007 - 12:07 AM
|
|
|
Enthusiast Joined Jan 28, '05 From Redondo Beach, CA Currently Offline Reputation: 86 (100%) |
i got the h1 harness from my seller
-------------------- |
 |
1 User(s) are reading this topic (1 Guests and 0 Anonymous Users)
0 Members:
| Lo-Fi Version | Time is now: July 31st, 2026 - 10:15 AM |