
 Oct 20, 2006 - 1:26 PM Oct 20, 2006 - 1:26 PM
|
 
|
|
Enthusiast  Joined Jan 28, '05 From Redondo Beach, CA Currently Offline Reputation: 86 (100%) |
Special thanks goes to first my gf (Becky) who bought these for my birthday..and everyones favorite: John aka Myzneyes and Chanh
Disconnect the positive terminal... First was getting the bulbs in: have the blue piece go in the side slot. bulb slides in easy.  save your plastic washer that comes with the bulb and this is why...without this your bulb isnt secure but i used the plastic washer and cut it into a C shape:  next put washer behind bulb harness like this:  should be nice and secure like this:  next hook up the connectors thats with the relay, use the existing H1 harness (pop off the exisitng rubber piece) and plug in the 2 connectors from relay...do this on the drivers side. next mount the relay and the ballast somewhere...heres where i did mine. plug in rest of wires, negative and positive, etc etc  next is the passenger side: because i have abs, i wedged it between the abs and in the frame.  plug positive back on...should be easy from here..heres my finished results, night pics will be on later: 
This post has been edited by LewFX: Oct 20, 2006 - 2:21 PM --------------------  |

 |
Replies
|
Jan 7, 2014 - 4:25 PM
|
|
|
Moderator Joined Jun 29, '08 From Denver Currently Offline Reputation: 59 (100%) |
Got these installed today. Still waiting for my fingers to thaw out but hey, it's done and over with.
Verdict: They will work but require slight modification to the HID bulb. H1 bulbs have small tabs on them to align the bulb. H1 HID bulbs have these too, but the design of our headlight housing allow the bulb to only go in one way, meaning the tab on the HID bulb won't line up where it's supposed to. Note the tab at the base of the bulb. There's one on each side. These must be removed. 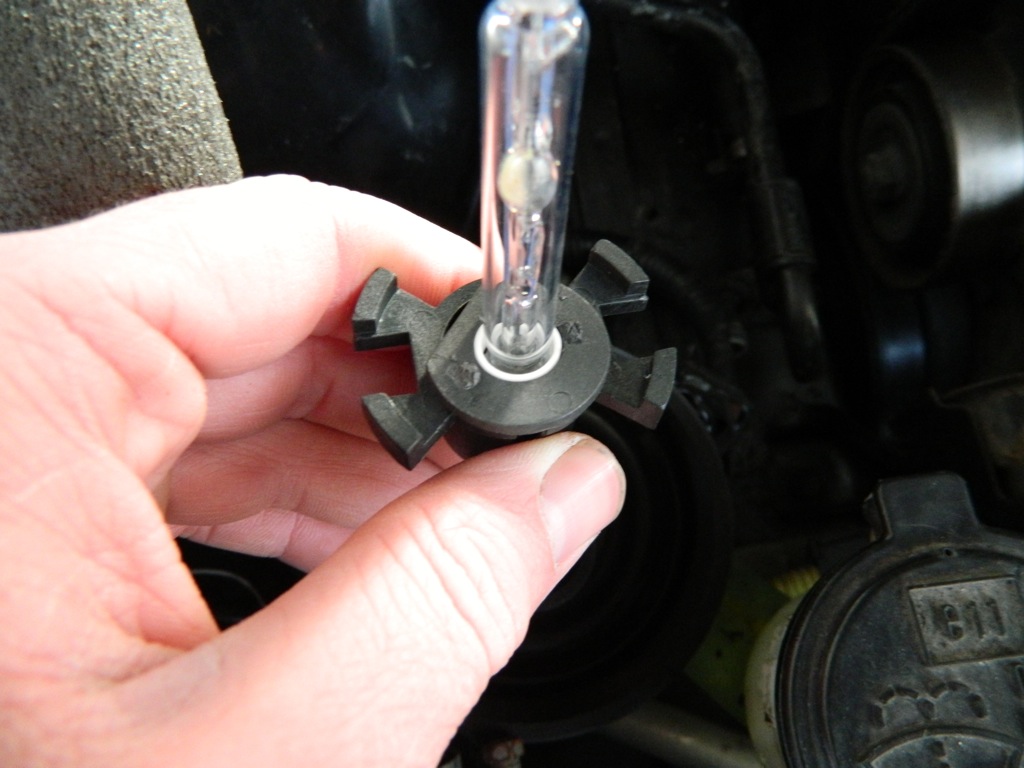 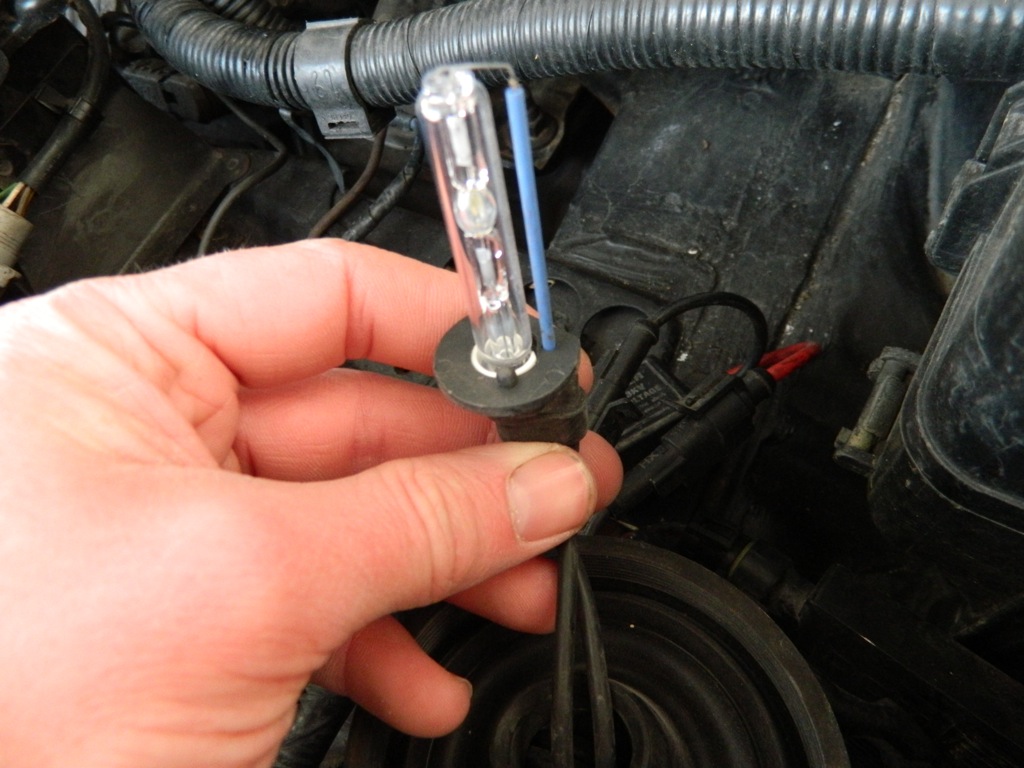 I had to continue working to take the tabs off after I took that picture. They need to be completely flat. After you have removed those tabs, the X tabs need to be aligned vertically on the bulb. It's a tight working space but after some careful maneuvering, you can get the bulb and adapter fitted into place and get everything put back together. Crappy picture but if you stare at it long enough, you can start to see everything.  I actually found this install easier than trying to hold the plastic C rings in place as the original how-to shows. Well worth the $7 I spent, and these can be found for as little as $4 shipped. -------------------- "Employ your time in improving yourself by other men's writings, so that you shall gain easily what others labored hard for." -Socrates. Even Socrates told us to use the search button!
 2006 Aston Martin V8 Vantage. 1998 Celica GT- BEAMS Swapped. 2022 4Runner TRD Off Road Prenium. 2021 GMC Sierra AT4. |
Posts in this topic
 LewFX My how to: install HID for JDM Projectors Oct 20, 2006 - 1:26 PM
 Chanh55 Looking good! Oct 20, 2006 - 1:30 PM Mynzeyes w00t! good job man. I'll add some of the p... Oct 20, 2006 - 1:31 PM tomazws Nice! I didn't do it side ways because th... Oct 20, 2006 - 1:37 PM LewFX more pics!!! Oct 20, 2006 - 2:20 PM
 azian_advanced QUOTE(LewFX @ Oct 20, 2006 - 2:20 PM... Oct 20, 2006 - 4:05 PM Chanh55 Whoa sexy! Oct 20, 2006 - 3:08 PM Culpable04 Nice !! I hope this helps others to instal... Oct 20, 2006 - 3:14 PM tomazws Lew you're funny... you actually went to a par... Oct 20, 2006 - 3:17 PM kamax wont it be find if the white touch the plastic? be... Oct 24, 2006 - 2:09 AM presure2 good job man! added to the stickys! Oct 24, 2006 - 8:17 AM tangcla I wouldn't recommend putting the ballast on th... Feb 10, 2007 - 6:00 PM celicume QUOTE(tangcla @ Feb 10, 2007 - 4:00 ... Feb 13, 2007 - 6:34 PM tangcla The way I secured my globe was just to bend the re... Feb 13, 2007 - 6:49 PM celicume QUOTE(tangcla @ Feb 13, 2007 - 4:49 ... Feb 13, 2007 - 7:12 PM tangcla Park it close to a wall, you see the circle mark o... Feb 13, 2007 - 7:58 PM tim86 wow those are bright... can hardly tell theyre the... Feb 14, 2007 - 7:45 AM Valo666 Jeff, your gf bought em for u for ur b-day?...can ... Feb 17, 2007 - 9:18 PM DeW_H0e_GT bringing this back....
so u guys didnt use the ... Oct 24, 2007 - 12:05 AM LewFX i got the h1 harness from my seller Oct 24, 2007 - 12:07 AM Projek_01 new cutoff pictures please!! what if you g... Mar 14, 2008 - 12:28 AM Rayme Did you fix the cut-off / beam direction? Mar 15, 2008 - 2:01 PM azian_advanced just to add...
it was difficult find a good spot ... Jul 2, 2008 - 11:37 AM azian_advanced RE: My how to: install HID for JDM Projectors Jul 2, 2008 - 11:42 AM richee3 I've been running HID's in my projectors f... Jan 3, 2014 - 7:15 PM ILoveMySilly97 QUOTE (richee3 @ Jan 3, 2014 - 4:15 ... Jan 3, 2014 - 11:42 PM richee3 Will do. Turns out the Honda guys have been having... Jan 4, 2014 - 1:34 AM richee3 I received the adapters today. Test fitted with a ... Jan 6, 2014 - 4:20 PM ILoveMySilly97 Nice find. Ima have to do this too. Jan 7, 2014 - 4:29 PM
azian_advanced QUOTE(LewFX @ Oct 20, 2006 - 2:20 PM... Oct 20, 2006 - 4:05 PM Chanh55 Whoa sexy! Oct 20, 2006 - 3:08 PM Culpable04 Nice !! I hope this helps others to instal... Oct 20, 2006 - 3:14 PM tomazws Lew you're funny... you actually went to a par... Oct 20, 2006 - 3:17 PM kamax wont it be find if the white touch the plastic? be... Oct 24, 2006 - 2:09 AM presure2 good job man! added to the stickys! Oct 24, 2006 - 8:17 AM tangcla I wouldn't recommend putting the ballast on th... Feb 10, 2007 - 6:00 PM celicume QUOTE(tangcla @ Feb 10, 2007 - 4:00 ... Feb 13, 2007 - 6:34 PM tangcla The way I secured my globe was just to bend the re... Feb 13, 2007 - 6:49 PM celicume QUOTE(tangcla @ Feb 13, 2007 - 4:49 ... Feb 13, 2007 - 7:12 PM tangcla Park it close to a wall, you see the circle mark o... Feb 13, 2007 - 7:58 PM tim86 wow those are bright... can hardly tell theyre the... Feb 14, 2007 - 7:45 AM Valo666 Jeff, your gf bought em for u for ur b-day?...can ... Feb 17, 2007 - 9:18 PM DeW_H0e_GT bringing this back....
so u guys didnt use the ... Oct 24, 2007 - 12:05 AM LewFX i got the h1 harness from my seller Oct 24, 2007 - 12:07 AM Projek_01 new cutoff pictures please!! what if you g... Mar 14, 2008 - 12:28 AM Rayme Did you fix the cut-off / beam direction? Mar 15, 2008 - 2:01 PM azian_advanced just to add...
it was difficult find a good spot ... Jul 2, 2008 - 11:37 AM azian_advanced RE: My how to: install HID for JDM Projectors Jul 2, 2008 - 11:42 AM richee3 I've been running HID's in my projectors f... Jan 3, 2014 - 7:15 PM ILoveMySilly97 QUOTE (richee3 @ Jan 3, 2014 - 4:15 ... Jan 3, 2014 - 11:42 PM richee3 Will do. Turns out the Honda guys have been having... Jan 4, 2014 - 1:34 AM richee3 I received the adapters today. Test fitted with a ... Jan 6, 2014 - 4:20 PM ILoveMySilly97 Nice find. Ima have to do this too. Jan 7, 2014 - 4:29 PM |
1 User(s) are reading this topic (1 Guests and 0 Anonymous Users)
0 Members:
| Lo-Fi Version | Time is now: June 12th, 2026 - 6:12 PM |