
 May 27, 2014 - 4:23 PM May 27, 2014 - 4:23 PM
|
 
|
|
Enthusiast  Joined Dec 3, '13 From Missourah Currently Offline Reputation: 0 (0%) |
Here is a How-To for charging the Air Conditioning System and I will illustrate proper methods for doing it and making the AC nice and Cold using equipment made for regular refrigeration/AC systems instead of automotive, as you may be able to acquire this sort of equipment from a pawn shop for not a whole lot of money. Which may be worth it for a few of you who have need to charge the AC yourself although for most people the cost of this equipment will be quite a bit more than if you'd just take it to some shop and have them charge the AC for <$100.
but some of you seem to have plenty of money for spending on the car, and this would cost less than what you blew on tires and struts.  I will stick to the basics of How the AC system works and charging the refrigerant to make it nice and cold, and not get into "fixing" mechanical issues like the compressor ect. So we will assume you just need to charge the refrigerant, and everything else is in working order. I will stick to the basics of How the AC system works and charging the refrigerant to make it nice and cold, and not get into "fixing" mechanical issues like the compressor ect. So we will assume you just need to charge the refrigerant, and everything else is in working order. First an overview of the refrigeration system and how it works. there are four basic pieces of any refrigeration/Air Conditioning system. The Compressor , Condenser, Evaporator, and metering device. The Evaporator is a small radiator tucked away in the air box mounted on the inside of the firewall deep underneath the dashboard, (also where the heater core is). The compressor Pumps the refrigerant through the system toward the metering device which is just before the evaporator. The metering device can be as simple as just a smaller hole for the refrigerant to pass through as it enters the evaporator, this causes a drop in the pressure of the refrigerant which lowers the boiling point of the refrigerant. For comfort air systems this pressure is designed so that the refrigerant in the evaporator will boil at 40 degrees Fahrenheit(with a car system this temp changes as the outdoor air changes). The cars blower moves the cabin air across the evaporator coil where the heat from the air is transferred into the refrigerant as the refrigerant boils into a vapor(evaporates), and the compressor pumps the Vapor refrigerant out to the Condenser, which is another 'radiator' mounted out on the front of the car and is stacked on top of the cars cooling radiator. At the condenser the Vapor refrigerant condenses back into liquid as the heat within the refrigerant is released back into the outdoor air. So note that heat flows from what is warmer to what is cooler, the system does not 'make cold' but rather removes heat from one area(inside the car) and moves it to another area(outside the car). Heat will always flow from what is warmer toward what is cooler, so The Evaporator Coil must be Colder than what you want the inside of the car to be and the Condenser coil must be Hotter than it is outside in order to give off heat to the outdoor air. Also be aware that the refrigerant is changing from a liquid to a vapor as it rejects heat and absorbs heat, and the refrigerant must be in the vapor state as it enters the compressor as you cannot compress liquid refrigerant, liquid refrigerant in the compressor will destroy the compressor.  this diagram is of a medium temperature refrigeration system like you would have for a cooler or food refrigeration so the temperature of the evaporator colder to achieve a 25 degree coil, and a 40 degree space temp. otherwise it works the same way. Ok so first off, if you want your AC to be Cold, Really Cold, Like it was when it was new, the most important thing is that the Sealed Refrigeration System In the pipes must contain ONLY Refrigerant, and Oil. if there is any Air or Moisture in the system it will not transfer heat as well and will not be as cold as you want. In most cases if you've leaked refrigerant out, then you're system is most likely contaminated with air and moisture as well which will eventually destroy you're compressor. but lets say you think you're system may be just a little low and you want to check it to be sure 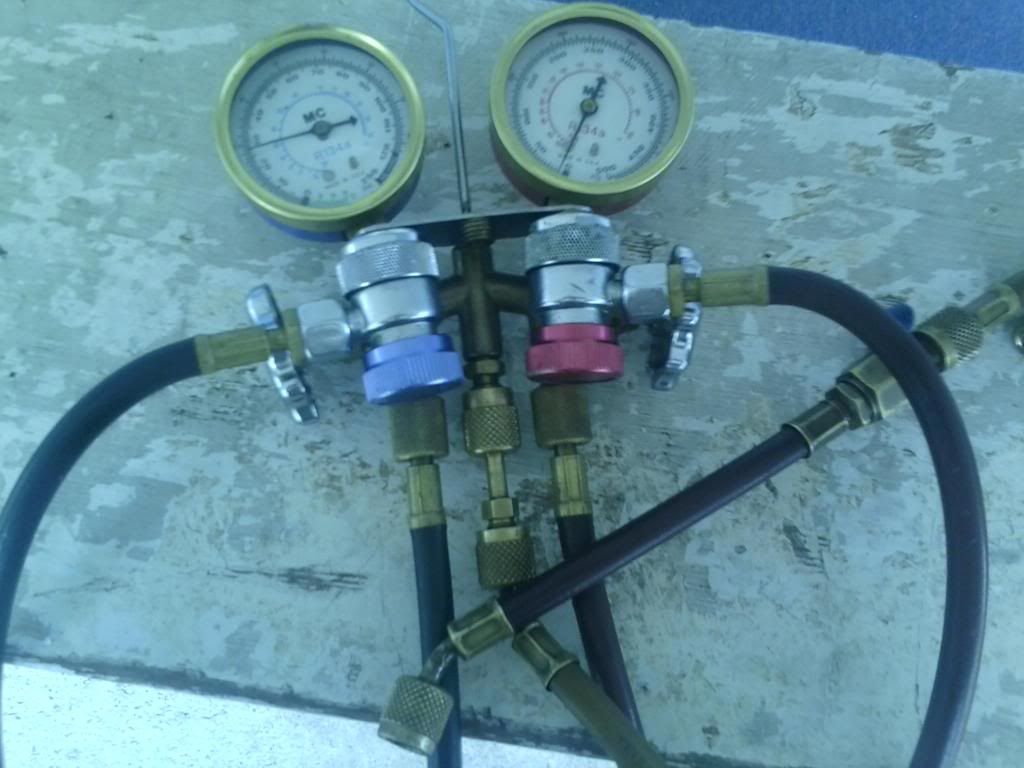 it is best to have a set of gauges like this for automotive, when doing a full recovery and recharge it is a Must, but if you've just got the little can of Freon and the one-gauge hose to top it off you can at least check it this way. there are two access ports on the car, High side and Low side, just as there are two gauges. and the connectors on the hose are made different sizes so that you cannot connect the low side to the high side. especially if you are using a little can of R134a you would not want to attach that to the high side by mistake !! the low side access port is on the larger of the two refrigerant pipes just before they enter the fire wall. 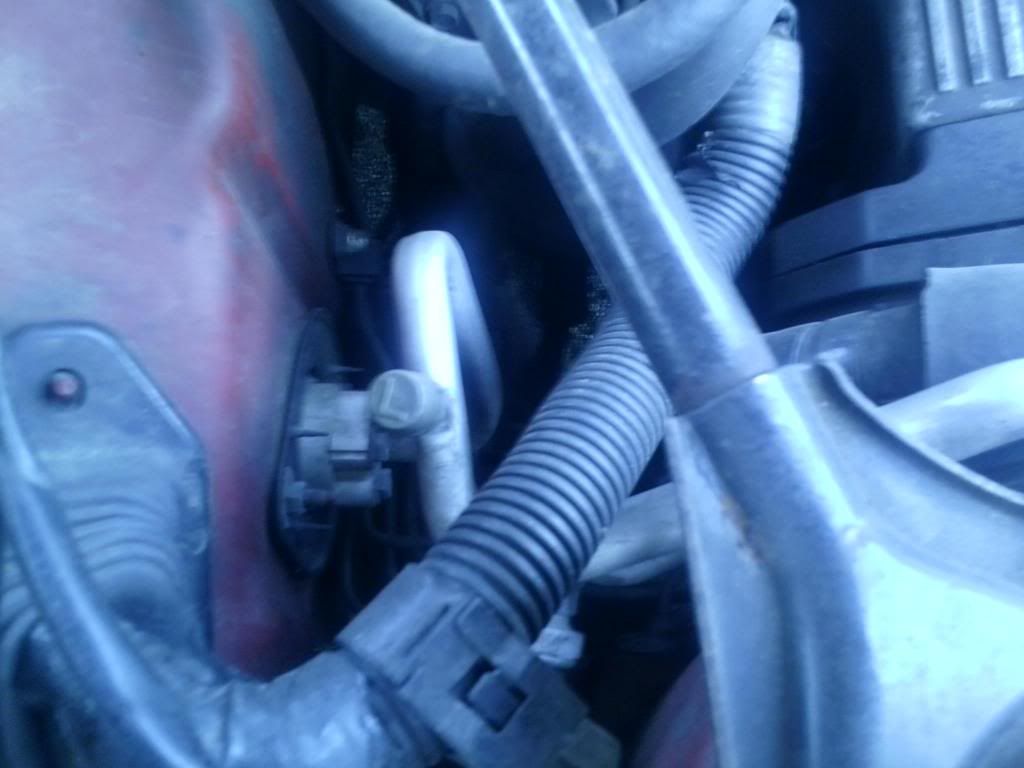 The Blue Hose goes Here, or if you have the one gauge can it attaches here. 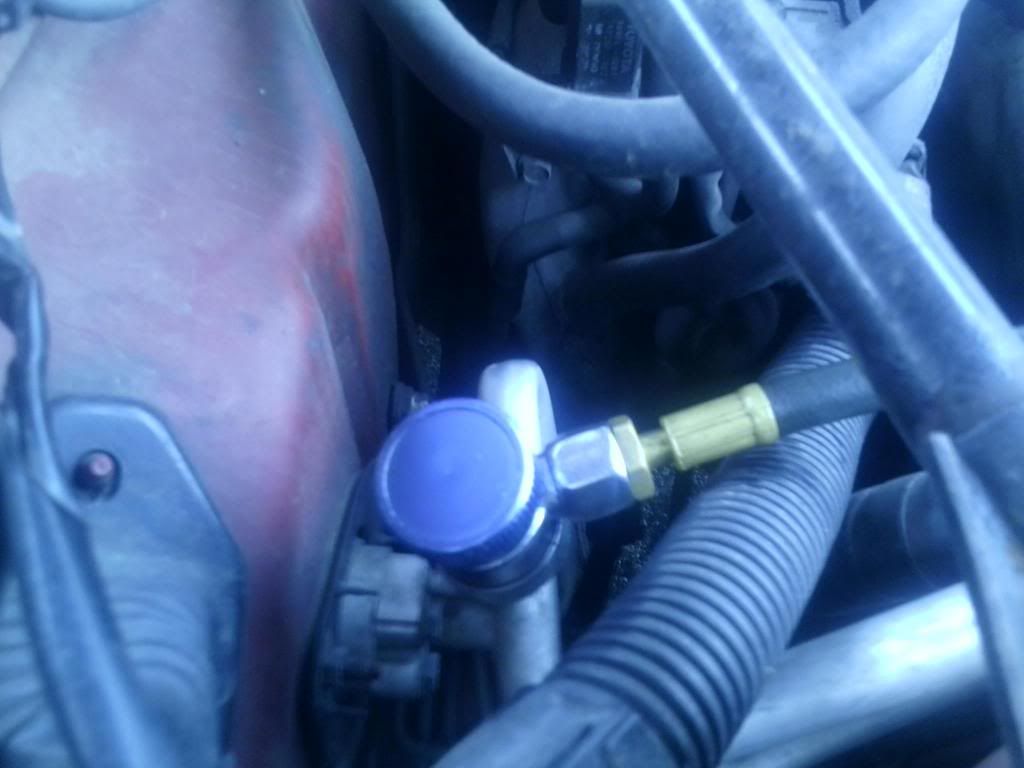 The high side access port is on the nose of the car where the condenser is 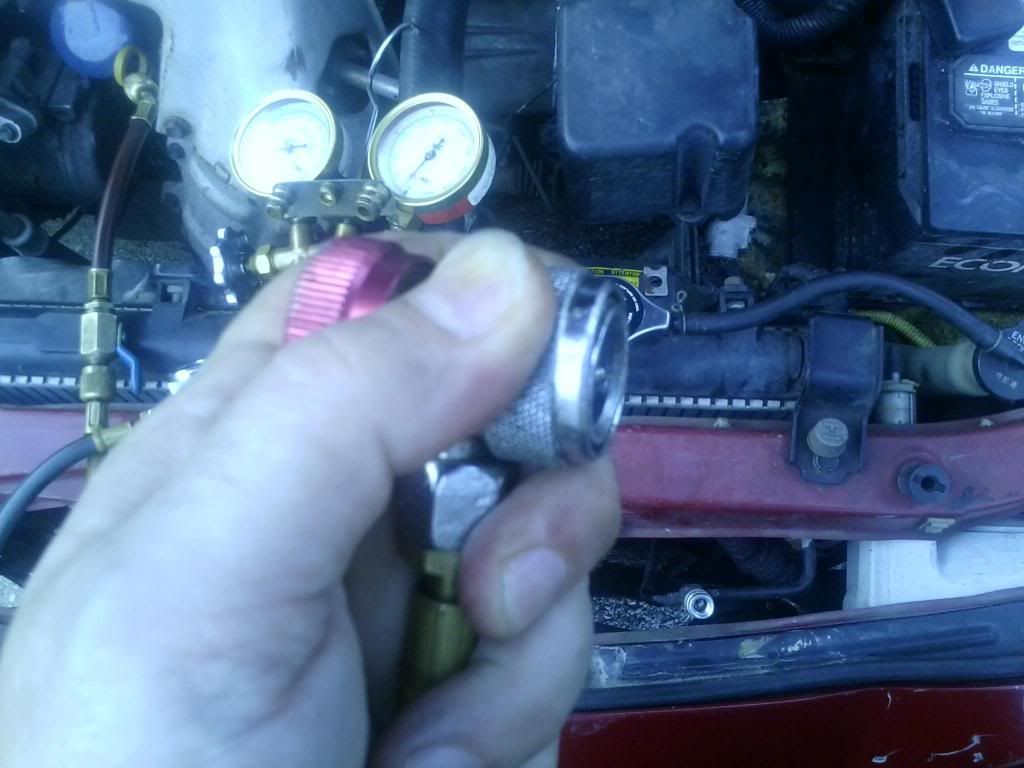 In Order for the system to work right it must have the Proper amount of refrigerant in it, not too little OR too Much. It's not like filling the "gas" you don't want to just "fill it up". With Too Much refrigerant in the system there will not be enough room for the refrigerant to evaporate and condense properly and you will end up with liquid refrigerant in your compressor which will destroy the most expensive component in the system. So the Best way is to Remove the Refrigerant, pull a Vacuum and Weigh in the Exact amount, more on this later. For now lets check if you need to worry about the refrigerant at all. the next gadget you will need is some kind of a thermometer that you can use to measure the temperature of a pipe.  I use something like this for pro work because it has a special sensor for wrapping around a pipe to get an accurate temperature, but anything that gets you an accurate pipe temp is good. Attach the thermometer to the same pipe you hooked the Low side port to. this is the Suction line. Start up the Car and turn on the AC full blast with the vent set to recirculate. You should see the Compressor kick on and in a short time the Suction pipe should get cold enough to sweat. The pressure of the Gauge is how we measure the temperature of the refrigerant inside the evaporator coil. There is a PSI/KPS on the outer dial for pressure and the inner blue dial shows what temperature R134a is at that pressure. the thermometer is measuring the physical temperature of the pipe. What we want to do now is to compare the two. The temperature of the Evaporator coil should be around 40 degrees F (it will be slightly warmer if its really hot outside), and the Temperature of the pipe should be about 15 degrees warmer than the temperature on refrigerant Gauge (55 degrees). To break it down simply let me just say that So long as the Temperature of the Pipe is Warmer than the Temperature of the evaporator coil this proves that All of the refrigerant leaving the Evaporator has fully Vaporized and therefore there is no liquid entering the compressor. If you see the temp of the pipe about 15 or so degrees warmer than the coil temp You are good. If you measure the air coming out of the vents inside the car it may be as cold as 45 degrees but this will vary as the inside of the car gets colder and if you're driving down the road or not. anything inside less than 55 degrees is just dandy. If you are using a manifold set then you're high pressure gauge will read about 30 degrees hotter than it is outside. so if it is 85 degrees outside the temperature on the gauge will read 115 degrees. Now if your pipe temp is The Same temp as the Coil Temp this means you have TOO MUCH refrigerant in the system and some will need to be removed. or If you're pipe temperature is much warmer than the Coil temperature, like for example say the coil temp on the gauge reads 30 degrees and the pipe temperature is 75 degrees, This is when you need to Add Refrigerant. and you want to do so slowly opening the lowside (blue) valve on the manifold, keeping an eye on that pipe temperature which will drop as you add more refrigerant. maybe if you've got a very small leak you can get away with just adding a little more, Be Careful not to Add too much or you will most surely destroy the compressor. If you are Very low on refrigerant the compressor may run for a moment and then kick off, and then kick back on. This would be caused by a low pressure cut-out switch located close to the lowside port where you hooked the gauge to.  if you hear the compressor cycling off and on then you can be pretty sure you are just low on refrigerant. This method will get you nice and cool unless you need a full recharge. The system works best when charged with the Exact amount of refrigerant and in order to remove all of the air and moisture from the system you will need to pull a vacuum on the empty piping to make it work right. Next I'm going to illustrate how to do a full recovery, vacuum and charge of the system. but I need to run some errands so I'll stop here and come back to complete this later tonight ( I may even look up the conversions from F to C for our friends in the rest of the world) This post has been edited by VavAlephVav: May 27, 2014 - 10:19 PM -------------------- Bust a Deal; Face the Wheel.
|

 |
Replies
|
May 28, 2014 - 1:39 AM
|
|
|
Enthusiast Joined Dec 3, '13 From Missourah Currently Offline Reputation: 0 (0%) |
Most Automotive systems will have leak detector dye already in the system which can make spotting leaks nice and easy. What you need is a special UV flashlight and a pair of Yellow glasses. and then you examine the whole track of aluminum piping connecting the AC components. check each place where it is bolted together, there are several. and take a good look at the coils of the condenser in the front, the thing is at the very front of the nose(unless you have a turbo) and gets all kinds of crap in it. Also take you should open the hood and clean that condenser coil with the hose once in a while, it
transfers heat so much better when its nice and clean, even some strong degreaser will help it a lot. grease and dirt will insulate the coil and it will not be able to give off heat the way it should. but now let's say we have removed the refrigerant - here's the deal, maybe you just took it apart because you are taking the whole car apart or something, but in most cases you are working on the AC because It Leaked. So what you Need to do is find out Where it leaked from and fix it before you just go put it back together and have it leak again. In the pro refrigeration business we use nitrogen to pressure test the system, EVERY TIME before you pull a vacuum and recharge it to be sure you're not just wasting your time. and it is best to use Nitrogen (and not CO2) to pressure test it because Nitrogen it very dry and has no moisture in it like CO2 does. I have a small portable Nitrogen tank and a 150# regulator 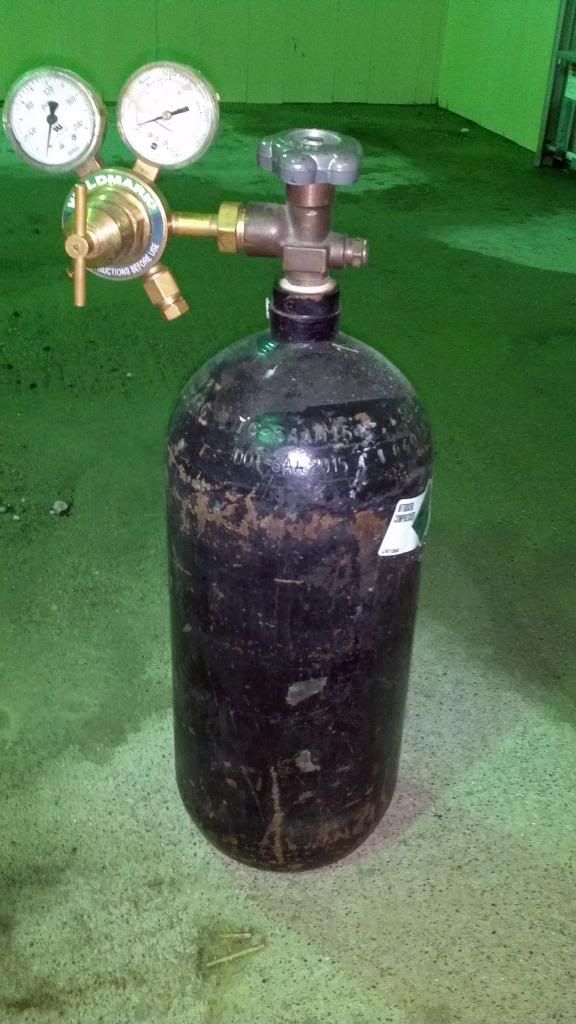 you just hook it up to the yellow hose and open the valves to pressurize the system, but there is no need to test it above 150 psi. there may be recommended test pressures on some sticker somewhere but I can just tell you if it will hold 150# then you're good. you ought to pressurize the system and valve it off, then wait a little while (15 min?) to check the gauges and be sure they don't show a loss of pressure. and if not then you can just open the valves and blow the nitrogen off to the atmosphere. DO NOT recover nitrogen into the recovery tank with the refrigerant, it operates at much higher pressures than the refrigerant does. the atmosphere is 80% nitrogen in the first place, you can just blow it off and not worry about Al Gore and ManBearPig coming to get you. OK now we are ready to pull a vacuum. you can get a decent vacuum pump for a couple hundred bucks, or I've seen cheap ones on ebay for $89 brand new. since you're not going to use it everyday those might work just fine for ya. 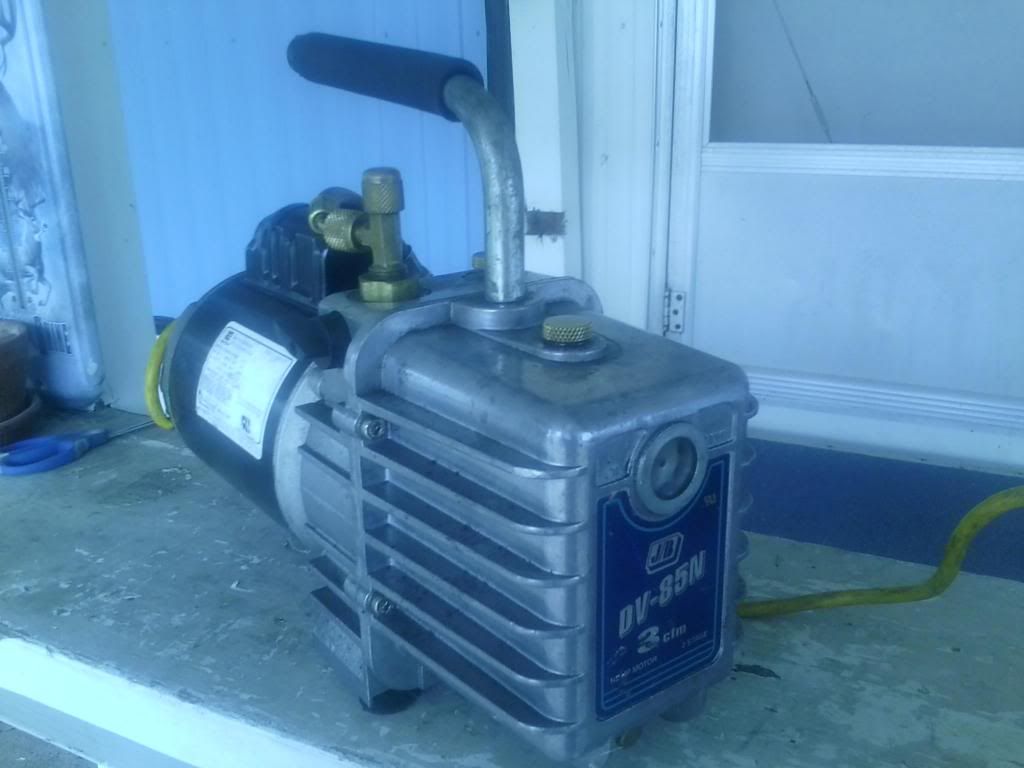 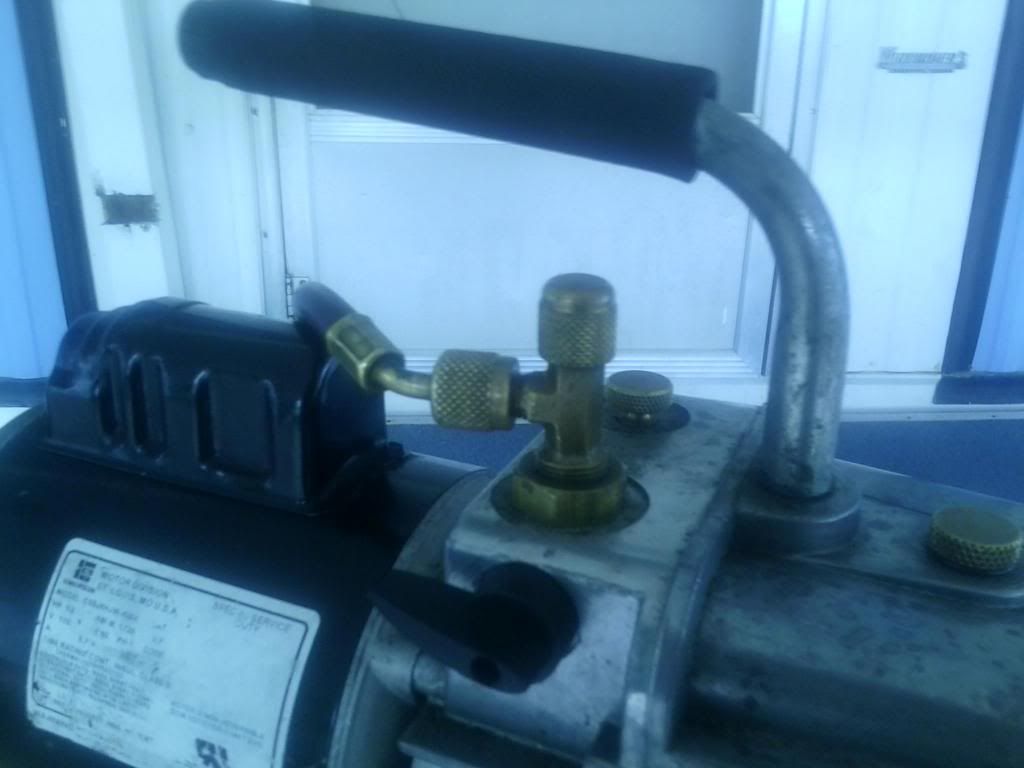 these require a special vacuum pump oil to run. stuffs kinda pricy too, and for it to work it's best you want to keep new oil in it. for regular refrigeration work I'd replace the oil most every time I'd use it because the oil absorbs moisture and will pull a better vacuum with new oil in it. but if your pumping a small, clean system like a car you can probably get away with using it a couple times. Hook up the vacuum pump to the yellow hose in the middle like so  BUT Be Sure you have let All of the pressure off of the system first, if there is even 5 psi of nitrogen left in the system when you start that vacuum pump it is going to spit all of that oil Right up in your face! then you're having a hell of a day. So be sure the valves on the connectors are open, and the valve on the vacuum pump is open, then turn on the vacuum pump. once the pump is running you can open both valves on the manifold, pay attention to the tone of the vacuum pump as you open the valves you will hear it make a deeper sound as you open it up to the system. So what is going on as the vacuum pump pulls on the system? as mentioned a couple of times, for our system to transfer heat at its best we want there to be ONLY Refrigerant and Oil inside the pipes. No Air, No Moisture. at atmospheric pressure water boils at 212 degrees F, or 100 C. unless you're in Denver, because at a higher elevation the air pressure is less and water will boil at a slightly lower temperature. Well, when we pull a vacuum we are lowering the pressure inside the piping system, and also lowering the boiling point of any moisture inside the system. (hopefully there is only traces of moisture in the first place and not much actual water!) when you first start up the pump you may see plenty of smoke coming out the exhaust of the pump, this is moisture in the system boiling off into vapor and being sucked out by the pump. So when you look at the blue gauge it goes down to zero and then goes into the negative where it is reading inches of mercury "hg instead of PSI, this is the vacuum indicator. the gauge goes down to 30" of mercury, but the needle will never actually get past 29.9" hg. 30" hg is a perfect vacuum, like outer space, which you cannot actually achieve. What we do is take that last inch of mercury between 29" and 30" and break it down into 24000 little bitty increments called Microns. (not the same as a micron measuring caliper) but these are ultra fine measurements which you need another special tool to measure accurately. 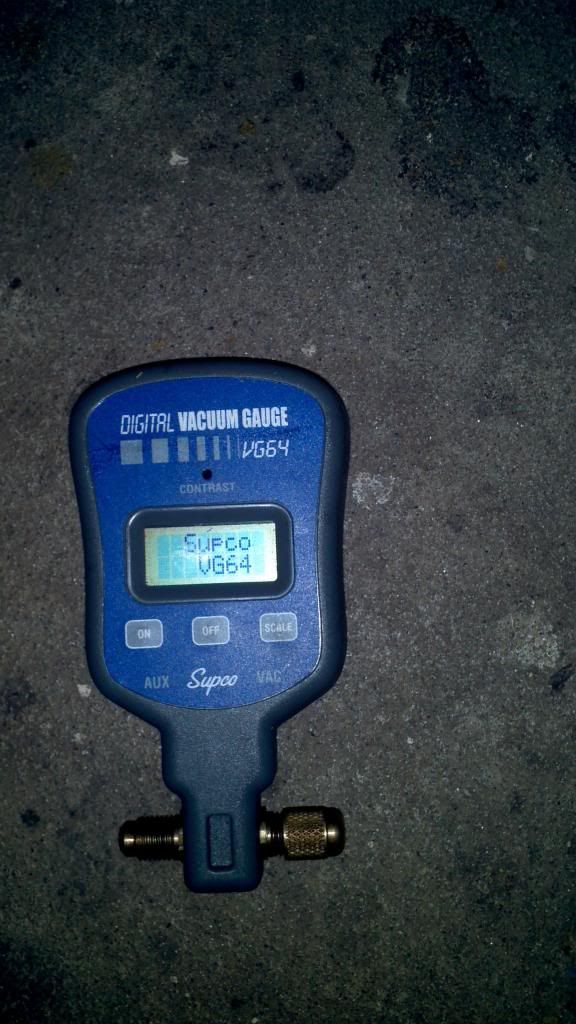 this would be placed in line of the yellow hose(not the ideal position but will do for what we are doing here) so you can measure the vacuum. so the standard for a good deep vacuum is a 500 micron vacuum. it counts down, 29" hg is 24000 microns, and 30" hg is 0 microns. to give you an idea of the difference at 24000 microns (29.0" hg) water boils at 72 degrees F, at 500 microns (29.9" hg) water boils at -12 degrees F. If you are boiling water at -12 degrees you can be sure the system is super dry. It may take quite some time to get it down this good and depends on just how dry or contaminated your system was in the first place. So this is the "proper" way to do it, but I'll go ahead and say you can do it with out getting the vacuum gauge, cause they are kinda pricey and if you're not using it all the time there's not much point in it. so instead what you do is Listen to the vacuum pump. remember when you first started the pump and opened the manifold valves, the tone of the vacuum pump changed to a deeper sound and it began to billow smoke out of it. you can periodically go to the manifold and close both valves again and listen to the pump, if you can tell the difference in the sound when the valves were open to when they are closed then you still have a ways togo, likewise if you still see vapor pouring out the vacuum pump there is still moisture inside that will take some time to remove. once you get to a point where you can open and close the valves and you don't notice much difference in the way the pump sounds then you have got a decent vacuum. good enough anyway. For a car system this might take 30-45 min, but the truth is you really don't know for sure without the vacuum gauge just how good it is, but do it like this and it will be good enough. NOW, when you think you've got a good enough vacuum DO NOT turn the pump off just yet. FIRST close the valves on the manifold THEN turn the vacuum pump off. you should be holding in a vacuum and reading negative on the blue gauge. we don't want to let atmosphere back into the system, we want to hold it in a vacuum and let that vacuum suck the refrigerant into our pipes. so now we need an Accurate Scale so that we can measure in the precise amount of refrigerant(or close). 24 oz of R134a. I'm also not familiar with the Rules you guys everywhere else have to deal with about acquiring refrigerant. In Missoura your Mom could walk into an O'reilly auto and buy Freon all day and nobody would even bat an eye, or Walmart too. maybe it's not so lax in Cali or Europe. maybe you'll need the help of a friend with a refrigerant certification. Although that card is not hard to get they just make you memorize a bunch of dates and regulations about not releasing it into the air and crap. Also remember there is the 1/4" fitting on a refrigerant drum bought for regular machines, and the 1/2" acme fitting on all automotive stuff, you can use whichever you get your hands on, R134a is the same no matter what, it's just a matter of using the 1/2" acme yellow hose the manifold came with, or attaching it to the adaptor and 1/4" flare hose if you have the other drum. you can use the little cans if you need to, but its better if you can get at least the whole 24 oz in one shot rather than take the chance of getting air mixed in when you have to switch out the smaller cans. /shrug So, if you have a large drum and a scale; at this point you are still holding your vacuum with the manifold valves closed hook up the refrigerant drum to the yellow hose open the valve on the drum and turn the drum upside down and set it on the scale, hit tare to zero the scale out. With the drum upside down you are getting Liquid refrigerant out of the drum, if it were right-side up you'd get vapor. we want liquid here. Then reach up to the other end of the yellow hose at the manifold connection and unscrew the hose from the manifold just a bit, just enough so that a little bit of refrigerant comes out of the hose then screw it back down tight. What you've just done is purge the air that was trapped in the yellow hose out and now the hose has only refrigerant in it. at this point the Manifold valves are still closed and holding vacuum inside the piping system. now we are ready to Open the High side Valve(red side) and the vacuum will begin to suck Liquid refrigerant into the high side of the system. slowly it will bleed through the system to the low side where it will bleed off through the metering device and flash into vapor before it enters the lowside. This is where you most certainly would NOT want to open the blue valve and let liquid straight into the low side where it would rush all that liquid straight to the compressor and ruin it as soon as you turn it on. watch the scale and close off the red valve on the manifold once you get to 24 oz and you're done. now you can go and start the car and kick on the AC full blast to watch the gauges. check for the readings as described in the beginning. the Temperature on the blue gauge should be around 40 degrees F, with the physical temperature of the pipe being about 15 degrees warmer. and the red gauge pressure should correspond to the temperature that is about 30 degrees hotter than whatever the temperature is outside. One important thing about adding refrigerant. When we had the system OFF and under a Vacuum we added Liquid refrigerant(can is upside down) Through the High(red) side. BUT when the system is RUNNING you open the Blue valve to add VAPOR refrigerant(can is right-side up) to the Low Side. quick physics class: the Higher pressure will go toward the Lower pressure until the two equalize. So What if you have a little can of R134a hooked up to the yellow hose and you open the red valve?? If it were 85 degrees outside the little can of refrigerant in your hand is at 95 psi, and the condenser pressure on the high side is about 160 psi (possible higher depending on the load). So it will flow Back out of the condenser and INTO the can in your hand, and you're gonna have a bad time... IF your compressor is noisy and rattles a bit you need a little more compressor oil for it. you can get that stuff at the auto parts store in little cans, and it is probably better to add it to the low side with one of those short hose single valves that screw straight on to the can. just add a little until the compressor shuts up, the total charge is only 4 oz. This post has been edited by VavAlephVav: May 28, 2014 - 2:18 AM -------------------- Bust a Deal; Face the Wheel.
|
Posts in this topic
 VavAlephVav How To Charge your Air Conditioning System May 27, 2014 - 4:23 PM
 njccmd2002 hmm this is cool.. hurry up and do it... how do ... May 27, 2014 - 9:15 PM VavAlephVav ya my Dad asked me to help him figure out how to g... May 27, 2014 - 10:22 PM VavAlephVav Ok So now we will look at how to Recover the syste... May 27, 2014 - 11:54 PM
 VavAlephVav and I forgot to add, the Filter/Dryer that njccmd2... Aug 9, 2014 - 9:08 PM
 |
1 User(s) are reading this topic (1 Guests and 0 Anonymous Users)
0 Members:
| Lo-Fi Version | Time is now: July 9th, 2026 - 12:47 PM |