
 May 28, 2006 - 3:20 AM May 28, 2006 - 3:20 AM
|
 
|
 Administrator  Joined Aug 23, '02 From Seattle, WA Currently Offline Reputation: 14 (100%) |
This thread is going to be updated as I do some bodywork and paint my car. I always love these progression threads myself, so I figured I'd make my own this time.
 Please post your comments as I go along. Since this is my project car and has a salvage title due to vandalism, I'm not doing things that I would if this were going to be a super nice paintjob, like having the rear side windows removed (Average quoted price was $200 around here) and using urethane base coat/clear coat paint (Expensive! And two different types of coats means twice the chances of me messing up.) I'm going to use an enamel of some sort, and going to stick with yellow probably. Anyway, on with the project: Day One Day one started with washing the car with lots of harsh dishsoap and drying it, to remove dirt and some wax. Don't mind the amateur graffiti or the ugly front wheels...Les Schwab screwed up my alignment and it ate my nice Yokohomas up front.  But do note those sexy sideskirts in the foreground...DCW JDM dealer option replicas, which fit perfectly and are beautiful! Props to Romas for excellent work on those skirts! But do note those sexy sideskirts in the foreground...DCW JDM dealer option replicas, which fit perfectly and are beautiful! Props to Romas for excellent work on those skirts!  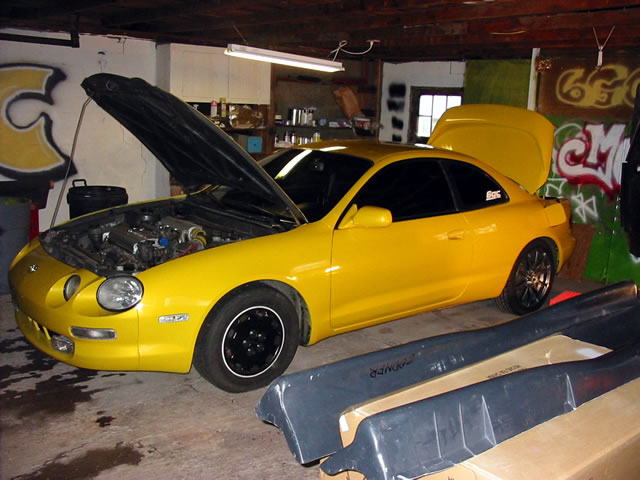 I then removed the bumpers, headlights, tail-lights, trunk lid, license plate bezel, and some other things. My front bumper is being replaced with a non-modified '95 bumper, and I'm getting rid of the fog lights. My license plate bezel and trunk lid are being replaced with parts from a '94 coupe as well, since they were both damaged in the horrible vandalism incident last June. 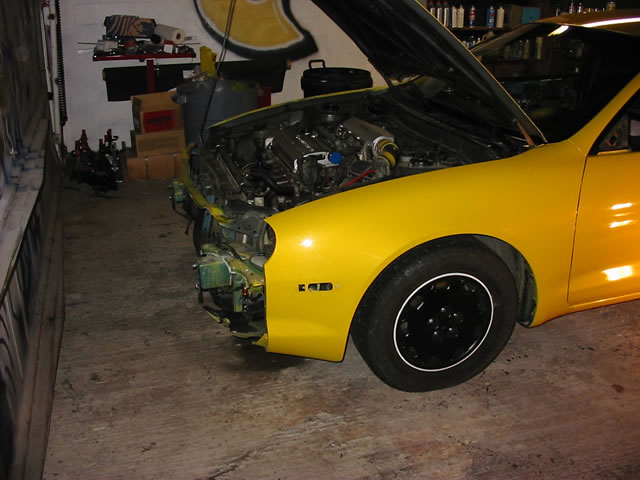 The next step was to start sanding, so I applied grease and wax remover to the hood and front fenders and wetsanded those with 400 grit sandpaper. I called it a day after wetsanding the front end. -------------------- New Toyota project coming soon...
|

 |
Replies
|
May 28, 2006 - 3:39 AM
|
|
|
Administrator Joined Aug 23, '02 From Seattle, WA Currently Offline Reputation: 14 (100%) |
Day Two
Day two started with more cleaning with grease and wax remover, and then sanding some of the scratches from when my car was vandalized. I used 120, then 220, then 320, then 400 for these areas, except in a couple areas where the scratches are so deep that it'll be easier to use some body filler.  I then sanded the roof and sides of the car, fuel door, all that fun stuff. I managed to get fiberglass embedded into my arm from my spot sanding pen, which wasn't much fun. 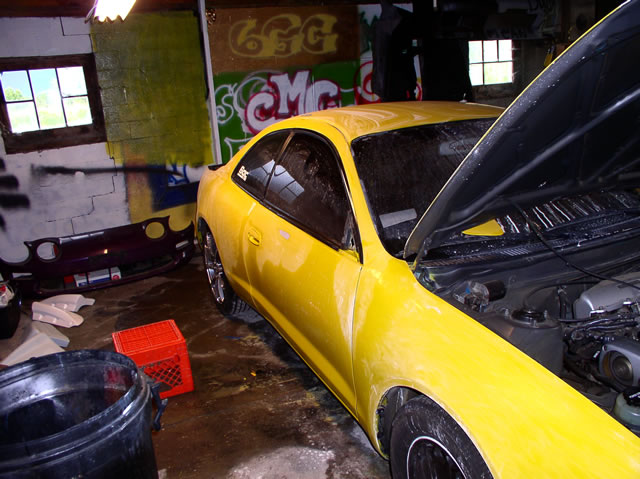 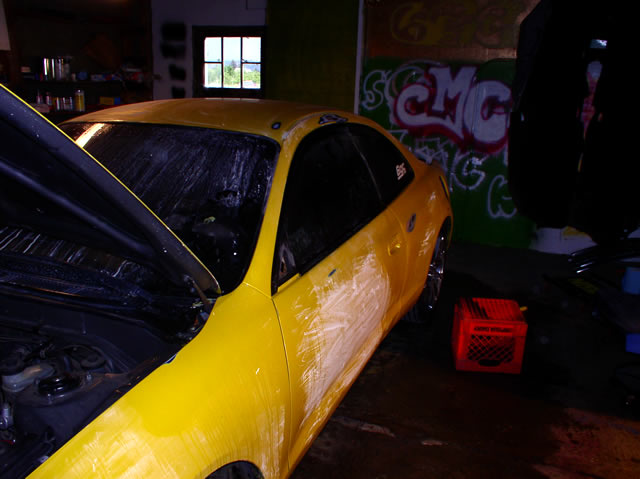 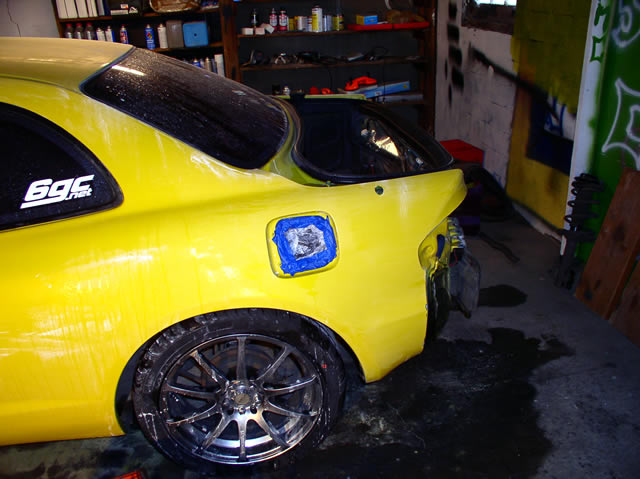 Once the whole car was sanded (the stuff off the car still isn't sanded, except the trunk lid), I took a break and then worked on getting the TRD replica wing to fit. My new trunk lid has four holes in incorrect places that need to be filled, and needs four new holes for the wing. I drilled the new holes and laid fiberglass over the holes that are going to be filled from the bottom side of the trunk lid, and tomorrow will fill these holes in completely with body filler. I also fixed a small chip in a sideskirt caused by shipping, and filled the backside of the antenna hole with fiberglass cloth. From what I read, for a small area such as this, the fiberglass cloth should be fine and shouldn't crack and fall off. Again, this is another corner cut, where the best situation would've been to have sheet metal welded in there. 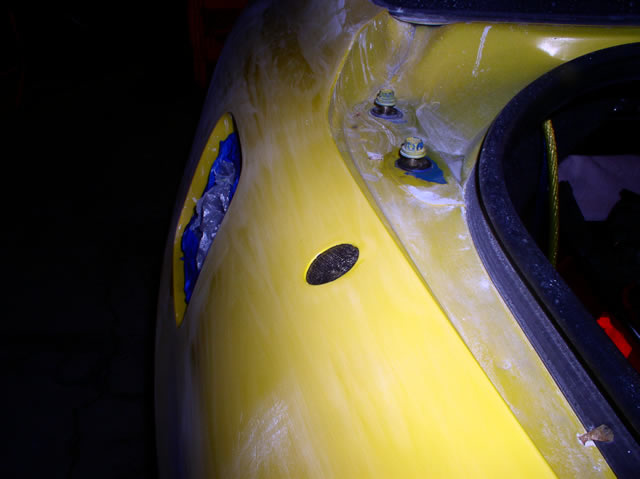 At this point, it was late, and I'd been working for a good eight hours or so, so I called it a night. I'm debating whether or not to shave the sidemarkers. Now would be to opportune time to do it, but I'm not quite sure if I want to. What do you guys think? -------------------- New Toyota project coming soon...
|
Posts in this topic
 Coomer My Yelli Celi Bodywork Project May 28, 2006 - 3:20 AM
 Kadett Nice work Coomer, yeah if I were you I would shave... May 28, 2006 - 3:49 AM j0e_p3t nice. good to know you're keeping your celica. May 28, 2006 - 3:55 AM pandakid looking nice, hope everyhing comes out great May 28, 2006 - 3:55 AM Batman722 You have incredible skills Coomer, I vote get rid ... May 28, 2006 - 8:01 AM presure2 looks good so far chris, good to see you bringin b... May 28, 2006 - 8:15 AM jgreening Keep up the good work Coom. Are you keeping her n... May 28, 2006 - 8:27 AM ILuvMyCelica95 Nice work Coom!! I think u should ditch th... May 28, 2006 - 8:32 AM dustinkemp good lookin coom.
new color? same color? mods? May 28, 2006 - 10:44 AM Supersprynt I guess im outta the loop? Not selling ne more I... May 28, 2006 - 10:47 AM ILuvMyCelica95 aren't u going with that greenish color? May 28, 2006 - 11:20 AM 97lestyousay Nice work, can't wait to see it finished. May 28, 2006 - 11:53 AM Digndoug About filling in the fender, do you think the fibe... May 28, 2006 - 4:07 PM b1gr3d as long as you fill thr outside of the holes with ... May 28, 2006 - 9:25 PM Digndoug QUOTE(b1gr3d @ May 28, 2006 - 10:25 ... May 28, 2006 - 9:34 PM Coomer QUOTE(dustinkemp @ May 28, 2006 - 8... May 28, 2006 - 11:37 PM Coomer Day Three
Day three didn't consist of getting... May 29, 2006 - 3:34 PM j0e_p3t damn... bleeding fingers. that's when you know... May 29, 2006 - 4:27 PM axelrduvirage Hey Coomer,
good luck and much success with the p... May 29, 2006 - 4:34 PM Coomer Day Four
Today was a very productive day, at leas... May 30, 2006 - 3:11 AM Supersprynt Are you relocating the key hole, with the Curren w... May 30, 2006 - 2:19 PM
Kadett Nice work Coomer, yeah if I were you I would shave... May 28, 2006 - 3:49 AM j0e_p3t nice. good to know you're keeping your celica. May 28, 2006 - 3:55 AM pandakid looking nice, hope everyhing comes out great May 28, 2006 - 3:55 AM Batman722 You have incredible skills Coomer, I vote get rid ... May 28, 2006 - 8:01 AM presure2 looks good so far chris, good to see you bringin b... May 28, 2006 - 8:15 AM jgreening Keep up the good work Coom. Are you keeping her n... May 28, 2006 - 8:27 AM ILuvMyCelica95 Nice work Coom!! I think u should ditch th... May 28, 2006 - 8:32 AM dustinkemp good lookin coom.
new color? same color? mods? May 28, 2006 - 10:44 AM Supersprynt I guess im outta the loop? Not selling ne more I... May 28, 2006 - 10:47 AM ILuvMyCelica95 aren't u going with that greenish color? May 28, 2006 - 11:20 AM 97lestyousay Nice work, can't wait to see it finished. May 28, 2006 - 11:53 AM Digndoug About filling in the fender, do you think the fibe... May 28, 2006 - 4:07 PM b1gr3d as long as you fill thr outside of the holes with ... May 28, 2006 - 9:25 PM Digndoug QUOTE(b1gr3d @ May 28, 2006 - 10:25 ... May 28, 2006 - 9:34 PM Coomer QUOTE(dustinkemp @ May 28, 2006 - 8... May 28, 2006 - 11:37 PM Coomer Day Three
Day three didn't consist of getting... May 29, 2006 - 3:34 PM j0e_p3t damn... bleeding fingers. that's when you know... May 29, 2006 - 4:27 PM axelrduvirage Hey Coomer,
good luck and much success with the p... May 29, 2006 - 4:34 PM Coomer Day Four
Today was a very productive day, at leas... May 30, 2006 - 3:11 AM Supersprynt Are you relocating the key hole, with the Curren w... May 30, 2006 - 2:19 PM
 Coomer QUOTE(Supersprynt @ May 30, 2006 - 12... May 30, 2006 - 2:57 PM dustin15brown I have been recomended to weld shut the sidemarker... May 30, 2006 - 3:09 PM Coomer QUOTE(dustin15brown @ May 30, 2006 - 1... May 30, 2006 - 3:25 PM brianforster damn coomer, nice job, this really inspires me to ... May 30, 2006 - 4:03 PM Coomer QUOTE(brianforster @ May 30, 2006 - 2... May 30, 2006 - 4:12 PM 97lestyousay QUOTE(Coomer @ May 30, 2006 - 2:12 P... May 30, 2006 - 8:41 PM brianforster my big problem with my body work right now is my f... May 30, 2006 - 4:26 PM Digndoug The fender looks good.. Thats exactly what i wante... May 30, 2006 - 7:59 PM amysmojo Can't wait to see your finished project @ the ... May 30, 2006 - 8:11 PM dustinkemp close amy ^^^
nice finding lol May 30, 2006 - 8:16 PM dustin15brown QUOTE(Coomer @ May 30, 2006 - 8:25 P... May 30, 2006 - 8:30 PM snapshotgt Plans to keep the car after all eh? ...not selling... May 30, 2006 - 10:41 PM KAOS Coomer what year bumper do you have? And are you s... May 30, 2006 - 10:53 PM playr158 QUOTE(dustin15brown @ May 30, 2006 - 9... May 31, 2006 - 1:00 AM Coomer This weekend I'm going to have lots of free ti... Jun 2, 2006 - 3:12 PM Supersprynt Honestly, I really dislike that. I'm not fond ... Jun 2, 2006 - 3:20 PM brianforster i dont really like the shaved liscence plate AT AL... Jun 2, 2006 - 3:37 PM playr158 i like the shave plate...well cause i did it...exp... Jun 2, 2006 - 4:10 PM azian_advanced ^^ what he said. but i think a uk plate surround ... Jun 2, 2006 - 4:11 PM ILuvMyCelica95 I dont like the rear plate hanging off the back li... Jun 2, 2006 - 5:12 PM Coomer Thanks for the comments. I'll probably just g... Jun 2, 2006 - 5:57 PM jgreening Christian, what are you going to do for paint? (c... Jun 2, 2006 - 6:21 PM Coomer QUOTE(jgreening @ Jun 2, 2006 - 4:21... Jun 2, 2006 - 7:10 PM jgreening QUOTE(Coomer @ Jun 2, 2006 - 7:10 PM... Jun 2, 2006 - 7:18 PM Coomer QUOTE(jgreening @ Jun 2, 2006 - 5:18... Jun 2, 2006 - 8:12 PM KAOS What you SHOULD do coomer is wire in a couple of r... Jun 2, 2006 - 7:57 PM CelicaZR Good luck Coomer
Cant wait to see the outcome Jun 2, 2006 - 8:06 PM Supersprynt Are you staying yellow? I know you hated it becaus... Jun 2, 2006 - 8:16 PM Coomer QUOTE (Supersprynt @ Jun 2, 2006 - 6... Jun 3, 2006 - 1:58 AM celicast3sgte i think a happy medium of yellow will work good co... Jun 3, 2006 - 2:17 AM JonCars17 I know this seems like a stupid question, but why ... Jun 3, 2006 - 5:09 AM 97lestyousay Because Yakima Cops are scared of real criminals. ... Jun 3, 2006 - 8:56 AM romeovaj well thats a stupid reason to pull people over Jun 3, 2006 - 9:13 AM dustin15brown thats yakima..... I mean just look at Coomer.... a... Jun 3, 2006 - 9:29 AM j0e_p3t QUOTE(Coomer @ Jun 2, 2006 - 11:58 P... Jun 3, 2006 - 3:10 PM Kadett I Agree, old color is better. Looks smoother, dont... Jun 3, 2006 - 3:22 PM Hanyo get a sexy euro plate holder Jun 3, 2006 - 4:38 PM Coomer QUOTE(Hanyo @ Jun 3, 2006 - 2:38 PM)... Jun 3, 2006 - 4:58 PM BLINKYxMUNKEY Nicely done. You are doing front and rear extensio... Jun 3, 2006 - 5:15 PM Coomer QUOTE(BLINKYxMUNKEY @ Jun 3, 2006 - 3... Jun 3, 2006 - 7:05 PM playr158 wat happened to the honda color you were discussin... Jun 3, 2006 - 7:05 PM Supersprynt Yeah mine are not great either so I've decided... Jun 3, 2006 - 8:45 PM jgreening Thats strange, mine fit nearly perfectly. Jun 3, 2006 - 9:58 PM Coomer Day Five
Today was a long day. I started by sandi... Jun 4, 2006 - 3:06 AM presure2 nice work chris, your definetly gonna want to get ... Jun 4, 2006 - 11:12 AM j0e_p3t nice. looks like professional work. keep it up. i ... Jun 4, 2006 - 11:16 AM Coomer Day Six
Today I got the paint booth to work reaso... Jun 4, 2006 - 9:02 PM Supersprynt I'm going to send you some parts ok?
Looks ... Jun 4, 2006 - 9:18 PM soulshadow Coomer what gun are u using for your spraying and ... Jun 4, 2006 - 9:24 PM b1gr3d if u got that much orange peel it was probably bec... Jun 4, 2006 - 11:04 PM dustin15brown Coomer you are doing an amazing job! Keep it u... Jun 5, 2006 - 12:53 AM doGGy Check what Air pressure your Paint gun requers - i... Jun 5, 2006 - 4:13 AM axelrduvirage Hey Coomer,
keep at it man! That yellow fend... Jun 5, 2006 - 7:47 AM turboinduction Hey Chris nice project. Long time no type. I... Jun 5, 2006 - 10:54 AM brianforster wow blast from the bast, whats up ti Jun 5, 2006 - 11:08 AM Silver94CelicaOwner Great work Coomer, I'm following this closely ... Jun 5, 2006 - 12:29 PM Silver94CelicaOwner Any updates yet Chris, or have you been busy latel... Jun 13, 2006 - 12:03 AM BLINKYxMUNKEY Bump. Updates? Jun 26, 2006 - 4:49 PM Rayme Awesome man, I'll be shortly starting my own b... Jun 26, 2006 - 6:54 PM Coomer I'm a bit discouraged. I sanded everything dow... Jun 26, 2006 - 7:04 PM axelrduvirage hang in there buddy.
i started my project http:... Jun 27, 2006 - 5:34 AM Coomer Day Seven
Today consisted of sanding everything d... Jun 28, 2006 - 10:26 PM CelicaQT OUCH! Try to get some aloe on there Chris... Jun 28, 2006 - 10:30 PM axelrduvirage instead of aloe, try hanging a few lights and some... Jun 29, 2006 - 4:51 AM doGGy Chris - about orange peel - either you are using t... Jun 29, 2006 - 9:41 AM Coomer Day Eight
Today was a good day...I finally got th... Jul 1, 2006 - 3:43 AM JFrost9 What did you do to get the paint to work out? I t... Jul 1, 2006 - 2:02 PM dustin15brown looking great coom Jul 1, 2006 - 7:21 PM Rayme are you using a single coat type of paint? (uretha... Jul 2, 2006 - 10:05 PM tomazws Looks awesome! Jul 3, 2006 - 12:37 PM WH95TE I cant wait to see the finished product. Yellow is... Jul 3, 2006 - 1:58 PM Coomer Day Nine
Day nine was tons of work, but I got a l... Jul 3, 2006 - 8:43 PM b1gr3d QUOTE(Coomer @ Jul 3, 2006 - 7:43 PM... Jul 3, 2006 - 10:30 PM NEVERSTOP lookin great Coom! I'll glad you didnt giv... Jul 4, 2006 - 12:41 AM dustin15brown QUOTE(NEVERSTOP @ Jul 4, 2006 - 1:41... Jul 4, 2006 - 1:34 AM Coomer Day Ten
Today I painted the last of the parts off... Jul 4, 2006 - 8:18 AM Batman722 Coomer, I am so looking forward to seeing the fini... Jul 4, 2006 - 11:36 AM Jaws4God are you putting on a different spoiler? Jul 4, 2006 - 11:35 PM
Coomer QUOTE(Supersprynt @ May 30, 2006 - 12... May 30, 2006 - 2:57 PM dustin15brown I have been recomended to weld shut the sidemarker... May 30, 2006 - 3:09 PM Coomer QUOTE(dustin15brown @ May 30, 2006 - 1... May 30, 2006 - 3:25 PM brianforster damn coomer, nice job, this really inspires me to ... May 30, 2006 - 4:03 PM Coomer QUOTE(brianforster @ May 30, 2006 - 2... May 30, 2006 - 4:12 PM 97lestyousay QUOTE(Coomer @ May 30, 2006 - 2:12 P... May 30, 2006 - 8:41 PM brianforster my big problem with my body work right now is my f... May 30, 2006 - 4:26 PM Digndoug The fender looks good.. Thats exactly what i wante... May 30, 2006 - 7:59 PM amysmojo Can't wait to see your finished project @ the ... May 30, 2006 - 8:11 PM dustinkemp close amy ^^^
nice finding lol May 30, 2006 - 8:16 PM dustin15brown QUOTE(Coomer @ May 30, 2006 - 8:25 P... May 30, 2006 - 8:30 PM snapshotgt Plans to keep the car after all eh? ...not selling... May 30, 2006 - 10:41 PM KAOS Coomer what year bumper do you have? And are you s... May 30, 2006 - 10:53 PM playr158 QUOTE(dustin15brown @ May 30, 2006 - 9... May 31, 2006 - 1:00 AM Coomer This weekend I'm going to have lots of free ti... Jun 2, 2006 - 3:12 PM Supersprynt Honestly, I really dislike that. I'm not fond ... Jun 2, 2006 - 3:20 PM brianforster i dont really like the shaved liscence plate AT AL... Jun 2, 2006 - 3:37 PM playr158 i like the shave plate...well cause i did it...exp... Jun 2, 2006 - 4:10 PM azian_advanced ^^ what he said. but i think a uk plate surround ... Jun 2, 2006 - 4:11 PM ILuvMyCelica95 I dont like the rear plate hanging off the back li... Jun 2, 2006 - 5:12 PM Coomer Thanks for the comments. I'll probably just g... Jun 2, 2006 - 5:57 PM jgreening Christian, what are you going to do for paint? (c... Jun 2, 2006 - 6:21 PM Coomer QUOTE(jgreening @ Jun 2, 2006 - 4:21... Jun 2, 2006 - 7:10 PM jgreening QUOTE(Coomer @ Jun 2, 2006 - 7:10 PM... Jun 2, 2006 - 7:18 PM Coomer QUOTE(jgreening @ Jun 2, 2006 - 5:18... Jun 2, 2006 - 8:12 PM KAOS What you SHOULD do coomer is wire in a couple of r... Jun 2, 2006 - 7:57 PM CelicaZR Good luck Coomer
Cant wait to see the outcome Jun 2, 2006 - 8:06 PM Supersprynt Are you staying yellow? I know you hated it becaus... Jun 2, 2006 - 8:16 PM Coomer QUOTE (Supersprynt @ Jun 2, 2006 - 6... Jun 3, 2006 - 1:58 AM celicast3sgte i think a happy medium of yellow will work good co... Jun 3, 2006 - 2:17 AM JonCars17 I know this seems like a stupid question, but why ... Jun 3, 2006 - 5:09 AM 97lestyousay Because Yakima Cops are scared of real criminals. ... Jun 3, 2006 - 8:56 AM romeovaj well thats a stupid reason to pull people over Jun 3, 2006 - 9:13 AM dustin15brown thats yakima..... I mean just look at Coomer.... a... Jun 3, 2006 - 9:29 AM j0e_p3t QUOTE(Coomer @ Jun 2, 2006 - 11:58 P... Jun 3, 2006 - 3:10 PM Kadett I Agree, old color is better. Looks smoother, dont... Jun 3, 2006 - 3:22 PM Hanyo get a sexy euro plate holder Jun 3, 2006 - 4:38 PM Coomer QUOTE(Hanyo @ Jun 3, 2006 - 2:38 PM)... Jun 3, 2006 - 4:58 PM BLINKYxMUNKEY Nicely done. You are doing front and rear extensio... Jun 3, 2006 - 5:15 PM Coomer QUOTE(BLINKYxMUNKEY @ Jun 3, 2006 - 3... Jun 3, 2006 - 7:05 PM playr158 wat happened to the honda color you were discussin... Jun 3, 2006 - 7:05 PM Supersprynt Yeah mine are not great either so I've decided... Jun 3, 2006 - 8:45 PM jgreening Thats strange, mine fit nearly perfectly. Jun 3, 2006 - 9:58 PM Coomer Day Five
Today was a long day. I started by sandi... Jun 4, 2006 - 3:06 AM presure2 nice work chris, your definetly gonna want to get ... Jun 4, 2006 - 11:12 AM j0e_p3t nice. looks like professional work. keep it up. i ... Jun 4, 2006 - 11:16 AM Coomer Day Six
Today I got the paint booth to work reaso... Jun 4, 2006 - 9:02 PM Supersprynt I'm going to send you some parts ok?
Looks ... Jun 4, 2006 - 9:18 PM soulshadow Coomer what gun are u using for your spraying and ... Jun 4, 2006 - 9:24 PM b1gr3d if u got that much orange peel it was probably bec... Jun 4, 2006 - 11:04 PM dustin15brown Coomer you are doing an amazing job! Keep it u... Jun 5, 2006 - 12:53 AM doGGy Check what Air pressure your Paint gun requers - i... Jun 5, 2006 - 4:13 AM axelrduvirage Hey Coomer,
keep at it man! That yellow fend... Jun 5, 2006 - 7:47 AM turboinduction Hey Chris nice project. Long time no type. I... Jun 5, 2006 - 10:54 AM brianforster wow blast from the bast, whats up ti Jun 5, 2006 - 11:08 AM Silver94CelicaOwner Great work Coomer, I'm following this closely ... Jun 5, 2006 - 12:29 PM Silver94CelicaOwner Any updates yet Chris, or have you been busy latel... Jun 13, 2006 - 12:03 AM BLINKYxMUNKEY Bump. Updates? Jun 26, 2006 - 4:49 PM Rayme Awesome man, I'll be shortly starting my own b... Jun 26, 2006 - 6:54 PM Coomer I'm a bit discouraged. I sanded everything dow... Jun 26, 2006 - 7:04 PM axelrduvirage hang in there buddy.
i started my project http:... Jun 27, 2006 - 5:34 AM Coomer Day Seven
Today consisted of sanding everything d... Jun 28, 2006 - 10:26 PM CelicaQT OUCH! Try to get some aloe on there Chris... Jun 28, 2006 - 10:30 PM axelrduvirage instead of aloe, try hanging a few lights and some... Jun 29, 2006 - 4:51 AM doGGy Chris - about orange peel - either you are using t... Jun 29, 2006 - 9:41 AM Coomer Day Eight
Today was a good day...I finally got th... Jul 1, 2006 - 3:43 AM JFrost9 What did you do to get the paint to work out? I t... Jul 1, 2006 - 2:02 PM dustin15brown looking great coom Jul 1, 2006 - 7:21 PM Rayme are you using a single coat type of paint? (uretha... Jul 2, 2006 - 10:05 PM tomazws Looks awesome! Jul 3, 2006 - 12:37 PM WH95TE I cant wait to see the finished product. Yellow is... Jul 3, 2006 - 1:58 PM Coomer Day Nine
Day nine was tons of work, but I got a l... Jul 3, 2006 - 8:43 PM b1gr3d QUOTE(Coomer @ Jul 3, 2006 - 7:43 PM... Jul 3, 2006 - 10:30 PM NEVERSTOP lookin great Coom! I'll glad you didnt giv... Jul 4, 2006 - 12:41 AM dustin15brown QUOTE(NEVERSTOP @ Jul 4, 2006 - 1:41... Jul 4, 2006 - 1:34 AM Coomer Day Ten
Today I painted the last of the parts off... Jul 4, 2006 - 8:18 AM Batman722 Coomer, I am so looking forward to seeing the fini... Jul 4, 2006 - 11:36 AM Jaws4God are you putting on a different spoiler? Jul 4, 2006 - 11:35 PM |
1 User(s) are reading this topic (1 Guests and 0 Anonymous Users)
0 Members:
| Lo-Fi Version | Time is now: July 12th, 2026 - 6:41 AM |