
 Mar 18, 2008 - 1:06 PM Mar 18, 2008 - 1:06 PM
|
 
|
 Enthusiast  Joined Jan 31, '08 From Canada Currently Offline Reputation: 0 (0%) |
In this case the hole is in the floor 3 layers deep, including a re-inforcement piece for the rocker!
Alright before you start cutting out and getting ready for a patch you have to make sure you have the right tools for job as well as equipment! A welder , welding gloves, shield/blanket & helmet, fire extinguisher (in case you light something on fire ), safety glasses, clamps, pencil & paper to write down your measurements(or in my case paper towel), sheet metal (20 & 16 gauge), side cutters, grinder, non-latex gloves, pick hammer, light (if needed), tin snips, epoxy primer, sealer, die grinder, measuring tape, tape, dolly or anvil, and whatever else you may think you'll need.       This post has been edited by speedfeen: Mar 18, 2008 - 1:15 PM --------------------  FEEN |

 |
Replies
|
Mar 18, 2008 - 1:16 PM
|
|
|
Enthusiast Joined Jan 31, '08 From Canada Currently Offline Reputation: 0 (0%) |
First things first. If you are going to have an accurate patch you must first MEASURE what you are cutting out and mark it down.  2. Cut out rusted area with tin snips, and grind off the really sharp edges. Make sure any wiring or sound deadener is clear of your working area. In this case I had to remove the sound deadner and tape up the wiring while I held it in place with a block of wood. Grind the area clean of rust or debris as this will not weld good and cause a lot of porosity in the welds. 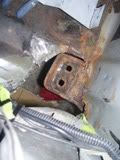 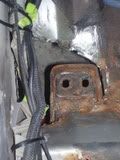 3. Before you go cutting random peices of metal make yourself a patch pattern, this way when you go to bend the piece of metal you are not running back and forth to see if it fits, which is more efficent.  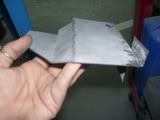 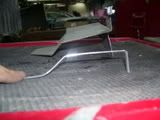 4. Make your patches to fit within 1/8 of an inch for accuracy. Use a pick hammer, anvil. dolly to make the edges accurate. This was one of the hardest patches to make as there were so many twists to it. Took maybe 1 to 2 hours to make the patch fit perfect! Tack weld them into place. Now be careful where you are welding. Depending on the area if you weld too fast, you will warp the panel, in this case, we are working with 16 gauge steel and 3 layers thick on the floor panel, not too much warping will happen. Weld around 8 tack welds then wait for it to cool and so forth. Keep them secured with clamps, patch holder or anything you can get your hands on. Remember your welds don't have to extra pretty, inmost cases you end up grinding them anyways. On a note if you have any holes in your patches try to do them first and as accurately in the right place as possible. Thats where the die grinder comes in. Clean the patches with wax and silicon remover to remove any substances on the metal. The white stuff around the welds is the galvonized coating on the metal. (Galvonized will help keep the metal from rusting out in the future). 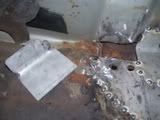 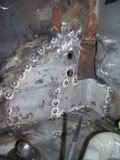 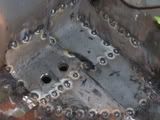 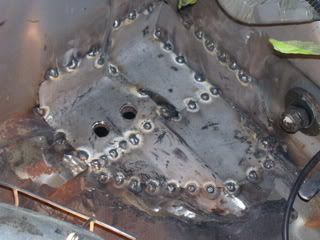 Touch-ups can be made to the holes after they have been welded in. Final welded patches. Includes 4-5 patches. 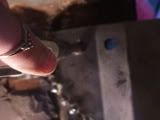 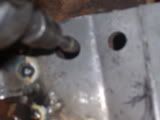 Let it cool down, then apply epoxy primer. Epoxy is a rust inhibitor, allows the life time of the metal to increase without the damage of rust. It seals it and it is waterproof. Epoxy is expensive so only use when needed. 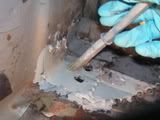  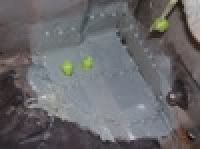 This epoxy is suppose to cure with in 40 minutes so follow the instructions to get the quality of the product. Now because we are dealing with the floor we do not need to grind the welds. Once the epoxy dries, apply sealer to it for an even better seal! In the holes, there are bolts so in case I get sealer in the holes and it dries, I put the bolts in and taped them so they would stay in place then sealed around them. Make sure you get al around the welds to cover the spaces between the tacks.      And voila! You have patched a floor of a (in this case an 87 300 ZX) floor! Let the sealer finish it's working time then remove the bolts. Let it cure completely before you re-install the sound deadener and wiring. Final result.... http://i84.photobucket.com/albums/k11/tige...rk/Mazda012.jpg Some other patches I did on the car 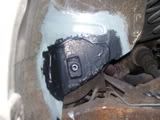 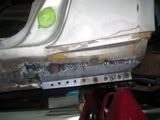  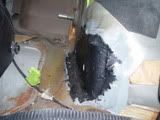 Well I hoped this helped, if you have any questions about this or any other body work, I'll answer it to the best of my knowledge, now remember I am an apprentice not a journeyman! Thanks for lookin! FEEN -------------------- FEEN |
Posts in this topic
 speedfeen How to build a patch that will last :) Mar 18, 2008 - 1:06 PM
 playr158 nice job
I'm doing about the same process on... Mar 18, 2008 - 1:17 PM D-Man Good job. Mar 18, 2008 - 2:14 PM speedfeen thank you
feen Mar 18, 2008 - 2:30 PM
playr158 nice job
I'm doing about the same process on... Mar 18, 2008 - 1:17 PM D-Man Good job. Mar 18, 2008 - 2:14 PM speedfeen thank you
feen Mar 18, 2008 - 2:30 PM
 D-Man QUOTE(speedfeen @ Mar 18, 2008 - 3:3... Mar 18, 2008 - 2:59 PM presure2 great work.
i would really like to see some work o... Mar 18, 2008 - 5:47 PM speedfeen QUOTE(presure2 @ Mar 18, 2008 - 5:47... Mar 19, 2008 - 10:25 AM speedfeen BODY WORK
there you go presure2 and everyone e... Mar 19, 2008 - 3:17 PM D-Man Reminds me of my first cougar.... Infact they have... Mar 19, 2008 - 3:20 PM 6strngs how about a right up on shaving emblem holes or re... Mar 19, 2008 - 3:54 PM speedfeen i wont have many pics BUT
i will write one up tom... Mar 19, 2008 - 9:07 PM speedfeen QUOTE(6strngs @ Mar 19, 2008 - 3:54 ... Mar 20, 2008 - 10:57 AM 6strngs anyway to do emblem holes other than welding? Mar 20, 2008 - 3:29 PM speedfeen not the right way....mickey mouse??? sure but im a... Mar 20, 2008 - 3:57 PM 6strngs I'm not sure what you mean by mickey mouse. bu... Mar 20, 2008 - 4:18 PM speedfeen then dont do it yourself....
MICKEY MOUSE...is... Mar 20, 2008 - 6:31 PM
D-Man QUOTE(speedfeen @ Mar 18, 2008 - 3:3... Mar 18, 2008 - 2:59 PM presure2 great work.
i would really like to see some work o... Mar 18, 2008 - 5:47 PM speedfeen QUOTE(presure2 @ Mar 18, 2008 - 5:47... Mar 19, 2008 - 10:25 AM speedfeen BODY WORK
there you go presure2 and everyone e... Mar 19, 2008 - 3:17 PM D-Man Reminds me of my first cougar.... Infact they have... Mar 19, 2008 - 3:20 PM 6strngs how about a right up on shaving emblem holes or re... Mar 19, 2008 - 3:54 PM speedfeen i wont have many pics BUT
i will write one up tom... Mar 19, 2008 - 9:07 PM speedfeen QUOTE(6strngs @ Mar 19, 2008 - 3:54 ... Mar 20, 2008 - 10:57 AM 6strngs anyway to do emblem holes other than welding? Mar 20, 2008 - 3:29 PM speedfeen not the right way....mickey mouse??? sure but im a... Mar 20, 2008 - 3:57 PM 6strngs I'm not sure what you mean by mickey mouse. bu... Mar 20, 2008 - 4:18 PM speedfeen then dont do it yourself....
MICKEY MOUSE...is... Mar 20, 2008 - 6:31 PM |
1 User(s) are reading this topic (1 Guests and 0 Anonymous Users)
0 Members:
| Lo-Fi Version | Time is now: July 9th, 2026 - 5:42 AM |