
 Jul 26, 2008 - 8:30 PM Jul 26, 2008 - 8:30 PM
|
 
|
|
Enthusiast  Joined Jan 2, '08 From Scotland Currently Offline Reputation: 3 (100%) |
OK posted a teaser in another thread. I've chosen a great crew to do the swap as I no longer have the facilities to do this myself.
Woodsport are well reknowned for their MR2 work in the UK. Paul, the boss, wanted to try a Celica conversion. So, without further ado, here we go.......... V6 Conversion by Paul Woods of Woodsport Anyone wanting to watch live  can do so HERE. User: woodsport pass:tv can do so HERE. User: woodsport pass:tv On arrival. 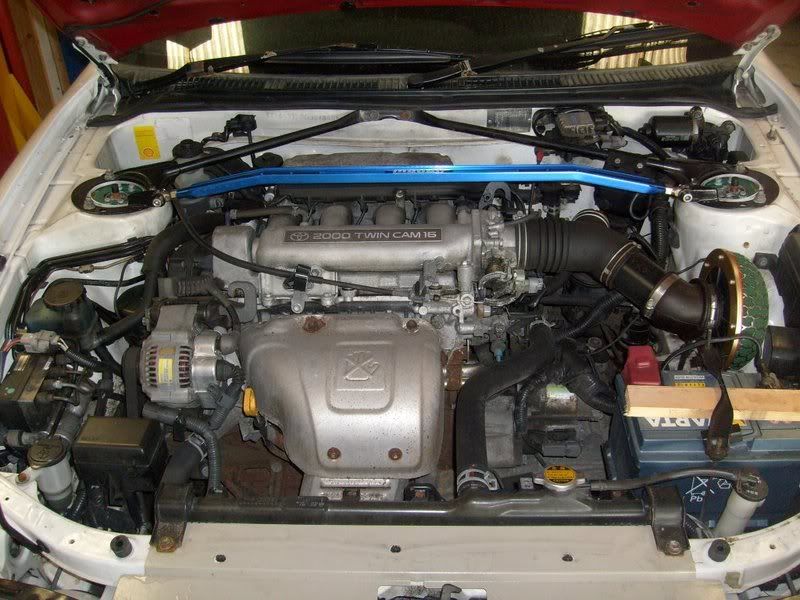 The "old" engine. Spare battery was a little on the short side, so, not being heightist, I gave it a little help =)) Making way for a good clean & a V6   Stripped ready for detailing, new gaskets, etc.  Heads ported to improve flow & BHP. Should be worth around 25-30 horsepower >:) Update  Heads & cams refitted As an Irish comedian once said, "and there's more" From the engine maestro Paul Woods- QUOTE well today was full of cleaning,priming,shotblasting and painting parts..... here are the major components all mocked up on the engine,i still have a lot of stuff to fit before this all goes on for good..... 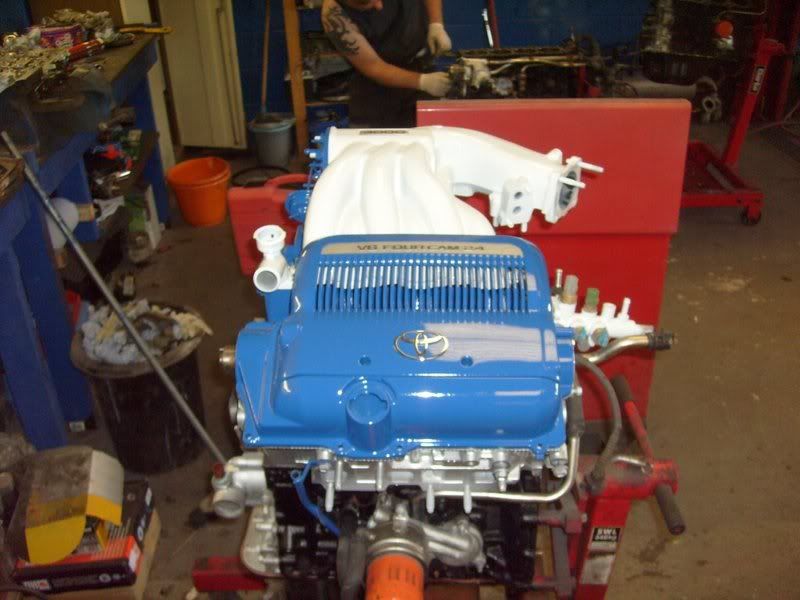  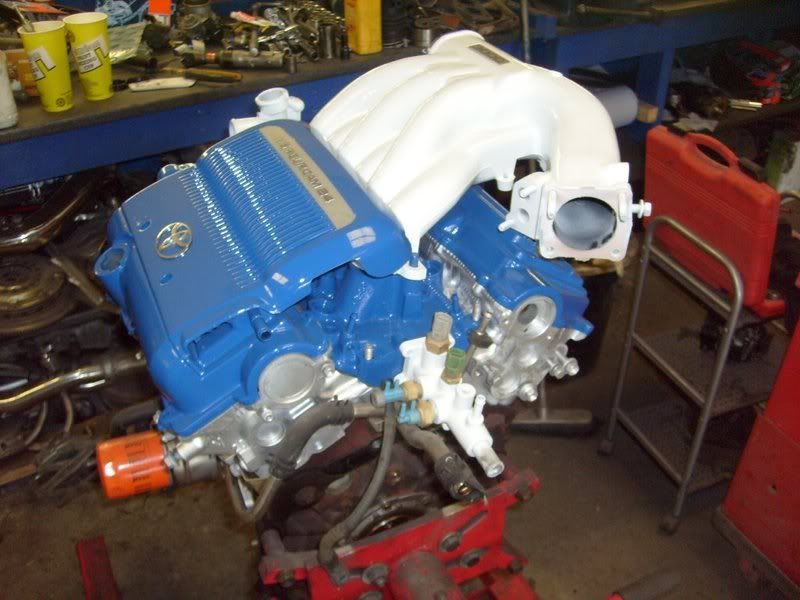 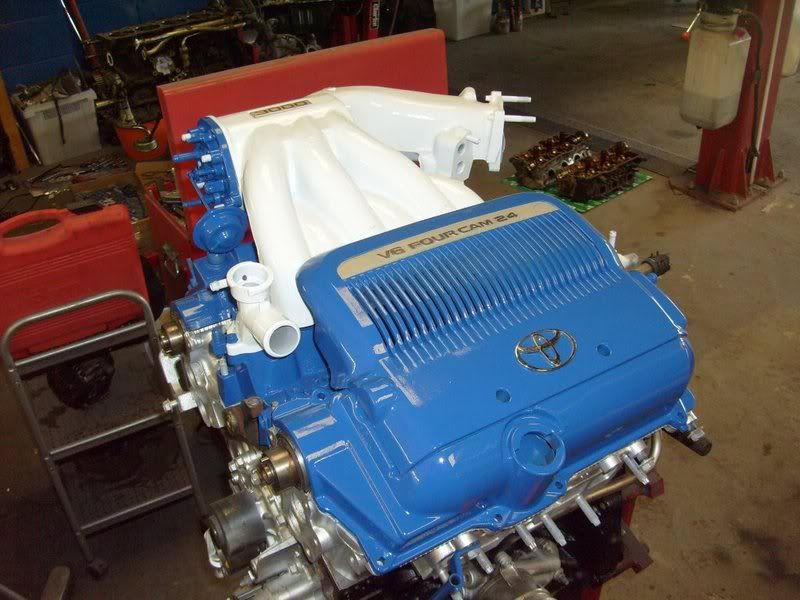 Yesterdays update (I was working then off on the falling down juice )  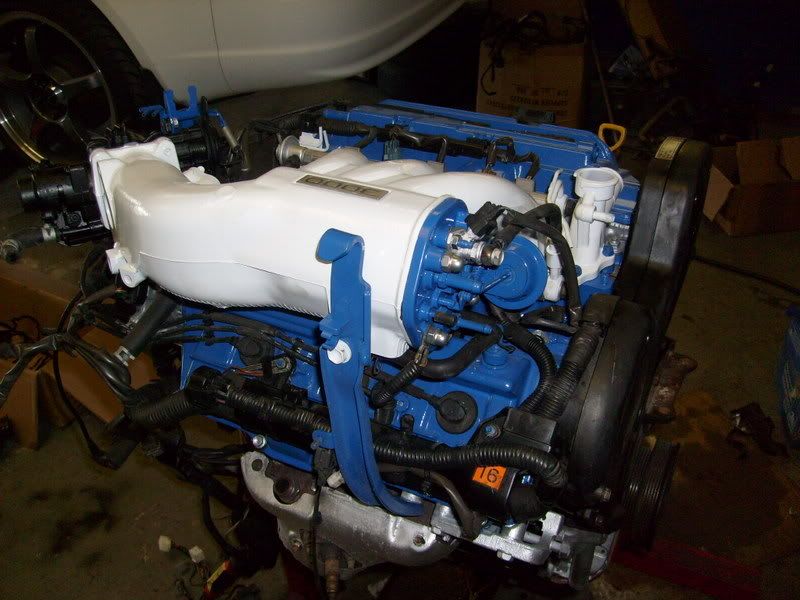  That's the engine 95% completed. Not long to wait for the fitting Was watching the Fidanza flywheel & new clutch being fitted today, as well as a VERY shiney gearbox Todays update Fidanza flywheel and new clutch fitted. 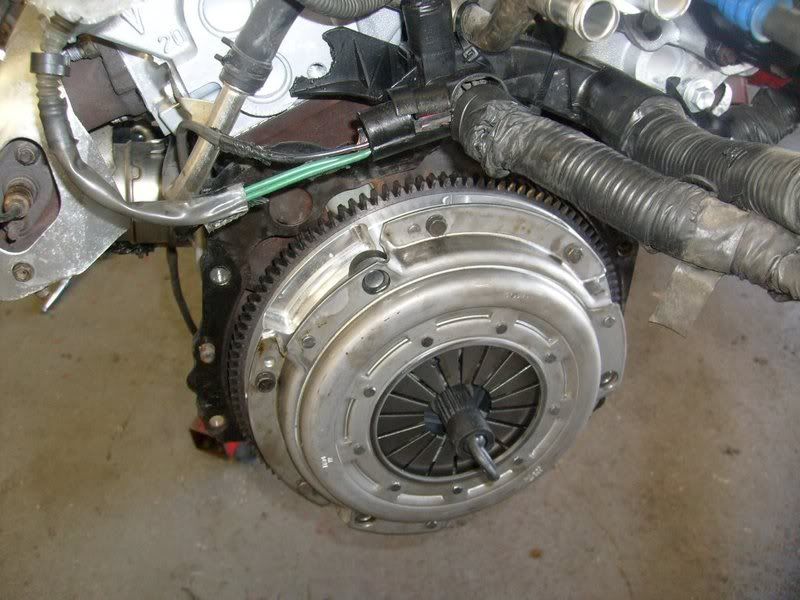 Gearbox also had a makeover... check out the gold blingy clutch slave cylinder  Then the box was bolted to the engine... bubble wrap on top to protect the paintwork....  Next job was the driveshaft fitment,this was one of the obstacles with the celica conversion,the old carrier bracket wont bolt up to the V6 block,and the V6 carrier bracket doesn't line up with the NA output hole,it only lines up with turbo boxes.... SO...... Paul had to make an axle carrier bracket from scratch. He started by making a flat plate that bolts to the block.... 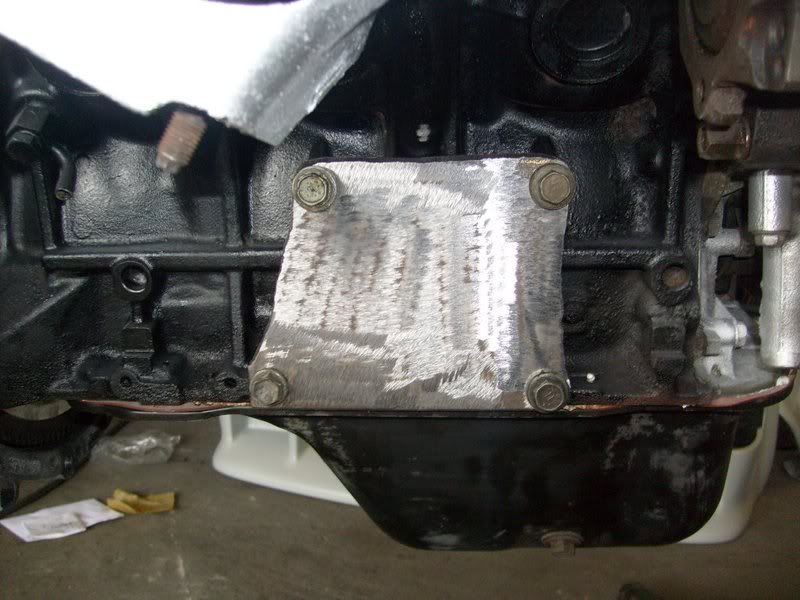 Then a plate is cut that fits the driveshaft bearing carrier....  Then its given a top hat bracing piece and seam welded....  And here is the completed mount back on the engine painted silver, (Paul thinks it's a wasted effort though as nobodys ever going to see it)  And for todays episode...... Fabricating the engine mount.... First thing to do was make the drivers side engine mount,for this its simply a piece of 5mm thick plate with four holes drilled in it in the right places,two for the v6 engine platform and two for the celica mount,problem is though that part of the celica mount interferes with one of the v6 mount holes,so we need to chop that area of the mount away....  The mount is then bolted to the bar and also given seam welding to both sides to make up for the area Paul chopped out,it would probably be fine on just the bolts but Paul wanted extra security.Now before you all scream athat the celica mount part is cast,he knows this.... and it will weld if you do it right,lets just say the added welded areas on it make him/me feel better about the mount than just having two bolts on it.  Here's that mount fitted....  Oops how did that get there....    It was tight going in but no harder than a v6 mr2 install really.The real fun starts now connecting it up! Paul's already had to move a power steering pipe out of the way and grind a small section of the radiator fan cowling away to clear the exhaust manifold.....  Oh, more bling too....... =)) 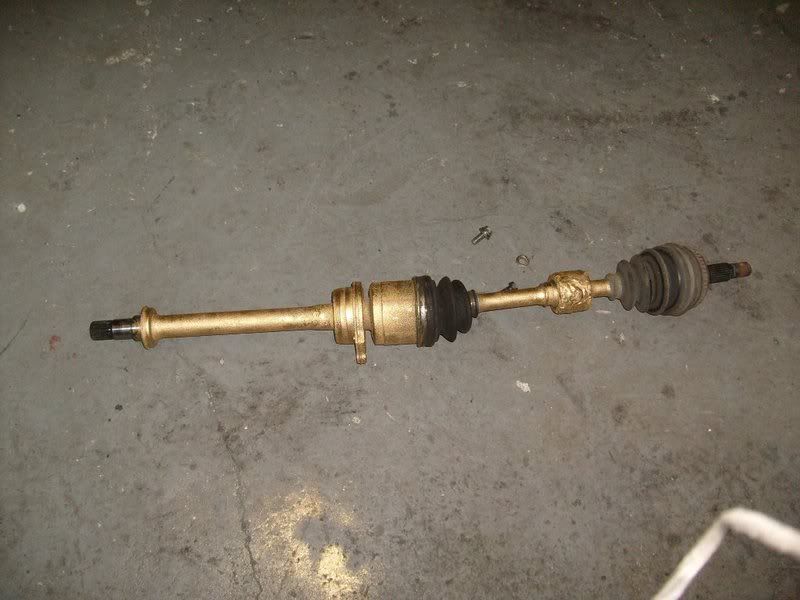 Today was about starting to connect stuff up, Paul got the alternator fitted,and it slightly fouls on the relay box,so that will be moved forward so that it has no chance of ever coming into contact with it.... 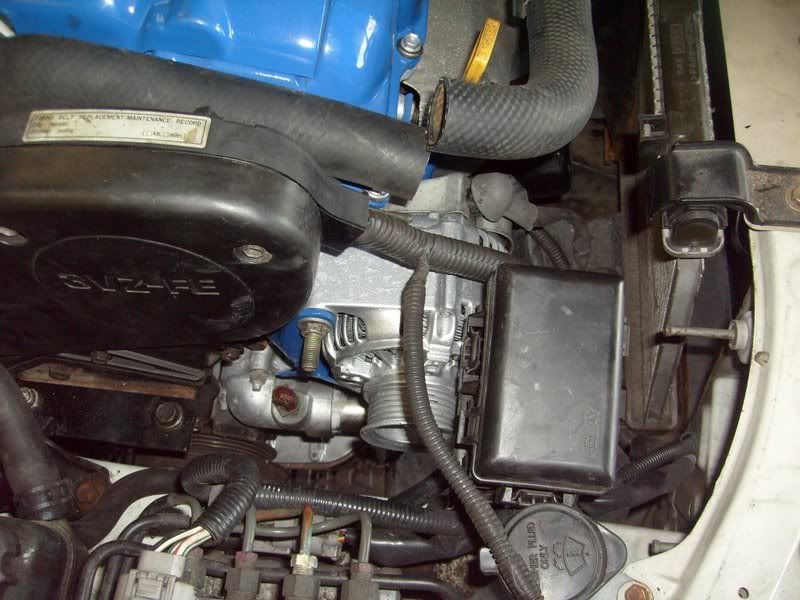 Sorted out the radiator hoses too.... pretty easy. 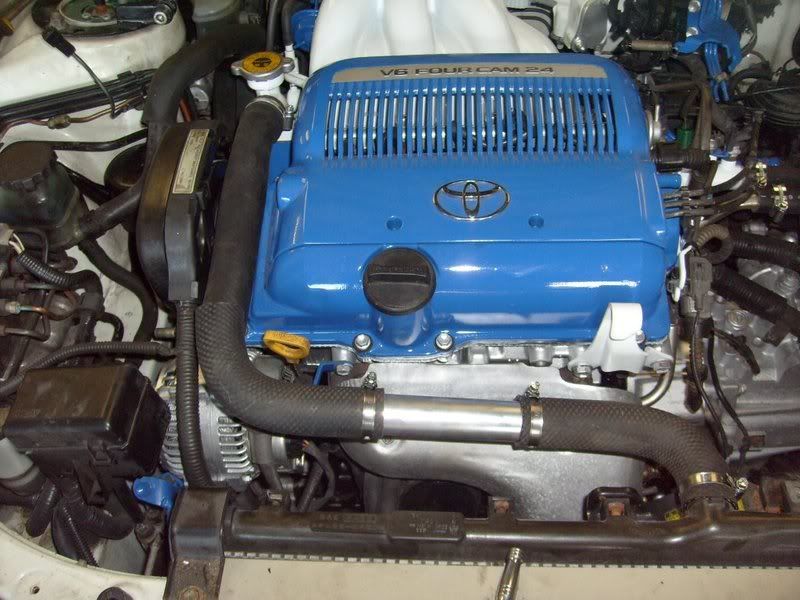 In this pic Paul's done heater hoses,mounted the coilpack/amplifier and joined the fuel feed and return lines....  The gear selector cables are also refitted along with the hydraulic line,thats just the same as the old engine set up though. Some stuff just plug n plays though,like the brake servo line here,same as before...  Paul has also taken the liberty of filling the front and rear torque mounts with polyurethane,they look a little weedy to him and the v6 is going to ask a lot more of them than the 3sge did,so poly filling them will make them more resistant. Shouldnt be long now before it gets wired up! B-) More & more Todays work. Today was full of a million little jobs,too many to mention! but here are the highlights..... Paul had to extend the throttle cable,there was no way on earth it was ever going to reach the throttle body the conventional way,so he made an adapter piece that joins the old celica cable onto a section of camry shifter cable ,its circled red below.... also got lots of vac hoses and the idle bypass hose fitted among other things.  Also the intake system is fitted, he made brackets to hold all of that so its supported.... 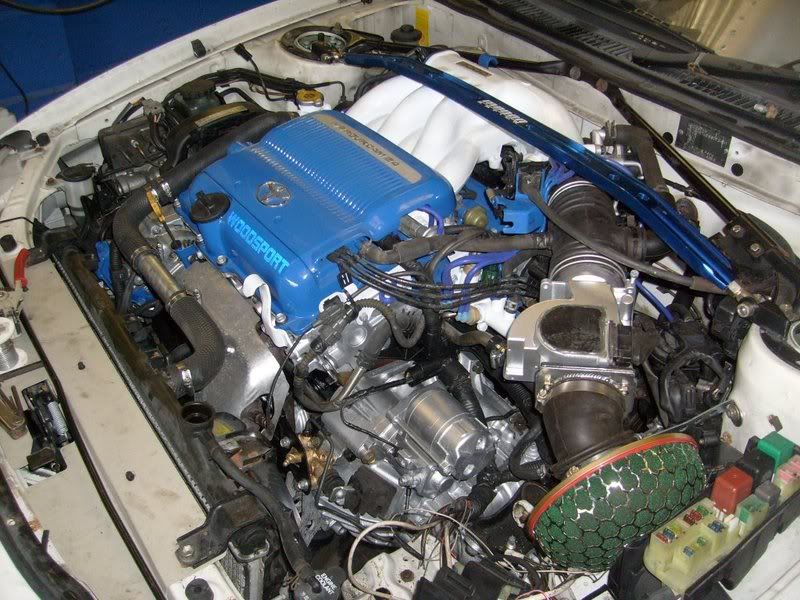 Here's an overview of what it looks like now... 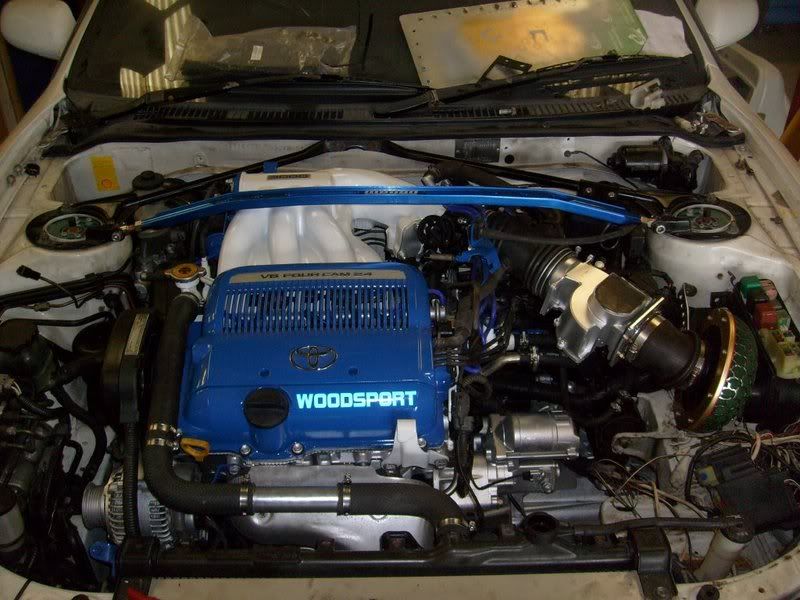 Next on the list is the exhaust and spaghetti,which is Pauls' favourite bit. OK update time. There was a small delay due to Paul running out of exhaust piping. Time to pick this back up where we left off... Paul's exhausted,quite literally! It took a full day of exhaust mods to get the v6 downpipes to clear the subframes and eliminate the Y pipe..... 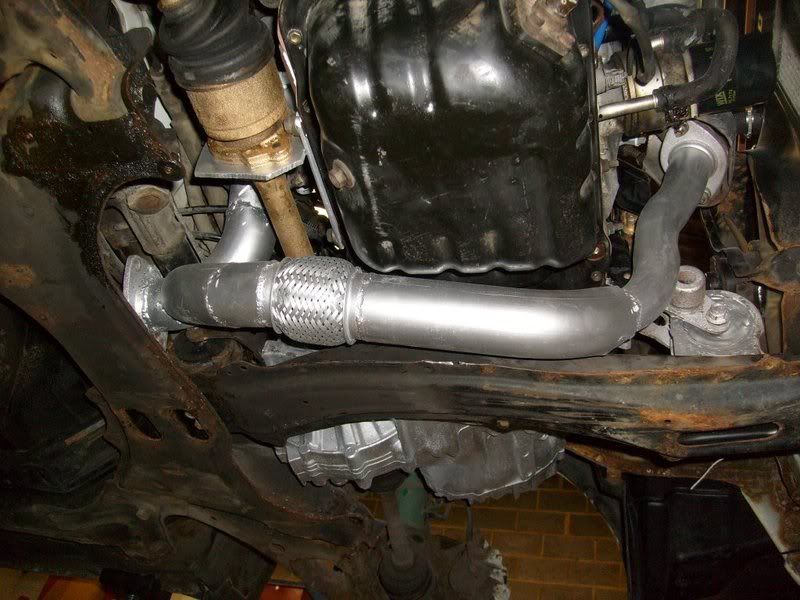 Also to make the rest of the system line up properly with the V6 pipe, Paul unbolted this middle section, flipped it 180 and bolted it back on.... it now lines up with the V6 downpipe exit...  This is the new intermediate section that Paul's made, this goes between the V6 downpipes and the rest of the system, still needs some VHT paint....  Update time We are at the spaghetti stage.... there was a bit of wiring up to do at the engine bay fusebox, a lot trickier than the MR2's Pauls used to doing but he sussed it out... 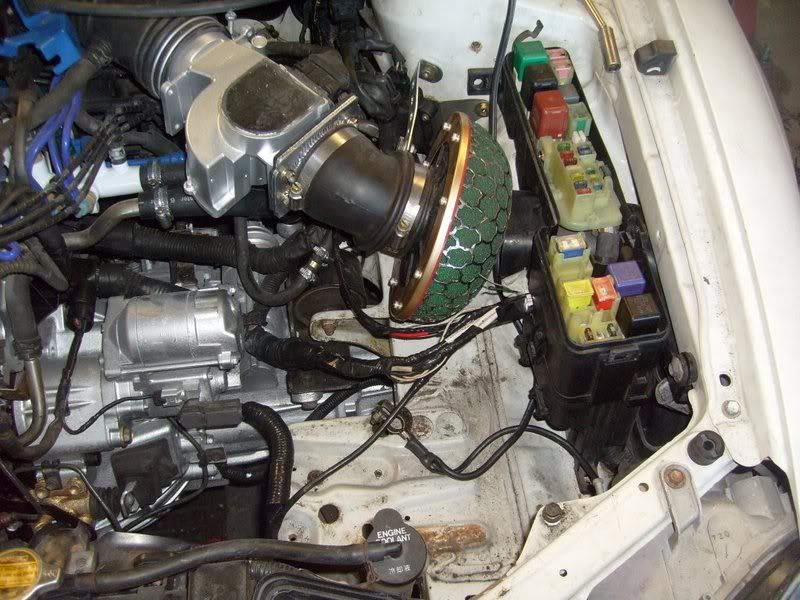 The majority of the spag is here in the passenger footwell, though, it's cramped and poorly lit, so its taking longer, plus Paul's not as young as he used to be =))  With any luck this will be firing up sometime tomorrow all being well. Paul's also fully documented every wire connection to be made for the home v6 builders, he's nice like that [flash width=425 height=344]http://www.youtube.com/v/WAD5zWniiB8&hl=en&fs=1[/flash] She lives >:) Can't really hear the exhaust note over the induction kit though (taken on Pauls phone so not the best quality either ). You tube of her running. taken via crap camera phone. http://www.youtube.com/watch?v=WAD5zWniiB8 This post has been edited by frisp: Jul 28, 2008 - 3:31 PM -------------------- Regards
frisp HKS Super Power Flow Induction Kit, HKS Silent Hi Power Exhaust, Fensport Decat, SS-III Spolier Projector Lights, LED JDM Tails, GT4 Nose, Tein Super Street coilover kit, 17" Aerospeed RSGT's, White dash LED's JDM Wind Deflectors, TRD Quick Shift, Stainless Sill Covers. Gen 7 leather, 3VZ-FE 3ltr V6 To be done.... Ganador mirrors, 2 Pot BrakesStainless brake lines, Decent Disks/pads |

 |
Replies
|
Jul 26, 2008 - 8:33 PM
|
|
 Enthusiast Joined Oct 27, '07 From North Carolina Currently Offline Reputation: 0 (0%) |
dude, when that gets done, it's gonna be so sick! U make me wanna do a v6 swap now!
|
Posts in this topic
frisp frisps 3vz-fe conversion by Woodsport Jul 26, 2008 - 8:30 PM frisp Do it. Paul is making a wiring guide for anyone at... Jul 26, 2008 - 8:35 PM JDM_Factory AWESOME! I love his work, wasn't he workin... Jul 26, 2008 - 8:40 PM njccmd2002 what gearbox are you using and who donated the v6,... Jul 26, 2008 - 8:40 PM frisp gearbox is standard S54. Engine is from a Camry, U... Jul 26, 2008 - 8:43 PM CelicaST_CALI RE: frisps 3vz-fe conversion by Woodsport Jul 27, 2008 - 10:59 PM Batman722 I've followed this on the ccuk, I'm glad t... Jul 27, 2008 - 11:30 PM frisp Availability for one. It will be going back for a ... Jul 28, 2008 - 12:01 AM DEATH Damn that's nice. For those of us addicted to ... Jul 28, 2008 - 3:07 PM frisp Not sure about the carrier issue, if we'd gone... Jul 28, 2008 - 3:30 PM l19tly how much did this conversion set you back? Jul 28, 2008 - 4:13 PM frisp with all the work, bearing in mind this was an R... Jul 28, 2008 - 5:43 PM snapshotgt How did you choose the 3vz? I assume boosting plan... Jul 28, 2008 - 6:03 PM njccmd2002 snap, you have the 1mz-fe
assuming you have the e... Jul 28, 2008 - 6:32 PM
frisp Do it. Paul is making a wiring guide for anyone at... Jul 26, 2008 - 8:35 PM JDM_Factory AWESOME! I love his work, wasn't he workin... Jul 26, 2008 - 8:40 PM njccmd2002 what gearbox are you using and who donated the v6,... Jul 26, 2008 - 8:40 PM frisp gearbox is standard S54. Engine is from a Camry, U... Jul 26, 2008 - 8:43 PM CelicaST_CALI RE: frisps 3vz-fe conversion by Woodsport Jul 27, 2008 - 10:59 PM Batman722 I've followed this on the ccuk, I'm glad t... Jul 27, 2008 - 11:30 PM frisp Availability for one. It will be going back for a ... Jul 28, 2008 - 12:01 AM DEATH Damn that's nice. For those of us addicted to ... Jul 28, 2008 - 3:07 PM frisp Not sure about the carrier issue, if we'd gone... Jul 28, 2008 - 3:30 PM l19tly how much did this conversion set you back? Jul 28, 2008 - 4:13 PM frisp with all the work, bearing in mind this was an R... Jul 28, 2008 - 5:43 PM snapshotgt How did you choose the 3vz? I assume boosting plan... Jul 28, 2008 - 6:03 PM njccmd2002 snap, you have the 1mz-fe
assuming you have the e... Jul 28, 2008 - 6:32 PM
 snapshotgt QUOTE (njccmd2002 @ Jul 28, 2008 - 6... Jul 28, 2008 - 7:16 PM Athorn That powder coating looks sick! Jul 28, 2008 - 11:14 PM frisp 3VZ was picked for a variety of reasons.
Availab... Jul 29, 2008 - 1:02 AM snapshotgt QUOTE (frisp @ Jul 29, 2008 - 1:02 A... Jul 29, 2008 - 1:43 AM frisp Good info
Woodsport have also supercharged the... Jul 29, 2008 - 1:57 AM frisp Must remember to update my sig. Off to pick her up... Aug 1, 2008 - 3:04 AM stevest202 have a nice drive back mate hes done a fantastic j... Aug 1, 2008 - 11:22 AM frisp Well, got back like 20 mins ago. Sounds absolutely... Aug 1, 2008 - 1:45 PM stevest202 hope you make hull mate would love to seeit in the... Aug 1, 2008 - 4:43 PM frisp Will try my damndest to get there Aug 1, 2008 - 7:48 PM frisp Couple of clips, kinda difficult on your own . Wea... Aug 12, 2008 - 2:15 PM D-Man Sweet Mother Ba-Geebus!! Your driving on t... Aug 12, 2008 - 2:20 PM frisp Well, the Hull show this Sunday is a no go for me ... Aug 12, 2008 - 2:23 PM D-Man better bring us some pics! Aug 12, 2008 - 2:31 PM trdproven work looks real professional with all the detailin... Aug 13, 2008 - 3:33 AM
snapshotgt QUOTE (njccmd2002 @ Jul 28, 2008 - 6... Jul 28, 2008 - 7:16 PM Athorn That powder coating looks sick! Jul 28, 2008 - 11:14 PM frisp 3VZ was picked for a variety of reasons.
Availab... Jul 29, 2008 - 1:02 AM snapshotgt QUOTE (frisp @ Jul 29, 2008 - 1:02 A... Jul 29, 2008 - 1:43 AM frisp Good info
Woodsport have also supercharged the... Jul 29, 2008 - 1:57 AM frisp Must remember to update my sig. Off to pick her up... Aug 1, 2008 - 3:04 AM stevest202 have a nice drive back mate hes done a fantastic j... Aug 1, 2008 - 11:22 AM frisp Well, got back like 20 mins ago. Sounds absolutely... Aug 1, 2008 - 1:45 PM stevest202 hope you make hull mate would love to seeit in the... Aug 1, 2008 - 4:43 PM frisp Will try my damndest to get there Aug 1, 2008 - 7:48 PM frisp Couple of clips, kinda difficult on your own . Wea... Aug 12, 2008 - 2:15 PM D-Man Sweet Mother Ba-Geebus!! Your driving on t... Aug 12, 2008 - 2:20 PM frisp Well, the Hull show this Sunday is a no go for me ... Aug 12, 2008 - 2:23 PM D-Man better bring us some pics! Aug 12, 2008 - 2:31 PM trdproven work looks real professional with all the detailin... Aug 13, 2008 - 3:33 AM |
1 User(s) are reading this topic (1 Guests and 0 Anonymous Users)
0 Members:
| Lo-Fi Version | Time is now: June 16th, 2026 - 10:02 PM |