
 Apr 12, 2009 - 8:54 PM Apr 12, 2009 - 8:54 PM
|
 
|
 Enthusiast  Joined Oct 19, '07 From Québec, Canada Currently Offline Reputation: 0 (0%) |
Here is my latest modz, a triple gauge kit molded at the top of my head unit. I wanted this kit to be as close as "factory installed" as possible. I ask a freind to mold it to rough, and I finished it my self, including final adjusments and finish. Here's what it looks like:
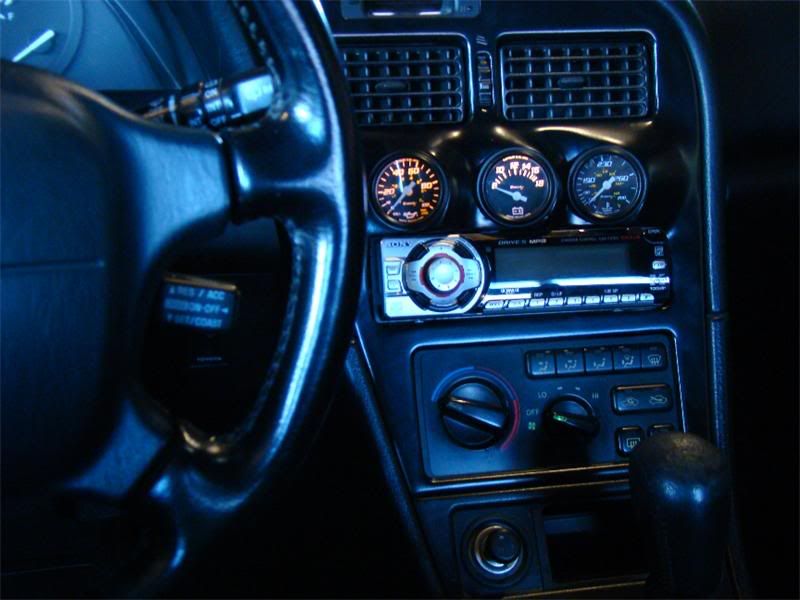 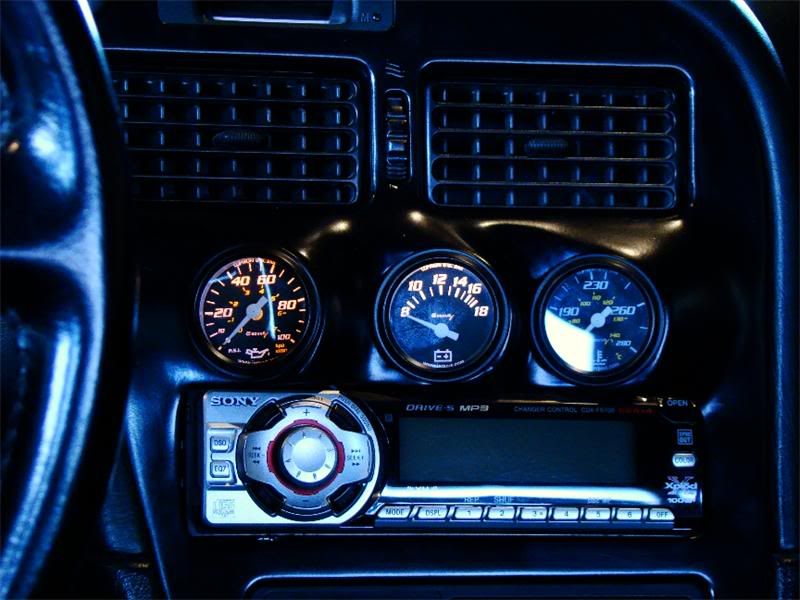 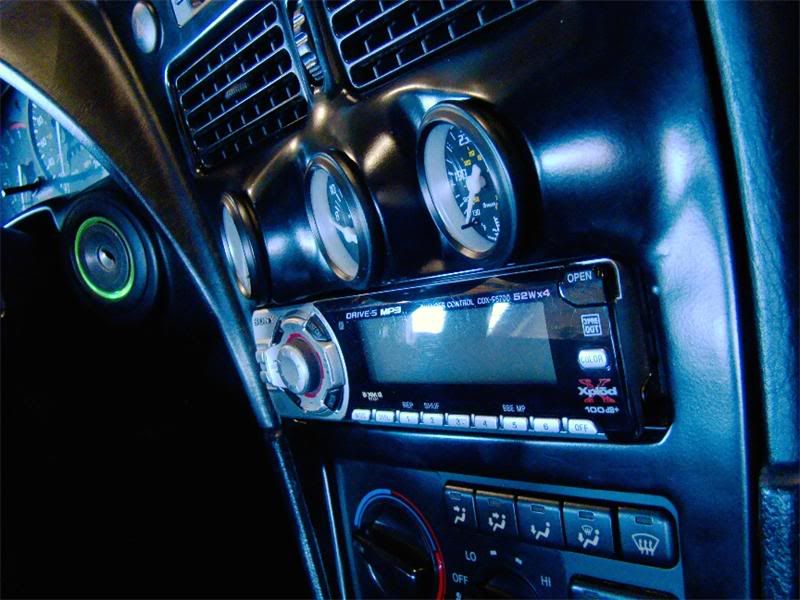  For the "low gloss" finish, I've used the semi-gloss Krylon paint for plastic, and for the final molding, the famous Mighty Putty as seen on tv  The gauge kit is the Equus 1½" mechanical gauges, that includes voltmeter, oil pressure and engine coolant temp. The engine coolant temp gauge is unused right now, cuz we already have one in our instrument cluster, I'm looking for a replacement gauge. Any suggestions welcomed about it. The gauge kit is the Equus 1½" mechanical gauges, that includes voltmeter, oil pressure and engine coolant temp. The engine coolant temp gauge is unused right now, cuz we already have one in our instrument cluster, I'm looking for a replacement gauge. Any suggestions welcomed about it.Let me know what u think 
-------------------- |

 |
Replies
|
Apr 13, 2009 - 10:58 AM
|
|
|
Enthusiast Joined Oct 19, '07 From Québec, Canada Currently Offline Reputation: 0 (0%) |
Thank u guyz
 Pretty easy to make in fact, the holes for the gauges are abs plastik pipes cut to an angle to have them driver oriented, and to make them hold to the trim, my friend used fiberglass. After many hours of sanding to make it smooth like it is, just paint it the color you want. I used semi-gloss but it's too glossy for my taste, I'd rather use flat black instead. Pretty easy to make in fact, the holes for the gauges are abs plastik pipes cut to an angle to have them driver oriented, and to make them hold to the trim, my friend used fiberglass. After many hours of sanding to make it smooth like it is, just paint it the color you want. I used semi-gloss but it's too glossy for my taste, I'd rather use flat black instead.If you want to make one of your own, be sure tu use 1½" gauges, otherwise it won't fit into the second din! Here's some more pics to help understand the process: 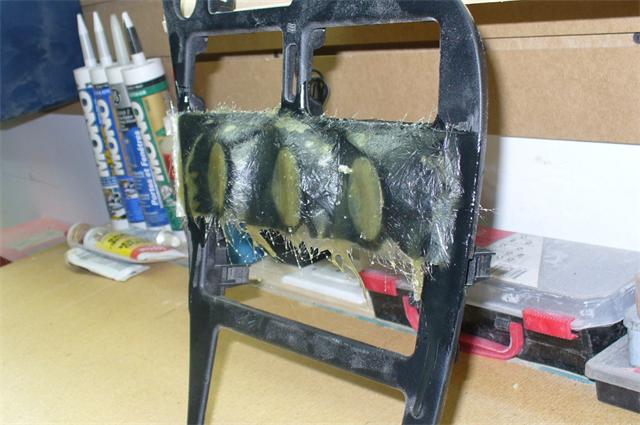 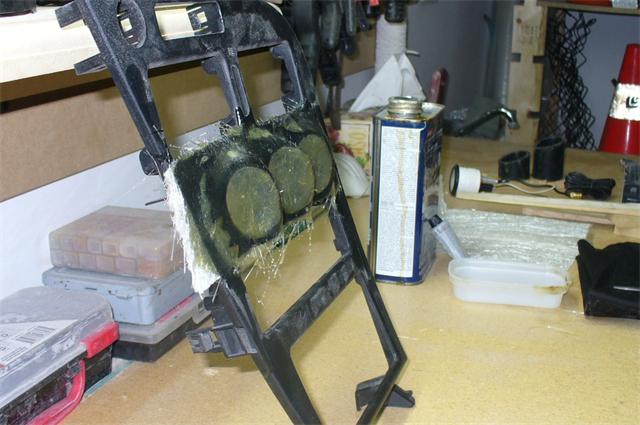 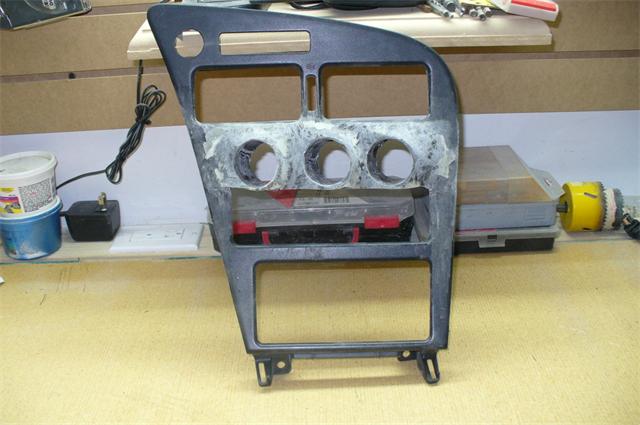 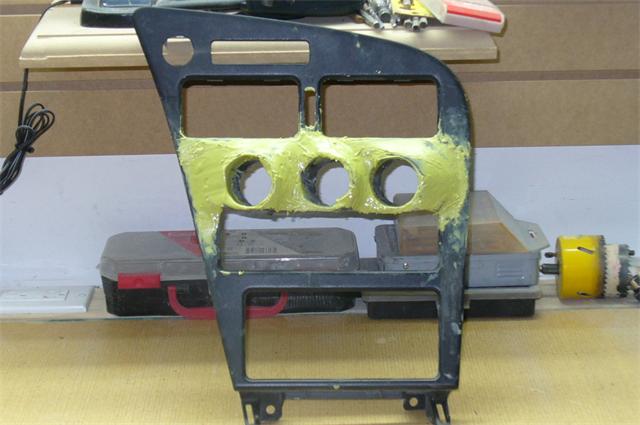 This is when it was ready to be painted to final finish: 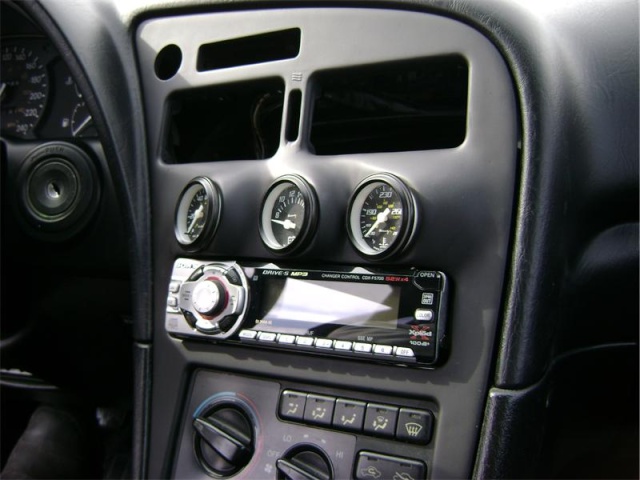 And for the gauges connections, simply refer to installation guide provided with the gauge kit, be advised that you'll need some extra fittings and t's if you want to keep your instrument cluster 100% functional. Because this gauge kit is mechanical and not electrical, oil must be bring to the oil pressure gauge itself, and cooling temp sensor is a capilary type (tube filled with ether) to conduct heat. For the voltmeter, I simply connect it to my existing head unit power and ground wires. For lightning, I connected it once again to my head unit lights-in wire. Time estimated for molding: 20 hours of work, for installation: 3-4 hours. A hole week of work if you include drying times of the different steps involded. Total cost estimated: 40$ for the gauge kit, 50$-60$ of material for molding This gauges kit from Equus is black faced gauges, but they are also available in white faced gauges. The bulbs used in this kit are #161, widely available. You can have them painted to match your lighting theme, if needed. So who's next? 
This post has been edited by HorseHead: Apr 13, 2009 - 11:03 AM -------------------- |
Posts in this topic
 HorseHead Triple gauge kit Apr 12, 2009 - 8:54 PM
 azian_advanced that looks great.. can you make me one? Apr 13, 2009 - 12:33 AM Slick Nice and clean fit! Apr 13, 2009 - 2:06 AM Legit94GT that looks great:) nice work, be expected to be as... Apr 13, 2009 - 2:13 AM Seztor Looks very nice mate. OEM style ;-) Apr 13, 2009 - 5:38 AM HorseHead I've seen some gauges kit installed in the air... Apr 13, 2009 - 11:09 AM BBoYRuGGeD crazy nice! job well done!
-bboy Apr 15, 2009 - 3:18 AM HorseHead Thanx bboy
However, I just learned today that t... Apr 18, 2009 - 2:12 AM 95CelicaST I didn't even know you can buy a mechanical oi... Apr 18, 2009 - 12:06 PM petna Neat install 2" gauges do fit with a bit of ... Apr 23, 2009 - 4:39 PM Dragondog u should make a HOW TO.........great look Apr 23, 2009 - 5:30 PM petna just a thought, you say that you've connected ... Apr 23, 2009 - 5:34 PM
azian_advanced that looks great.. can you make me one? Apr 13, 2009 - 12:33 AM Slick Nice and clean fit! Apr 13, 2009 - 2:06 AM Legit94GT that looks great:) nice work, be expected to be as... Apr 13, 2009 - 2:13 AM Seztor Looks very nice mate. OEM style ;-) Apr 13, 2009 - 5:38 AM HorseHead I've seen some gauges kit installed in the air... Apr 13, 2009 - 11:09 AM BBoYRuGGeD crazy nice! job well done!
-bboy Apr 15, 2009 - 3:18 AM HorseHead Thanx bboy
However, I just learned today that t... Apr 18, 2009 - 2:12 AM 95CelicaST I didn't even know you can buy a mechanical oi... Apr 18, 2009 - 12:06 PM petna Neat install 2" gauges do fit with a bit of ... Apr 23, 2009 - 4:39 PM Dragondog u should make a HOW TO.........great look Apr 23, 2009 - 5:30 PM petna just a thought, you say that you've connected ... Apr 23, 2009 - 5:34 PM
 HorseHead QUOTE (petna @ Apr 23, 2009 - 5:34 P... Apr 23, 2009 - 8:59 PM TRDGT4 man that looks great!!! Apr 23, 2009 - 6:47 PM HorseHead Pretty nice gauges BTW petna Apr 23, 2009 - 9:06 PM petna cheers for the info dude. thats a good one to know... Apr 24, 2009 - 10:10 AM Superaison Wanna make me one? Apr 25, 2009 - 9:10 PM
 |
1 User(s) are reading this topic (1 Guests and 0 Anonymous Users)
0 Members:
| Lo-Fi Version | Time is now: June 25th, 2026 - 10:44 PM |