
 Mar 6, 2011 - 7:11 PM Mar 6, 2011 - 7:11 PM
|
 
|
|
Enthusiast  Joined Dec 29, '05 From So-Cal Currently Offline Reputation: 12 (100%) |
in my case, im replacing a clutch because im slipping.
ill come back to clean this better, but the tools are: 12mm-19mm sockets needed with a Strong breaker bar and a "Y" horse shoe to help pry open the axle from the driver side. Two jack stands for the car 2-3 hydro jacks needed; one support the engine, one support the tranny Cherry picker can ease the lowering of the tranny... TORQUE SPECIFICATIONS for CELICA Application Ft. Lbs. (N.m) Flywheel Bolts 4A-FE ........................................... 58 (79) 5S-FE ........................................... 65 (88) 3S-GTE ......................................... 80 (108) Pressure Plate Bolts ............................ 14 (19) Transaxle-To-Engine Bolts 10-mm Bolts ..................................... 34 (46) 12-mm Bolts ..................................... 47 (64) Wheel Lug Nuts ................................. 76 (103) TORQUE SPECIFICATIONS (CELICA ALL-TRAC) Application Ft. Lbs. (N.m) Dynamic Damper Bolt .............................. 19 (26) Engine Mount Crossmember-To-Underbody Bolt ................. 38 (52) Bracket-To-Engine Bolts (Right Front) ......... 38 (52) Insulator Through Bolt ........................ 64 (87) Insulator-To-Bracket Nuts (Right Front) ....... 38 (52) Mount-To-Crossmember Bolt ..................... 54 (73) Flywheel Bolt .................................... 65 (88) Power Steering Pump Bolt ......................... 32 (43) Pressure Plate Bolts ............................. 14 (19) Stiffener Support Brace Bolt (Engine Block-To-Flywheel Housing) .............. 27 (37) Strut Tower-To-Firewall Brace Bolt ........................................... 15 (20) Nut ............................................ 47 (64) Suspension Crossmember Bolt .................... 112 (152) Transaxle-To-Engine Bolts 10-mm Bolts .................................... 34 (46) 12-mm Bolts .................................... 47 (64) Wheel Lug Nuts .................................. 76 (103) Things to move out of the way: 0. Remove all under panels and cross bar member with the front and rear engine mounts off. (Take off the Down pipe connected to the exhaust manifold too for ease) 1. Driver and Passenger side axles. (tie rod and suspension strut will have to come out for ease of taking axles out) 2. radiator so you can move more freely; as well as the upper and lower radiator tube 3. unplug the sensors on the tranny....i believe there are only two on my GT 2.2L 5sfe 4. Remove the pins from the shifting links...(there are 2) 5. remove the Clutch Cylinder slave (there should be two bolts holding it; DO NOT REMOVE THE ACTUATOR LINES CONNECTED TO THE SLAVE UNIT); follow this to the side of the tranny there is a bolt also holding the clutch fluid line (remove that instead of taking off the line; easier to remove bracket with line on it by taking off the bolt) 6. SAVE the engine mount bolt (there should be 3 holding to the metal bracket on the transmission) for last...do not remove the bolt in the middle of the driver side engine mount here are the location of the bolts... 11 of them total: **HINT: make sure engine and tranny are evenly balance and then remove the 3 bolts on the driver side engine mount, then WRIGGLE that darn thing left and right to get it out. 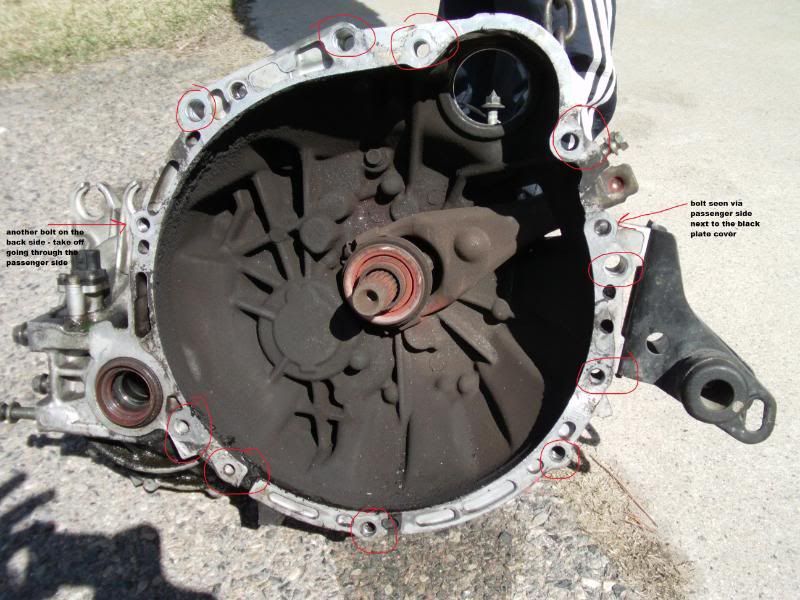 picture of the the tranny off exposing the flywheel: 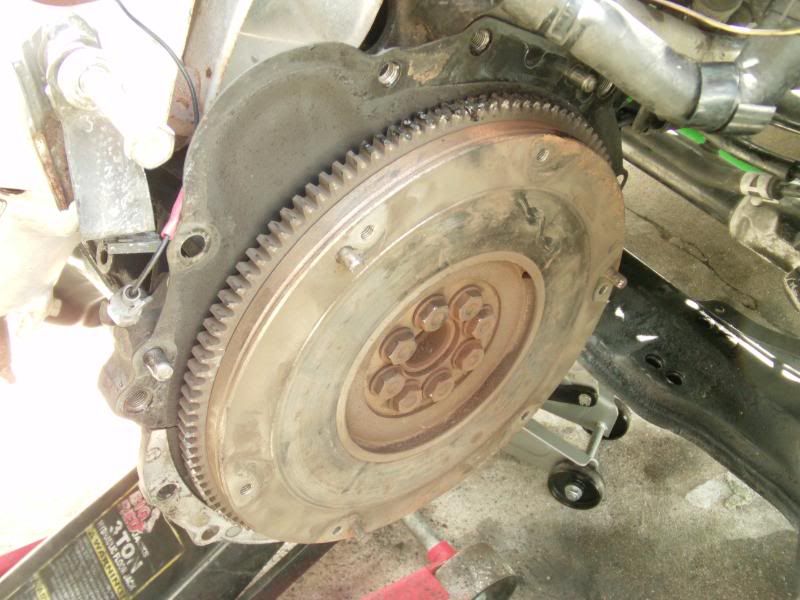 OEM VS NEW CLUTCH NEW Spec clutch stage 3+ (got it cheap for $150 shipped; so i invested, more than enough for my DD, but it was cheap and figured i try it, stage 1 was $250 already not including ship): 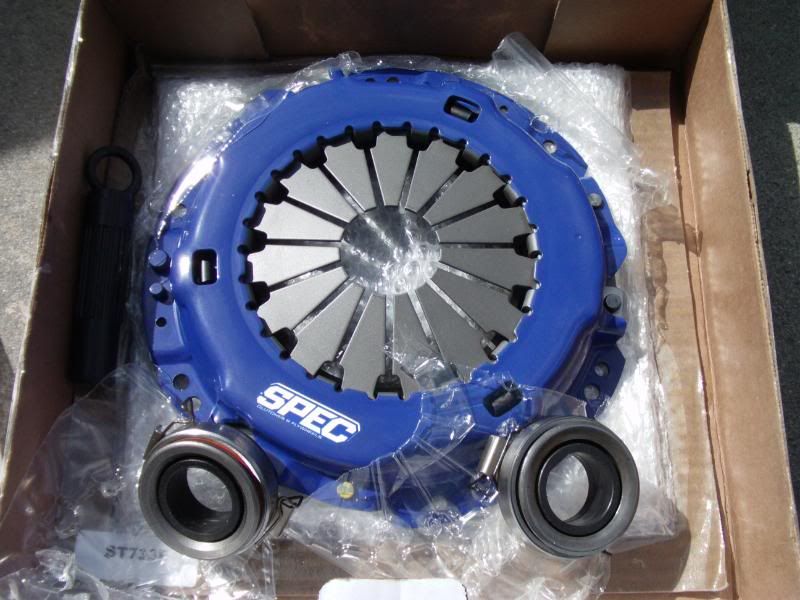 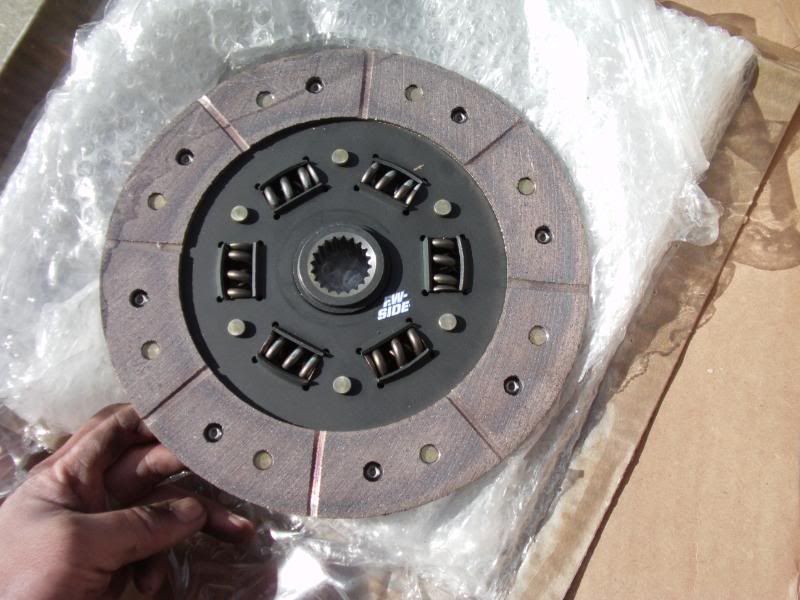 OLD: 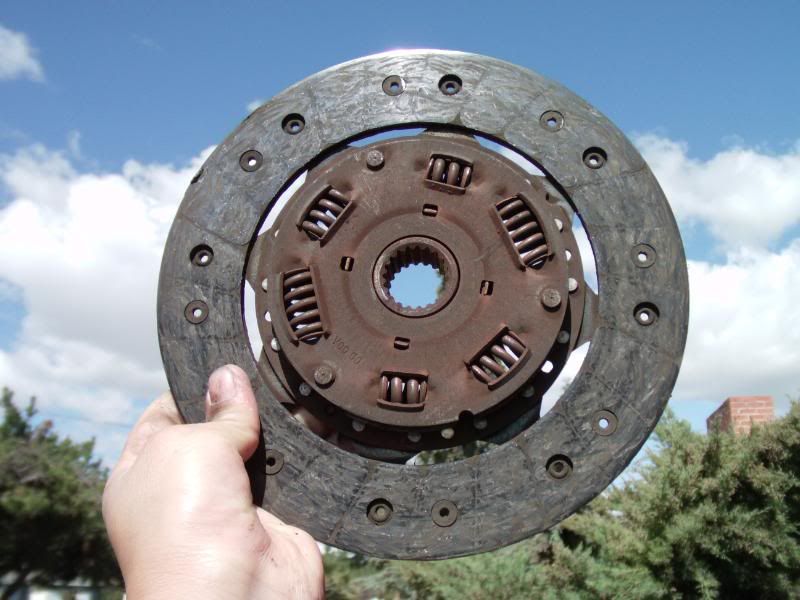 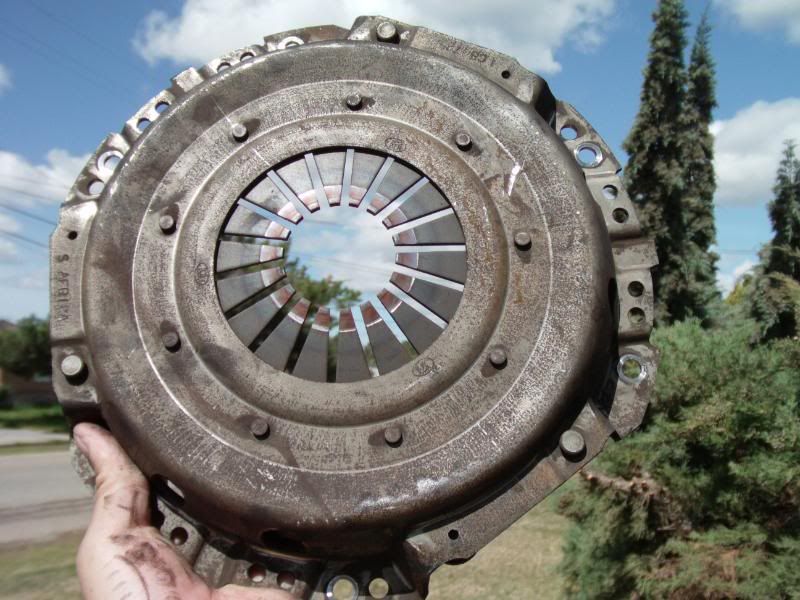 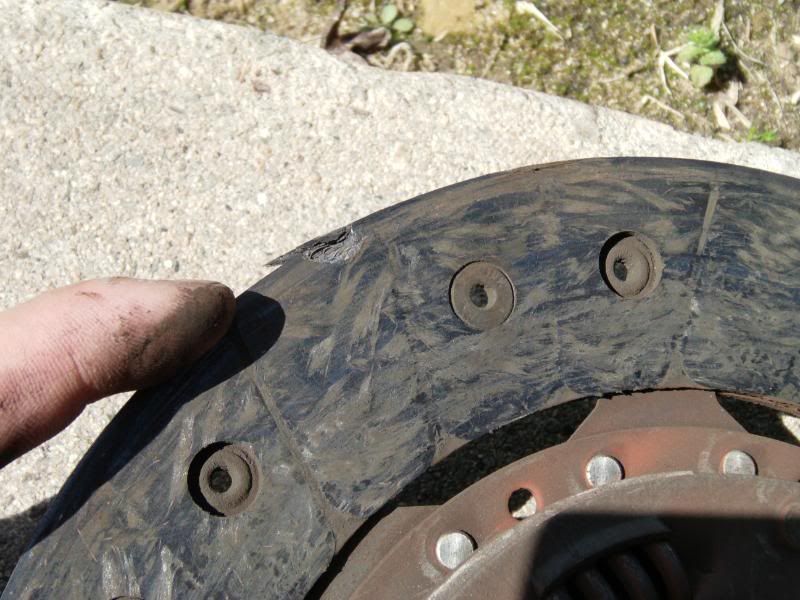 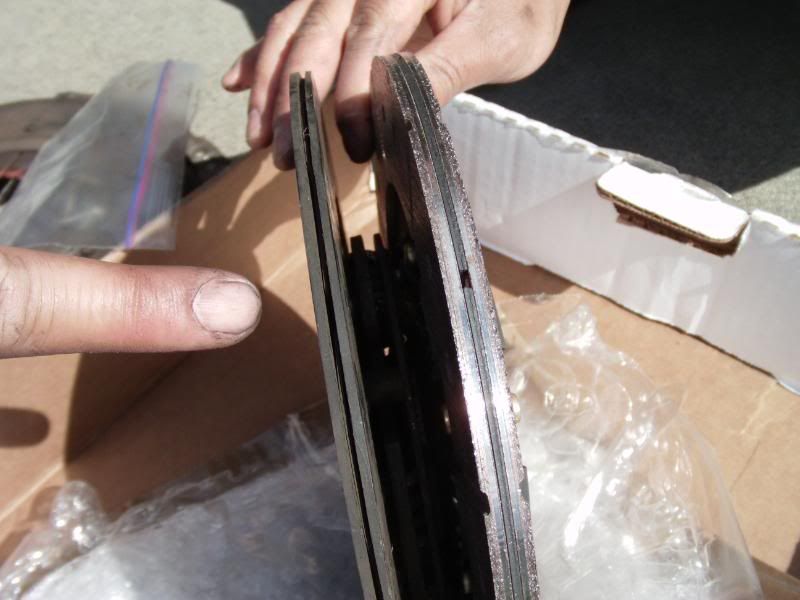 in working progress....will update later. off to the store  low on cash low on cash
This post has been edited by chacha: Mar 7, 2011 - 9:26 PM |

 |
Replies
|
Mar 9, 2011 - 1:56 AM
|
|
|
Enthusiast Joined Dec 29, '05 From So-Cal Currently Offline Reputation: 12 (100%) |
oh well, i went ahead and bought a sach flywheel new for $60 buck..i would like the Billet aluminum, but didn't have the $400 cash to give out... i clean the inside of the engine wall facing the backside of the flywheel...not all. but most....clean and scrub the outer rim of the tranny where the housing and engine meets for a clean surface and follow most guide line through this video:
butter up the throw arm (don't know if that is right, but this thing): and install flywheel with a torque tool wrench.... i had to put the socket in like this with the breaker bar.... torque everything to 65lbs in a star diagram.... |
Posts in this topic
 chacha how to remove your tranny (MANUAL) 5sfe Mar 6, 2011 - 7:11 PM
 Smaay if you are sure you got all the bolts, then you ju... Mar 6, 2011 - 7:46 PM bsamps4 It's actually really hard to tell from the pic... Mar 6, 2011 - 7:48 PM chacha I really thought taking this tranny out was going ... Mar 6, 2011 - 8:28 PM cyberblader1130 Hopefully someone makes a write-up for this, I am ... Mar 6, 2011 - 9:10 PM bsamps4 If you are shaking it and it isn't moving at a... Mar 6, 2011 - 11:11 PM chacha i checked and i couldn't see any more bolts...... Mar 7, 2011 - 12:10 AM chacha how many bolts does the regular 5sfe tranny have? Mar 7, 2011 - 12:15 AM csscza just pulled mine, theres two bolts on top that I h... Mar 7, 2011 - 12:09 PM chacha thanks C, i already pulled that bolt in the upper ... Mar 7, 2011 - 12:20 PM chacha had problems in the beginning and now it is in wor... Mar 7, 2011 - 12:52 PM chacha does our 5sfe teanny have a pilot bearing? Mar 7, 2011 - 8:03 PM Smaay no, FWD cars do not have a pilot bearing Mar 7, 2011 - 8:10 PM chacha okay thanks...
cross member bar is dirty, but i w... Mar 7, 2011 - 9:14 PM chacha another question...i have the spec stage 3+ clutch... Mar 7, 2011 - 9:50 PM chacha i screwed myself up i think....i installed the shi... Mar 11, 2011 - 7:57 PM chacha okay...cables were install in wrong...switched and... Mar 11, 2011 - 9:39 PM malecrod make sure you connect your ground cable to tranny,... Mar 12, 2011 - 1:12 PM chacha fixed....turn out to be the starter...replaced wit... Mar 12, 2011 - 4:26 PM seth199232 this is a stupid question but i cant seem to find ... Jan 6, 2012 - 4:30 PM mandrek i believe that it is an s54. Jan 6, 2012 - 4:41 PM purplegt4 How to change your clutch:
http://burialc2.oborod... Mar 6, 2012 - 2:11 PM Smaay ok so how can i translate that to engrish? Mar 6, 2012 - 3:46 PM purplegt4 good picture reference anyway LOL. a lot of the si... Mar 6, 2012 - 4:12 PM demmahom34 hi i am trying to replace my engine mounts and tra... Jan 13, 2018 - 9:59 PM
Smaay if you are sure you got all the bolts, then you ju... Mar 6, 2011 - 7:46 PM bsamps4 It's actually really hard to tell from the pic... Mar 6, 2011 - 7:48 PM chacha I really thought taking this tranny out was going ... Mar 6, 2011 - 8:28 PM cyberblader1130 Hopefully someone makes a write-up for this, I am ... Mar 6, 2011 - 9:10 PM bsamps4 If you are shaking it and it isn't moving at a... Mar 6, 2011 - 11:11 PM chacha i checked and i couldn't see any more bolts...... Mar 7, 2011 - 12:10 AM chacha how many bolts does the regular 5sfe tranny have? Mar 7, 2011 - 12:15 AM csscza just pulled mine, theres two bolts on top that I h... Mar 7, 2011 - 12:09 PM chacha thanks C, i already pulled that bolt in the upper ... Mar 7, 2011 - 12:20 PM chacha had problems in the beginning and now it is in wor... Mar 7, 2011 - 12:52 PM chacha does our 5sfe teanny have a pilot bearing? Mar 7, 2011 - 8:03 PM Smaay no, FWD cars do not have a pilot bearing Mar 7, 2011 - 8:10 PM chacha okay thanks...
cross member bar is dirty, but i w... Mar 7, 2011 - 9:14 PM chacha another question...i have the spec stage 3+ clutch... Mar 7, 2011 - 9:50 PM chacha i screwed myself up i think....i installed the shi... Mar 11, 2011 - 7:57 PM chacha okay...cables were install in wrong...switched and... Mar 11, 2011 - 9:39 PM malecrod make sure you connect your ground cable to tranny,... Mar 12, 2011 - 1:12 PM chacha fixed....turn out to be the starter...replaced wit... Mar 12, 2011 - 4:26 PM seth199232 this is a stupid question but i cant seem to find ... Jan 6, 2012 - 4:30 PM mandrek i believe that it is an s54. Jan 6, 2012 - 4:41 PM purplegt4 How to change your clutch:
http://burialc2.oborod... Mar 6, 2012 - 2:11 PM Smaay ok so how can i translate that to engrish? Mar 6, 2012 - 3:46 PM purplegt4 good picture reference anyway LOL. a lot of the si... Mar 6, 2012 - 4:12 PM demmahom34 hi i am trying to replace my engine mounts and tra... Jan 13, 2018 - 9:59 PM Smaay read my guide for removing the engine Jan 15, 2018 - 11:13 PM
 |
1 User(s) are reading this topic (1 Guests and 0 Anonymous Users)
0 Members:
| Lo-Fi Version | Time is now: July 5th, 2026 - 10:59 PM |