
 Jun 17, 2007 - 5:12 PM Jun 17, 2007 - 5:12 PM
|
 
|
|
Enthusiast  Joined Aug 17, '04 From California Currently Offline Reputation: 20 (100%) |
A few weeks ago I had to replace my wheel bearing so i decided to take a few pictures and do a write up of what i did. It was an easy project which took about an hour to take off, hour to put back on. Youll probably have to wait longer for the machine shop to do the pressing. These steps are good for either side in the front. I only replaced the pass. side so thats all i have here: (please bare with me its my first how to
 ) )1) Here is a picture of the tools that i used for the job, not pictured is a hammer. One thing to note is that i have V6 camry axles which have bigger ends so a 30mm socket will be too big, find the right size for your car before starting. 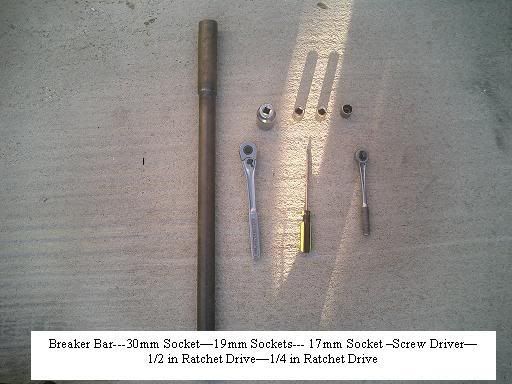 2) This is a picture of what you are basically trying to take off. This is the Steering Knuckle which contains the wheel bearing in the center. Ive labled the parts that need to be removed in order for the Steering Knuckle to come out. I will go futher into detail as to how to remove everything in the following steps. 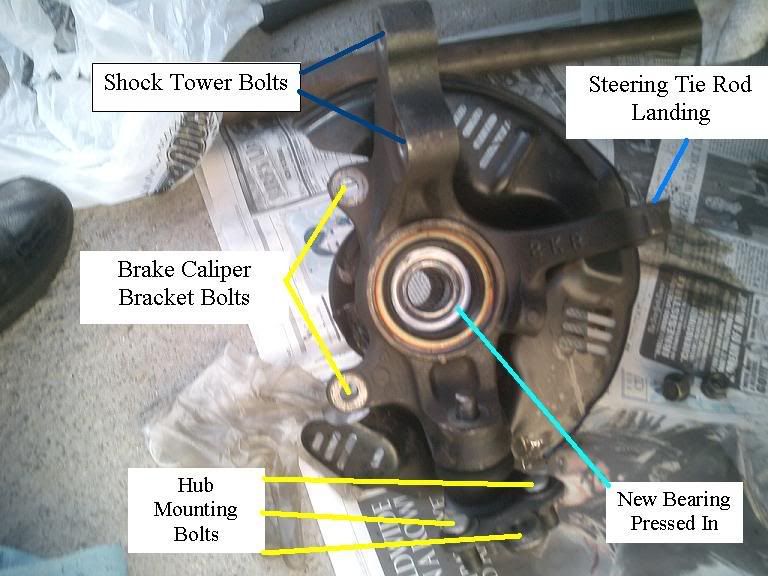 3) The First thing you need to do is get the car in the air with proper jackstand supports and then take off the wheel. Once the wheel is off, your first step will be to remove the axle nut as pictured here. I used my 1/2 inch drive with a 30mm socket, and 3 foot breaker bar. Make sure when you use the bar, that the socket is on straight with the nut so you dont strip it. 2nd, notice how i turned the wheel to the left a little, this is to avoind hitting the fender with the bar when you go to turn it. Also, you will notice the screw driver in the rotor. This is not the best way to keep the rotor from spinning but i was alone and had no one to hold the brakes for me. 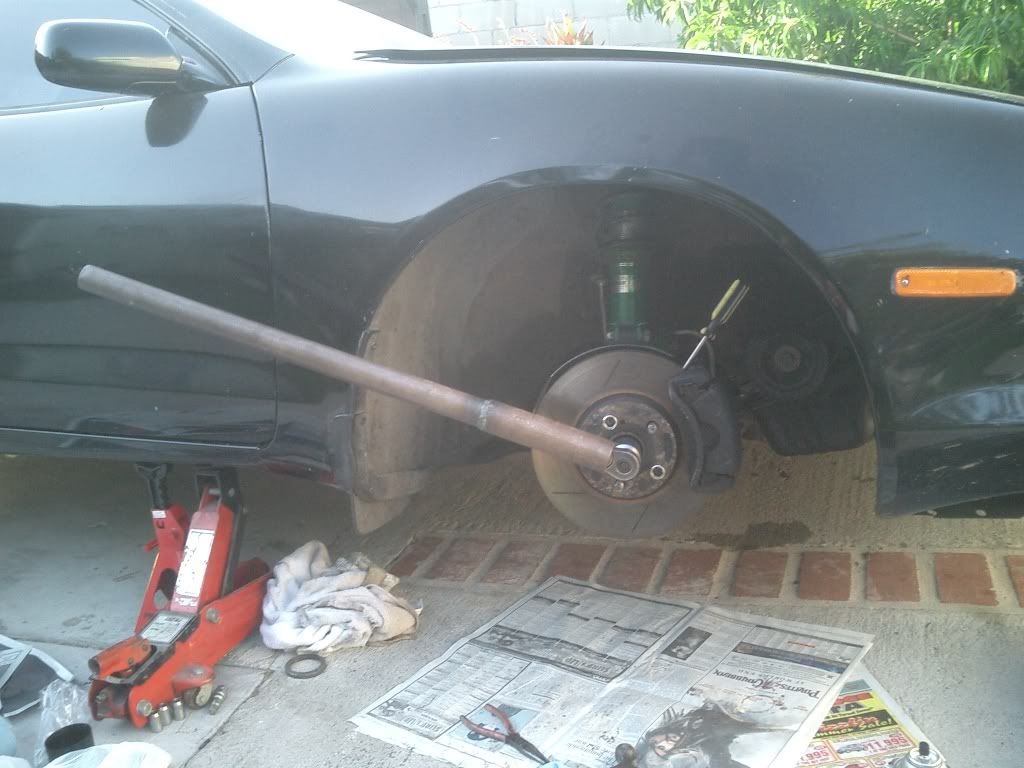 4) Once the axle nut is removed, your next step is to take the axle out of the hub. It just slides right out, you may have to play with it a little by turning the brake assembly one way or the other. *Then, as you see in the picture you will need to remove the brake caliper, with is very easy. Just as you see in the picture, remove the bottom shock bolt, (This gives you clearance for top caliper bolt) and loosen but dont remove the top one. (19mm) *2nd you will remove the caliper bracket bolts (17mm x2) once they are off, the whole caliper comes off with the pads still in place. LEAVE THE BRAKE LINE ON and just hang it from your spring with a wire or a coat hanger so its out of your way. 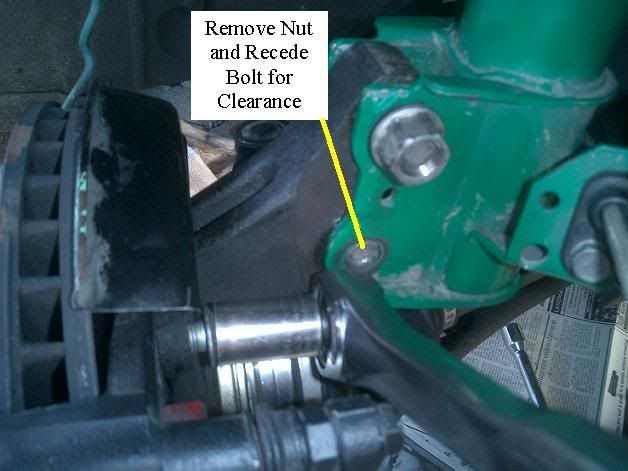 5) Once the Caliper is removed you could slilde off the rotor and it should look like this now. 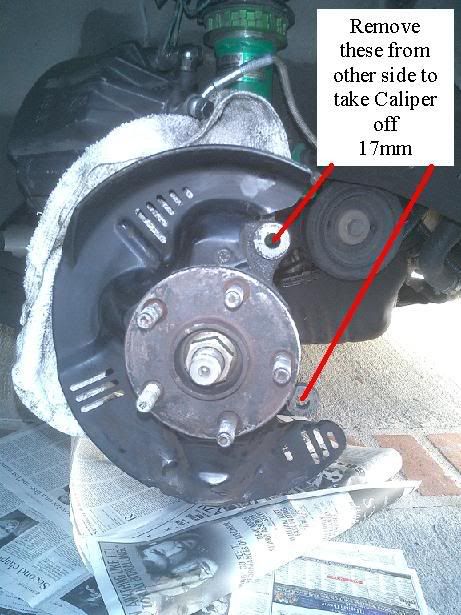 6) Your next step will be to remove your steering Tie rod. In the manual it says you need a puller for this step and you may do so if you feel more comfortable. I'll show you my way, which worked out great and didnt harm anything. 1st- You will need to remove the cotter pin from the castle nut on the tie rod. Then you will loosen the castle nut (17mm) and turn it so that it is ALMOST of the bolt. 2nd- Now you can get a hammer, and give the castle nut a good hit with your hammer in the ^ upwards direction. It doesnt need to be that hard, it should pop the tie rod loose, now you can remove the castle nut.  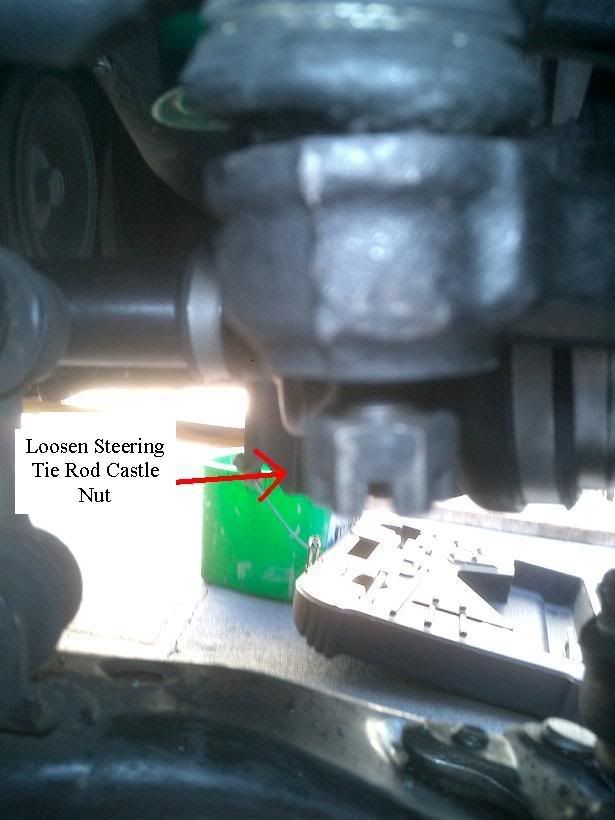 7) Your next and final step in the removal of the steering knuckle is to take off the the two nuts, and one bolt that hold the hub onto the lower control arm. (17mm I believe) You will need to take these off from under the control arm. (Once these are off, you can take the shock tower bolts completely off and take the hub out) * These 2 nuts and bolt will be on pretty strong, so i again used a 1/2 in. ratchet drive and the breaker bar to remove them. Here are two pictures of what you will be removing. 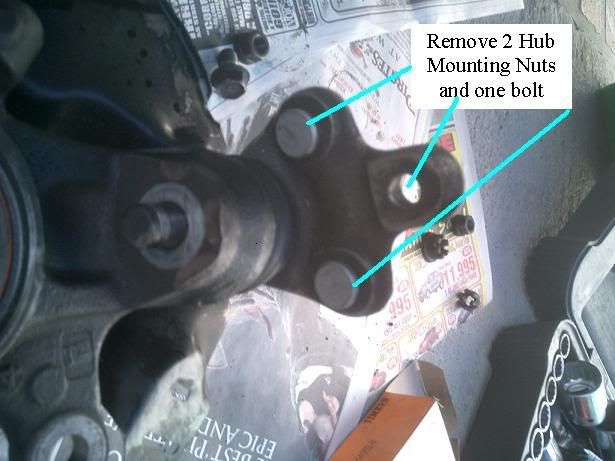 Steering Knuckle Removed: 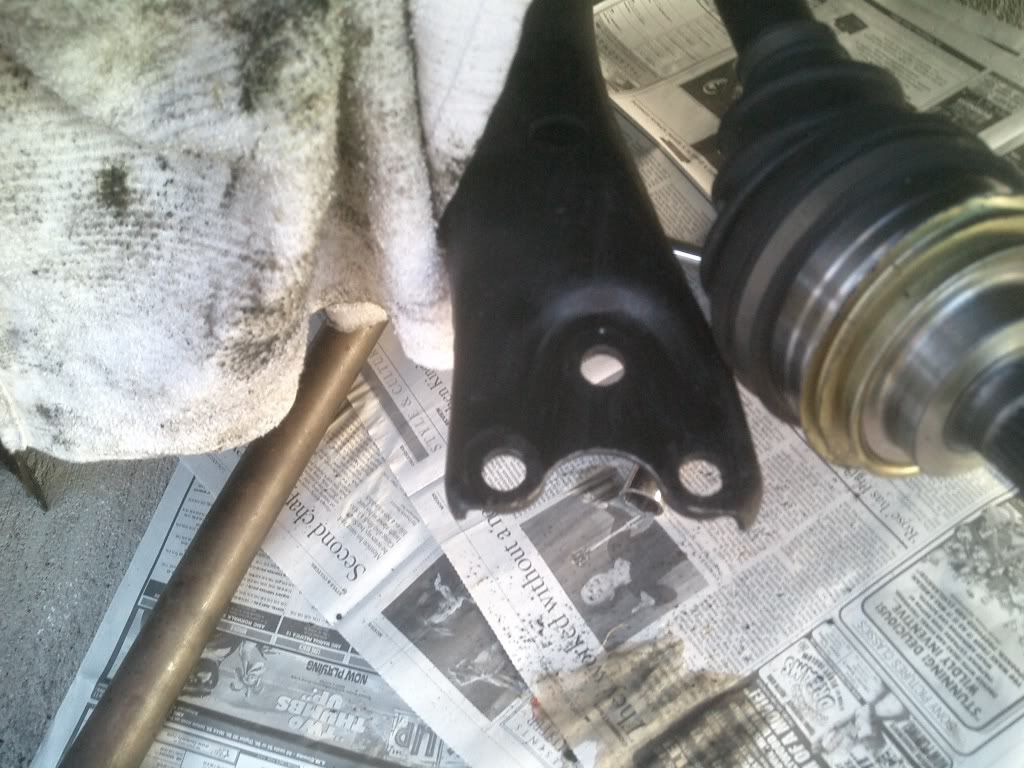 8) Once you remove the two nuts and bolt the hub will come right out. You will then need to take your Steering Knuckle, along with the new bearing and new seals and take them all to a local machine shop to press everything in. I was charged $35 at carquest for the job which was a great deal. Prices will range between $35-$65 per hub. I bought the new bearing and seals at autozone for $52! so combined, this job only cost me about $85. Which is way better than what some shops charge for doing it for you. I was quoted $350 on labor alone! This will save you a lot of money, and its not hard to do at all with the correct tools. 9)Here is my old bearing which look like its been through a lot in its lifetime: 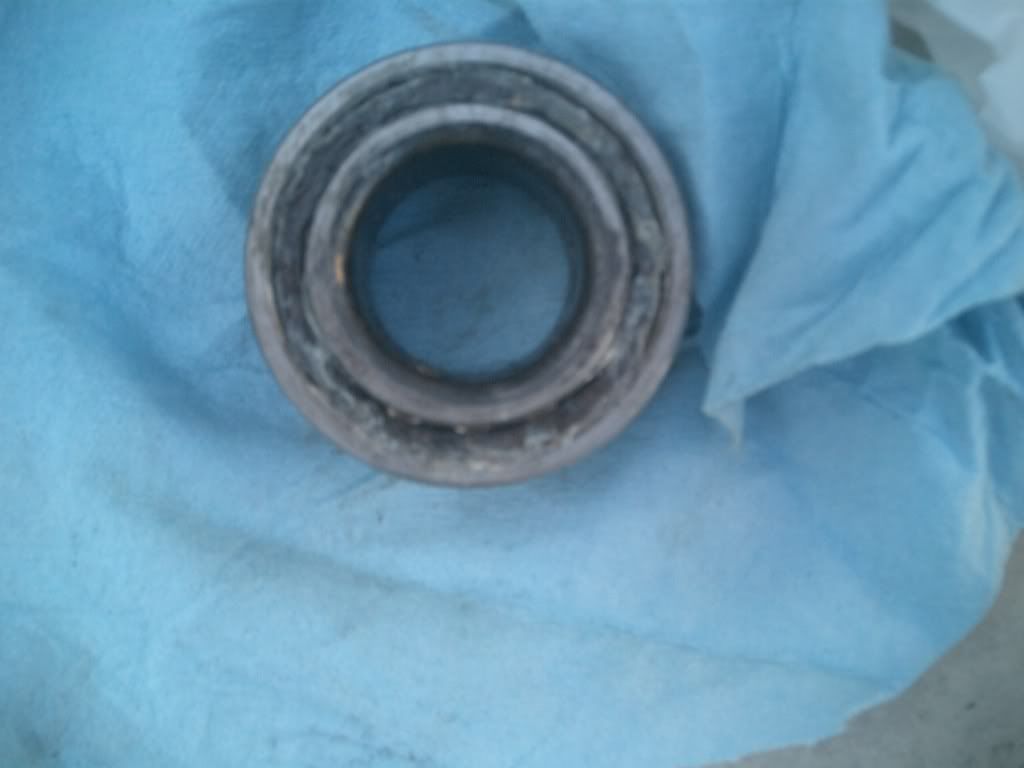 See the 2nd pic above, it has the new wheel bearing and seals pressed it. (Looks way better now) 10) Once your get your Steering Knuckle back put everything back on in reverse order. Heres a little tip when you go to put your Brake caliper back on: First of all, by removing the caliper from the bracket, It should have kept the pads in place, therefore there will BE NO NEED to push the brake cylinder back in with a "C" clamp. The caliper should slide right over the rotor. BUT in order to do so... the Rotor has to be perfectly flat and as far back as possible. I used my lug nuts for this as you can see in this picture: 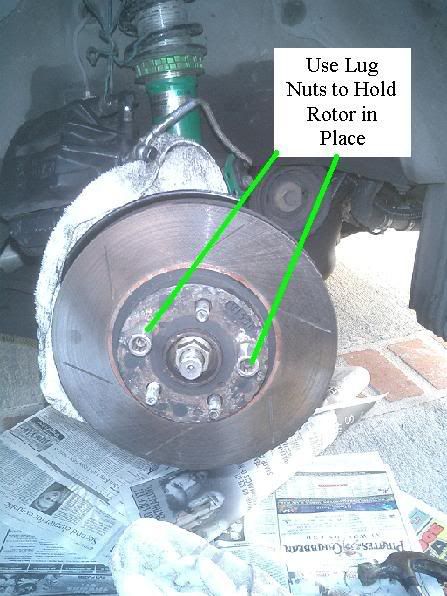 Here is the finished product once everything it put back on:  So there you have it, my first How To, I hope someone finds it usefull one day. If you have any questions feel free to ask. If any parts are unclear, please let me know and ill try to clarify as well as edit the post. Thanks! This post has been edited by eggman40: Jul 19, 2007 - 1:24 AM |

 |
Replies
|
Jun 26, 2012 - 4:46 PM
|
|
|
Enthusiast Joined Apr 24, '08 From Orange County, CA Currently Offline Reputation: 33 (100%) |
all 94-99 Celica use the same front wheel bearings and seals.
on another note. I'm not getting a loud squeeling or howling noise as speed increases. Installed both front timken wheel bearings a year ago and have accumulated 10,000 miles since. Now my front right tire has play. I had both torn outer cv axles and drove my car for a while like that. Since all the grease came out it pretty much tore up my wheel bearing/hub. When I go over bumps or holes in the ground the front right tire makes a popping/clunking noise. How to diagnose if its the hub? This post has been edited by BonzaiCelica: Jun 26, 2012 - 7:13 PM -------------------- Group buy to replicate Narrow E series transaxle parts
http://www.6gc.net/forums/index.php?showto...p;#entry1107514 Items for Sale: http://www.6gc.net/forums/index.php?showto...p;#entry1107572 |
Posts in this topic
eggman40 How To Replace Wheel Bearing (Front) Jun 17, 2007 - 5:12 PM laff09 Awesome write-up Jun 17, 2007 - 7:17 PM Remy Wow thanks alot for the write-up I need to replace... Jun 17, 2007 - 11:01 PM eggman40 Glad I could help guys! It'll save you lot... Jun 18, 2007 - 2:25 AM CelicaZR good stuff man
I went and got a quote today to ... Jun 18, 2007 - 4:03 AM Ve1Ls1dEvolutioN nice write up...how could you tell if you need to ... Jul 10, 2007 - 9:37 PM alltracman78 If it's making noise or has play in the wheel.... Jul 11, 2007 - 8:54 PM
laff09 Awesome write-up Jun 17, 2007 - 7:17 PM Remy Wow thanks alot for the write-up I need to replace... Jun 17, 2007 - 11:01 PM eggman40 Glad I could help guys! It'll save you lot... Jun 18, 2007 - 2:25 AM CelicaZR good stuff man
I went and got a quote today to ... Jun 18, 2007 - 4:03 AM Ve1Ls1dEvolutioN nice write up...how could you tell if you need to ... Jul 10, 2007 - 9:37 PM alltracman78 If it's making noise or has play in the wheel.... Jul 11, 2007 - 8:54 PM
 eggman40 QUOTE(alltracman78 @ Jul 11, 2007 - 6... Jul 19, 2007 - 1:30 AM alltracman78 One more thing to add.
If you're going to repl... Jul 11, 2007 - 9:01 PM SlowCelica94 Nice write up, but your jack stand poisitioning is... Jul 12, 2007 - 4:53 PM purplegt4 $160 from a shell gas station. supplied my ow... Jul 14, 2007 - 4:13 PM eggman40 QUOTE(purplegt4 @ Jul 14, 2007 - 2:1... Aug 2, 2007 - 9:42 PM njccmd2002 can anyone supply parts # for the bearing and sea... Oct 19, 2007 - 10:46 AM TrdPnoy what if you just replacing the bearing and not the... Oct 23, 2007 - 3:01 PM eggman40 QUOTE (TrdPnoy @ Oct 23, 2007 - 1:01... Sep 25, 2008 - 3:29 PM Spider77 TM514002B - thats the P/N for the Timken bearing. ... Sep 25, 2008 - 3:50 PM 6gtfour is the timkin wheel bearing better than oem bearin... Dec 27, 2009 - 7:01 PM BonzaiCelica yo eggman can you get those pics to work?!... Dec 28, 2009 - 3:59 AM azian_advanced the wheel bearing for both superstrut and mcpherso... Dec 28, 2009 - 8:19 AM DKGT4 QUOTE (azian_advanced @ Dec 28, 2009 - 8... Apr 16, 2012 - 4:46 PM BonzaiCelica My car currently has 121,000 miles. Would you guys... Dec 28, 2009 - 11:21 AM nsxtypeR Then don't replace them Dec 28, 2009 - 1:18 PM trdproven some pics are not working. Dec 30, 2009 - 8:34 AM Remy I have this thread saved with pics on my hard driv... Jan 1, 2010 - 4:15 PM CelicaST_CALI YES!please Jan 1, 2010 - 4:51 PM Remy Its a compressed file so u just need something to ... Jan 1, 2010 - 5:45 PM Penkka does anyone has an old or new bearing, I need the ... Jan 13, 2010 - 12:00 AM garin QUOTE (Penkka @ Jan 13, 2010 - 12:00... Jan 13, 2010 - 9:32 AM CelicaST_CALI remy that file doesnt work for me?
File not fo... Jan 13, 2010 - 12:07 AM Penkka no it doesnt include the hub, only the bearing and... Jan 13, 2010 - 9:49 AM garin QUOTE (Penkka @ Jan 13, 2010 - 9:49 ... Jan 13, 2010 - 9:53 AM Penkka QUOTE (garin @ Jan 13, 2010 - 10:53 ... Jan 13, 2010 - 11:00 PM Remy QUOTE (CelicaST_CALI @ Jan 12, 2010 - 11... Jan 13, 2010 - 8:17 PM 97lestyousay good write up.
Make sure and double check all of ... Feb 12, 2011 - 6:38 PM 808celica QUOTE (97lestyousay @ Feb 12, 2011 - 1... Feb 13, 2011 - 12:24 AM Euphoria I have an ABS on my passenger side and didn't ... Feb 13, 2011 - 12:53 PM 97lestyousay Unless the guy distorted it when he pressed it in,... Feb 13, 2011 - 1:54 PM mkernz22 To sort of bring this back from the dead, I need t... Jun 22, 2011 - 4:24 PM mak5603 Yeah bro. Timkens the way to go if it's not oe... Jun 22, 2011 - 6:38 PM mkernz22 I might order from the dealer. From the dealer the... Jun 22, 2011 - 6:51 PM Euphoria QUOTE (97lestyousay @ Feb 13, 2011 - 1... Jun 24, 2011 - 7:29 AM chacha i need someone in the Fresno area who can help me ... Sep 15, 2011 - 3:52 PM Pk97 QUOTE (eggman40 @ Jun 17, 2007 - 5:1... Dec 15, 2020 - 2:53 AM
eggman40 QUOTE(alltracman78 @ Jul 11, 2007 - 6... Jul 19, 2007 - 1:30 AM alltracman78 One more thing to add.
If you're going to repl... Jul 11, 2007 - 9:01 PM SlowCelica94 Nice write up, but your jack stand poisitioning is... Jul 12, 2007 - 4:53 PM purplegt4 $160 from a shell gas station. supplied my ow... Jul 14, 2007 - 4:13 PM eggman40 QUOTE(purplegt4 @ Jul 14, 2007 - 2:1... Aug 2, 2007 - 9:42 PM njccmd2002 can anyone supply parts # for the bearing and sea... Oct 19, 2007 - 10:46 AM TrdPnoy what if you just replacing the bearing and not the... Oct 23, 2007 - 3:01 PM eggman40 QUOTE (TrdPnoy @ Oct 23, 2007 - 1:01... Sep 25, 2008 - 3:29 PM Spider77 TM514002B - thats the P/N for the Timken bearing. ... Sep 25, 2008 - 3:50 PM 6gtfour is the timkin wheel bearing better than oem bearin... Dec 27, 2009 - 7:01 PM BonzaiCelica yo eggman can you get those pics to work?!... Dec 28, 2009 - 3:59 AM azian_advanced the wheel bearing for both superstrut and mcpherso... Dec 28, 2009 - 8:19 AM DKGT4 QUOTE (azian_advanced @ Dec 28, 2009 - 8... Apr 16, 2012 - 4:46 PM BonzaiCelica My car currently has 121,000 miles. Would you guys... Dec 28, 2009 - 11:21 AM nsxtypeR Then don't replace them Dec 28, 2009 - 1:18 PM trdproven some pics are not working. Dec 30, 2009 - 8:34 AM Remy I have this thread saved with pics on my hard driv... Jan 1, 2010 - 4:15 PM CelicaST_CALI YES!please Jan 1, 2010 - 4:51 PM Remy Its a compressed file so u just need something to ... Jan 1, 2010 - 5:45 PM Penkka does anyone has an old or new bearing, I need the ... Jan 13, 2010 - 12:00 AM garin QUOTE (Penkka @ Jan 13, 2010 - 12:00... Jan 13, 2010 - 9:32 AM CelicaST_CALI remy that file doesnt work for me?
File not fo... Jan 13, 2010 - 12:07 AM Penkka no it doesnt include the hub, only the bearing and... Jan 13, 2010 - 9:49 AM garin QUOTE (Penkka @ Jan 13, 2010 - 9:49 ... Jan 13, 2010 - 9:53 AM Penkka QUOTE (garin @ Jan 13, 2010 - 10:53 ... Jan 13, 2010 - 11:00 PM Remy QUOTE (CelicaST_CALI @ Jan 12, 2010 - 11... Jan 13, 2010 - 8:17 PM 97lestyousay good write up.
Make sure and double check all of ... Feb 12, 2011 - 6:38 PM 808celica QUOTE (97lestyousay @ Feb 12, 2011 - 1... Feb 13, 2011 - 12:24 AM Euphoria I have an ABS on my passenger side and didn't ... Feb 13, 2011 - 12:53 PM 97lestyousay Unless the guy distorted it when he pressed it in,... Feb 13, 2011 - 1:54 PM mkernz22 To sort of bring this back from the dead, I need t... Jun 22, 2011 - 4:24 PM mak5603 Yeah bro. Timkens the way to go if it's not oe... Jun 22, 2011 - 6:38 PM mkernz22 I might order from the dealer. From the dealer the... Jun 22, 2011 - 6:51 PM Euphoria QUOTE (97lestyousay @ Feb 13, 2011 - 1... Jun 24, 2011 - 7:29 AM chacha i need someone in the Fresno area who can help me ... Sep 15, 2011 - 3:52 PM Pk97 QUOTE (eggman40 @ Jun 17, 2007 - 5:1... Dec 15, 2020 - 2:53 AM |
1 User(s) are reading this topic (1 Guests and 0 Anonymous Users)
0 Members:
| Lo-Fi Version | Time is now: July 28th, 2026 - 12:50 PM |