
 Mar 3, 2010 - 1:13 AM Mar 3, 2010 - 1:13 AM
|
 
|
 Enthusiast  Joined Feb 2, '07 From Berlin, WI Currently Offline Reputation: 18 (100%) |
I made one for 1GC so I thought I'd share it with you guys on here as well.
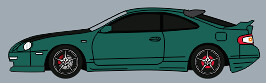
 http://1stgencelica.com/forum/viewtopic.ph...;p=53542#p53542 Upon request, I'm starting a thread with tips on how to use photoshop to mess around with your celica. That way, instead of wasting $$$$ on trying out different paint jobs and what not. You can see instant results. :lol2: but, here we go. I will update this thread whenever I have time and if you guys have any questions you want answered relating to how to do this, I will try my best to answer them. So i'm sorry if I don't update it as much as I might have finals or sumthing for school. TIP #1 How to lower your car. best thing for photoshopping your car is to well, have a decent picture of your car. i just picked a really easy one like this. sorry for stealing the pic if this belongs to someone on here  so open it up in photoshop and make a new layer by looking in the bottom right hand side and in the "LAYERS" box, drag your "BACKGROUND" image into the new layer button like so.  now that you have two layers. it's like putting two pieces of paper on top of each other. so the trick of this tip is that you're going to erase the ground under the car on your top layer and just shift it down however much you want. so select your eraser tool ( I like to use the eraser tool, with a BRUSH style at the top toolbar. It gives it a less harsh edge when erasing, you'll see what i mean)  and adjust the size on the top. then just take off the ground including the wheels of your car too. so all you have left is just the body of the car and the upper part of the background. if you don't see any changes happening. It might be easier if you take the background off. Press the eyeball in the layers box to make your layers visible or not visible. It will still be there but it's just hidden, not deleted. so you can see exactly what you've deleted. now you see that i've deleted the bottom portion of the image.  after you're happy with your erasing, turn your background layer back on and then select the layer you just erased. All you do is just nudge it down however much you like by either pressing the down arrow or you can click on your picture and just drag it down a bit.  but now we see that there's a distortion in your image at the top. well that's an easy fix. We can just crop it off. so select the crop tool. then just click and draw a box around the area you want ideally cutting off that top part like so.  then just press enter and you're done. you just dropped your car for free!  before after 
--------------------  *1997 Celica ST - 3SGE Greytop BEAMS *1977 Celica RA29 - Classic Cruiser *2005 Matrix AWD - dedded but still hanging around like a ghost 2019 Rav4 XLE Premium - Sports mode is fun. |

Posts in this topic
 cheela Photoshop TIPS Mar 3, 2010 - 1:13 AM
 njccmd2002 dude thats awesome, i need to get photochop Mar 3, 2010 - 1:32 AM CelicaST_CALI Way to show the easiest thing to do hahahha jk go... Mar 3, 2010 - 1:41 AM manphibian Tutorials on left:
http://www.digimods.co.uk/tuto... Mar 3, 2010 - 3:27 AM
njccmd2002 dude thats awesome, i need to get photochop Mar 3, 2010 - 1:32 AM CelicaST_CALI Way to show the easiest thing to do hahahha jk go... Mar 3, 2010 - 1:41 AM manphibian Tutorials on left:
http://www.digimods.co.uk/tuto... Mar 3, 2010 - 3:27 AM cheela yeah, just showing the noobs some easy tips. and y... Mar 3, 2010 - 11:15 AM
  |
1 User(s) are reading this topic (1 Guests and 0 Anonymous Users)
0 Members:
| Lo-Fi Version | Time is now: July 30th, 2026 - 8:50 PM |