  |

 Apr 12, 2005 - 2:12 AM Apr 12, 2005 - 2:12 AM
|
 
|
|
Enthusiast  Joined Jan 9, '05 From Under the car Currently Offline Reputation: 0 (0%) |
QUOTE(Mr_E @ Apr 11, 2005 - 6:17 PM) If you want a picture of suspension parts...... [right][snapback]269701[/snapback][/right] Hmmmmmmmm.....shiny. Next on my list of mods. |

|
Apr 12, 2005 - 2:13 AM
|
|
 Enthusiast Joined Mar 8, '04 From Newport, RI Currently Offline Reputation: 63 (99%) |
great info. Keep it comming
-------------------- |

|
Apr 12, 2005 - 2:36 PM
|
|
|
Enthusiast Joined Nov 16, '04 From UK Currently Offline Reputation: 0 (0%) |
QUOTE(Insanity-74 @ Apr 12, 2005 - 2:12 AM) QUOTE(Mr_E @ Apr 11, 2005 - 6:17 PM) If you want a picture of suspension parts...... [right][snapback]269701[/snapback][/right] Hmmmmmmmm.....shiny. Next on my list of mods. [right][snapback]269915[/snapback][/right] Start saving. That bill *hurt* -------------------- JDM ST205
Blitz Spec NUR Exhaust, somewhere over $1000 Needing another one 18000 miles later, bloody annoying. |
|
Apr 12, 2005 - 11:52 PM
|
|
|
Enthusiast Joined Nov 24, '04 From Moscow, russia Currently Offline Reputation: 0 (0%) |
Blin! spot on info mate
 as always as alwaysbut now i know what the knocking sound is from the front right when i'm in full lock (parking) and maybe my squeeking problem as well  do you think that a dodgy fig 8, could account for the half inch drop i posted about the other week ? --------------------  Life is for living, and you don't get a second chance Take care now !! |
|
Apr 13, 2005 - 2:30 AM
|
|
|
Enthusiast Joined Jan 9, '05 From Under the car Currently Offline Reputation: 0 (0%) |
QUOTE(popstar @ Apr 12, 2005 - 11:52 PM) Blin! spot on info mate as alwaysbut now i know what the knocking sound is from the front right when i'm in full lock (parking) and maybe my squeeking problem as well do you think that a dodgy fig 8, could account for the half inch drop i posted about the other week ? [right][snapback]270334[/snapback][/right] Could be mate, havnt you managed to get that sorted yet? You`ll know if the fig 8`s are bust, you`ll be able to see movement if you get someone to rock the wheel while you stick your head under and have a look. Or youll get the knocking sound. Another cause of knocking on the st205 is the brake pads, there is a little stainless steel cross that sould be on the front of the brake caliper which holds the pads secure, these sometimes rust through and drop off, just happened on mine, took me ages to locate the knocking sound.  Amost managed to get the Celica rattle and knock free Amost managed to get the Celica rattle and knock free 
|
|
Apr 13, 2005 - 11:36 PM
|
|
|
Enthusiast Joined Nov 24, '04 From Moscow, russia Currently Offline Reputation: 0 (0%) |
Mate i hope to get it seen to this weekend !
what with work, partying and the young ladied of Moscow to keep happy..... but serously mate, i hate just go to a garage and in my bad russian try to explain about a noise, and what i think is the problem, i much prefur to go in knowing the problem and just get it fixed...... -------------------- Life is for living, and you don't get a second chance Take care now !! |
|
Apr 14, 2005 - 1:12 AM
|
|
 Enthusiast Joined Jul 19, '04 From Los Angeles, CA Currently Offline Reputation: 2 (100%) |
nice info! sticky fo sho
|
|
Aug 27, 2005 - 1:31 AM
|
|
|
Enthusiast Joined Jan 9, '05 From Under the car Currently Offline Reputation: 0 (0%) |
Fitting a Down pipe / DeCat pipe
Well here we go again .more work on the Faff. this time, how to fit a down pipe/DeCat pipe. Not sure about how many companies make Down pipes for the GT4 or whether they are interchangeable between the various models, st185/205 etc but the model in particular is the now infamous Tipo Blue ST205, the down pipe in question is one of JJ`s. (Cheers Bud) 1. My first task after receiving the FedEx tracking form (via internet) was a day in advance, liberally coat all the bolts with WD40 or GT85, whichever you prefer. Now the whole job will have been made a lot easier by the fact that not long ago (less than a week) I had a Full stainless system fitted so the down pipe to exhaust bolts shouldnt be too hard to shift, the rest however look like age and water have joined forces to rust the bolts solid and could be a right pain in the arse. 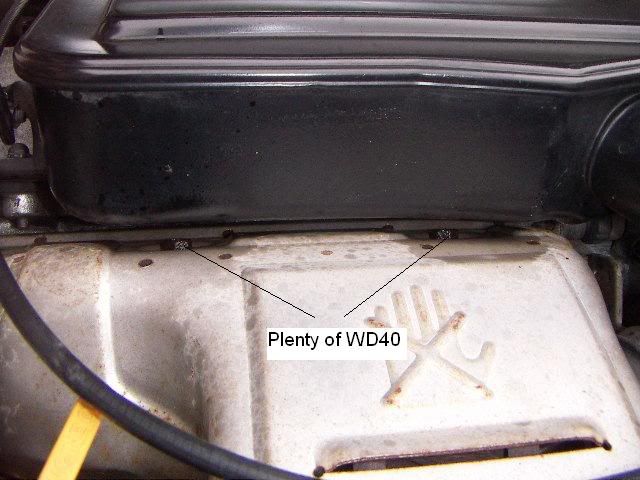 Dont forget down the front either 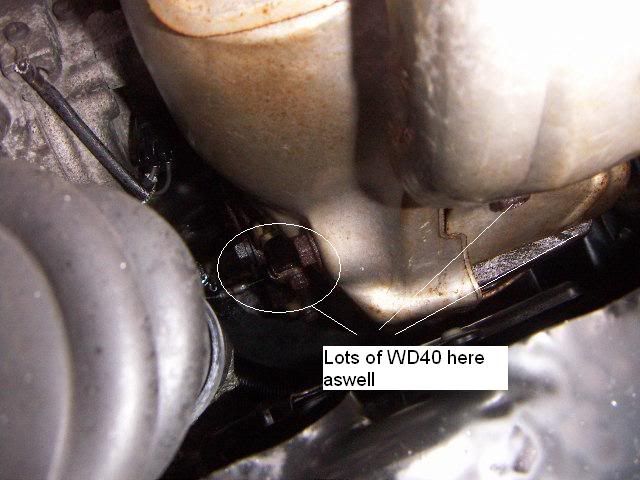 Whilst Im at it, Im going to use this opportunity to paint/polish the heat shield as well which hasnt looked to good since the day I bought the car. Im also going to replace all the missing/broken bolts that hold the plastic shielding under the car in place as well as check the radiator out and give the turbo a quick once over and clean. The front most radiator which cools the charge cooler water is bent out of shape and will have to be replaced at a later date. Also Im going to re-lag the chargecooler and clean it as mentioned earlier on the original post, now that Im getting more confident I will also clean out the intake and polish up the throttle body internals. Right after a few days of letting the WD40 do its stuff and JJ`s down pipe arrived I was ready, (WD40 produces a lot of smoke on the manifold when you forget that its soaked in the stuff, can also be quite scary too) First job was to drain the charge cooler, did this by removing one of the feed pipes from the back. Undo the 3 bolts that secure the CC to the engine, undo the vacuum pipes and level sensor wires and undo the jubilee clips on the intake. Now getting this off is a nightmare, I found the best method was to pull the front up out of the rubber `charge cooler to turbo` connector then pull towards you. While its off you may as well clean it out internally and lag the underneath, I used alloy tape from Halfrauds and several layers of fibreglass matting, costs next to nothing and is a good insulator. Put it somewhere safe out of the way. Next I removed the air box to turbo pipe and cleaned it out, cleaned the compressor side of the turbo with some carb cleaner and blocked of the holes to prevent foreign object damage to the blades etc. Now its time to remove the turbo heat shield, one of the several that there is, It is held on by 3 bolts, one right at the front and two on the top, the front one came undone no trouble at all, both the top ones sheared off. (I drilled and retapped them) With the heat shield removed I used this opportunity to polish it up, after trying several methods I decided that the best was to use a wire brush fitment for an electric drill, worked in a diagonal direction at a constant angle, this gives a really good brushed steel effect and looks quite smart, not as bling as the chromed efforts. (Not sure how long it will last before it goes rusty? Only time and bad weather will tell. 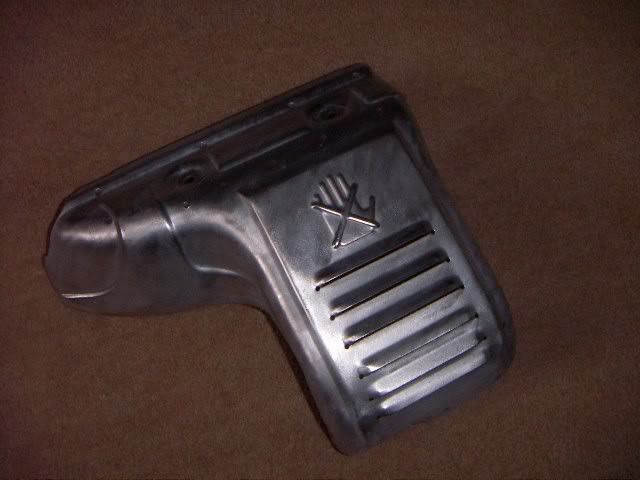 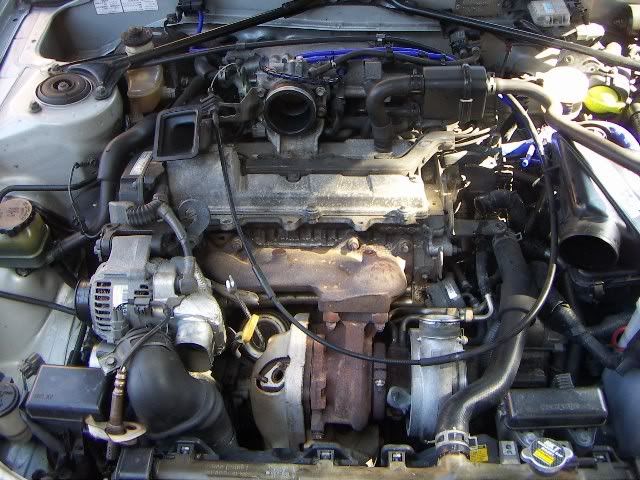 Next job was to remove the radiator; Im sure its not essential to do this but it makes working a lot easier and adds a surprising amount of room to the workspace. Catch all the water/coolant that comes out, as youll be working under the car next and its not nice stuff to lie in for several hours. To remove the radiator, start by jacking the car up, both sides and supporting on good axel stands. Remove the drivers side under tray, its held on by about 6 bolts/self tapping screws two of which are behind the front wheel, but are accessible without removing the front wheel. Here too you will find the Oil filter which is surprisingly small (if you wanted you could change the oil at this point as the filter is very easy to remove etc and everything is at hand.) Now drain the rad, the drain plug is on the drivers side corner of the rad or you could do what I did and just remove the bottom feed pipe (youll require at least 4L of coolant to refill the engine later) Remove the remaining feed pipes, unclip the two fan power supplies (one on each side). Remove the small fuse box on the left of the rad (held on by 2 10mm bolts if I remember correctly) Undo the two top brackets that hold the rad in place. Now simply pull the radiator upwards, you might catch the battery tray a little on the fan housing, but its soft and gives way pretty easily. Store somewhere very safe (we all know how easy it is to damage a radiator.) To aid removing the rad you can also remove the snorkel to the alternator, (throw this a long way away as its the most pointless piece of crap I have ever seen in a car engine bay) Next remove the Lambda sensor and put it somewhere safe (they are expensive) Remove the dipstick Sit back have a beer or a coffee at this point as this is where things start getting annoying. As you can see, a fare amount of space has been created to work in. Next job is to remove some more of the heat shielding to the left of the CAT held in place by about 4 bolts, getting the bolts off wasnt a problem, getting the heat shielding away was a proper pain in the ass, took me about 30 mins of cussing, swearing, bending and hammering to get this thing away. Be very careful as there is a sensor near the dipstick that could be damaged by this process. 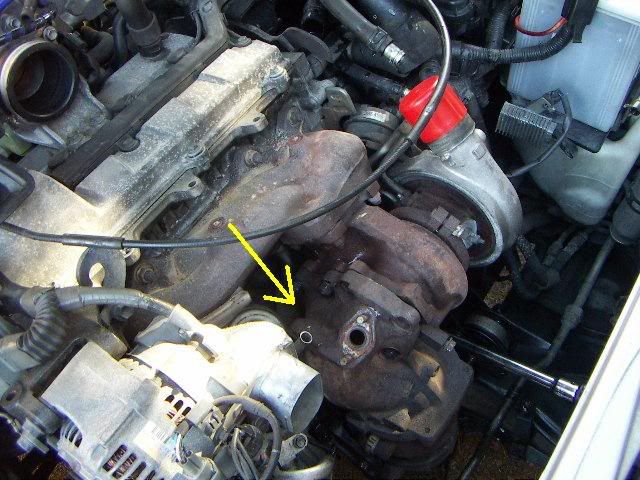 Now that the heat shielding is off it is time to start the process of removing the CAT itself, start by undoing the CAT to turbo bolts. There is one down the back that is a pain in the butt to get to, I had to make a special tool to remove it. Now I aint no expert at tool making so it was nothing flash but the access to the bottom most stud is very limited, couldnt get a ring spanner or and open spanner onto it, not enough room for a socket and ratchet, after half an hour or so of head scratching and feeling like I should jack this in for a bad job, I discovered one of my old sump plug tools (from my Peugeot 205 Gti owning days) It was basically a big alan key, ground down so that the little end has a square head, this happened to fit perfectly into one of the quarter inch drive sockets that I had lying around (the 14mm one to be precise) I fashioned a little extension bar (good old bench grinder) slotted the three together and hey presto, the perfect tool to access the bottom most nut .success. Before removing there nuts you have to disconnect the exhaust and remove the sensor from the CAT, now mine was stuck solid, I had to disconnect the cable end from the loom and remove it later, lots of WD40 and a pipe wrench needed. Now I was ready to disconnect the CAT from the car ..bugger me this thing weighs a tonne, without a word of a lie it must weigh in at 20Kg`s if not more ..this is what you`ll be removing 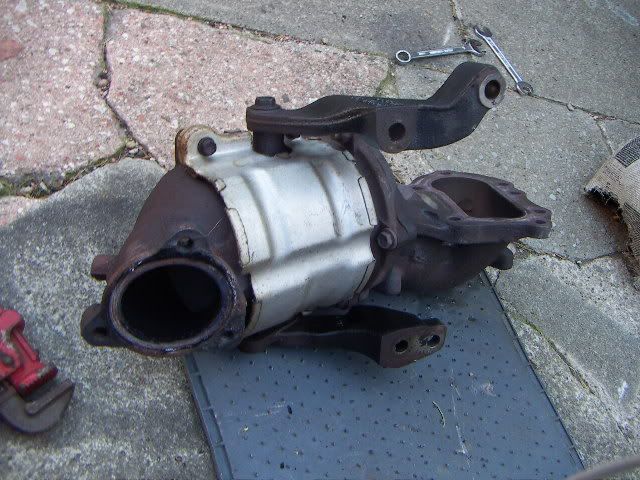 Carefull of them fingers when your removing it from the car. Not sure about anyone else but the CAT Conv material inside the CAT was not discoloured or damaged at all, it looks almost brand new, anyway, it`ll be kept to one side ready for reversing this job come MOT time, unless I fit a sports high flow CAT, which will be the most likely option. I dont wanna have to do this job again. Heres the big void that`ll be left behind, dont worry, you`ll soon fill it 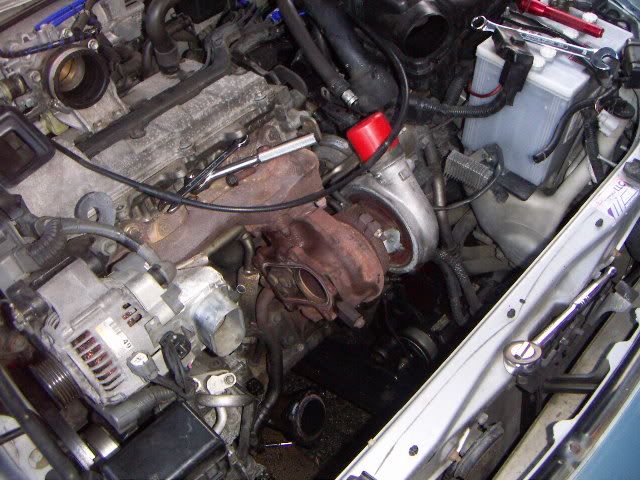 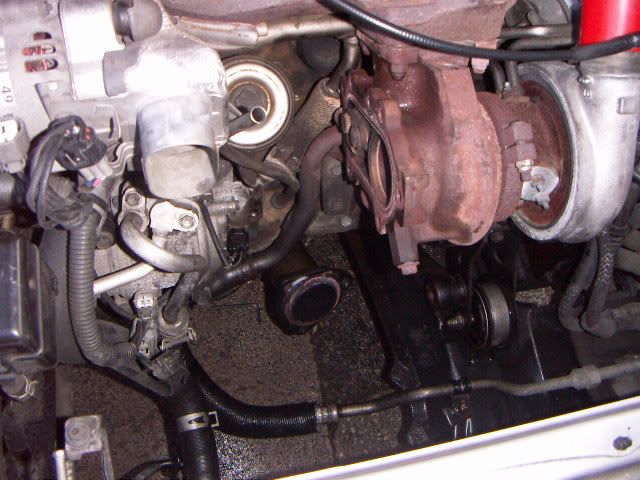 Now your ready for the good stuff, putting on the bling and getting it all back together again. Time for another beer. Right, as I found, putting this thing back together was a right pain in the arse. First of put the studs onto the turbo manifold, put the supporting braket onto the right side lower most bolt that secured the origional DP to the engine block but dont tighten any of the bolts up (you will probably need to modify the holes in the braket, I enlarged the right side one by about 4mm to get it to fit. Next put the downpipe on to the turbo along with its gasket, put the bolts onto the DP to exhaust flange (with the exhaust in place too) dont forget the gasket, but again, dont tighten them up. Right, now tighten up the turbo manifold studs, then the exhaust bolts and finally the braket bolts. It will probably take a bit of giggery pokery but it will fit eventually. Now your all ready to start putting everything else back together. Put the radiator back in and secure it back up, Dont foget the little fuse box. Fill it up with coolant. Put the sensor back into the bottom of the DP, I had to use a little exhaust sealant cause it `blew` ever so slightly. Connect it back up. Now carefully put the Lambda sensor back on and secure it, You`ll need to remove the little heat shield that goes around it as it obstructs the main heat shield from fitting back correctly. Put the main heatshield back on, and the Chargecooler, connect up the pipes (the two on the right hand side, and fill with more coolant. Not forgetting the little vacume pipe at the back of it. Now your pretty much ready to go. Reset the ECU as I got an error code at first. Jobs a good un. Kinda rushed through the last bit, If anyone requires any help then feel free to PM me and I`ll go through in more detail what to do. Happy downpipe fitting...Insanity. 8) The finished article 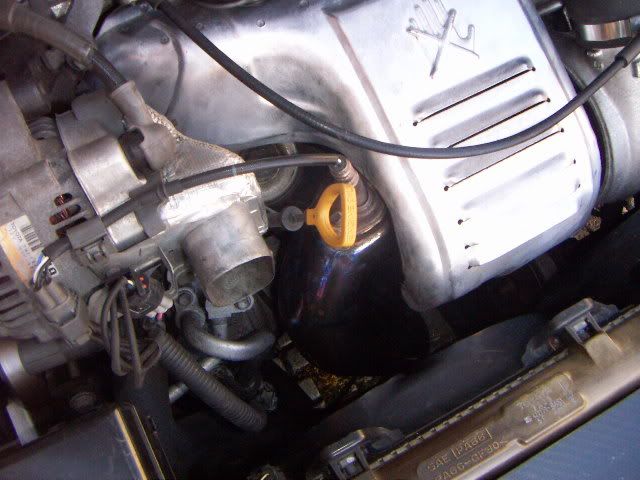 & With one of Davest205`s(from the GT4oc) carbon rad panels 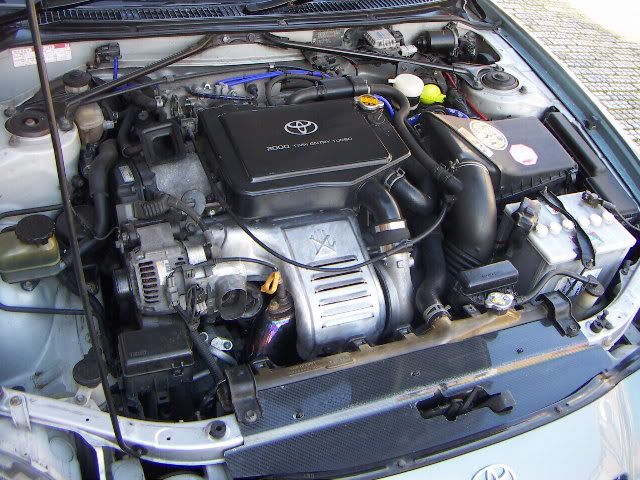
This post has been edited by Insanity-74: Sep 16, 2005 - 10:16 AM |
|
Oct 6, 2005 - 7:34 AM
|
|
|
Enthusiast Joined Jul 20, '04 From Russia, Moscow Currently Offline Reputation: 0 (0%) |
Thanks for all the info. Very useful. Great job and keep it comming.
|
|
Oct 6, 2005 - 7:59 AM
|
|
|
Enthusiast Joined Nov 24, '04 From Moscow, russia Currently Offline Reputation: 0 (0%) |
Hmmm
that looks like something i can do, with a bit of help (busy Zhenya) and with no MOT i don't have to save the cat  another outstanding bit of info thanks mate -------------------- Life is for living, and you don't get a second chance Take care now !! |
|
Jan 4, 2007 - 9:52 PM
|
|
|
Enthusiast Joined Nov 20, '06 From Auckland, New Zealand Currently Offline Reputation: 0 (0%) |
I just removed the intake resonator box. It seems to have made a slight improvement in acceleration, and the extra noise u can hear from the turbo spooling is awesome.
Would have been better though if the lil guide to do it, stated that the wheel had to be removed etc. It took me 1 hour to do it, from taking the wheel off, pulling off the plastic wheel arch, removing the box and then putting the wheel arch back on and the tyre back on and goin for a quick boost to make sure its fine. Good tip either way though
|
|
Jan 5, 2007 - 5:13 PM
|
|
|
Enthusiast Joined Jan 9, '05 From Under the car Currently Offline Reputation: 0 (0%) |
you dont need to take the wheel off, just jack the car up a bit.
|
|
Jan 5, 2007 - 5:46 PM
|
|
|
Enthusiast Joined Feb 1, '05 From Charlotte NC Currently Offline Reputation: 14 (100%) |
ACKHEM...STICKY??
--------------------  QUOTE (Galcobar @ Oct 15, 2008 - 2:44 AM)  You want power but have no money. That's a problem. Cheap. Reliable. Fast. Pick two. |
|
Jan 5, 2007 - 6:13 PM
|
|
|
Moderator Joined Oct 1, '02 From fall river, ma Currently Offline Reputation: 13 (100%) |
QUOTE(easternpiro1 @ Jan 5, 2007 - 5:46 PM) [snapback]515468[/snapback] ACKHEM...STICKY?? ....read the stickys before you post this. look at the post dates.. 
-------------------- Former Team 5SFTE pro member ;)
 13.6@108MPH, 5SFTE Powered |
|
Jan 5, 2007 - 10:48 PM
|
|
|
Enthusiast Joined Nov 20, '06 From Auckland, New Zealand Currently Offline Reputation: 0 (0%) |
QUOTE(Insanity-74 @ Jan 5, 2007 - 10:13 PM) [snapback]515459[/snapback] you dont need to take the wheel off, just jack the car up a bit. Ive got 18" chrome mags and the cars lowered on super lows, not much clearance for me hehe. check my profile, ull see what I mean. |
|
Jan 6, 2007 - 4:27 AM
|
|
|
Enthusiast Joined Jan 9, '05 From Under the car Currently Offline Reputation: 0 (0%) |
Yep...I have 18`s aswell, and Eibach lowered suspension.....when you jack the car up, the wheel drops enough to get a stubby screwdriver in.
|
|
Jan 6, 2007 - 2:57 PM
|
|
|
Enthusiast Joined Nov 20, '06 From Auckland, New Zealand Currently Offline Reputation: 0 (0%) |
ah thats where i went wrong, the screwdriver i was using was about.. a foot long.
|
|
Apr 16, 2013 - 9:52 AM
|
|
 Enthusiast Joined Sep 29, '09 From Prince George, BC CANADA EH! Currently Offline Reputation: 8 (100%) |
SO you still think the aftermarket dump valve and breather filter are good just stay away from the bailey valve?
-------------------- ST205 Crew represent
 Challenge Accepted |
|
Apr 16, 2013 - 10:20 AM
|
|
 Enthusiast Joined May 4, '09 From coral springs florida US Currently Offline Reputation: 21 (100%) |
Ok so i have my engine light on and i tried to figure out the code by connecting E1 & TE1 but my check engine light didnt blink like it was supposed to. My car is a st with obd2 and the 3s obd1 this coukd be causing the light not to flash is there a differ method to read the check engine light codes? Because i tried the ecu scanner and couldnt detect any codes.
--------------------  |
|
Apr 16, 2013 - 12:28 PM
|
|
 Enthusiast Joined Oct 10, '03 From Wichita, KS Currently Offline Reputation: 5 (100%) |
QUOTE (diegohiga @ Apr 16, 2013 - 10:20 AM) Ok so i have my engine light on and i tried to figure out the code by connecting E1 & TE1 but my check engine light didnt blink like it was supposed to. My car is a st with obd2 and the 3s obd1 this coukd be causing the light not to flash is there a differ method to read the check engine light codes? Because i tried the ecu scanner and couldnt detect any codes. Sounds like whoever did your swap wiring didn't wire in the diagnostic connector correctly. You won't be able to use the code reader either. You can put a switch on the te1 and e1 wires coming out of the ECU instead... Someone here did a write up a few years back. It might be in the stickies. --------------------  Project ST204.5 99.88946% complete... |
|
1 User(s) are reading this topic (1 Guests and 0 Anonymous Users)
0 Members:
| Lo-Fi Version | Time is now: May 8th, 2024 - 12:37 PM |