  |

 Jul 27, 2015 - 1:28 PM Jul 27, 2015 - 1:28 PM
|
 
|
|
Enthusiast  Joined Dec 9, '14 From Juneau, Alaska Currently Offline Reputation: 3 (100%) |
I'm replacing a bad rear engine mount in my Celica GT with a 3SGTE engine swap. The rear engine mount on my swap is basically the same as a Celica with a 5SFE and a Manual Transmission.
The front engine mount is easy to replace and can be done in about an hour. I'm stuck on how to remove the rear mount. I've spend 4 hours so far with limited success. First Problem: removal of the through bolt holding the mount to the engine bracket. This was a pain. the power steering rack mount point is is the way. You can bend the bold away from the mount but it's hard to bend out and pull at the same time. Solution: Leave the front engine mount off and to use a smaller bolt to push in the hole on the other side and lightly tap the bolt out with a hammer. the tapping combined with bending it away from the power steering rack mount worked. Second Problem: Getting the motor mount out This is the hard part. it has long bolts that hold it and the cross member to the sub-frame. By the time you pull the bolts out, the mount bumps against the engine bracket and the power steering rack. Solution: I haven't figured this part out yet. I tried unbolting the cross member and I'm moving it around to see if that helped. I think that and rocking the engine and maybe unbolting the power steering rack to get it out of the way. Does anyone have any ideas or techniques?? More on this topic including pictures coming soon! |

|
Jul 27, 2015 - 2:05 PM
|
|
|
Enthusiast Joined Jan 20, '09 From Winnipeg Currently Offline Reputation: 5 (100%) |
If you do a search there's a thread where NUMEROUS people have had the exact same problem.
There's actually a really simple way (from what i've read/watched) to get the mount out in less than a minute, and even a video of the member taking the mount out. If you find that thread, you should be able to get it out. -------------------- -Protection mode, For when your amp tries to blow its load. 1995 Toyota Celica GTS - Daily Driver 1999 Chevy Cavalier - Winter Beater 1994 Honda Civic CX Hatchback - Dead My Celica! |
|
Jul 27, 2015 - 3:21 PM
|
|
|
Enthusiast Joined Dec 9, '14 From Juneau, Alaska Currently Offline Reputation: 3 (100%) |
QUOTE (jordisonjr @ Jul 27, 2015 - 11:05 AM)  If you do a search there's a thread where NUMEROUS people have had the exact same problem. There's actually a really simple way (from what i've read/watched) to get the mount out in less than a minute, and even a video of the member taking the mount out. If you find that thread, you should be able to get it out. I searched but I didn't find that thread. I'll look again. Thanks. |
|
Jul 27, 2015 - 3:35 PM
|
|
|
Enthusiast Joined Jan 20, '09 From Winnipeg Currently Offline Reputation: 5 (100%) |
QUOTE (antoine64 @ Jul 27, 2015 - 4:21 PM) QUOTE (jordisonjr @ Jul 27, 2015 - 11:05 AM) If you do a search there's a thread where NUMEROUS people have had the exact same problem. There's actually a really simple way (from what i've read/watched) to get the mount out in less than a minute, and even a video of the member taking the mount out. If you find that thread, you should be able to get it out. I searched but I didn't find that thread. I'll look again. Thanks. It might take a bit, but its the largest thread on it. Ill see if I can dig it up. -------------------- -Protection mode, For when your amp tries to blow its load. 1995 Toyota Celica GTS - Daily Driver 1999 Chevy Cavalier - Winter Beater 1994 Honda Civic CX Hatchback - Dead My Celica! |
|
Jul 27, 2015 - 3:36 PM
|
|
|
Enthusiast Joined Dec 9, '14 From Juneau, Alaska Currently Offline Reputation: 3 (100%) |
found some instructions here:
http://www.6gc.net/forums/index.php?showto...md2002&st=0 I'm going to post my own experience once I try it. I couldn't rock the engine much due to the b pipe still being connected so I'll pop it off and see. In this guys video the engine is quite easy to rock. This post has been edited by antoine64: Jul 27, 2015 - 3:36 PM |
|
Jul 28, 2015 - 12:23 AM
|
|
|
Enthusiast Joined Dec 9, '14 From Juneau, Alaska Currently Offline Reputation: 3 (100%) |
Mount came out. I tipped it back as in the video then wiggled the center cross-member until it slowly came out the back. I loosened one of the Steering rack bolts but I don't know if that helped.
I did not need to take the exhaust pipe off but that might have helped the engine rocking.     I ordered the wrong rear mount so I took the existing one and removed all the rubber filler that's been making my car vibrate. I'm going to put it back in along with a new front mount. The filler is supposed to make the engine move less and transfer more energy to the road. Less hopping when launching or something like that. The byproduct is that you get a vibrating interior. I want less vibration so I'm going back to stock mounts.  |
|
Jul 28, 2015 - 8:32 AM
|
|
|
Enthusiast Joined Jan 20, '09 From Winnipeg Currently Offline Reputation: 5 (100%) |
Glad you got it out.
Was this an aftermarket mount? Or a poly insert on the OEM mount? -------------------- -Protection mode, For when your amp tries to blow its load. 1995 Toyota Celica GTS - Daily Driver 1999 Chevy Cavalier - Winter Beater 1994 Honda Civic CX Hatchback - Dead My Celica! |
|
Jul 28, 2015 - 10:52 AM
|
|
|
Enthusiast Joined Dec 9, '14 From Juneau, Alaska Currently Offline Reputation: 3 (100%) |
QUOTE (jordisonjr @ Jul 28, 2015 - 5:32 AM) Glad you got it out. Was this an aftermarket mount? Or a poly insert on the OEM mount? It's an OEM that the previous owner filled with black rubbery material. The model number on the mount 12371-74440 says it's for a 3SGTE which is great because that's what I have. |
|
Jul 29, 2015 - 3:34 PM
|
|
|
Enthusiast Joined Dec 9, '14 From Juneau, Alaska Currently Offline Reputation: 3 (100%) |
The install process went the same as in his video. With the cross member out, angle the mount so the bolts are pointing forward then wiggle the cross member until the bolts slide into the holes. I had more trouble with the center bolt going through the mount as the power steering rack mounting area is in the way. I got it in by wiggling and bending things while pushing the bolt. It took about 15 minutes or so. Torquing the bolt was tough too as the torque wrench didn't have much room between the car and the sub-frame and my 3" exhaust pipe. the manual says 64 ft pounds for the center bolts and 57 or 59 ft pounds for the bottom bolts and nuts. I thought it was too much torque for the bottom bolts so I slowly tightened them but it felt like it was going to twist off at any minute. The front bolts for the cross member to the frame are only 26 ft pounds. as they are 12mm bolts this is not surprising but it doesn't seem like much for what they support.
The new mounts worked great! The inside of the car has much less vibration than before. Now I just have to fix the gas leak I discovered while under the car and I'm back on the road! This post has been edited by antoine64: Jul 29, 2015 - 3:35 PM |
|
Jul 29, 2015 - 7:36 PM
|
|
 Enthusiast Joined Mar 8, '04 From Newport, RI Currently Offline Reputation: 63 (99%) |
The rear engine mount in the pic is from an auto, not a manual, the manual one has different rubber pattern and is stronger.
Why not do the kirk inserts ? -------------------- |

|
Jul 29, 2015 - 8:27 PM
|
|
|
Moderator Joined Jun 29, '08 From Denver Currently Online Reputation: 59 (100%) |
The rear motor mount is like a 6gc initiation process. You aren't a true 6gc enthusiast until you know the struggle of fighting the rear mount.

-------------------- "Employ your time in improving yourself by other men's writings, so that you shall gain easily what others labored hard for." -Socrates. Even Socrates told us to use the search button!
 2006 Aston Martin V8 Vantage. 1998 Celica GT- BEAMS Swapped. 2022 4Runner TRD Off Road Prenium. 2021 GMC Sierra AT4. |
|
Jul 29, 2015 - 9:40 PM
|
|
|
Enthusiast Joined Dec 9, '14 From Juneau, Alaska Currently Offline Reputation: 3 (100%) |
QUOTE (Batman722 @ Jul 29, 2015 - 4:36 PM) The rear engine mount in the pic is from an auto, not a manual, the manual one has different rubber pattern and is stronger. Why not do the kirk inserts ? I hope that's not true. A lot of time wasted if I have to replace it. I'll confirm the serial number. |
|
Jul 29, 2015 - 9:51 PM
|
|
 Enthusiast Joined Jul 12, '08 Currently Offline Reputation: 5 (100%) |
QUOTE (richee3 @ Jul 29, 2015 - 8:27 PM) The rear motor mount is like a 6gc initiation process. You aren't a true 6gc enthusiast until you know the struggle of fighting the rear mount. This is very true. Many of us have different techniques to do it. Once you figure it out its actually pretty easy. In my case I remove the exhaust to free up some space. Its usually pretty easy to remove the mount after that. Installation requires chasing the threads on the trans with a tap and tapering the bracket through bolt. Chasing the threads allows you to tighten the bolts 99% of the way by hand before using a box end wrench to for final torque, and the taper on the through bolt really simplifies pushing it back through the bracket. This post has been edited by enderswift: Jul 29, 2015 - 9:53 PM --------------------  |
|
Jul 29, 2015 - 10:13 PM
|
|
|
Enthusiast Joined Dec 9, '14 From Juneau, Alaska Currently Offline Reputation: 3 (100%) |
the number on the mount is 12371-74440 according to what I've read in various places this is for an ST205 with a 3SGTE and a manual transmission.
http://oemparter.com/oem-parts/1237174440.html#region=europe and here http://www.6gc.net/forums/index.php?showto...aded&start= and http://www.celicatech.com/forums/archive/i...php/t-7944.html I also don't think the ST205 had an automatic transmission option. the Kirk poly inserts would have increased the vibration in the car which I'm trying to reduce. Depending on how it drives I may eventually go that route. QUOTE (enderswift @ Jul 29, 2015 - 6:51 PM) QUOTE (richee3 @ Jul 29, 2015 - 8:27 PM) The rear motor mount is like a 6gc initiation process. You aren't a true 6gc enthusiast until you know the struggle of fighting the rear mount. This is very true. Many of us have different techniques to do it. Once you figure it out its actually pretty easy. In my case I remove the exhaust to free up some space. Its usually pretty easy to remove the mount after that. Installation requires chasing the threads on the trans with a tap and tapering the bracket through bolt. Chasing the threads allows you to tighten the bolts 99% of the way by hand before using a box end wrench to for final torque, and the taper on the through bolt really simplifies pushing it back through the bracket. that's a good idea. Thanks for sharing. |
|
Jul 30, 2015 - 9:30 PM
|
|
|
Enthusiast Joined Mar 8, '04 From Newport, RI Currently Offline Reputation: 63 (99%) |
I'm probably wrong, sorry.
That rubber looks like MR2 mounts IMO. Here's a pic of auto and manual mounts, note the rubber. QUOTE (Batman722 @ Sep 9, 2006 - 11:23 PM) no problem Kirk  here they are. Right now I don't know if the MR2's auto mount is the same as ours but i will find out tomorrow when my EPC is back. here they are. Right now I don't know if the MR2's auto mount is the same as ours but i will find out tomorrow when my EPC is back.the auto mount is on the left in all of the pics. 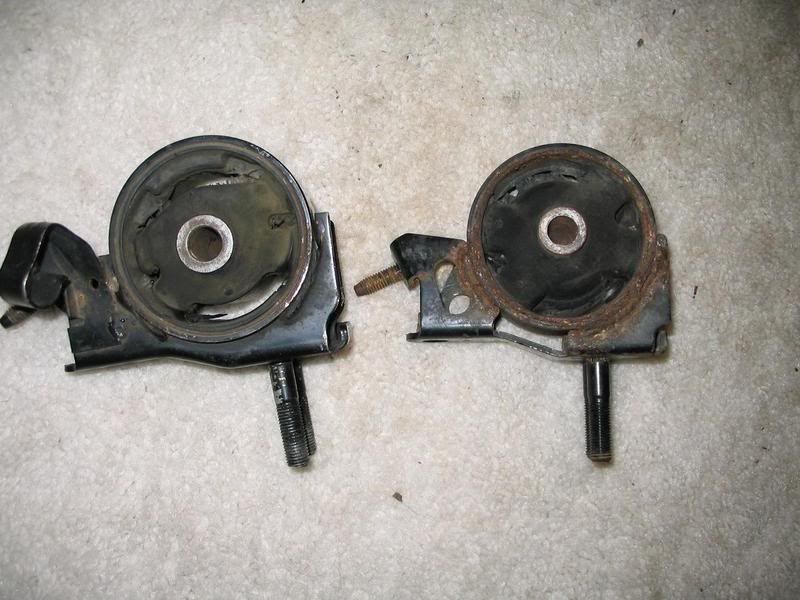  AUTO ^^ 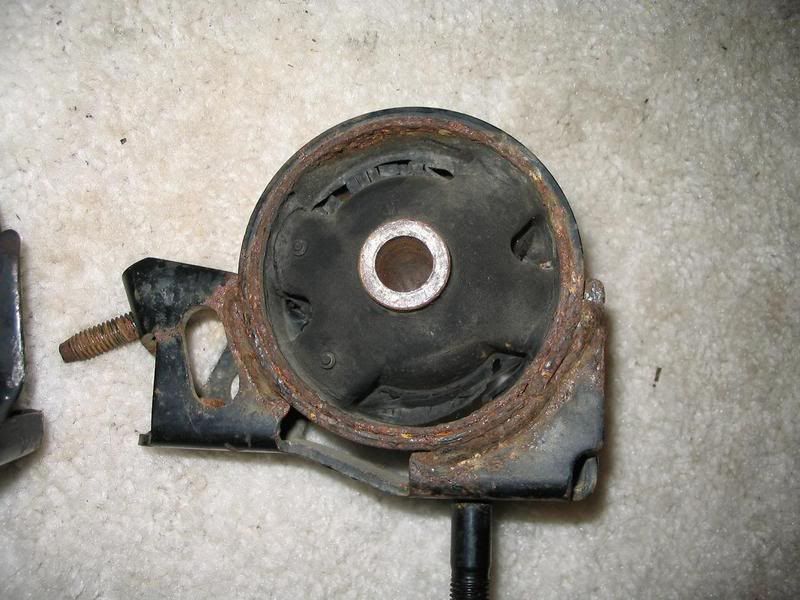 MANUAL ^^ 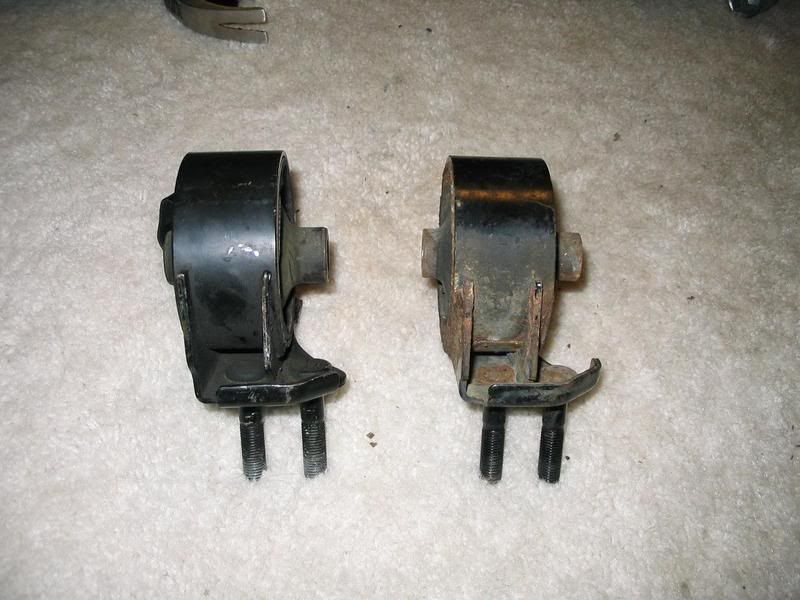 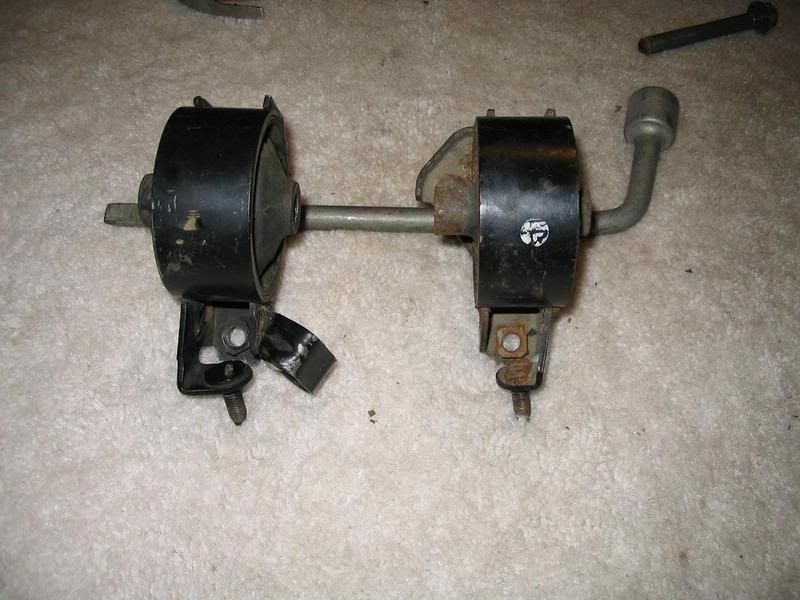 notice the auto shifter cable bracket on the auto mount ^^ I will post up the part #s for these tomorrow and years they were made (I want to make sure these aren't just a 96+ thing with us) hope this helps MR2 mount for reference fyi. 
-------------------- |
|
Jul 30, 2015 - 11:52 PM
|
|
|
Enthusiast Joined Dec 9, '14 From Juneau, Alaska Currently Offline Reputation: 3 (100%) |
Thanks for sharing the pictures. I ordered one that looks like the one on the right and it wouldn't fit. it was frustrating. I like the pictures by the way. I think mine is different due to the transmission that's in there. I don't know what it is. it might be out of an mr2. in any case getting the correct mount is important and can be tricky on these swapped vehicles.
I don't have any more vibration or gas leak but I am noticing why people prefer solid mounts. The car is a bit softer at launch. |
|
Aug 4, 2015 - 8:14 PM
|
|
|
Enthusiast Joined Aug 2, '05 From Guam Currently Offline Reputation: 15 (100%) |
doing the rear mount was a pita for me after i did my manual swap. I actually used 3 auto mounts besides my manual tranny mount for quite some time until I had to replace them. I only changed the front and the rear to manual. main engine mount is still auto. and yes the manual mounts have more legs to the bushing. getting back to the rear mount, but using mounts made for my celica, had to remove subframe and unbolted other parts of the frame and used a bottle jack and kept playing with jack, wiggling, moving it around.
-------------------- 94 Celica GT
|Toyota OEM Japan|Toyota Racing Development|Tom's|Competition Clutch|5Zigen|Apexi| |Laille/Beatrush|Magnecor|Denso|Royal Purple|Optima|PIAA|PW JDM|Megan Racing|Nitto| |Work|Greddy|Samco|Project Mu|H&R|Gates|Moog|Rota|Yokohama|Epman|1320|Upgr8 04 Celica GT |Toyota OEM Japan|Toyota Racing Development|Tein|BC Racing|Greddy| |
|
1 User(s) are reading this topic (1 Guests and 0 Anonymous Users)
0 Members:
| Lo-Fi Version | Time is now: May 8th, 2024 - 6:29 AM |