
 Sep 17, 2007 - 1:54 AM Sep 17, 2007 - 1:54 AM
|
 
|
 Enthusiast  Joined Jun 29, '03 From 캘리포니아 Currently Offline Reputation: 23 (100%) |
Ok here is a basic run through of how to paint interior panels. I will most likely go more in depth later on.
First, you will need to remove whatever pieces of the interior you'll want to paint. I will show you using the center interior pieces. Step 1. Clean/Prep. Clean off each piece indivisually and wipe them off until dry. This will remove any dust and debris from being painted on and creating an uneven surface. You may lightly wet sand the piece to better ensure you have a smooth surface, however that is not neccessary. You can use an alcohol based cleaner, but I simply used water and made sure they were clean. These are the pieces I chose to paint. They were already previously painted silver, but I felt it needed a change.  Step 2. Primer/tape. You will now primer all your pieces. The purpose of primer is to make a good bond between the piece and the paint. If you do not primer your pieces, the paint will easily chip or peel off. You may need to tape off some parts you do not want primered/painted, or just simply remove them. Parts such as vents, cigaretter lighter, and clock can easily be removed by clips. But parts like the dimmer knob will need to be taped up if you choose to paint that piece above the steering column. When you have all your parts ready and clean, then your ready to spray on some primer. When you primer, be sure to get many good thin coats on there. If you put on thick coats, you may cuase run lines. Thick coats will also not dry for a long time. The key is to allow proper drying times. You should have about 2-3 coats or until piece is fully covered. I had to first sand off the clear coat, before I could primer or paint them. Clear coat doesnt like to be painted on. This picture shows the part sanded and ready for primer.  Here are the pieces primered and ready for paint. 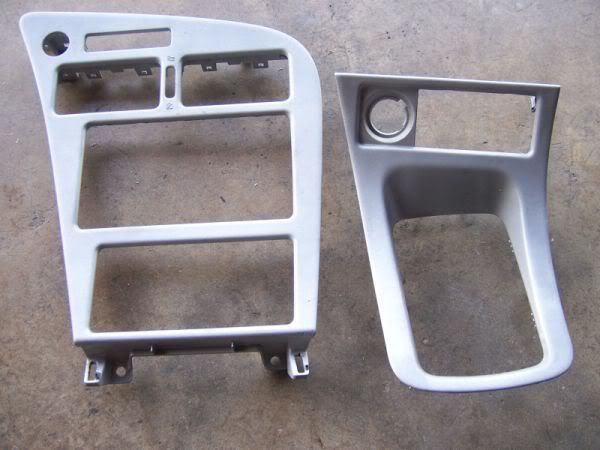 Step 3. Paint After your primer layers are fully dry, you are then ready to paint. You can use any type of spray paint you find at your local hardware store or Autozone. When spraying the pieces, try to keep the can about 8-10 inches away from the pieces. This will help the coats from going on too thick. Coat they piece about 3-5 times depending on the desired look. Again, use many thin coats to fully cover the piece. Here is the first coat of paint. Notice that it is not fully covered yet. That is ok. This is just a base coat and you do not want to go too thick with it. You'll have more coats to be able to cover up the entire piece.  This is the paint I chose to go with this time. The color is called Storm Grey.  Here is a picture of one of the pieces painted next to the primered piece  Here are both of the pieces finished and ready to be installed on the car again  Step 4. Clear Coat (optional) After you've completed painting your pieces, you can now clear coat them. I chose not to clear coat my interior pieces this time around. I find that the clear coat will actually dull the color of the paint if you find your paint too shiney. Step 5. Reinstall parts. Make sure that all your parts are COMPLETELY dry. If not then you risk leaving finger prints imbedded onto your pieces and will have to start the whole paint process over again. I've messed this up before when i rushed it. It's not fun sanding all your hard work off, so just be patient. Step 6. Enjoy. Look at your interior and admire your work. There may be paint fumes for awhile, so please drive with your windows down and allow freshly painted parts to vent until you feel you will be ok  . .(ok I notice I don't have any pictures of the redone interior, but I finised so late that there was no sunlight left, so I haven't even been able to see my new interior yet either. Pictures will be up later) --------------------  |

 |
Replies
(1 - 19)
|
Sep 18, 2007 - 10:54 PM
|
|
|
Enthusiast Joined Jun 21, '07 From SoCal Currently Offline Reputation: 0 (0%) |
doppppppppe
|
|
Sep 18, 2007 - 11:57 PM
|
|
|
Enthusiast Joined Jun 21, '07 From SoCal Currently Offline Reputation: 0 (0%) |
ps how do u take off those parts
and good job on the article!! p.s what kind of paint do u recommend |
|
Sep 19, 2007 - 12:53 AM
|
|
|
Enthusiast Joined Jun 29, '03 From 캘리포니아 Currently Offline Reputation: 23 (100%) |
QUOTE(mrgrape @ Sep 18, 2007 - 9:57 PM) [snapback]597206[/snapback] ps how do u take off those parts and good job on the article!! p.s what kind of paint do u recommend Here is a basic explaination of removing the center pieces. The yellow circles represent where clips are supposed to be (mine is modified so I don't have all the clips it should have, but I labeled the picture as if the clips were still there). There are also clips on the sides of the shifter surround but it's pretty simple to remove. All you need to do is pull up on the shifter surround, and then just unplug the cigarette lighter when you have it up. The convertibles have switches there that need to be removed. After you remove the shifter surround, you will see two screws on the bottom of the other piece. Just remove those two, and you will be able to pull that piece out. Basically point your vents all the way up, stick your fingers in there, and pull outwards. From there, you should know what to do. You will need to unplug your clock and your hazard lights switch. 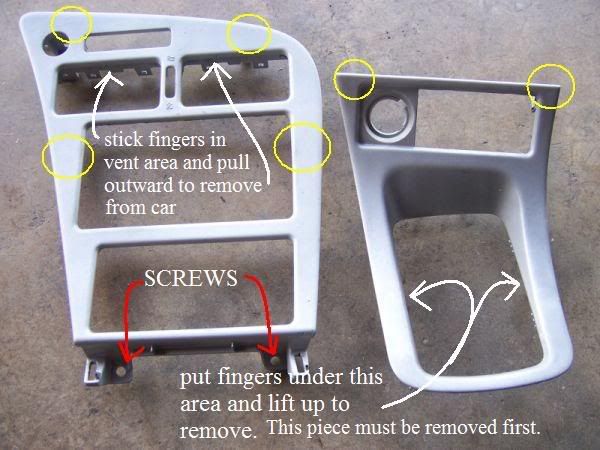 -------------------- |
|
Sep 19, 2007 - 2:11 AM
|
|
|
Enthusiast Joined Aug 11, '07 From Corona, CA Currently Offline Reputation: 4 (100%) |
oh snaps, so thats how ya do it. sticky dis
 nice job derr --------------------  Pandelica 2.0 in progress. |
|
Sep 19, 2007 - 2:44 AM
|
|
|
Enthusiast Joined Jun 29, '03 From 캘리포니아 Currently Offline Reputation: 23 (100%) |
Here is a better look behind the shifter surround to give you a better idea of where you will need to apply lifting force in order to remove the piece. Again, yellow circles represent where clips are present.
 -------------------- |
|
Sep 19, 2007 - 6:13 PM
|
|
|
Enthusiast Joined Jun 21, '07 From SoCal Currently Offline Reputation: 0 (0%) |
thanks for the removal piece!
got it in one hit! now any type of sandpaper u specifically recommend? and what type of spray can??? i have to be 18 or older to buy right? also is it possible to take off the pieces abive and just drive?? or is that dangerous This post has been edited by mrgrape: Sep 19, 2007 - 6:14 PM |
|
Sep 19, 2007 - 9:45 PM
|
|
|
Enthusiast Joined Jun 29, '03 From 캘리포니아 Currently Offline Reputation: 23 (100%) |
QUOTE(mrgrape @ Sep 19, 2007 - 4:13 PM) [snapback]597411[/snapback] thanks for the removal piece! got it in one hit! now any type of sandpaper u specifically recommend? and what type of spray can??? i have to be 18 or older to buy right? also is it possible to take off the pieces abive and just drive?? or is that dangerous I personally used 600 grit and wet sanded it. You could use any type of sand paper depending of what you need to do. I had to take off some old paint so i used a lower grit. You can use a 1000 or 1500 wet sand grit and then finish up with some rubbing compound and then polishing combound if you want your paint to look reflective like your exterior paint. I have always just used duplicolor automotive paint that i bought at autozone. It's for exteriors but in my opinion doesn't really make a difference. It's all in the technique. I forgot i still need to take pics of my new interior haha. And yes, legal age to purchase spray paint is 18, however they rarely card me even though I look like im 16, but really im not haha. When they do card me, they are like woah! and then they take a double look at the ID in the light because they don't believe im over 18 haha. lame  EDIT: OH and you CAN drive without those pieces, but you will need your hazard light plugged in atleast. Reason being is that if you do not have your hazard switch plugged in, your turn signals will not work. This post has been edited by MaskedMan: Sep 19, 2007 - 9:47 PM -------------------- |
|
Sep 19, 2007 - 10:02 PM
|
|
|
Enthusiast Joined Jun 21, '07 From SoCal Currently Offline Reputation: 0 (0%) |
oh thankks. im gonna get someone to buy me the spray can...
and i just figured out about the hazard lights lol |
|
Sep 20, 2007 - 12:44 AM
|
|
|
Enthusiast Joined Jun 8, '07 From Houston, Texas Currently Offline Reputation: 1 (100%) |
sticky/how to vote. Props for takin the time to do this!
BTW, this is all good information because to change stuff like CD Decks and Climate Control LED's you need to be able to get in there. Good job bro! -------------------- |

|
Sep 22, 2007 - 9:55 AM
|
|
|
Enthusiast Joined Jun 21, '07 From SoCal Currently Offline Reputation: 0 (0%) |
how do i remove the vent and the clock?
|
|
Sep 22, 2007 - 2:41 PM
|
|
|
Enthusiast Joined Jun 8, '07 From Houston, Texas Currently Offline Reputation: 1 (100%) |
QUOTE(mrgrape @ Sep 22, 2007 - 2:55 PM) [snapback]598111[/snapback] how do i remove the vent and the clock? You have to remove the plastic panel that covers all that, then from the back, you can squeeze the clip things and remove them. Try not to break it though
-------------------- |
|
Sep 22, 2007 - 8:58 PM
|
|
|
Enthusiast Joined Jun 29, '03 From 캘리포니아 Currently Offline Reputation: 23 (100%) |
QUOTE(cHinaman727 @ Sep 22, 2007 - 12:41 PM) [snapback]598162[/snapback] QUOTE(mrgrape @ Sep 22, 2007 - 2:55 PM) [snapback]598111[/snapback] how do i remove the vent and the clock? You have to remove the plastic panel that covers all that, then from the back, you can squeeze the clip things and remove them. Try not to break it though Hey, no explaining without a picture! Haha jk . Ok here is a picture (a very blurry one might i add) of what it looks like behind the center piece. The tool you will need is a pocket screwdriver, or a flathead screwdriver. Or better yet, a pocket flathead screwdriver! Ok basically, pry gently up on tabs until you can wedge the clock or the vents out. Both left and right vents will come out as one piece. You must remove your clock first to access 2 of the clips that hold your vents in place. -------------------- |
|
Sep 22, 2007 - 11:16 PM
|
|
|
Enthusiast Joined Jun 21, '07 From SoCal Currently Offline Reputation: 0 (0%) |
uhhhh gay i just messed up the vent clips....w/e
got it on and put it back on and its hot!!!! too late maskedman lol thanks anyways right now im doing the door buttons area im still wondering how u take off the vent pieces by the windows? |
|
Sep 23, 2007 - 2:37 PM
|
|
|
Enthusiast Joined Jun 29, '03 From 캘리포니아 Currently Offline Reputation: 23 (100%) |
QUOTE(mrgrape @ Sep 22, 2007 - 9:16 PM) [snapback]598243[/snapback] uhhhh gay i just messed up the vent clips....w/e got it on and put it back on and its hot!!!! too late maskedman lol thanks anyways right now im doing the door buttons area im still wondering how u take off the vent pieces by the windows? Which ones? The ones that you can adjust, or the ones above those that you cant. The drivers side vent you basically just pull out and wiggle it until you have it. The passenger side one...umm...pull REALLY hard? The it the only interior piece that i never got to painting becuase i could never figure out how to get it out without the fear of breaking it. It's seriously in there GOOD. Hmmm... you know what, I don't have much to do at all today. I'm going to try to make atleast 3 more how to articles haha. -------------------- |
|
Sep 23, 2007 - 6:16 PM
|
|
|
Enthusiast Joined Jun 21, '07 From SoCal Currently Offline Reputation: 0 (0%) |
yay! haha
if i go to the socal meet ill show u off my interior! |
|
Sep 23, 2007 - 6:25 PM
|
|
|
Enthusiast Joined Jun 29, '03 From 캘리포니아 Currently Offline Reputation: 23 (100%) |
QUOTE(mrgrape @ Sep 23, 2007 - 4:16 PM) [snapback]598397[/snapback] yay! haha if i go to the socal meet ill show u off my interior! You totally need to go. It's of most uber importantness that you show me your interior and i show you mine haha. -------------------- |
|
Sep 25, 2007 - 7:49 PM
|
|
|
Enthusiast Joined Jul 4, '07 From US Currently Offline Reputation: 2 (100%) |
i used this to paint my interior, and it worked like a charm
   
|
|
Oct 18, 2007 - 6:27 PM
|
|
|
Enthusiast Joined Jun 21, '07 From SoCal Currently Offline Reputation: 0 (0%) |
how do u take off the passenger side vent? near the door
|
|
Oct 18, 2007 - 7:31 PM
|
|
|
Enthusiast Joined Jul 4, '07 From US Currently Offline Reputation: 2 (100%) |
QUOTE(mrgrape @ Oct 18, 2007 - 6:27 PM) [snapback]606280[/snapback] how do u take off the passenger side vent? near the door that was a pain in the arse, i will admit it...its the same thing as the drivers, but the bloody bugger is hard to remove for some reason... you just gotta work it... make sure you dont crack it though otherwise you will be F***ed |
 |
1 User(s) are reading this topic (1 Guests and 0 Anonymous Users)
0 Members:
| Lo-Fi Version | Time is now: May 20th, 2026 - 11:13 AM |