
 Aug 16, 2009 - 9:16 PM Aug 16, 2009 - 9:16 PM
|
 
|
 Enthusiast  Joined May 13, '06 From Kaimuki, HI Currently Offline Reputation: 10 (100%) |
I just started polishing my manifold, since my engine is out, and most of it is taken apart, i decided to start polishing all of the aluminum pieces that I could find, AND, I figured I would take a picture of the semi-finished product and post up a little how-to on it, this whole thing is going to take over a week to polish because there are so many curves, a valve cover would probably be easier and faster to do even though it's larger, it's more flat than the manifold I'm polishing. So here is how I am doing it. (pictures below)
1) take off the part! it's easier this way 2) the first thing I did was get out my 8.5 amp handheld grinder (4 inch disk) and grind down the seam on the top of the manifold, it makes it look a lot cleaner, since it's aluminum you can do the same thing with a file, it takes longer but your chances of screwing up are a lot smaller. You can also file down the letters/numbers that may be cast into the part. 3a) If you do have a handheld grinder, buy one of those pads that is made for rust removal and put it on. Since aluminum is a soft metal it should be almost the same thing as sanding with 50 grit paper, then using 100 grit, then using 200, then using 400, it saves a lot of time, but it isn't as smooth as the sandpaper method. For example, with me using the grinder with the rust removal pad, I was able to grind down the cast pits and bumps, and polish it to the equivalent of what 400 grit sandpaper will give you, and the whole process to this point took about 20 minutes, vs 2 - 3 hours with sandpaper: 50, then 100, 200, 400... 3b) sadly there will be a lot more work if you don't have a grinder, you'll have to sand by hand with 50 grit, then 100 grit, 200 grit, 400 grit, 1000 grit, 1500 grit. The more you sand with each bit of sandpaper the better it will look. You can literally get a mirror shine out of pitted cast aluminum. 4) If you used the grinder with the rust removal pad (I forget exactly what it's called), then you should now take 400 grit sandpaper and sand over where you used the grinder until you don't see any more of the swirl marks that the pad left. After this repeat the same process with the 1000 grit or similar paper, I suggest going in one direction (like forward and backward), and then switching directions (like left to right) so that you can see if the scratches are covered up by the other scratches, then repeat the same process with 1500, switching directions. After this you should almost see a perfect mirror shine. 5) buy Mothers Aluminum Polish, you can get it from Napa or probably other auto parts stores. Put it on an old t-shirt, and polish away. Hopefully you won't see any scratches. This isn't something you should rush through, if you do then when you get to the last stages with the higher grit sandpaper you will see the spots you missed. The spot below took me about 1 hour to grind down the seam, sand, and polish. Parts that have more curves will be harder. 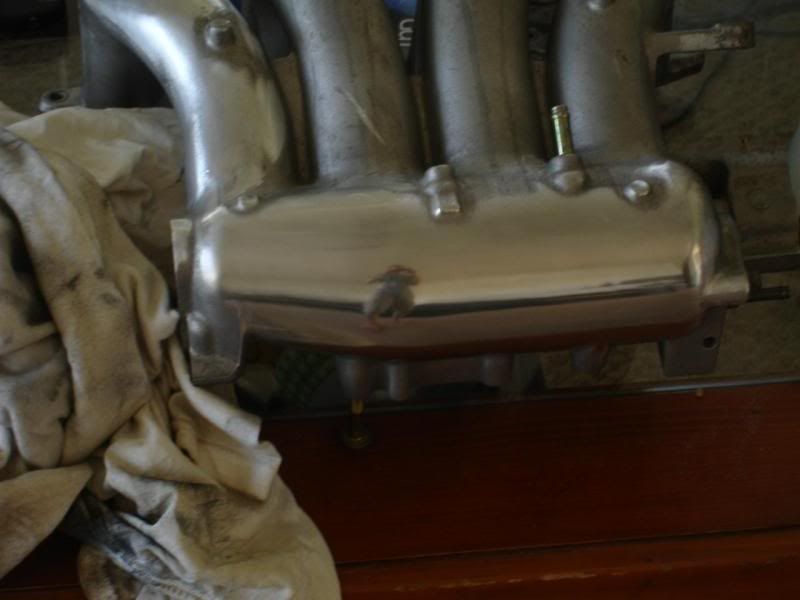 
This post has been edited by match220: Aug 16, 2009 - 9:32 PM -------------------- -Jay
95 GT conv. project car: Manual, Gen III 3sgte, JN pisons, Eagle rods, overbore, crank knife-edged, crank scraper, ARP head/main/flywheel, Autronic EMS, Haltech Dual Wideband O2 controller, Audi 1.8T individual coils, FMIC and SSQV BOV, 3" downpipe, 3" ultra-high-flow cat, 2.5" Borla muffler, +other 01 S2000: FMIC, Haltech EMS, Haltech wideband, 570cc inj, forged pistons/rods, sleeved block, 5 angle valve job, ported and polished 02 R6, all stock, except for braided stainless brake lines, frame sliders, and adjustable brake/clutch leve |

Posts in this topic
 match220 How-To: Aluminum polishing, 3sgte manifold Aug 16, 2009 - 9:16 PM
 samir0189 thats pretty awesome, didn't know that those c... Aug 16, 2009 - 10:23 PM match220 no, the rainbow color mainly happens to stainless ... Aug 16, 2009 - 11:06 PM
 808celica shouldnt you be putting the car back together?? j... Aug 17, 2009 - 12:26 AM match220 QUOTE (808celica @ Aug 16, 2009 - 7... Aug 17, 2009 - 5:56 AM
  |
1 User(s) are reading this topic (1 Guests and 0 Anonymous Users)
0 Members:
| Lo-Fi Version | Time is now: July 10th, 2026 - 10:42 AM |