
 Jun 9, 2012 - 6:57 AM Jun 9, 2012 - 6:57 AM
|
 
|
|
Enthusiast  Joined Aug 2, '05 From Guam Currently Offline Reputation: 15 (100%) |
HOW TO REMOVE AC EVAPORATOR:
I will not go into detail besides what I am just covering on this thread. I will not go into any troubleshooting or diagnostics for the most part. You will also get a chance to replace your expansion valve as well by doing this. GENERAL INFO: The AC System components include A/C control panel, A/C amplifier, evaporator, evaporator temperature sensor, pressure switch, engine coolant temperature switch, A/C compressor, condenser, receiver-drier, and pipes and hoses. 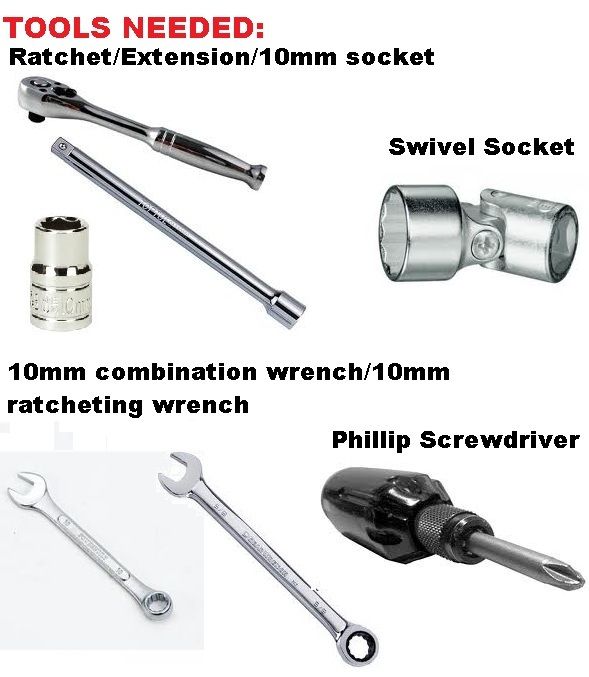 and CONFIDENCE:  EVAPORATOR SAMPLE:  REASON: When your evaporator has a leak or has a strange AC smell, or you are changing your expansion valve (which are two common issues in AC). Also, you must have done diagnostics prior to. This also serves as reference as is. TOYOTA REMOVE/INSTALL: EVAPORATOR Removal Disconnect negative battery cable. Discharge A/C system using approved refrigerant recovery/recycling equipment. Disconnect inlet and outlet lines. Plug openings immediately. Remove grommets. Remove instrument panel and reinforcement. See INSTRUMENT PANEL. Unplug electrical connectors. Separate cooling unit cases. Remove evaporator. Reassembly & Installation To install evaporator assembly, reverse removal procedure. If installing new evaporator core, add 1.4 ounces of refrigerant oil before installation. Evacuate and recharge system. Test system for leaks. TOYOTA TORQUE SPEC: Refrigerant Lines.....................Inch lbs. (N.m) Compressor .......................... 86 (9.8) Evaporator .......................... 86 (9.8) Receiver-Drier ...................... 48 (5.4) TOYOTA EVAPORATOR INSPECTION: Condition Code Procedure Abrasion damage, affecting structural integrity ... A .. Require repair or replacement. Abrasion damage, not affecting structural integrity .............. .. ........ No service suggested or required. Air flow obstruction, affecting performance .. A .. Require repair or replacement. Attaching hardware broken ................. A ... Require repair or replacement of hardware. Attaching hardware missing ................ C .......... Require replacement of hardware. Attaching hardware not functioning ............ A ... Require repair or replacement of hardware. Bracket bent, affecting performance ............ A .. Require repair or replacement. Bracket bent, not affecting performance .. .. ........ No service suggested or required. Bracket broken, affecting performance ............ A ............ Require replacement. Bracket broken, not affecting performance .. .. ........ No service suggested or required. Bracket corroded, affecting performance .. A .. Require repair or replacement. Bracket corroded, not affecting performance .. 2 .. Suggest repair or replacement. Bracket cracked, affecting performance ............ A .. Require repair or replacement. Bracket cracked, not affecting performance .. 1 .. Suggest repair or replacement. Bracket holes elongated, affecting performance .. A .. Require repair or replacement. Bracket holes elongated, not affecting performance ............ .. ........ No service suggested or required. Bracket loose, affecting performance ............ A .. Require repair or replacement. Bracket loose, not affecting performance .. 1 .. Suggest repair or replacement. Bracket missing ......... C ............ Require replacement. Corroded, affecting structural integrity ... A ............ Require replacement. Corroded, not affecting structural integrity ... .. ........ No service suggested or required. Evaporator foam seal leaking ................ A ............ Require replacement. Evaporator foam seal missing ................ C ............ Require replacement. Fitting type incorrect (such as compression fitting) ............... B ............ Require replacement. Flange leaking .......... A .. Require repair or replacement. Leaking ................. A .. Require repair or replacement. Restricted internally ... A .. Require repair or replacement. Threads damaged ......... A .. Require repair or replacement. Threads stripped (threads missing) ............... A ............ Require replacement. Here look at your Glove Box, this is how you remove it. You also will need to remove the lower corner side panels, kick panel, etc.  Things to know where they are located and what to remove. Green: Harnesses to unplug Red: Nuts and Screws to remove Orange: Air Bag Harness (Not a concern)  Hiding Bolts/Screws 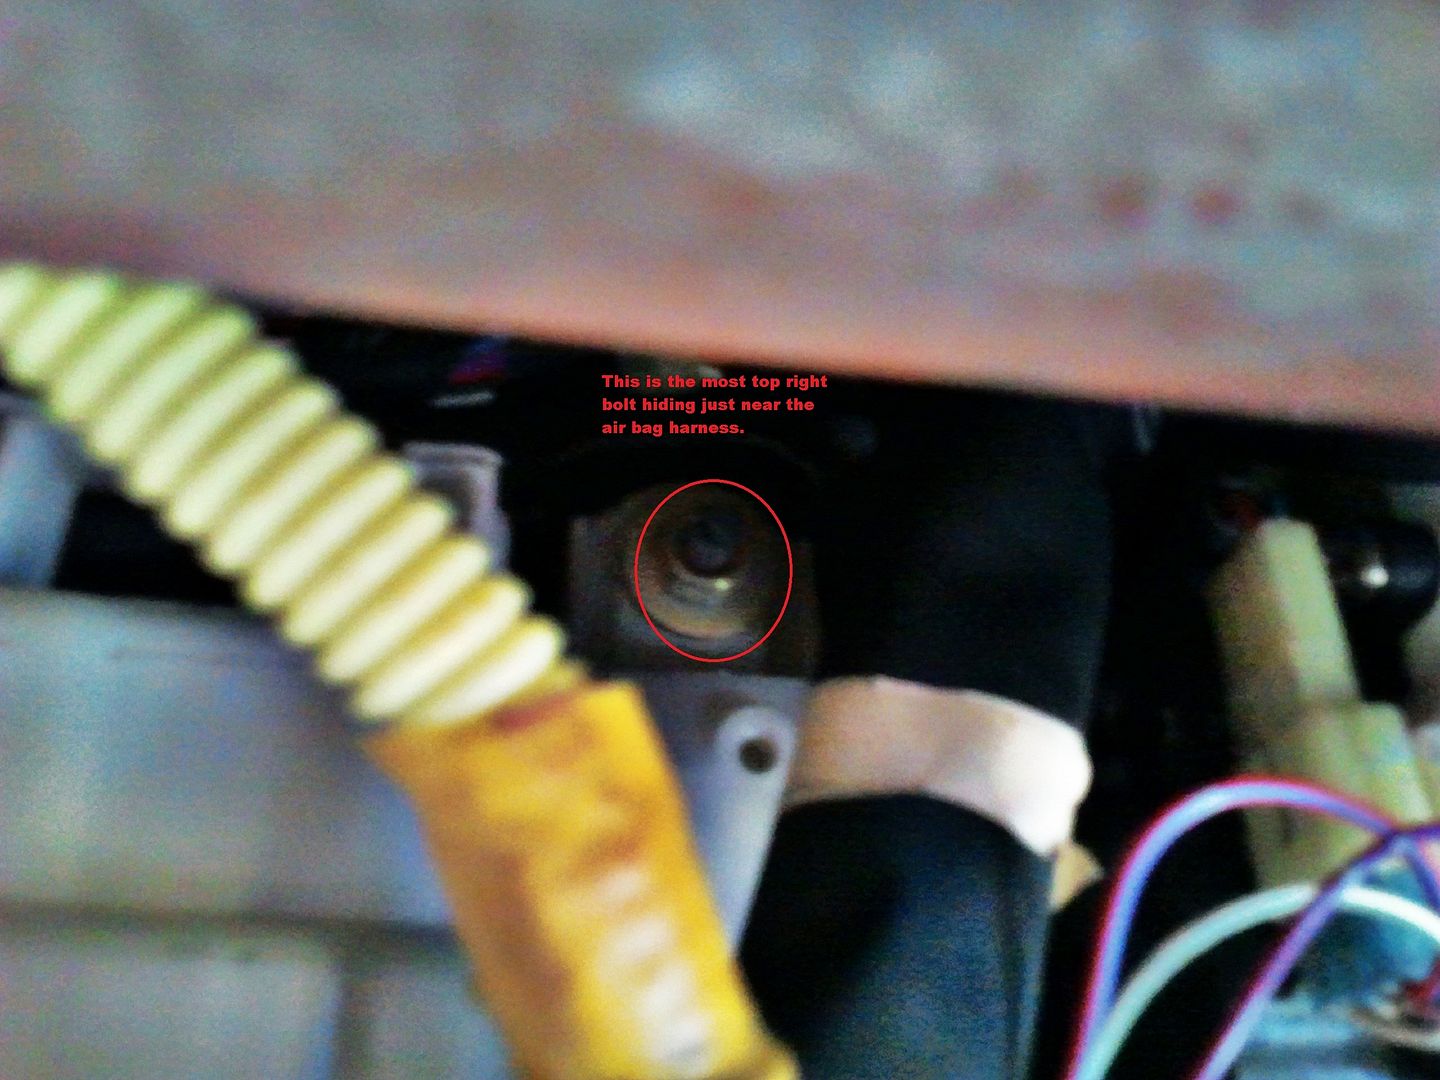    Once all fasteners and harnesses are removed, you have to unbolt from the firewall to free the evaporator. At this point you will need to relieve pressure. Do not attempt to do this part without knowledge and experience. 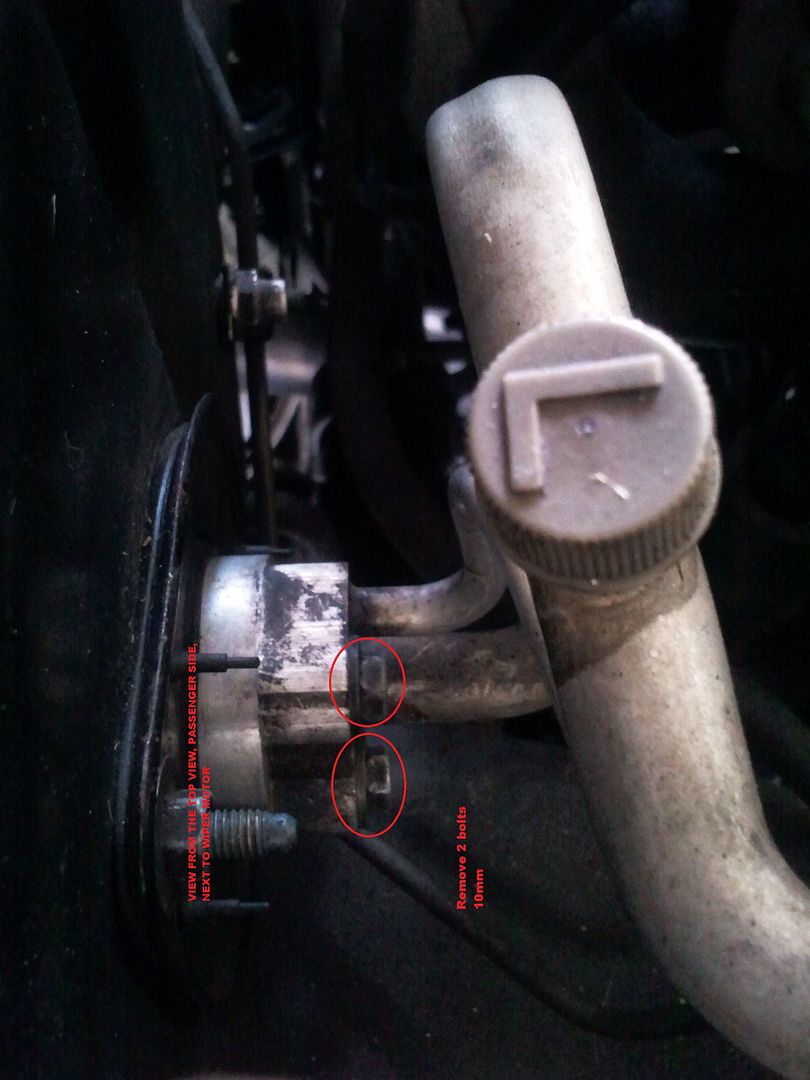 REINSTALL: is reverse, however, i found it easier to get the evaporator housing in its bolting position (not bolted yet), because if you install the drain hose first it makes it harder for the evaporator to go back on. Make sure before you are done that the drainage hose is put back through the firewall. I apologize I am not doing this all the way. Could have gone as far as vacuuming or charging but i ran out of time to take pics vs finishing the job. RESULTS: AC IS ICE COLD...BRRrrrr. Note: 1. I am not covering removing the pressure in the system. 2. I am not covering vacuuming the system. 3. I am not covering charging the system. 4. I am not covering how to change expansion valve or O-rings, thats straightforward. **If you are getting this far, I think you already know what you are doing. Its highly recommended and to most if not all AC techs to always change the AC drier when opening up the system. This writeup will save you time to do this part yourself and then bring it to the AC shop for vacuuming and recharge. I am not responsible how you go about doing this job. That is your choice and discretion. This post has been edited by trdproven: Jun 9, 2012 - 9:33 PM -------------------- 94 Celica GT
|Toyota OEM Japan|Toyota Racing Development|Tom's|Competition Clutch|5Zigen|Apexi| |Laille/Beatrush|Magnecor|Denso|Royal Purple|Optima|PIAA|PW JDM|Megan Racing|Nitto| |Work|Greddy|Samco|Project Mu|H&R|Gates|Moog|Rota|Yokohama|Epman|1320|Upgr8 04 Celica GT |Toyota OEM Japan|Toyota Racing Development|Tein|BC Racing|Greddy| |

 |
Replies
(1 - 10)
|
Jun 9, 2012 - 12:07 PM
|
|
|
Moderator Joined Jun 29, '08 From Denver Currently Offline Reputation: 59 (100%) |
Could've used this a couple of months ago
 Found out how to do it myself and was beyond grateful that the entire dash didn't have to come out. Found out how to do it myself and was beyond grateful that the entire dash didn't have to come out.
-------------------- "Employ your time in improving yourself by other men's writings, so that you shall gain easily what others labored hard for." -Socrates. Even Socrates told us to use the search button!
 2006 Aston Martin V8 Vantage. 1998 Celica GT- BEAMS Swapped. 2022 4Runner TRD Off Road Prenium. 2021 GMC Sierra AT4. |
|
Jun 9, 2012 - 9:27 PM
|
|
|
Enthusiast Joined Aug 2, '05 From Guam Currently Offline Reputation: 15 (100%) |
^ Yupp, i believe the whole dash will need to come out in the later 2000 years, not sure when it starts but even my 04 dash does not need to come out, so it may be somewhere 2006+
-------------------- 94 Celica GT
|Toyota OEM Japan|Toyota Racing Development|Tom's|Competition Clutch|5Zigen|Apexi| |Laille/Beatrush|Magnecor|Denso|Royal Purple|Optima|PIAA|PW JDM|Megan Racing|Nitto| |Work|Greddy|Samco|Project Mu|H&R|Gates|Moog|Rota|Yokohama|Epman|1320|Upgr8 04 Celica GT |Toyota OEM Japan|Toyota Racing Development|Tein|BC Racing|Greddy| |
|
Jun 11, 2012 - 7:53 PM
|
|
|
Enthusiast Joined Dec 30, '11 From Atlanta via Mobile Currently Offline Reputation: 0 (0%) |
so the bracing bar isn't holding the evap core box in???? I know the heat box is held in, but if thats the case, I'll get started on replacing the core and valve!
-------------------- QUOTE (Araykhel @ Oct 10, 2011 - 6:32 PM)  Today I learned that I need a turbo to complete me. |
|
Jun 13, 2012 - 7:26 PM
|
|
|
Enthusiast Joined Aug 2, '05 From Guam Currently Offline Reputation: 15 (100%) |
If you are talking about the bracing on the left hand side, it does not hold the evap core up, but it was blocking the evap assembly from being removed. If your drier is a bit old, its recommended to change that everytime, its like the AC systems filter.
This post has been edited by trdproven: Jun 13, 2012 - 7:29 PM -------------------- 94 Celica GT
|Toyota OEM Japan|Toyota Racing Development|Tom's|Competition Clutch|5Zigen|Apexi| |Laille/Beatrush|Magnecor|Denso|Royal Purple|Optima|PIAA|PW JDM|Megan Racing|Nitto| |Work|Greddy|Samco|Project Mu|H&R|Gates|Moog|Rota|Yokohama|Epman|1320|Upgr8 04 Celica GT |Toyota OEM Japan|Toyota Racing Development|Tein|BC Racing|Greddy| |
|
Jul 5, 2012 - 4:44 PM
|
|
|
Enthusiast Joined Feb 20, '12 From Florida Currently Offline Reputation: 0 (0%) |
do I have to change out the expansion valve as well?Also having tuff time finding the evap itself any places you get them? Great write up by the way
This post has been edited by xxgetbackupxx: Jul 5, 2012 - 4:45 PM |
|
Jul 5, 2012 - 6:17 PM
|
|
|
Enthusiast Joined Aug 2, '05 From Guam Currently Offline Reputation: 15 (100%) |
well, its not necessary to change the expansion valve if its working, however, its one of those things when you are in there, you might as well, because removing the evap core is a back ache. My scenario was I changed the evap core without changing the expansion valve, and guess what the expansion valve went out soon after. Wasted my time, and Freon. Hell, its only 20-30 bucks so might as well. your drier is usually the one that needs replacing especially if its been there for a bit. This one I recommend you change. Since I changed the drier the first time, it was not that old. Without a functional drier which acts like the filter, you may be wasting time.
Note: I'd rather change the evap than the drier. I hate the drier one, gives me a backache. the drier is all the way in the bottom, and on drop cars its not the best scenario especially getting the bracket and lines back on. This post has been edited by trdproven: Jul 5, 2012 - 6:18 PM -------------------- 94 Celica GT
|Toyota OEM Japan|Toyota Racing Development|Tom's|Competition Clutch|5Zigen|Apexi| |Laille/Beatrush|Magnecor|Denso|Royal Purple|Optima|PIAA|PW JDM|Megan Racing|Nitto| |Work|Greddy|Samco|Project Mu|H&R|Gates|Moog|Rota|Yokohama|Epman|1320|Upgr8 04 Celica GT |Toyota OEM Japan|Toyota Racing Development|Tein|BC Racing|Greddy| |
|
Jul 5, 2012 - 6:49 PM
|
|
|
Enthusiast Joined Feb 20, '12 From Florida Currently Offline Reputation: 0 (0%) |
Yea, a mechanic was gonna charge me 700 to change it...but this doesn't look to bad. What do you use to plug the lines so moisture doesn't get in the lines?
|
|
Jul 5, 2012 - 11:09 PM
|
|
|
Enthusiast Joined Aug 2, '05 From Guam Currently Offline Reputation: 15 (100%) |
you don't have to worry that much about moisture, thats what the vacuuming part is for. sometimes moisture screws up the drier, thats why I recommend the replacement. if you are changing a major component like compressor, guarantee you'd better change your drier and vacuum it good. run the vacuum pump on the high and low sides for at least 1-2 hrs to be sure, and then recharge only on the low side.
This post has been edited by trdproven: Jul 5, 2012 - 11:11 PM -------------------- 94 Celica GT
|Toyota OEM Japan|Toyota Racing Development|Tom's|Competition Clutch|5Zigen|Apexi| |Laille/Beatrush|Magnecor|Denso|Royal Purple|Optima|PIAA|PW JDM|Megan Racing|Nitto| |Work|Greddy|Samco|Project Mu|H&R|Gates|Moog|Rota|Yokohama|Epman|1320|Upgr8 04 Celica GT |Toyota OEM Japan|Toyota Racing Development|Tein|BC Racing|Greddy| |
|
Aug 30, 2012 - 7:14 AM
|
|
 Enthusiast Joined Feb 11, '08 From Auckland, New Zealand Currently Offline Reputation: 0 (0%) |
i want to take this out as part of AC removal, can that whole white box be removed and replaced with a straight pipe or something?
-------------------- Mike W
1996 Toyota Celica ST205 GT-FOUR GT2860RS turbine, TiAL mvr44, JE 86.5φ piston, Clutchmasters FX400, APEX P-FC 269awhp / 273ft-lbs |
|
Aug 11, 2013 - 8:00 AM
|
|
|
Enthusiast Joined Jun 18, '11 From Lublin, Poland Currently Offline Reputation: 0 (0%) |
awesome instructions
 helped me to clean my evap and change expansion valve in about an hour
|
 |
1 User(s) are reading this topic (1 Guests and 0 Anonymous Users)
0 Members:
| Lo-Fi Version | Time is now: July 11th, 2026 - 11:24 AM |