
 Jan 27, 2014 - 2:18 AM Jan 27, 2014 - 2:18 AM
|
 
|
 Enthusiast  Joined Nov 29, '09 From Milwaukee Currently Offline Reputation: 0 (50%) |
My first how to:
Do you hate how your single din protrudes way too far out above the pocket ? If so this "how to" is for you. What you need: 5th Gen Celica pocket 5th Gen Celica Brackets 6th gen Celica brackets Aftermarket headunit bezel (the one that came with the headunit in the box) 1. First take apart your dash to get to your radio, if you don't know how to do that refer to the how to of the TRD Quickshifter install. 2. Take out the factory headunit and pocket but keep it all together. (Important for measuring later on) 3. Whatever you have under the single din unit unscrew the 4 screws holding it in place... (2 screws on each side) DONT DETACH THE HEADUNIT YET. 4. Take the 5th gen pocket, and screw it directly in place of where your old pocket was. (The holes will match up) 5. There are 2 tabs along the top of the bezel surrounding the 5th gen pocket. Your single din will rest on top of the 2 tabs, when the pocket is screwed in place. (The headunit will protrude like normal aftermarket headunits do) 6. Now that you have the pocket in place measure how much further it sticks out. 7. Once you have your measurement you can detach the headunit leaving the pocket in place. 7a. Now once the headunit is detached attach the aftermarket headunit bezel, to the headunit (came with the headunit) 7b. Now you will need to file the 2 small tabs off of the 5th gen pocket (this will make the headunit fit into place) 7c. Now your headunit is flush... But not attached. 8. In my case i could drill holes exactly where the little indentations about a quarter inch back from the origional screw hole. (Measure though because it may be different.) 9. Once the you have the front screw holes drilled on both sides of the headunit, your rear screws will not line up with anything. (The bracket is too short) 10. Take your 5th gen bracket and line up the two holes that are catty corner from each other. These holes will line up with the rear headunit hole and the front pocket hole. 11. Now on the holes that don't match up (front headunit hole "That you drilled", and rear pocket hole) drill holes in the 5th gen brackets to match accordingly. 12. Once everything is lined up and together. Take the whole "double din" And re-install it. (THIS IS TO TEST FIT, IF YOU TRY TO FORCE THE DOUBLE DIN/ AC Surround INTO PLACE YOU MIGHT BREAK IT) 12a. Flip the AC/Double Din surround over 13. Now when you test fit the aftermarket bezel surrounding the headunit will stick out to the left and right too far. You will have to file the AC/Double Din surround accordingly to make everything snap into place. (You will file to the left and right of where the aftermarket headunit bezel touches the AC/ Double din surround.) You will file about 2 inches ( file according to the length of each side of your headunit bezel) off of the left and right of the surrounding "box"... From the top left and right corner. 14. Now everything should fit into place... Reassemble and you officially have an aftermarket headunit that looks factory fresh !!!  Before:  After: 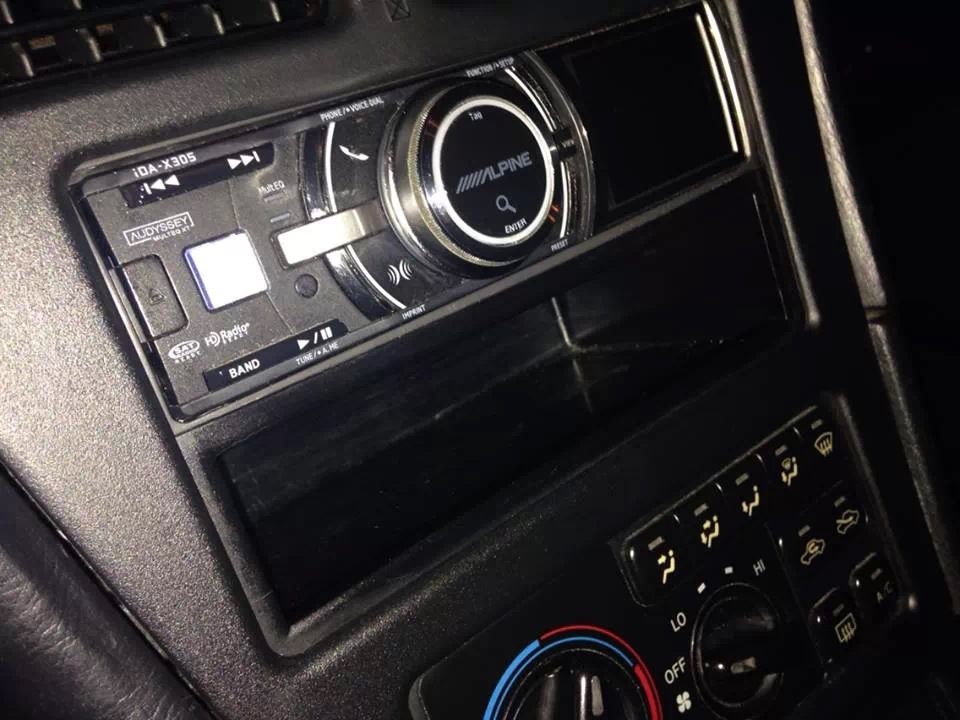 *"Do this at your own risk I am not responsible if you damage your car during modification" This post has been edited by drumbum: Jan 27, 2014 - 2:33 AM --------------------  Weekend Warrior-----1998 Celica GT: White Daily Driver----------1997 Celica GT: Blurple |

Posts in this topic
 drumbum How To: Flush Single Din Jan 27, 2014 - 2:18 AM
 azn87 Does this still have space to fold down the facepl... Jan 27, 2014 - 2:34 AM
 drumbum You will not be able to fold down the face plate s... Jan 27, 2014 - 2:47 AM
  |
1 User(s) are reading this topic (1 Guests and 0 Anonymous Users)
0 Members:
| Lo-Fi Version | Time is now: July 8th, 2026 - 8:08 PM |