Help - Search - Members - Calendar
Full Version: CAI GT how to.
6G Celicas Forums > 6th Generation Celica > Engine/Transmission/Maintenance
Pages: 1, 2, 3
urbandork
I did submit this to the how to article section, however because of several ppl asking me for the how to directly i have decided to put it up as a thread and when ever it gets reviewed as a "how to" it gets reviewed.

"Usual disclamer"

GT CAI How To (this also works for the ST celica as well)

Tools and parts:
Metric socket/ratchet set
Screw driver
Hack saw
Dremel
¾ inch hole saw
Permanent marker
90-93 Honda accord CAI system (2 piece 2¾ in. pipe)

The Concept Design:


Step 1: Prep
Take out the stock air-box. This is done by disconnecting it from the throttle body, Unbolting the air box as well as taking out the resignation from the front fender (note; this is where the air filter will go). When taking out the air-box you will have to disconnect a breather tube as well as a temperature sensor. The temp. sensor can simply be puledl/wiggled free from the rubber flange that holds it on. After pulling the temp sensor out remove and save the rubber flange.


Step 2: More prep
Next thing on the list is to take out or rather detach the fuse box from the car. To do this there are three bolts. Two are under the cover, one is in the back and one is on the side. The third bolt holding the fuse box down is in the front and at the bottom. At this point take note of the bottom of the fuse box as it will be attacked by the friendly dremel.


Step 3: Modify “S” pipe
Now with the engine bay free of the stock air-box its time take a look at how the piping from a 90-93 accord CAI system will be used to route a CAI system for our GT’s. There are two pieces of pipe in the accords CAI package. The first piece has an “S” type shape as well as a small pipe for a breather tube. The second piece is shaped more like an “L” and this is the pipe that will be routed through the fender where the filter element will be mounted.


Test mount the S pipe to the throttle body using the supplied couplers. Next take the L pipe and stick the short end down and into the hole that’s in the fender. If you care about scraping the finish make sure you’re careful when navigating the pipe around the fuse box and into the hole as well as placing cloth anywhere needed.

With both pipe soft mounted you will see that the second bend from the throttle body routes the pipe on a tighter angled vector then is needed to mount up to the L pipe properly. Luckily the L pipes length is just perfect and it reaches all the way out to the second bend on the S pipe and ends just exactly where the cut in the second bend needs to be made. Use the permanent marker to mark off where the cut on the second bend of the S pipe needs to be made and take Mr. Hacksaw to it. Clean off the edge as well as any stray derby and or saw dust.


Step 4: Modify “L” pipe
At this point the only piece of pipe that should be cut is the second bend on the S pipe. The L pipe should be untouched, but not for long. After cutting the second bend on the S pipe a coupler should be able to link the S pipe to the L pipe, which should be routed through the hole and down into the front fender area.

With the front left-hand splash guard off the filter element should be able to be mounted on to the shorter end of the L pipe that’s sticking through the hole. You might note that there is more pipe then needed sticking though the hole. Test mount the filter element to see how much of the pipe needs to be taken off. If the pipe is too far into the filter element it probably will lead to airflow restrictions but it will be louder because of this.


If your planing on fitting a bypass valve as i have done a section of pipe is going to have to cut to allow the fittment of the bpv. It is best to make the cut on the L pipe rather then the s pipe.


Step 5: Temperature sensor
With the S pipe soft mounted to the L pipe, now would be a good time to figure out where you want to drill the hole that will mount the temp sensor. Chose a place and make sure that the sensor will reach it. Then use a ¾ inch hole saw to make a hole in the pipe. The hole should be the same size as that on the air box which held the rubber flange for the temp sensor. Slip the flange onto the hole and test fit the temp sensor.


Step 6: Fuse box modification
Now with the pipes cut and mounted you should be able to try to mount the fuse box back in its original location. When doing this you should be able to see what and how much of the fuse box needs to be taken off.

The bottom of the fuse box can be taken off, this exposes the plug. All that needs to be shaved off is some of the sides and bottom of the fuse box as well as some of the plug. This step is best done with a steady hand and a dremel with a “cut off” blade. A slow yet steady approach is a good idea.

If you don’t want to bust out the dremel then the fuse box can be left alone and either secured by zip ties or longer bolts can be used to hold the box in to place via stock mounting points.


Step 7: All done
Now that the pipes are cut, the hole for the temp sensor is made, and the fuse box is modified the pipes should be able to be mounted using the couplers and air filter that it came with. After getting everything back together start the car and enjoy the sound of cold air intake.


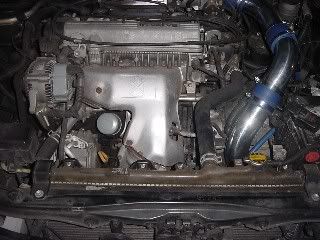
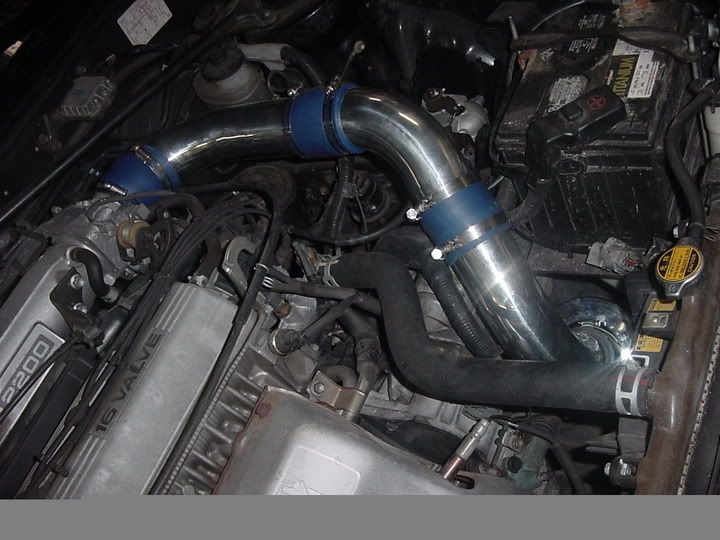
Here are a few other member's setups as well


(another method)


(the INJEN SRI)


Notes:
EBay has the cheapest 90-93 accord CAI systems, but make sure it is the two piece type like the one on Pro Car Parts.

Some 90-93 accord CAI piping have two breather tubes rather then just one. From my experience with Pro Car Parts and EBay, the chrome set has two where as the powder coated one only has one.

the use of a bypass valve. It is not needed to work properly however it is something you can ad on to protect against hydrolock. Keep in mind that inorder for hydro lock to take place almost the whole filter element needs to be submergered in to water. This would have to be avery deep puddle. I drove around with no bypass for a long while with no troble. I put it on when it started to rain heavily and because a shop i was checking out had one in stock.

WARNING Must use 2.5 inch pipe if not moding the hole below the fuse box. If you use 2.75" pipe the sides of the hole will rub a cut into the pipe.

If you use 2.75" cut the hole larger.
Fietsbel
*picss doens;t work*
urbandork
grrr cant figure out how to get all pix to work so they are in link form. If n e one whats to give it a shot ur welcomed to take a hack at it. Tag ur it.

Coomer these are the pix that i was guna send you. I know ur busy so take ur time no rush. I can still email them to you if its easier. I posted the how to up because there were several ppl asking me about it. Hope i havnt over stept any lines.
Fietsbel
I placed youre photo;s on mine webspace:

user posted image
user posted image
user posted image
user posted image
user posted image
user posted image
user posted image
user posted image
user posted image
user posted image
wuhukf
What do you do with the breather hose that comes with the intake? Not sure whether to plug it in to the throttle body or valve cover or just to plug it up and not use it.
operative
Thank you all, this is the first detailed instructions on the GT CAI. This is overdue for years. Thanks urbandork, im gonna go try it.
LewFX
how is this 20-30 bucks? the bypass valve alone is 30-50, not to mention a real name brand filter is around 40-60
Digndoug
QUOTE(LewFX @ Feb 23, 2005 - 5:03 PM)
how is this 20-30 bucks? the bypass valve alone is 30-50, not to mention a real name brand filter is around 40-60
[right][snapback]249289[/snapback][/right]


You dont need a name brand filter. just get a good one, as in a good designed one.
I did the same thing but with a 92-95 civic one. I didnt cut extra peaces so it might not look as clean, but i just bought it and threw it in, and which is why i took the route of the fender, then later to figure it out it workes better, or atleast sounds better. Mine looks the same cut as the accord though.

Also I bought mine for $26 shiped, i kinda got lucky though.
LewFX
not to be rude or anything, but for people who follow pictures more to put the instruction under the pic..still would need a bypass right digndoug?
operative
confused.gif What is better, diameter 2 1/2" or 2 3/4"? Lots of the ebay kits are 2.5"
urbandork
In responce.

First off the price of jsut the CAI should be around 20 to 30 bucks because that is aournd the lowest price you can find it on ebay including shipping. The filter is usually included with the CAI system when bought. The bypassvalve is an options that must be outsourced and thus the price is not included in the project build. This also holds ture if the builder wants to use a diffrent airfilter.

Second the hoses that are supplied with the kit because all of the stock hoses, just one at that, can be plugged right back on the CAI piping with out over stretching it. If a color theme is needed then go right ahead and do so.

Thirdly going back to the use of a bypass valve. It is not needed to work properly however it is something you can ad on to protect against hydrolock. Keep in mind that inorder for hydro lock to take place almost the whole filter element needs to be submergered in to water. This would have to be avery deep puddle. I drove around with no bypass for a long while with no troble. I put it on when it started to rain heavily and because a shop i was checking out had one in stock.

opps almost forgot. The pipe diamiter of my kit was 2 3/4 inch. I would not suggest any larger as then the whole that the pipe routes down into the fender by would need to be modified. This means that i would advise the builder to ask how large the pipe is before buying/biding on any items

As for what is better i was told that 2.5 is the best for the 2.2l.
urbandork
QUOTE(LewFX @ Feb 23, 2005 - 5:18 PM)
not to be rude or anything, but for people who follow pictures more to put the instruction under the pic..still would need a bypass right digndoug?
[right][snapback]249293[/snapback][/right]


rephrase? If its about the placement of pics i couldnt get them to work so Fietsbel was kind enough to take car of that for me. (big thanks btw)
urbandork
QUOTE(Digndoug @ Feb 23, 2005 - 5:08 PM)
QUOTE(LewFX @ Feb 23, 2005 - 5:03 PM)
how is this 20-30 bucks? the bypass valve alone is 30-50, not to mention a real name brand filter is around 40-60
[right][snapback]249289[/snapback][/right]


You dont need a name brand filter. just get a good one, as in a good designed one.
I did the same thing but with a 92-95 civic one. I didnt cut extra peaces so it might not look as clean, but i just bought it and threw it in, and which is why i took the route of the fender, then later to figure it out it workes better, or atleast sounds better. Mine looks the same cut as the accord though.

Also I bought mine for $26 shiped, i kinda got lucky though.
[right][snapback]249290[/snapback][/right]


This is another point which i forgot to add in the how to. Keep in mind im not the only one who has done. I believe Digndoug was one of the ppl i asked when i first looked into CAI when first became a member on this site.

The infomation is out there on this forum. However i figured since i did it under 25 bucks i might as well gather up all the little tid-bits and type up a how to article.

I guess you can all it a thanks to all the members who helped me out at first and have already done a custom CAI system for the GT, because honestly its nothing new.

Bigmeanbulldog55
Some one please make this into a "HOW TO." I really could have used this when I got my car. And I'm sure it'd help out all kinds of newbies.
Redline_Racer
Awesome bro here is mine, I made it out of Mandrel Bent Piping, and hand polished it it cost me around 80 to make.

user posted image
user posted image
user posted image

-Brandon
LewFX
okay so which version is better!!! and redline, where did you move the black box? can anyone help me modify my short ram injen to make it go cold air??
urbandork
QUOTE(LewFX @ Feb 24, 2005 - 5:42 AM)
okay so which version is better!!! and redline, where did you move the black box? can anyone help me modify my short ram injen to make it go cold air??
[right][snapback]249585[/snapback][/right]


that black box is the stock airbox so it needs no relocation rather it just needs to be taken out. However if you were talking about the one to the left of the bat. that would be the cruise contorl i think. Where he relocated that or if he retained it im unsure. If memory servs i think he was able to relocate.

Take a pic of ur injen one and ill let you know about making it a cai. im sure it can be done.

As to which ones better, with out sounding like a big head id have to say the fender route is. for the following reasons.

The stock airbox actually intakes air from the place the filter element in my set up does. If you look at the front of ur bumper (model with no fogs) you will see that on the drivers side there is a small scoop that actually flows air in to the fender area. Putting the filter element here ensures true cold air. This is because it is separated from the engine bay, the only thing going into this area is fresh outside air. Another great thing about having the filter elment here is that its closer to the outside and thus more aduioable/louder.

In comparision the way redline has his set up the piping, puts the filter element near the exhaust manifold where it is pron to still injest hot air. furter more the filter element is still in the engine bay area. This causes it to get heat soaked and also means that it is not constantly fed cold air. Inorder to solve this probly an air scope can be made however even with and airscoop it probably isnt to effective at cold air injestion.

I beleive redline was one of the ppl i asked questions about CAI when i looked into it. Or at least i remember looking at his set up via pix from the members page. I decided not to go with this set up for the above reasons but also because of its location next to the exhaust manifold and the number of bends. The least bends ensures the smoothes flow of air possible.
Redline_Racer
I'll be honest, I like Urban Dorks set up better than mine just because its cooler haha. But I have gotten alot of props from local tuners on my work.

QUOTE
I beleive redline was one of the ppl i asked questions about CAI when i looked into it. Or at least i remember looking at his set up via pix from the members page. I decided not to go with this set up for the above reasons but also because the number of bends and its location next to the exhaust manifold


^^ Yeh and I also had to relocate my cruise control


-Brandon

ALSO! I have made a custom scoop to bring in air from under the car, and I am working on making a heat shield.
urbandork
QUOTE(Redline_Racer @ Feb 24, 2005 - 7:44 AM)
I'll be honest, I like Urban Dorks set up better than mine just because its cooler haha. But I have gotten alot of props from local tuners on my work.

QUOTE
I beleive redline was one of the ppl i asked questions about CAI when i looked into it. Or at least i remember looking at his set up via pix from the members page. I decided not to go with this set up for the above reasons but also because the number of bends and its location next to the exhaust manifold


^^ Yeh and I also had to relocate my cruise control


-Brandon

ALSO! I have made a custom scoop to bring in air from under the car, and I am working on making a heat shield.
[right][snapback]249639[/snapback][/right]


Yes i remeber you telling i think or at least reading in a post. I am positive i spoke you about the cai subject back when i was planning mine. Thanks a bunch for all the info.

Aside from that its also important to note that what really tops off the whole CAI package is the temp sensor. If you have the CAI piping but the temp sensor is just left in the egine bay, then its reading even hotter air then it would be with the stock airbox. I would assume this only means less HP then even the stock airbox.
Redline_Racer
Either way Urban our cars sound beastly and better than any civic. Woot

-Brandon


(and that little blue tube running off of my intake is my O2 sensor.)
urbandork
QUOTE(Redline_Racer @ Feb 24, 2005 - 7:54 AM)
Either way Urban our cars sound beastly and better than any civic. Woot

-Brandon

[right][snapback]249641[/snapback][/right]


Yeah i know thats what i love about a CAI system. I love the noise it makes when the butterfly valve on the TB is opened. Its one of those sounds that make me siver and go ahhhh. Kinda like nails on a chalk board but a really good feeling.

Sometimes im sad becasue deep down inside ill miss that sound when i go to a 5sfte set up. But i try to remind myself how sexy the bov sound will be between shifts.
LewFX
http://www.lewfx.com/celica/DSCF0001.JPG

if you want a pic with the filter and heat shield off, let me know...i just took out the last part of the stock box, what a pain!

im sure all i need a certain piece to connect to the injen end and have the other end go through the hole...but what piece is recommended
urbandork
how big is the pipe. looks like 2.25 or 2.5 inch. If you want to extend that for a cai system then ull probably want to use the same size pipe. Try to find a cai kit or pipe thats the same size and firgure out how to route it. By the looks of it you might want to cut the pipe you have and extend it so the last bend is farther down. Or you can see if another section of pipe with a bend similar to the L pipe in the how to can be modded to fit.

personally you might be better off selling the injen for a hi price and then use the money to get pipe off of ebay. This way you might even make money back lol.
duga10
there are many sizes being quoted of the pipe that gets connected to the TB

what is the actual diameter of the entry? on a 5sfe?

ive heard things from 2.25" to 2.75" (now thats half an inch gap!) anyone know?
urbandork
if memory servs its 2.25
LewFX
the injen is 2.5 inches
soltrain
This really really needs to be put into the how-to section. Coomer?
urbandork
lol i already fowarded it in the how to section. its pending aprovale. C man said he will get to it when he can. I feel him tho school, work, play, everthing else. days get short lol.

at least its on the board some where lol. Plus ppl can always bump it.
operative
I just installed an Accord CAI into my celica yesterday, its working great. Car is much more responsive, it sounds like a monster. My car use to pull like a sissy on 3rd gear, now it rockets. I found that my OEM pipe was cracked, didnt notice before. You guys should check your intake pipes.

I would like to note that I got the 3" accord cai, which is too big. GET 2.5", stock is 2.5". 3" does not fit into the fender hole, had to increase the size of the hole. Had to remove the bottom of the fuse box. Fuse box does not fit into original position.
urbandork
yes as its posted in the parts list the pipe should be 2.75 as anything larger will require making a larger hole as well as moving the fuse box. As it is, 2.75 bairly goes into the stock fender hole.

Also keep in mind that the CAI is going on a 2.2l. In reality theres no reason to go with n e thing over 2.5 inch. N e thing larger will see marginally smaller throtle responce. I went 2.75 because at the time it was the cheapest and i didnt find n e body with the kit in 2.5 inch form.

btw operative do you have any pix. you should post them in intrested to c what it looks like with 3in pipe.
urbandork
bump for that guy
LewFX
bout the 90 accord version as well, took about an hour to get everything in. bpv will come today.
LewFX
QUOTE(operative @ Apr 7, 2005 - 10:56 AM)
I just installed an Accord CAI into my celica yesterday, its working great.  Car is much more responsive, it sounds like a monster.  My car use to pull like a sissy on 3rd gear, now it rockets.  I found that my OEM pipe was cracked, didnt notice before.  You guys should check your intake pipes.

I would like to note that I got the 3" accord cai, which is too big.  GET 2.5", stock is 2.5".  3" does not fit into the fender hole, had to increase the size of the hole.  Had to remove the bottom of the fuse box.  Fuse box does not fit into original position.
[right][snapback]267746[/snapback][/right]


i noticed that even the 2.5 is big to the throttle. 2.25 will be just right.
operative
aite guys, I've loaded a pic to my profile of the 3" CAI.
king_wsk
QUOTE(operative @ Apr 23, 2005 - 10:03 PM)
aite guys, I've loaded a pic to my profile of the 3" CAI.
[right][snapback]277009[/snapback][/right]


Nice! I just purchased a 90-93 CAI from procarparts off ebay and they let me come and pick it up for 1/2 the $25 shipping cost... so $18+12.50 = $30.50 for the CAI. I'm going to pick it up tomorrow but probably won't be able to install it 'til tuesday.
king_wsk
I lied, I was so excited to get my CAI, I just installed it. Its so freaken awesome!!! I haven't properly mounted the fusebox as I was afraid to take the dremel to it, but the instructions where very helpful.

BTW, the guys over at Pro Car Parts are very helpful and nice. I highly recommend them.
urbandork
QUOTE(king_wsk @ Apr 26, 2005 - 7:08 AM)
I lied, I was so excited to get my CAI, I just installed it.  Its so freaken awesome!!!  I haven't properly mounted the fusebox as I was afraid to take the dremel to it, but the instructions where very helpful. 

BTW, the guys over at Pro Car Parts are very helpful and nice.  I highly recommend them.
[right][snapback]278170[/snapback][/right]


Cool im glad to hear u got it in all good and that my instructions were helpful. Hope to c some pix soon.
LewFX
ill try to post pics of mine as well when i get my newer bpv
blu94gt
Not to bring back a thread from the dead, but I just finished doing this to my car and I have to say I like it. Very sexy growl from the intake biggrin.gif I still need to installl the temperature sensor in the intake, I didn't have a hole cutter (and after having a dremel wheel shatter and embed into my nose I was done working for the day lol). Definitely worth it I think, kind of a pain to get the lower airbox out tho

~Brian
dahoman9
bump
DmVinny
Obviously this should work for the ST (7afe) as well... ? correct
urbandork
depends on the placement of the intake manifold is realitive to the engine bay and whole in the fender.

on a 5sfe in a celica the bends and lengths are just right. I would think that if the placement of the intake manifold are to farther foward or behind then the 5sfe then i might have some troubles when dealing with the angle of the pipes and length.


Id say try it and at most lose 20 or so bucks on the pipes. At least ull have fun cutting stuff up and junk.


o also i dont know if the intake side of the manifold is the same size and thus you may need a smaller reducer.

DmVinny
I'll give it a shot after my car comes back from the mechanics.
Akimbo
urban give me a link of the right intake to buy
LewFX
ebay...90-93 accord cai...2 piece
dabbill
I bought a CAI for my car ST off ebay for like 30$, works great. I left out the bybass valve cause it took away the sound of the intake.
LewFX
My new re-routed cai, works nicely

user posted image
Akimbo
Hmm...so you sure as hell should have a bypass valve if you're gonna have it there...looks like danger for puddles...
LewFX
i covered it back up with the plastic shield, just took a pic to show
This is a "lo-fi" version of our main content. To view the full version with more information, formatting and images, please click here.
Invision Power Board © 2001-2024 Invision Power Services, Inc.