Installing a Header on the 7A-FE
| Author: | Mynzeyes |
| Approximate Time: | 2+ hours |
| Required Tools: | 7A-FE header (for a Corolla) Various sockets Excess exhaust pipe Ring clamps (optional) Welder/Shop to weld |
Disclaimer: I, once again, am not responsible. You get the idea.
NOTE: MAKE SURE THE CAR AND EXHAUST SYSTEM IS COLD! A HOT SYSTEM WILL CAUSE BOLTS TO CROSS-THREAD, AND YOU WILL HAVE TO SAW THE STOCK HEADER/DOWNPIPE OFF LIKE I DID! LEARN FROM ME!
1. First, get the front of the car off the ground, and make sure it is VERY VERY sturdy. You will be under it for a while. Make sure the jack-stands are out of your way in accessing the header, and you may also remove the wheels to give you more room.
 2. Unbolt the 2 o2 sensors from the factory header, there will be one accessible from on top in the engine bay, and the 2nd is located underneath the car near the passenger side drive axle. Also, you'll need to remove the heat shield via about three bolts that hold it on. The bolts should be in plain view.
3. I would start at the catalytic converter, and unbolt the downpipe from there, I don't recall the number of bolts, but I believe it to be 2 bolts.
4. Next unbolt the downpipe from the header, and remove that section. Once again, not sure as the number of bolts again, but probably 2-3.
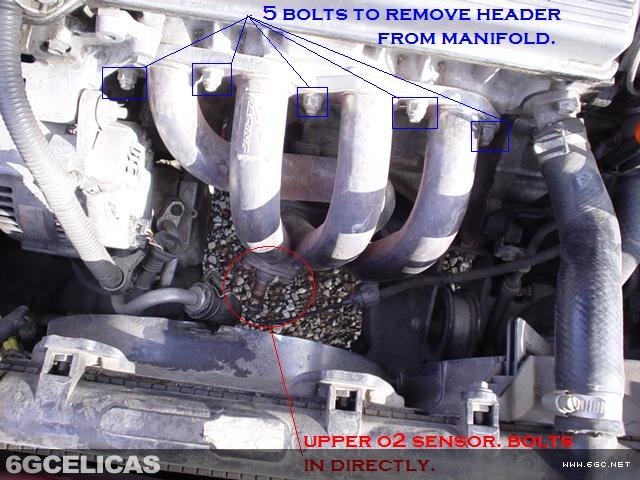 5. Get back on top of the car, and unbolt the header from the head via 5 bolts, and remove the upper portion of the header.
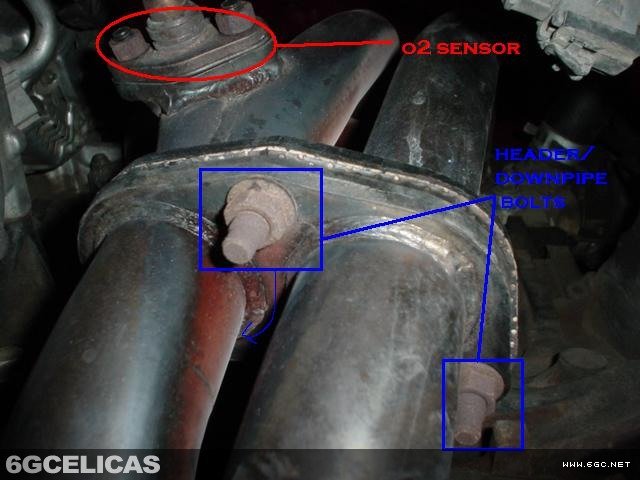
6. Lower the new header into place, and test for fitment, BE ADVISED: YOU MAY NEED TO BORE THE HOLES IN ORDER FOR THE HEADER TO SLIDE INTO PLACE. I needed to do this to mine, because it was off by MAYBE 2-3mm. If need be, do this next, but if not, bolt the header up with either the factory gasket, the one given with the header (if available) or a new gasket bought from Toyota. Also, the upper o2 sensor can be bolted into place, it should bolt right into the new header (shown in picture 1 on the right, and the o2 sensor is shown again in the 2nd picture.)
7. Next, from under the car, put the downpipe into place, and bolt it onto the header via the bolts/gaskets included w/ the header (seen in picture 2.)
8. Now, a piece of pipe is needed to reach from the header to the catalytic converter, note that you can get an aftermarket cat when doing this, and purchase it for a Corolla to match the header, and it will bolt right up, but then you may need to get pipe to reach from the cat to the after-cat exhaust.
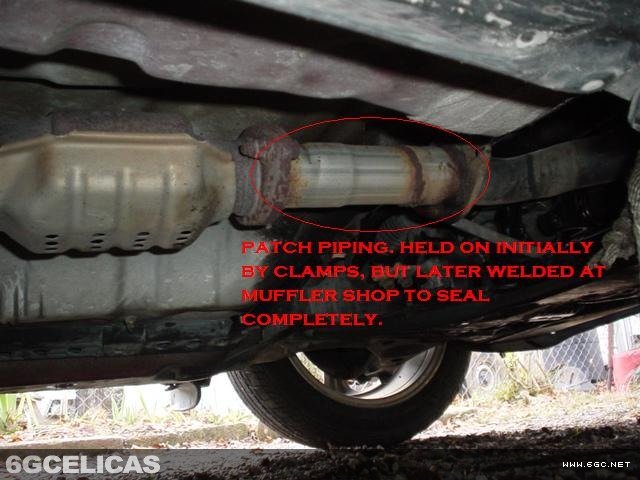 9. To secure the pipe in place, you may either use the exhaust ring-type clamps available at an automotive shop, but I HIGHLY recommend welding, or taking to a shop to weld it into place (mine is welded, and can be seen in picture 3.)
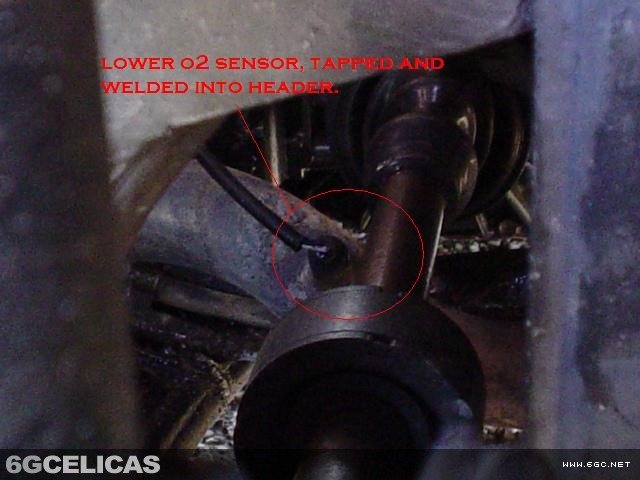
10. After that is done, the header is on; the only problem is that 2nd o2 sensor. If you unplug it, your check engine light (CEL) will come on, and be annoying. In order to put the o2 sensor into place, you will need to tap into the header w/ a torch cutter, and make a hole big enough to put the o2 sensor in. You can either get a bung to bolt the o2 sensor to, or weld the sensor directly to the header (I did this, and can been seen in picture 4 on the right.)
 11. After this is done, go back and recheck everything. Check the welds in the patch pipe from the cat to the down pipe, the welds on the 2nd o2 sensor, the bolts holding the downpipe and header together, bolts on the upper o2 sensor, and the bolts holding the header to the manifold.
If everything is tight and sealed, put the wheels back on and drop the car back on the ground and take it for a test drive. You may also want to reset the ecu by unplugging your battery for a little while, but that's up to you. Hope this is easy to follow for you all, and if not, email me or PM me or IM me and I'll explain something if need be. Enjoy.