Installing JDM-Style Side Markers
| Author: | Mynzeyes |
| Approximate Time: | 2+ hours |
| Required Tools: | Sidemarker lights Excess wire Screwdriver Drill Wire cutter/stripper |
Disclaimer: I am not responsible for any injuries you may sustain from working on your car. I am also not responsible for anything that is lost or broken while following this how-to. You control your own destiny.
1. First, CAREFULLY mark where on the fender you would like for the side marker to go. Measure THOROUGHLY. Down from the hood, over from the door, and diagonally from the mirror. Also, make sure both sides are the same, and stick the lens up on the fender via 2-sided tape or something equivalent to insure proper placement.
 2. This how-to gets messy early. Ok, mark with the rubber backing you got with the side markers where the holes are to go on the fender, in order to insert the main bulb housing, and also the screws.
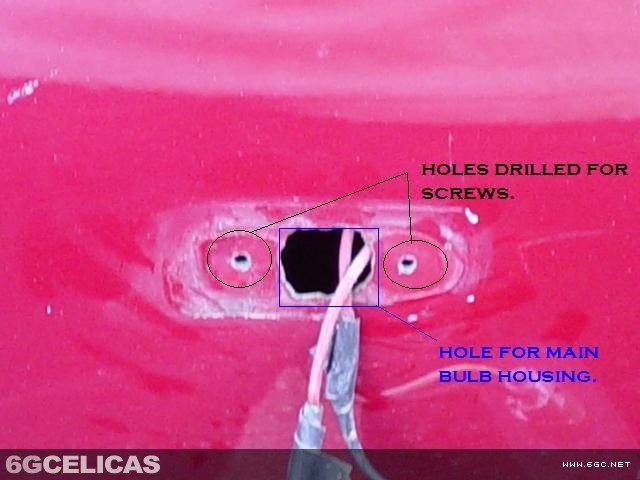
3. Find the proper size drill for the screws, REMEMBER it is better to make the hole a little small, and work the screw in, rather than the hole being too big. Also, for the main bulb housing, I used a larger bit than the screw hole, but smaller than the housing, and just kept working it out, until there was a nice snug fit.
4. Grab some safety goggles or something…and drill on. It only hurts to see holes in your fender for a minute. You will see the holes I drilled in the 1st picture on the right. They are BOXED/CIRCLED accordingly.
5. Insert the side marker housing into place, rubber grommet and all, and bolt into place.
 6. In order to wire the side marker, you will need to loosen the top of the fender in order to get a hold of the wires. You will also need some excess wire so that you may lengthen what is coming from the side marker.
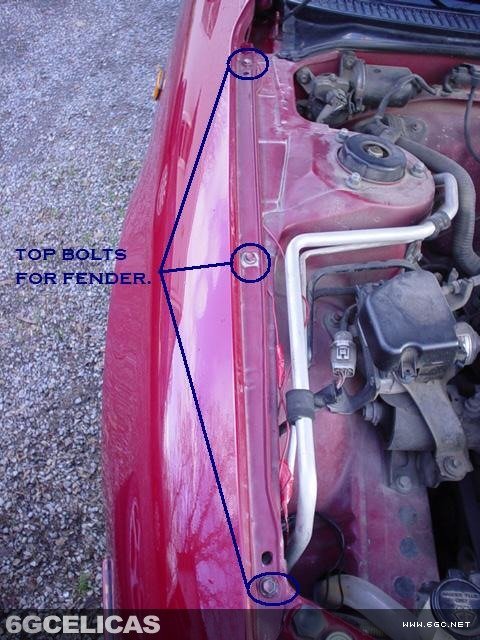
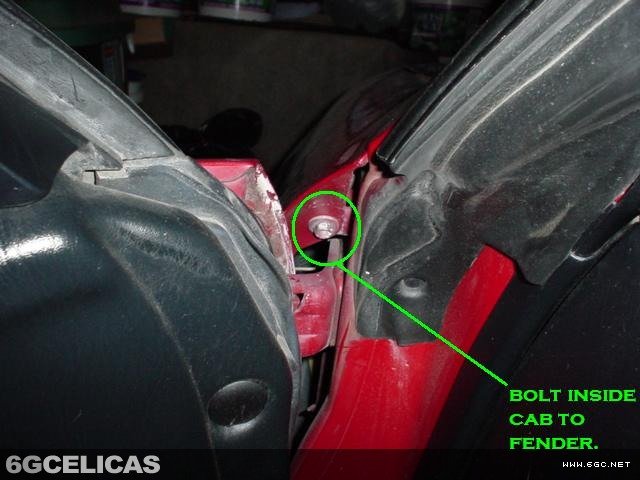 7. There are 3 top bolts in the engine bay, and 1 bolt near the bottom of the a-pillar inside the door-jam. These bolts are circled in pictures 2 and 3 on the right. Remove these bolts.
8. After removing the bolts, and lengthening the wires from the side marker, you can reach into the fender well and guide the wires up to the front turn signal.
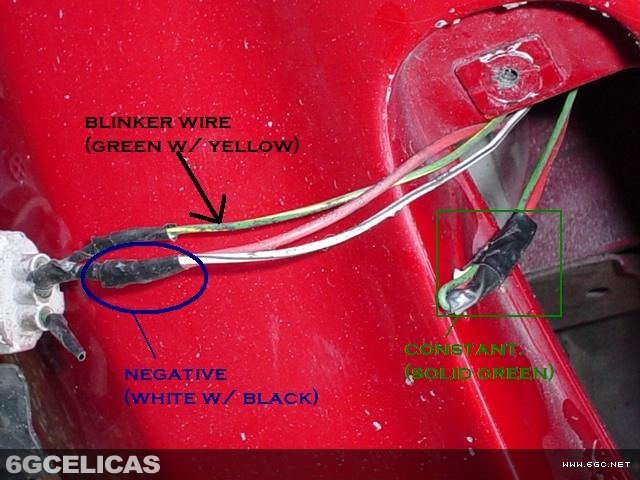
9. Remove the front turn signal and locate the wires you would like to splice the side marker into. NOTE: the negative from the side marker must go to the white/black stripe wire on the parking light. If you want the side marker to be on constantly, then you should wire the positive into the solid green wire, but if you would like for the side marker to stay off, yet blink when your blinker is on, wire it into the green/yellow striped wire (you will see my connections in picture 4.)
10. Cover all of the wires and connections, put the turn signal back in, bolt the fender back up, and put the lens on the side marker and you're done!
 Oh yeah, and check to make sure everything works. And if you blow a fuse or something, you probably have the positive wire grounded somewhere accidentally. Just repeat this process on the other side and enjoy!