Making Custom Hood Vents
| Author: | Fred |
| Approximate Time: | 4 Hours |
| Required Tools: | Socket wrench Drill 2mm and 10mm drill bits Jigsaw Pencil Paper and cardboard Masking tape Felt pen Scissors Razor blade Rubber beading Mesh |
If you're wanting to create custom hood vents for your car, you may follow this how-to. If you are not capable of using a drill and a jigsaw safely and acurately then get someone else to do this, because it is easy to mess up a hood. Always use eye and ear protection when using power tools.
 Start by lifting up the hood. Remove the lining by taking out the black plastic tabs. You will now be able to see the bracing underneath the hood. You will then find all kinds of shapes. I decided that the triangle ones in the middle towards the front of the hood looked the best so I took two sheets of A4 paper, taped them together, and put one of the edges along the long straight part of the hood skin next to the bracing. Then, with the edge of my nail I rubbed the paper along the remainder of the bracing and removed it. You will now have a basic idea of what it looks like. Take the pencil and trace the line that was made by your thumb/fingernail and cut it with some scissors. Then put it back into the hood and see if it fits.
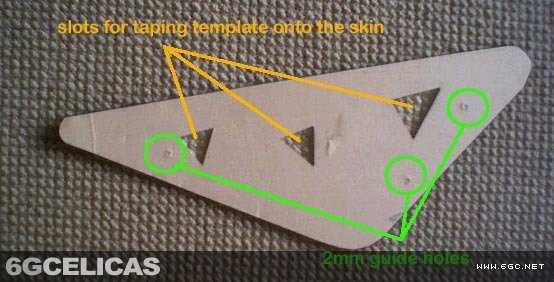
Now transfer this pattern to the cardboard.Cut out the cardboard with the razor blade, because scissors tend to twist the cardboard. When you're done cutting, put this back into the bracing gap and see if it fits. If it does, great. If it doesn't, try again. Now measure inwards about 5 to 10mm from the three edges of the triangular template, and with a ruler draw a line. Now, recut along these lines and round off the corners until they look good. Once you're done with that, the easiest part of the process is done.
Lower your hood and cover the entire surface with masking tape, making sure you get a good overlap, then raise your hood again and disconnect the windshield washer hoses. Then trace arond the brackets that hold your hood on with a felt pen so that you can fit it back in the same position.
Take your socket wrench and remove the four bolts that hold the hood onto the car. You will need a friend or two for this part; One on one side of the car and one to remove the rod that holds up the hood once you have the bolts out. Put a blanket or something down on the ground (I found that the front lawn was the best place) and place the hood onto this with the bracing in full view.
Now, place your template into the gap that you traced. You should have roughly 5 to 10mm spacing between the template and the hood bracing. (The reason for this will become clear later.) Under no circumstances should you stand on the hood as even the slightest pressure can warp the main skin. Now you need to measure all around the template to make sure it has an even gap between the template and the bracing and then tape it into place. Now, take your drill and drill three holes through your template and hood. Two on one side and one on the other side works best. That way you cannot transfer it the wrong way around when it comes to transferring it to the top of the hood. These will be your guide holes. Take off the template and flip it over and do the other side of the bracing, unless you only want one vent. Be sure not to lose the template. Now turn the hood over. Take the template and line the holes in it up with the holes in the hood by putting the drill bit through it and then while holding it down trace around it with the felt tip pen, flip it over and repeat on the other side. you should now have a fair idea of what it's going to look like.
 Now it's time to cut the vents. Get the drill and drill a 10mm hole inside the triangle. This will be the guide hole for your jigsaw. The reason for making the template 5-10mm smaller is so that when you start cutting with the jigsaw it will not catch on the brace and will only cut the outside skin. Now put the jigsaw blade into the 10mm hole and slowly cut your way to the outside line. Be careful to make smooth cuts, because jigsaws do not cut very well at sharp angles. Follow the line around, taking extra care on the tight corners. If you need to stop the jigsaw, make sure that it is against the skin until the blade has stopped moving, otherwise the jigsaw will bounce all over the place, which might dent the skin of the hood.
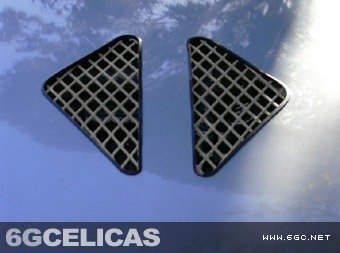
Once you're done cutting, now all you have to do is go and get some rubber beading. It looks kind of like a U shape and this will cover the edge of your cut out shape. You can stick this into place permanently with some silicon glue. Now you need to get some nice looking mesh. I suggest that you go to a place that does sheetmetal work, as they have a much wider selection than your car parts store. Fit this mesh grill between the skin of the hood and the brace and fix it in place with some silicon glue. Once you're done with this, put the hood back on the car and enjoy!