
 Nov 15, 2008 - 10:33 PM Nov 15, 2008 - 10:33 PM
|
 
|
 Enthusiast  Joined Apr 18, '05 From Calgary Currently Offline Reputation: 20 (100%) |
A How-To/Guide to convert to a GT-FOUR Front End ------------------------------------------------------------ Intro --------- there are a lot of gt-four front end conversion information spread out across different threads so i figured i'd compile a bunch of information into a single thread. this thread should hopefully answer most gt-four conversion questions. the purpose of this thread is to present all the parts that are needed to doing the conversion and identify the little mods that need to be done for everything to fit properly so you can DIY. basically you will need ALL the parts in the following figures (except those circled in blue) to closer resemble the specs of the gt-four front and allow perfect fitment... however seeing as this will be an expensive project, there are several things that you can do in order to take the most cost-effective route. take note of the numbers in the figures marked in red as it will be later referenced: 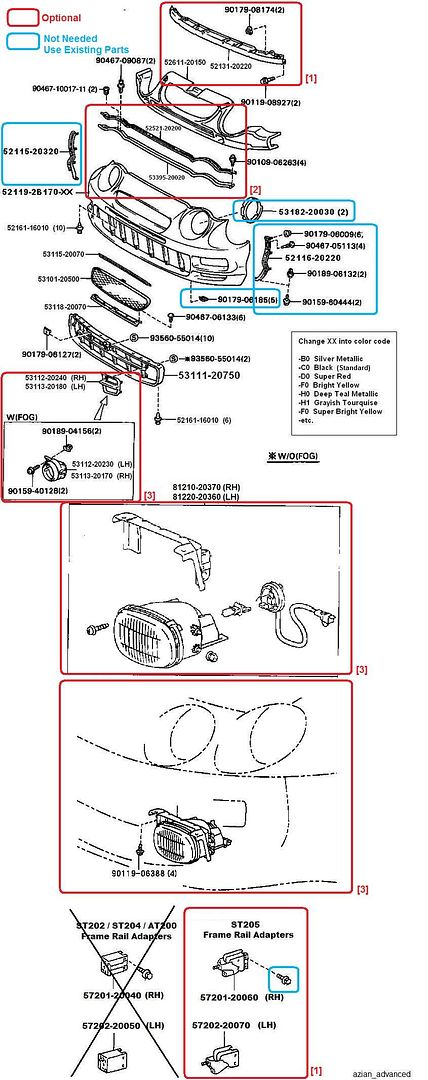 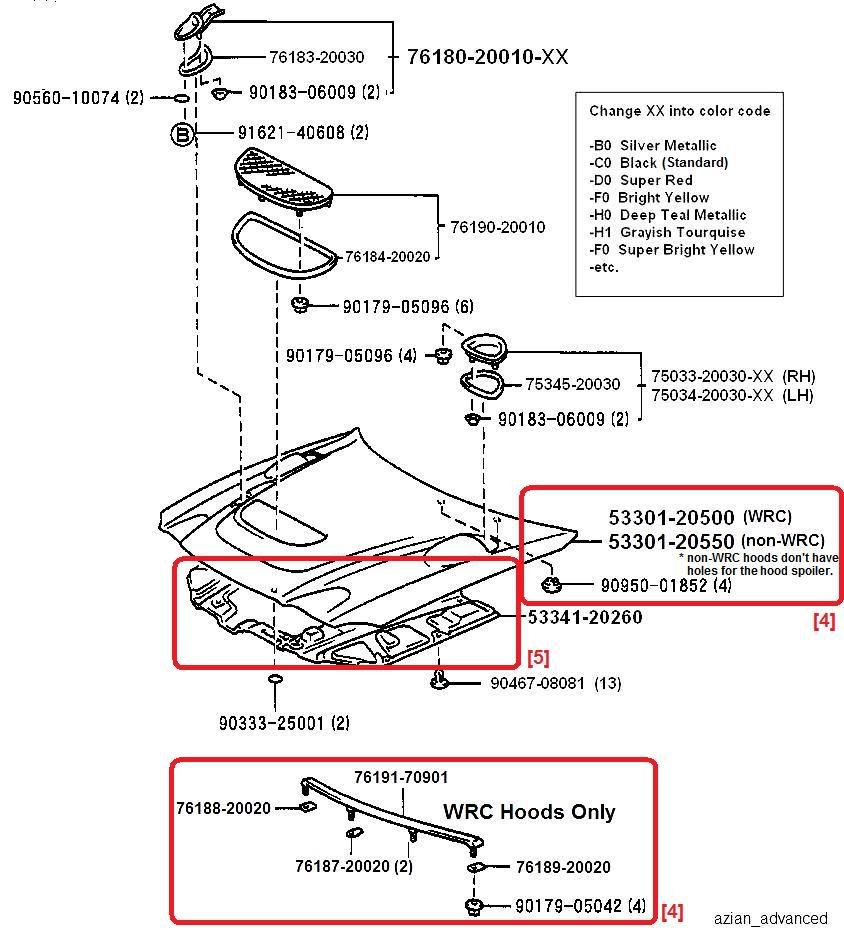 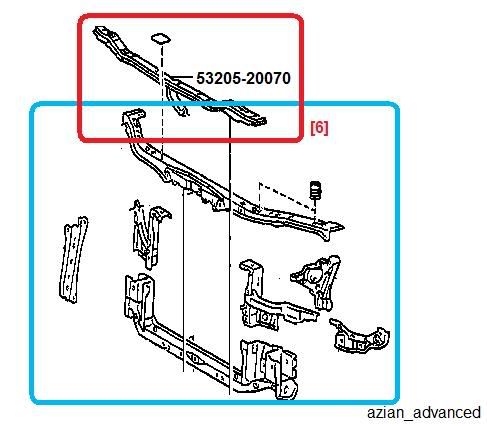 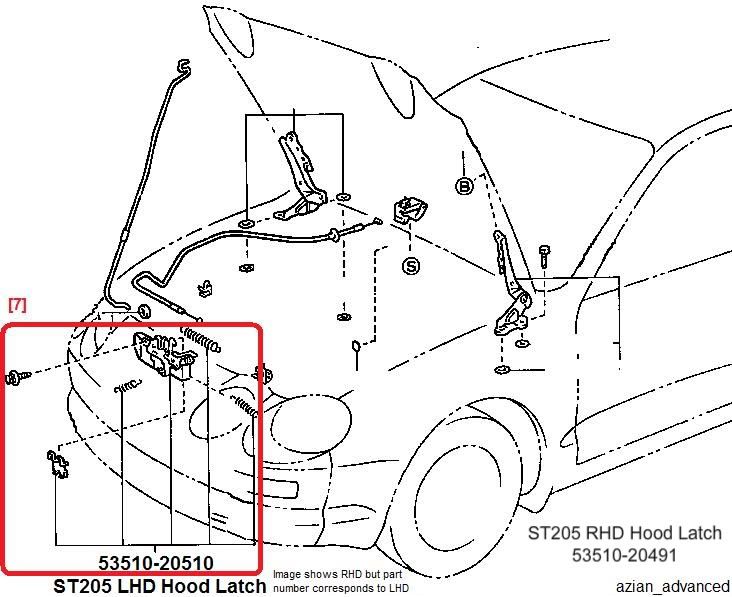 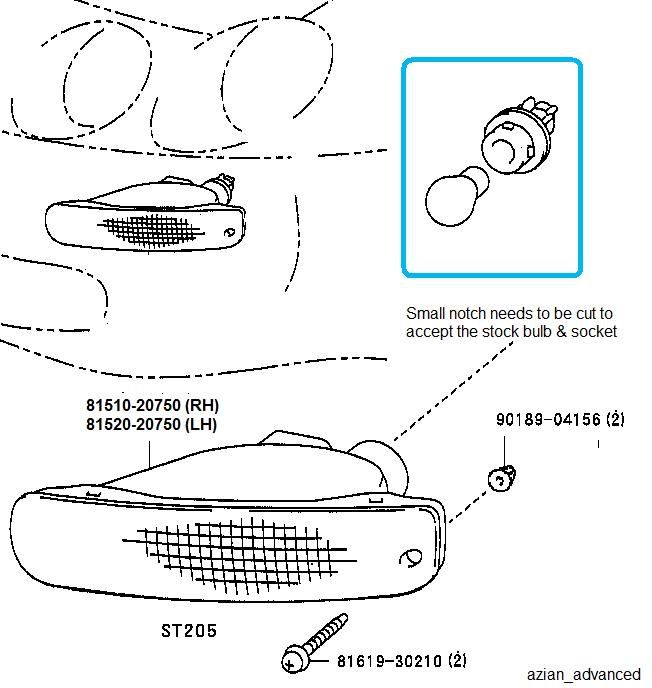 [1] Front Reinforcement (Crash) Bar You can use the stock crash bar and cut it or use the gt4 crash bar and modify it to fit the stock frame rails. However, the crash bar will not sit properly in the gt-four bumper foam absorber. If you get the st205 crash bar you might as well get the st205 frame rail adapters in order for the crash bar to sit flush inside the foam absorber. If you decide to cut your stock crash bar or modify the gt4 crash bar to fit the stock rails, there will be about a 1.5" gap between the absorber and the crash bar AND 1/2" offset in height. But on the bright side, the gap will not cause the look to appear any different than a stock gt-four.. modified gt4 crash bar on stock rail adapters show that it doesn't align with the bumper & bumper absorber   Pros: You save about $300 without having to buy the crash bar (~$100) and frame rail adapters (~$200) without affecting the overall appearance. Cons: If you lightly bump into an object, the bumper will flex until it reaches the end of the 2" gap and stop at the crash bar. This increases the bumpers chance of cracking or damaging. Notes: on modifying your existing crash bar (taken from What's the GT4 Bumper made out of?" : QUOTE (MaskedMan @ Oct 23, 2008 - 2:19 AM)  QUOTE (Random_Stranger @ Oct 23, 2008 - 12:04 AM) Because that mess is light as heck and kinda flimsy. Or is it just mine? Anyways, I was curious about that and I am also wondering if someone can explain in full detail how to cut the stock Celica impact bar? They said it was in layers. So am I cutting it like sideways? How much? Anybody got pics? My stuff is coming in Thursday or Friday from the paint shop. Also a tab is broken in the top part of where the screw goes into the fender. The guy said I should be alright without that top tab if I just have the part where all the screws go through. Like that lil bar that bolts to the inside bottom inner part of the bumper. I kinda think it will create a gap. Wondering if I should try and fix it with fiber glass and styrofoam (that kind you can mold). Anyways, replies and thoughts are welcome and needed asap if you can give in. Thanks The crash is made up of what I like to refer to as 3 inner chambers. Basically, you're going to cut across the bar, removing the bottom "layer" of the crash bar making it 2/3 of the size it was originally. I don't have any physical pictures, but I just drew this picture for you  . .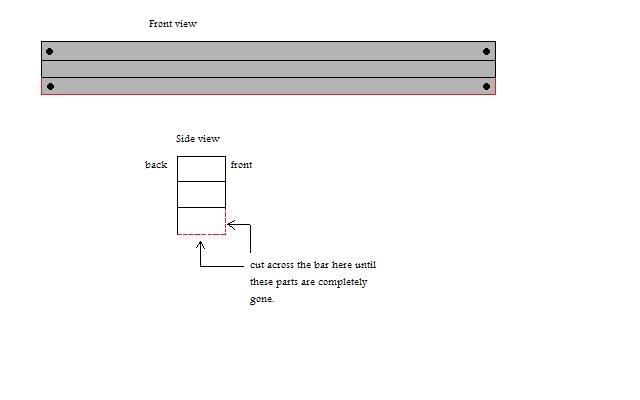 As for the bumper, I'm not quite sure what you are referring to, but having just 1 tab broken shouldn't be a problem. The bumper is held on by enough bolts as is, so it should hold just fine. A pic of the finished product (from FS: lots of ST205/ST204 Parts, bumper/headlights/tails/spring/strut/seats) QUOTE (HaRv3sTeR @ Jul 8, 2008 - 12:35 PM) ST204 crash bar already cut to fit ST205 bumper - 25$ + shipping  Supplementary Notes: on modifying your existing crash bar (taken from Need help with the gt4 front bumper) QUOTE (azian_advanced @ Sep 7, 2006 - 11:52 PM) i haven't done this since i used an actual gt4 reinforcement bumper... but looking at it, it seems you'll need to cut a straight horizontal line across the bar starting right below the top bolt of the frame rail, and another just above the bottom bolt all the way across. here are two pics for comparison:  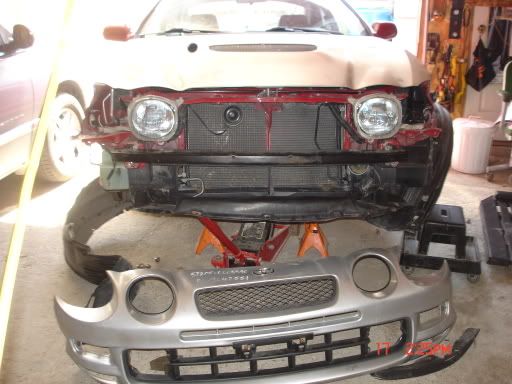 the pink lines is where you cut. Notes: on modifying a gt4 crash bar to fit on stock frame rails (taken from finished gt4 conversion) QUOTE (azian_advanced @ Sep 4, 2006 - 5:40 AM) the reinforcement bumper was not a direct bolt-on job... the front frame rails where the re-bar bolts on to is different on the gt4's. this is how it appears when you compare two ST205 crash bars and have it against the frame rails... 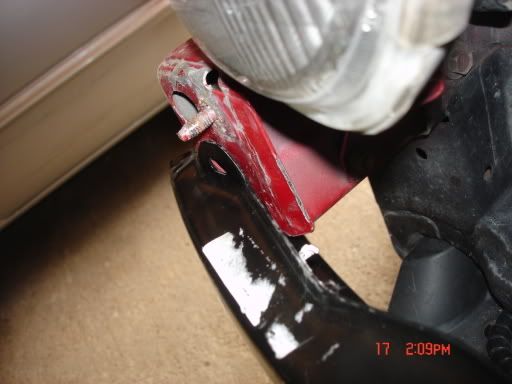 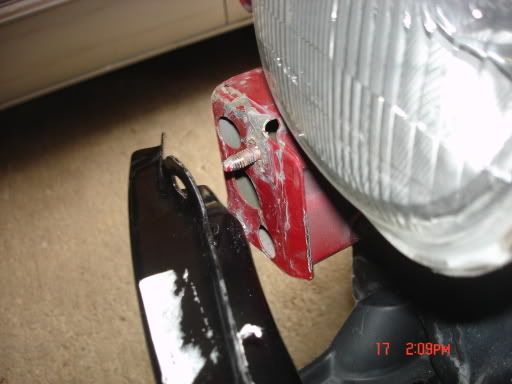 as you can see, the bottom is far too forward for the upper threading to fit through... this is how it looks after being cut (using an impact metal sheet cutter): 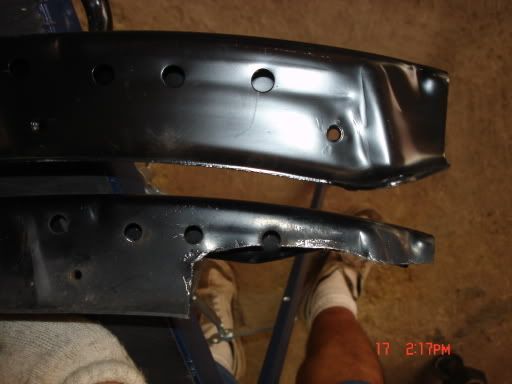 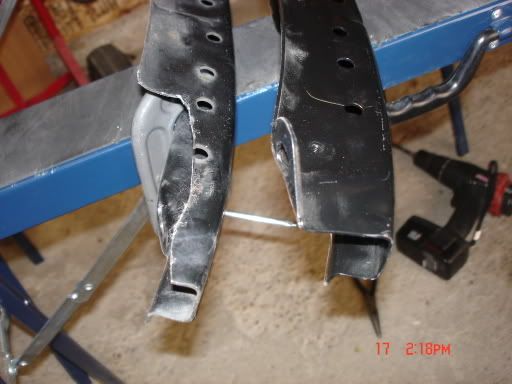 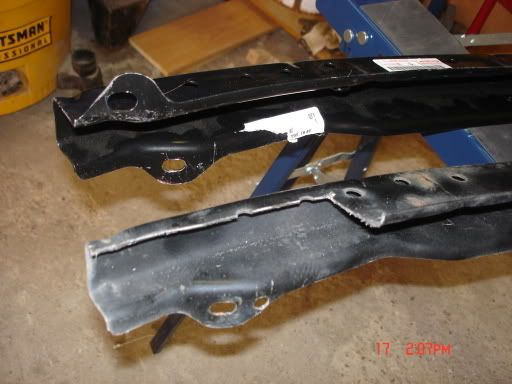 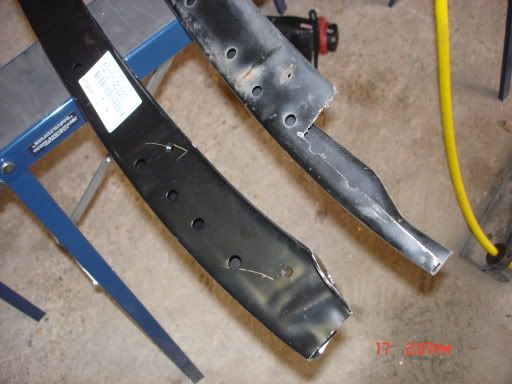 and here it is when bolted on 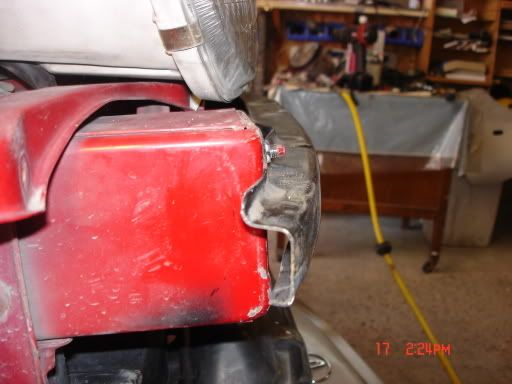 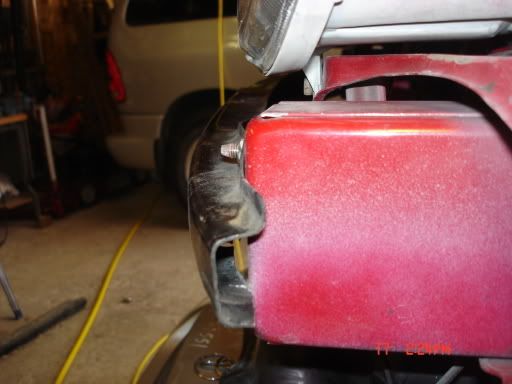 another thing which i totally missed is when you have the bumper installed, the bar sits slightly higher than it should be. right now, it doesn't fit in the groove on the bumper absorber. that may be because my car was in a previous front end accident and things aren't lining up 100% perfect. [2] Bumper to Hood Metal Retainer & Rubber Seal You can use your stock ST/GT metal retainer and rubber seal, and make a few 'bends' to make it fit properly. I did this the first time doing the conversion and it works, it will not appear 100% however so if this doesn't work out for you, you can always bite the bullet and pay the ~$60 to order the gt-four retainer and seal. QUOTE (azian_advanced @ Sep 4, 2006 - 5:40 AM) 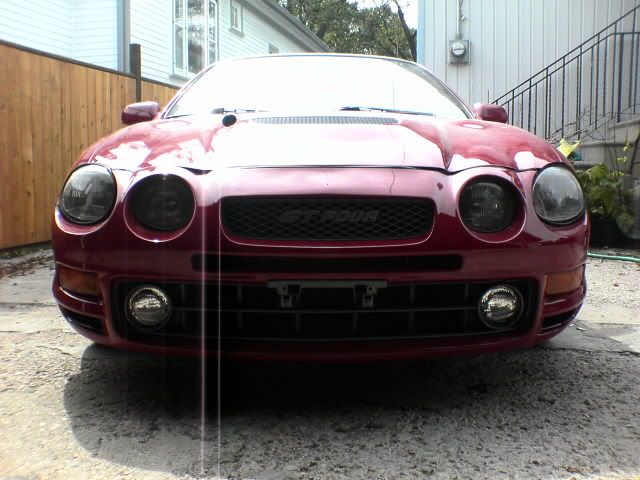 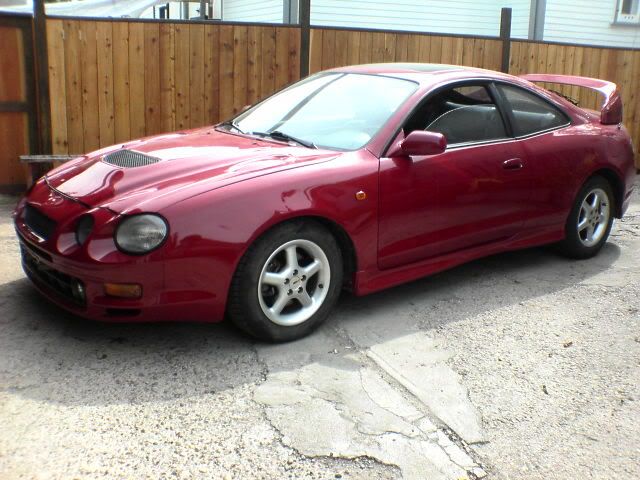 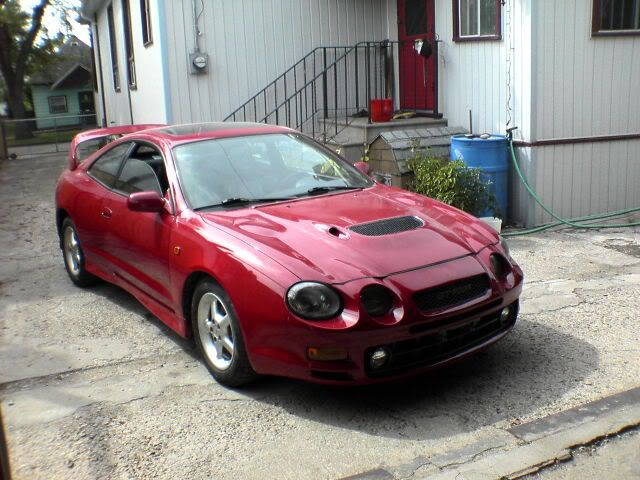 [3] Fog Lamps If you don't want to get the gt-four fog lamps (which cost ~$200) you need to get the correct bezel type as there is one for fog lamps and one without. If you plan to use the stock gt-four fog lamps, you'll need to use the gt-four crashbar and frame rails in order for the foglamp to align properly iwth the foglight bezel. If you already have a 96-99 celica with foglamps, you may be able to wire the fogs easily using your current fog light wiring. Otherwise, you can find foglight wiring kits at Walmart or other automotive shops for about ~$10-$15 and wire them yourself. I would recommend you wire them to your ignition power so that it will always shut off when you leave your car in case you accidentally leave them on and drain your battery. An alternative solution is to get the fog lamp bezels anyway (without the fog lamps) and put your own 4" fog lamp. There are a number of fog lamp kits out there you can use. Mounting them is another story. You can mount the fogs onto the bezel using a $4 tube of basic household silicone sealant (from a hardware store) and cement glue. Basically glue the fog lamp to the bezel and then fill the surrounding area with silicone. It's very easy and takes about 5 mins plus 15 mins to cure. I have been using my fogs for 2 years now and hasn't fallen off. the pic shows the lamps glued to the bezels and silicone surrounding the lamp and bezel. 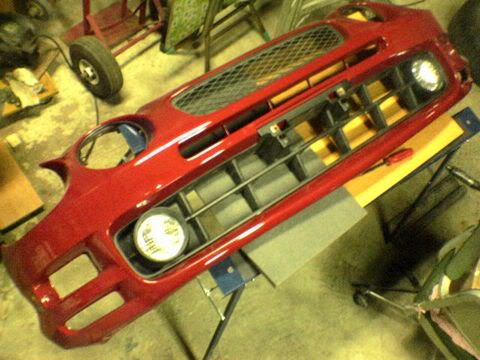 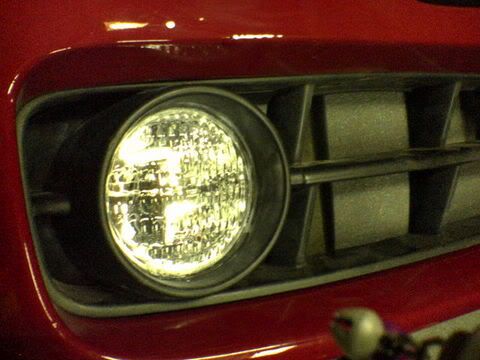 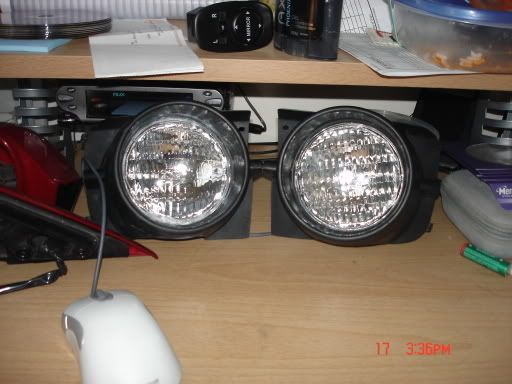 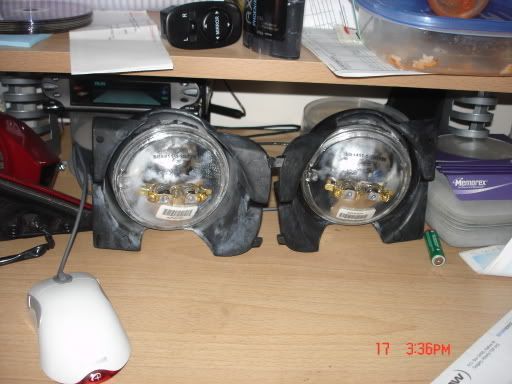 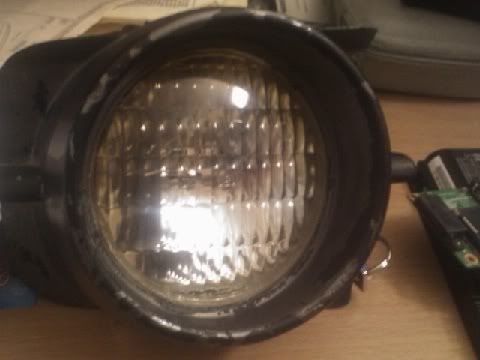 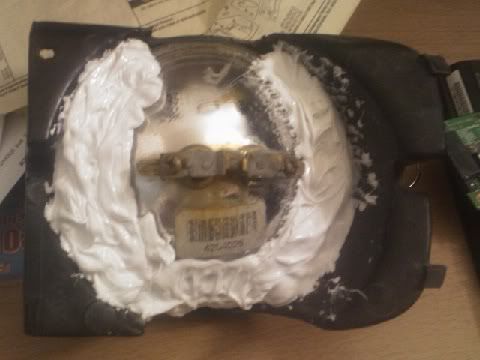 another option is to create your own bracket. some people on the forum have done this already. Pros: save $250. use any 4" fogs you want. good opportunity to upgrade to 'clear' lens fogs.. Cons: need to do some custom work.. [4] WRC Hood The only difference between the WRC hood and the non-WRC hood is that the WRC hoods have 4 holes that are used to mount the hood spoiler. The hood spoiler doesn't provide any significant benefit except for looks... and it adds 6Gs of downforce to your FWD which is always a bonus!  . rumor says the hood spoiler is discontinued but i'm sure that's wrong and your supplier should be able to order them new. . rumor says the hood spoiler is discontinued but i'm sure that's wrong and your supplier should be able to order them new. Pros: WRC hood makes your car way cooler...you can proudly say you have a wrc hood Cons: you'll need the hood spoiler and that costs ~$175. [5] Hood Insulation The insulation is completely optional. afaik, it's main purpose is to muffle engine noise and helps reduce paint fade. the insulator covers the hood vent which makes your car un-c0ol. 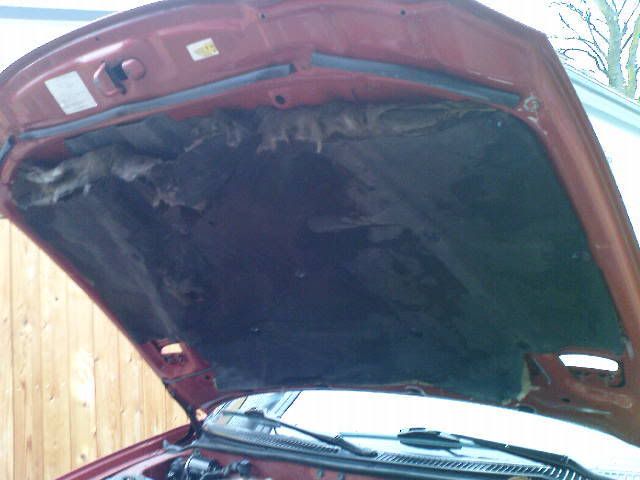 Pros: by not getting the insulation it shows off a portion of your engine bay through the hood. Cons: hmmm.. can't think of any. [6] Upper Front Bumper Support Bar The gt-four upper bar is higher in the center than regular ST/GT's. If you decide to get the gt-four support bar it needs to replace the existing one. It bolts in the center and welds on the ends. gt-four upper support bar shown with st205 frame rails and crash bar. 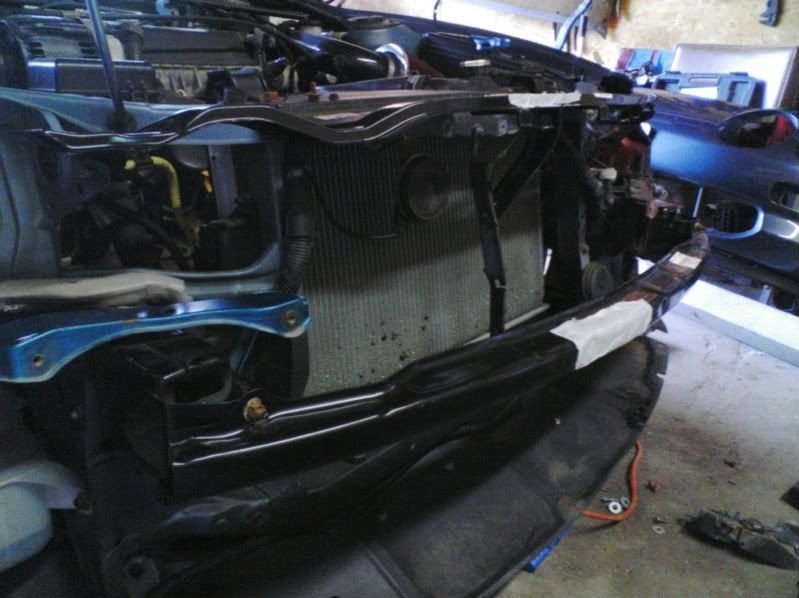 image taken from Batman722's thread: painting batman722's gt-4 front end conversion Otherwise, you can use custom spacer brackets like in Malpaso's car... 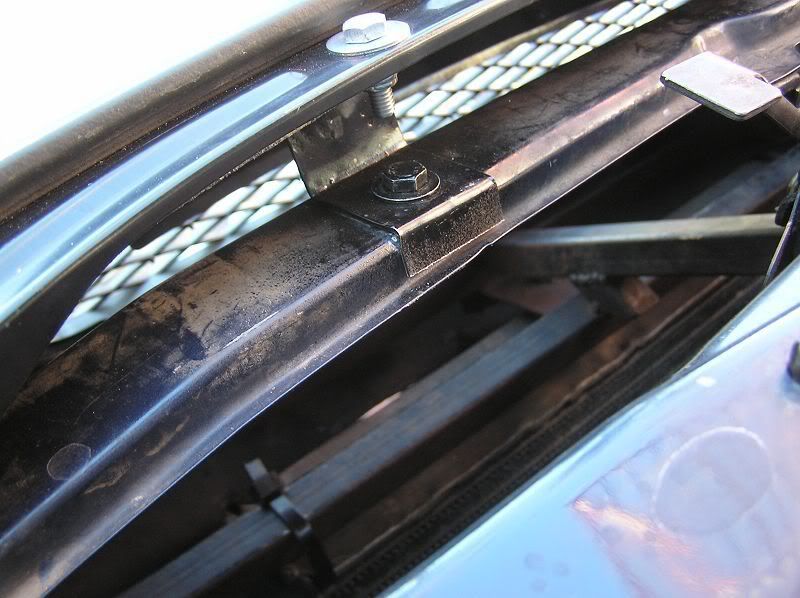 Or you can use long bolts and have the bumper retainer clamped between the head of the bolt and a nut.  [7] Hood Latch The original hood latch is able to latch the hood securely however the safety hook is too short. The short safety hook will not allow enough clearance to fit your fingers in between the hood and bumper to pull the lever and release the hook. If you close the hood with an unmodified hood latch, you will not be able to open the hood. There are 3 ways you can go about fixing this: a) The best way is to order the LHD gt-four hood latch as it should be a direct swap. The RHD and LHD latches differ as the hood release cable attaches on different sides so a RHD gt-four latch won't work if you got it from a halfcut. The only problem is the LHD ST205 hood latch can only be ordered in the continental European countries where LHD ST205's were sold. b) The other way is to modify your own. You can extend your safety hook latch an extra 1.0" (Requires some welding). 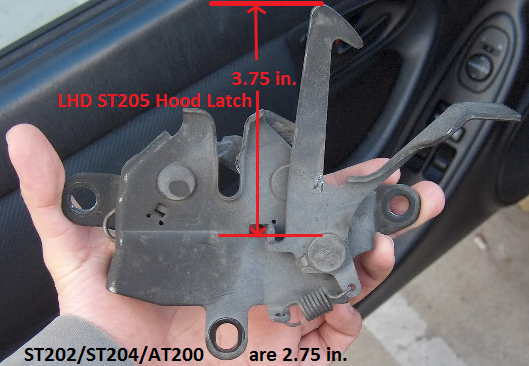 Image courtesy of nics from this thread, with the added dimensions by me. Click here to view the original image. Click here to see an example of Malpaso's modified hood latch. Click here to see an example of Celiquick's modified hood latch. The GT-Four Curse: The common dilemma with this conversion is that people are not closing the hood completely and instead it is the safety hook alone that is holding it down so after going over 40 mph or so the built-up air pressure under the hood would release the hood from the safety hook and smash the hood against the windshield (windscreen). This is due to the safety hook not being extended long enough to make the hood appear that it's not properly latched. When you release the hood, the hood travels up until the safety hook stops it. It should then leave you enough of a gap to fit your fingers and release the safety hook. If the hook isn't extended long enough, you will NOT be able to open the hood and you'll have a difficult time. Be sure that it is long enough so that when you release the hood, you can tell the hood is unlatched. c) The last way to go about it is to bend the safety hook entirely out of the way (you don't really need it). This is a good temporary solution until you get the safety hook extended or until you order the LHD hood latch. Now that the safety hook is no longer being used, it's very obvious to differentiate if the hood is unlatched or not since nothing is holding it down. I still have my safety hook this way since the conversion over 3 years ago and have had the 'curse' happen once... until this past winter (see below)  . .The aftermath of improper hood latch modification.. It could have been much worse. Luckily the windshield didn't smash. Before After  X. Turn Signals The gt-four turn signal connectors are completely different from the ST/GT ones, so that makes the two sockets different from one another. So you'll need to use your stock bulb & sockets but in order for it to work in the gt-four turn signal housing, you need to cut a tiny 2mmx2mm rectangular notch like this: |___| . the stock socket has notches in different positions than the gt4 socket. this mod only takes 2 mins using a utility/X-ACTO knife or any sort of blade. i don't have pics of this but it's a very simple mod. FAQs: 1. Where can I buy the GT-FOUR parts listed above? You can order them from any Toyota dealer that have access to the japanese catalog. Ordinary dealers won't be able to supply you these parts. To get the best price, contact Aaron of PartzNet.com. See this thread for Aaron's contact information. Other common sources to order from are ToyotaWorld.com (it's best to call them) and 1stToyotaParts.com. But please note, all the parts can be obtained from these dealers except for the LHD ST205 hood latch as it can only be ordered from European countries that sold LHD ST205's. 2. How much will it approximately cost all together? It depends on the parts you order. If you order only the mandatory parts, it can cost around $1000 plus shipping. If you get all the extras (ie. fogs, rails, crashbar, retainer, upper support, hood spoiler, insulation, etc etc. it can cost close to $2200 plus shipping. Keep in mind the parts need to be painted as well. In general, the more you money spend on this project, the less custom work is required. 3. Can you break down the cost for each part? Prices for individual parts can be found here: JDM OEM Part Numbers and Prices If it's not listed in that thread, PM me and I will let you know. 4. Can I get the GT-FOUR hood without the bumper? It will work but you will have a 1" gap between the stock bumper and the gt-four hood.  5. Can I get the GT-FOUR bumper without the hood? Yes, but it may not be 100% flush, you cannot use the upper bumper retainer (Part number: 53205-20070) from the GT-Four, but will still need to get the GT-Four frame rails & crash bar, or modify/remove your stock one.  6. Will the bumper bolt on to the stock fenders? Yes. 7. Will it be bad if snow or rain fall in through the center hood grill? All GT-Fours came with a plastic cover mounted between the hood grill and the hood insulation. It catches rain water and directs it to the front where it falls on the radiator improving cooling. However, this weakens the end tank of an oem radiator due to the changes in temperature (expansion and compression particularly in cold weather climate) on the composite material. After 2 years my oem rad developed a crack causing the engine to spew out coolant when it was about -40 degrees. so I purchased a metal radiator (from performanceradiator.com aka USA Radiator). Most people remove this plastic cover as it improves cooling by releasing the hot air trapped in the engine bay. There is no real potential hazard with rain or snow falling through since rain drops and snow flakes will quickly evaporate as it reaches or comes in contact with the header or heat shield. If your car can withstand an engine bay wash, then it should withstand small rain drops or snow falling through. 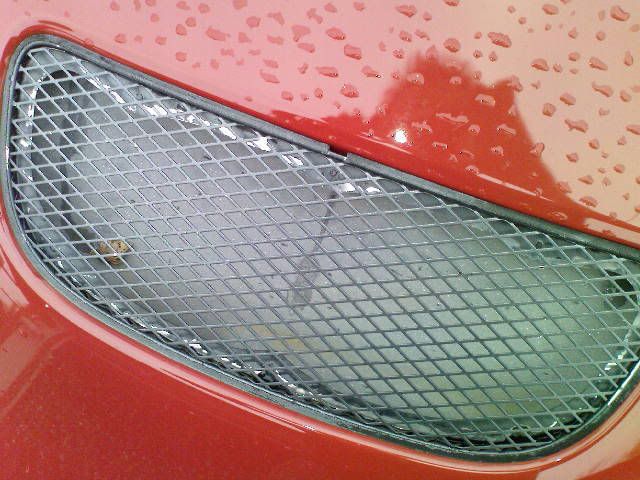 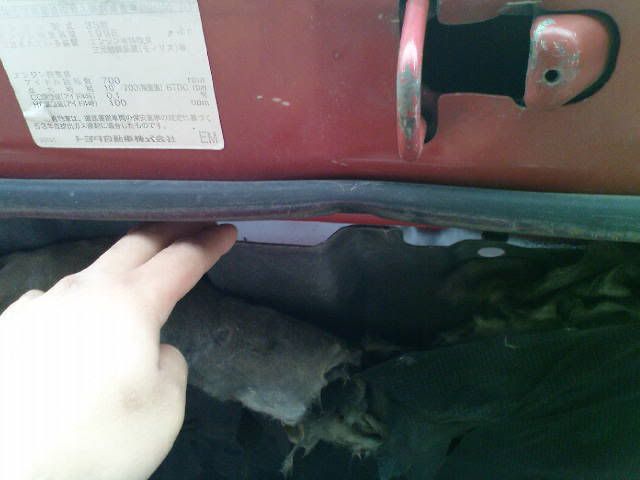 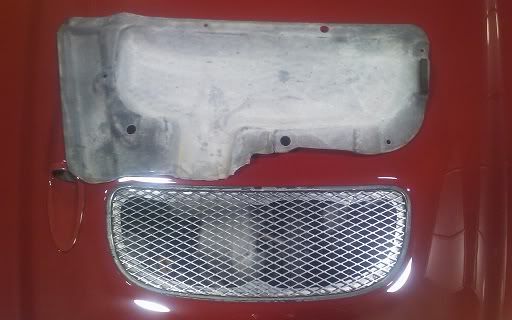   If there's anything else that is missing, please let me know and I will add it. Thanks This post has been edited by azian_advanced: Jul 18, 2015 - 6:47 PM -------------------- -------------------------------------------------------------------------------- -------------------------------------------------------------------------------- |

Posts in this topic
 azian_advanced How To Convert To A GT-FOUR Front End Nov 15, 2008 - 10:33 PM
 samir0189 This looks thorough! Hopefully I'll one da... Nov 15, 2008 - 10:45 PM bccentaur3 STICKIFY this bad boy
Gerald, where did you get y... Nov 15, 2008 - 10:46 PM azian_advanced i bought them from a local auto parts store called... Nov 15, 2008 - 11:06 PM CelicaST_CALI wow with that new avatar i didnt noticed it was th... Nov 15, 2008 - 11:08 PM enderswift everyone in this community will love you forever
... Nov 16, 2008 - 2:12 AM malpaso At last even every noob here knows who is the mast... Nov 16, 2008 - 2:41 AM
samir0189 This looks thorough! Hopefully I'll one da... Nov 15, 2008 - 10:45 PM bccentaur3 STICKIFY this bad boy
Gerald, where did you get y... Nov 15, 2008 - 10:46 PM azian_advanced i bought them from a local auto parts store called... Nov 15, 2008 - 11:06 PM CelicaST_CALI wow with that new avatar i didnt noticed it was th... Nov 15, 2008 - 11:08 PM enderswift everyone in this community will love you forever
... Nov 16, 2008 - 2:12 AM malpaso At last even every noob here knows who is the mast... Nov 16, 2008 - 2:41 AM
 Random_Stranger QUOTE (malpaso @ Nov 15, 2008 - 11:4... Nov 16, 2008 - 3:13 AM trdproven Gerald,
Would the latch need to be extended upwar... Nov 16, 2008 - 5:46 AM presure2 QUOTE (trdproven @ Nov 16, 2008 - 5... Nov 16, 2008 - 6:49 AM trdproven QUOTE (presure2 @ Nov 16, 2008 - 7:4... Nov 21, 2008 - 5:10 PM WH95TE Now I just need to get some money. Nov 16, 2008 - 10:46 AM tomazws STICKY! Nov 18, 2008 - 3:02 AM presure2 QUOTE great post, added to the sticky!
read my... Nov 18, 2008 - 7:22 AM trdproven This is what it looks like I really need:
Hood
LH... Nov 22, 2008 - 4:23 AM azian_advanced i don't think you can reuse your stock bumper ... Nov 22, 2008 - 8:48 AM trdproven If one was to modify the stock st204 crash bar/rei... Nov 22, 2008 - 8:00 PM azian_advanced thanks for pointing that out. if you keep your st... Nov 23, 2008 - 5:18 AM trdproven does water get in the hood scoop onto the engine o... Nov 23, 2008 - 7:58 AM BloodyStupidDavey QUOTE (trdproven @ Nov 23, 2008 - 12... Nov 23, 2008 - 8:23 AM KAOS QUOTE (BloodyStupidDavey @ Nov 23, 2008 ... Feb 2, 2009 - 1:15 PM azian_advanced let's just say it's not as bad as driving ... Feb 2, 2009 - 2:53 PM turbochloe can i get the measurements of these so i can make ... Jul 30, 2009 - 12:01 PM presure2 QUOTE (turbochloe @ Jul 30, 2009 - 12... Jul 30, 2009 - 5:14 PM antoine64 you could also just use longer bolts and a few bod... Sep 10, 2015 - 3:02 PM azian_advanced that is malpaso (Martin's) car. try PMing him ... Jul 30, 2009 - 2:24 PM BonzaiCelica how much lighter is the gt-four crash bar?? Nov 22, 2009 - 3:54 AM Cavegod its about the same, the gt crash bar is alloy Nov 22, 2009 - 6:36 AM elco Im missing two parts to finish my conversion. Can ... Sep 6, 2010 - 10:51 PM mak5603 Hardest parts to get Sep 10, 2010 - 2:36 AM chacha PM me a price offer for the frame rails....i have ... Sep 14, 2010 - 1:37 PM Celicia I hate to post a reply to such an old thread, espe... Jun 21, 2015 - 8:41 PM richee3 It's not that it doesn't fit, it just does... Jun 21, 2015 - 11:05 PM Celicia QUOTE (richee3 @ Jun 22, 2015 - 12:0... Jun 22, 2015 - 7:11 AM azian_advanced QUOTE (Celicia @ Jun 22, 2015 - 7:11... Jul 18, 2015 - 6:47 PM Celicia See. Jun 22, 2015 - 2:43 PM SupraKid RE: How To Convert To A GT-FOUR Front End Jun 29, 2015 - 1:10 AM Tigawoods neat!
Id like to do it the opposite way, 205 ... Jun 30, 2015 - 7:23 AM SupraKid Done that to... Sorta... hahaha Jun 30, 2015 - 10:44 PM rentaspace QUOTE (Tigawoods @ Jun 30, 2015 - 8... Jul 11, 2015 - 1:44 AM cellocinema were you able to do like this without any mod(repl... Jan 2, 2016 - 9:35 AM jordisonjr Can anyone explain to me how hte ST205 bumper fits... Sep 10, 2015 - 3:27 PM azian_advanced the main concern with having a regular hood with a... Sep 10, 2015 - 5:39 PM trdproven Goal for the hood latch is just extending it one i... May 6, 2017 - 6:54 AM 7Mguy Sorry for replying to such an old thread but I rec... Aug 5, 2018 - 5:34 AM slavie QUOTE (7Mguy @ Aug 5, 2018 - 6:34 AM... Aug 11, 2018 - 2:17 PM
Random_Stranger QUOTE (malpaso @ Nov 15, 2008 - 11:4... Nov 16, 2008 - 3:13 AM trdproven Gerald,
Would the latch need to be extended upwar... Nov 16, 2008 - 5:46 AM presure2 QUOTE (trdproven @ Nov 16, 2008 - 5... Nov 16, 2008 - 6:49 AM trdproven QUOTE (presure2 @ Nov 16, 2008 - 7:4... Nov 21, 2008 - 5:10 PM WH95TE Now I just need to get some money. Nov 16, 2008 - 10:46 AM tomazws STICKY! Nov 18, 2008 - 3:02 AM presure2 QUOTE great post, added to the sticky!
read my... Nov 18, 2008 - 7:22 AM trdproven This is what it looks like I really need:
Hood
LH... Nov 22, 2008 - 4:23 AM azian_advanced i don't think you can reuse your stock bumper ... Nov 22, 2008 - 8:48 AM trdproven If one was to modify the stock st204 crash bar/rei... Nov 22, 2008 - 8:00 PM azian_advanced thanks for pointing that out. if you keep your st... Nov 23, 2008 - 5:18 AM trdproven does water get in the hood scoop onto the engine o... Nov 23, 2008 - 7:58 AM BloodyStupidDavey QUOTE (trdproven @ Nov 23, 2008 - 12... Nov 23, 2008 - 8:23 AM KAOS QUOTE (BloodyStupidDavey @ Nov 23, 2008 ... Feb 2, 2009 - 1:15 PM azian_advanced let's just say it's not as bad as driving ... Feb 2, 2009 - 2:53 PM turbochloe can i get the measurements of these so i can make ... Jul 30, 2009 - 12:01 PM presure2 QUOTE (turbochloe @ Jul 30, 2009 - 12... Jul 30, 2009 - 5:14 PM antoine64 you could also just use longer bolts and a few bod... Sep 10, 2015 - 3:02 PM azian_advanced that is malpaso (Martin's) car. try PMing him ... Jul 30, 2009 - 2:24 PM BonzaiCelica how much lighter is the gt-four crash bar?? Nov 22, 2009 - 3:54 AM Cavegod its about the same, the gt crash bar is alloy Nov 22, 2009 - 6:36 AM elco Im missing two parts to finish my conversion. Can ... Sep 6, 2010 - 10:51 PM mak5603 Hardest parts to get Sep 10, 2010 - 2:36 AM chacha PM me a price offer for the frame rails....i have ... Sep 14, 2010 - 1:37 PM Celicia I hate to post a reply to such an old thread, espe... Jun 21, 2015 - 8:41 PM richee3 It's not that it doesn't fit, it just does... Jun 21, 2015 - 11:05 PM Celicia QUOTE (richee3 @ Jun 22, 2015 - 12:0... Jun 22, 2015 - 7:11 AM azian_advanced QUOTE (Celicia @ Jun 22, 2015 - 7:11... Jul 18, 2015 - 6:47 PM Celicia See. Jun 22, 2015 - 2:43 PM SupraKid RE: How To Convert To A GT-FOUR Front End Jun 29, 2015 - 1:10 AM Tigawoods neat!
Id like to do it the opposite way, 205 ... Jun 30, 2015 - 7:23 AM SupraKid Done that to... Sorta... hahaha Jun 30, 2015 - 10:44 PM rentaspace QUOTE (Tigawoods @ Jun 30, 2015 - 8... Jul 11, 2015 - 1:44 AM cellocinema were you able to do like this without any mod(repl... Jan 2, 2016 - 9:35 AM jordisonjr Can anyone explain to me how hte ST205 bumper fits... Sep 10, 2015 - 3:27 PM azian_advanced the main concern with having a regular hood with a... Sep 10, 2015 - 5:39 PM trdproven Goal for the hood latch is just extending it one i... May 6, 2017 - 6:54 AM 7Mguy Sorry for replying to such an old thread but I rec... Aug 5, 2018 - 5:34 AM slavie QUOTE (7Mguy @ Aug 5, 2018 - 6:34 AM... Aug 11, 2018 - 2:17 PM  |
1 User(s) are reading this topic (1 Guests and 0 Anonymous Users)
0 Members:
| Lo-Fi Version | Time is now: July 9th, 2026 - 2:44 PM |