
 Apr 16, 2008 - 12:23 PM Apr 16, 2008 - 12:23 PM
|
 
|
 Enthusiast  Joined Apr 18, '05 From Calgary Currently Offline Reputation: 20 (100%) |
How To Replace The Timing Belt and/or Water Pump on a 5SFE ----------------------------------------------------------------------- Disclaimer: I hold no responsibility for anything that breaks, any personal injuries, any damage to the vehicle, or any unexpected results caused by this how-to. Related Thread: Tools Used:     * I'm not gonna label each and every single tool used because there's too many to list. **Just to give you a general idea, you absolutely NEED a full assortment of ratchets, sockets, extensions, screw drivers, wrenches, two hydraulic jacks, jack stands, pulley puller, crowbar (or breaker bar), some sort of marker (ie touch up paint or 'White-Out'), a way in sorting out nuts & bolts removed, determination and patience. ***It's optional to have: set of pliers, a short pick, a hammer, some liquid gasket maker, a pipe (used as an extension for tight bolts), and impact ratchets (makes doing/undoing bolts faster). Parts to Order:  Timing Belt 13568-09041 (for 5SFE) 13568-19056 (for 7AFE) 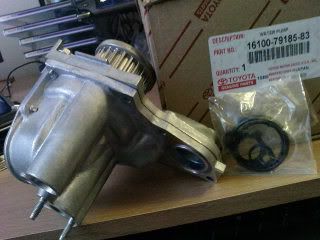 Water Pump Kit (Water Pump Gaskets are included) 16100-79185-83 (for 5SFE) 16100-19305-83 (for 7AFE)  Thermostat and Thermostat Gasket 90916-03046 & 16325-63011 (for both 5SFE & 7AFE btwn 94-95) 90916-03090 & 16325-63011 (for 5SFE btwn 96-99) 90916-03115 & 16325-63011 (for 7AFE btwn 96-99)  Coolant (If you're replacing your water pump) Follow this guideline here as well: **** http://www.celicatech.com/93rmsour/1993/93...a/em/timin0.pdf Intro ------ My car is now at 125,270 kms (77,806 miles). Although, still a bit young but a good age to do a timing belt change as it has never been done since it came from the factory. I think 13 years, regardless of mileage, is long enough of a reason to have it replaced. So why not just get a complete tune up? So I bought a bunch of OEM tune up parts recently: timing belt, water pump, thermostat, TRD oil filters, coolant, spark plug wires, distributor cap, rotor, oxygen sensor, and a few other bits that were missing from my car. I've already done the easy half of the tune up. The distributor cap and rotor were replaced. New spark plug wires were put on. My spark plugs are still new so I didn't bother getting new ones. An oil change was done just a few days ago.  Now comes for the harder half of the tune up: timing belt and water pump replacement. For this, it's best to have everything in the timing belt area to be changed. This consists of also replacing both idler and tensioner pulleys but due to the lack of funds, I didn't order them. After a lot of searching for possible how-to's or guides to changing a timing belt, the only one I found useful was the BGB manual on CelicaTech.net found here. The most discouraging part of the search was the numerous comments made about this being a very difficult task and that someone with an 'average' level of mechanical experience is better off getting it professionally done by an expert. This is my first time doing a timing belt change or anything regarding an engine that simply isn't 'bolt-on' per se or had anything to do with regular maintenance. After successfully completing this for the first time, I would agree to what everyone says. It's a lot of work, requires a lot of tools, can be very frustrating having to set the timing right by the 'tooth'. But the big question is: "Was it worth doing this myself? or should I have forked out a few hundred dollars out of my own pocket and have had a professional do this for me?" That all depends on the individual. After reading this guideline, one must decide whether it would be worth his or her time provided that he/she has the necessary tools to attempt such a task.. imo, with my dad's tools and garage and my desire to learn more about celicas and engines in general, it was definitely worthwhile doing this myself. Procedure ------------------ 1. Put the car on jackstands. Don't lift it too high but high enough that the hydraulic jack will reach the bottom of the engine oil pan for lifting. Ensure you have a lot of room around to work with.  2. Place some sort of soft cloth (or that pad that mechanics use) to cover the body around the engine bay so that one could lean over without damaging the paint.  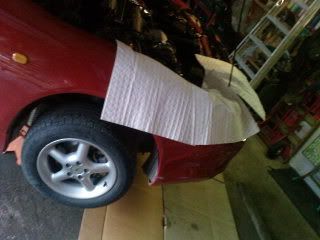 Something bigger than what I used would have been a lot better. 3. Disconnect the negative terminal from your battery. Remove the strut bar (a combination of 14mm on the firewall and 12mm bolts on the strut mounts if you are using the stock one). Remove the harnesses attached to the alternator. Loosen the rear 14mm bolt pivoting the alternator to the motor. Loosen the 12mm clamping bolt on the side to allow the alternator to adjust. Now loosen the top bolt on the alternator bracket to lower the alternator. This loosens the belt for the next step. 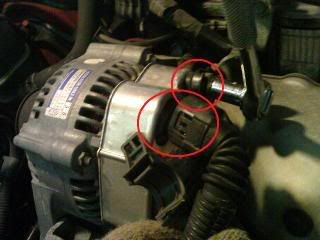 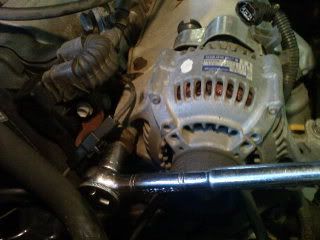   4. Now that the belt is loose, remove it. Now, remove the rear bolt pivoting the alternator and the clamping bolt on the side. Remove the alternator.  5. Remove the passenger side wheel. Remove the passenger side lower splash guard. If you're replacing your water pump, drain your coolant. The drainage plug is located on the lower passenger side of the radiator. The plug looks like a winged nut and can be undone without tools. Make sure the engine has already cooled down before draining the system.  
This post has been edited by azian_advanced: Aug 10, 2011 - 7:37 AM -------------------- -------------------------------------------------------------------------------- -------------------------------------------------------------------------------- |

Posts in this topic
 azian_advanced How To Replace Your Timing Belt/Water Pump Apr 16, 2008 - 12:23 PM
 azian_advanced 6. Remove the two 10mm bolts holding the harness ... Apr 16, 2008 - 12:28 PM D-Man RE: How To Replace Your Timing Belt/Water Pump Apr 16, 2008 - 12:38 PM
 njccmd2002 QUOTE(D-Man @ Apr 16, 2008 - 1... Apr 16, 2008 - 12:43 PM Redline08 this is jesus Apr 16, 2008 - 1:15 PM _mikeE Awesome how-to gerald! very informational you ... Apr 16, 2008 - 1:33 PM nightryder sticky sticky sticky Apr 17, 2008 - 9:38 AM lagos Excellent write up! Apr 17, 2008 - 10:12 AM x_itchy_b_x nice to see someone put all that time and effort i... Apr 17, 2008 - 10:38 AM GriffGirl I third the motion to stickie!!!! ... Apr 17, 2008 - 11:25 AM WALKER Great job with the write-up. I will probably atte... Apr 17, 2008 - 1:43 PM presure2 GREAT job man!
this is definetly sticky materi... Apr 17, 2008 - 4:31 PM Chanh55 Very nice write-up. Apr 17, 2008 - 4:48 PM 99GT I took longer haha well over 3-4 days. Apr 17, 2008 - 5:36 PM azian_advanced thanks for the great comments guys..
i'm one ... Apr 17, 2008 - 10:43 PM CelicaST_CALI nice job this is grrrrr ATE Apr 17, 2008 - 10:55 PM mr-belowaverage Excellent write-up. You've set the bar for my ... Apr 21, 2008 - 9:16 AM snapshotgt You're a animal. Apr 21, 2008 - 1:40 PM Tigawoods well, looks like i will be needing this! Aug 11, 2008 - 3:38 PM CelicaST_CALI uh oh..lol Aug 11, 2008 - 7:16 PM KAOS ... back from the dead.
Does anyone run without t... Aug 7, 2009 - 9:21 PM xxgetbackupxx QUOTE (KAOS @ Aug 7, 2009 - 10:21 PM... Feb 7, 2013 - 7:02 PM SL44 This is a great how-to. There are a few steps tha... May 17, 2010 - 3:08 PM atcos4 i know this thing is way old but did anyone else h... Sep 27, 2012 - 6:11 PM Special_Edy QUOTE (atcos4 @ Sep 27, 2012 - 6:11 ... Sep 28, 2012 - 8:06 AM Smaay put the car in gear and have someone hold th brake... Sep 27, 2012 - 8:32 PM sandusky1977 Oh, I forgot to thank you when I used this tutoria... Sep 28, 2012 - 8:14 AM SwissFerdi RockAuto is a solid site, not just for buying but ... Sep 28, 2012 - 11:51 AM vasilescus @azian_advanced you're a legend! I used ... Jan 26, 2013 - 12:26 AM njccmd2002 if someone will do this for the 3sge Feb 7, 2013 - 10:40 PM 1994whitecelicagt Hi!
I'm sorry to bother you, but I am jus... Aug 1, 2013 - 7:54 PM 1994whitecelicagt Thank You!
I have just finished my timing bel... Sep 4, 2013 - 12:52 AM VavAlephVav this was a big help, but I wish i'd of been ... Dec 27, 2013 - 10:09 PM VavAlephVav Ill add a couple of pics to help anybody who is t... Jan 3, 2014 - 11:17 PM BonzaiCelica a video guide sure will help... https://www.youtub... May 9, 2017 - 1:22 AM msk59 One of the best write up I have seen thus far. Whe... May 9, 2017 - 8:14 AM
njccmd2002 QUOTE(D-Man @ Apr 16, 2008 - 1... Apr 16, 2008 - 12:43 PM Redline08 this is jesus Apr 16, 2008 - 1:15 PM _mikeE Awesome how-to gerald! very informational you ... Apr 16, 2008 - 1:33 PM nightryder sticky sticky sticky Apr 17, 2008 - 9:38 AM lagos Excellent write up! Apr 17, 2008 - 10:12 AM x_itchy_b_x nice to see someone put all that time and effort i... Apr 17, 2008 - 10:38 AM GriffGirl I third the motion to stickie!!!! ... Apr 17, 2008 - 11:25 AM WALKER Great job with the write-up. I will probably atte... Apr 17, 2008 - 1:43 PM presure2 GREAT job man!
this is definetly sticky materi... Apr 17, 2008 - 4:31 PM Chanh55 Very nice write-up. Apr 17, 2008 - 4:48 PM 99GT I took longer haha well over 3-4 days. Apr 17, 2008 - 5:36 PM azian_advanced thanks for the great comments guys..
i'm one ... Apr 17, 2008 - 10:43 PM CelicaST_CALI nice job this is grrrrr ATE Apr 17, 2008 - 10:55 PM mr-belowaverage Excellent write-up. You've set the bar for my ... Apr 21, 2008 - 9:16 AM snapshotgt You're a animal. Apr 21, 2008 - 1:40 PM Tigawoods well, looks like i will be needing this! Aug 11, 2008 - 3:38 PM CelicaST_CALI uh oh..lol Aug 11, 2008 - 7:16 PM KAOS ... back from the dead.
Does anyone run without t... Aug 7, 2009 - 9:21 PM xxgetbackupxx QUOTE (KAOS @ Aug 7, 2009 - 10:21 PM... Feb 7, 2013 - 7:02 PM SL44 This is a great how-to. There are a few steps tha... May 17, 2010 - 3:08 PM atcos4 i know this thing is way old but did anyone else h... Sep 27, 2012 - 6:11 PM Special_Edy QUOTE (atcos4 @ Sep 27, 2012 - 6:11 ... Sep 28, 2012 - 8:06 AM Smaay put the car in gear and have someone hold th brake... Sep 27, 2012 - 8:32 PM sandusky1977 Oh, I forgot to thank you when I used this tutoria... Sep 28, 2012 - 8:14 AM SwissFerdi RockAuto is a solid site, not just for buying but ... Sep 28, 2012 - 11:51 AM vasilescus @azian_advanced you're a legend! I used ... Jan 26, 2013 - 12:26 AM njccmd2002 if someone will do this for the 3sge Feb 7, 2013 - 10:40 PM 1994whitecelicagt Hi!
I'm sorry to bother you, but I am jus... Aug 1, 2013 - 7:54 PM 1994whitecelicagt Thank You!
I have just finished my timing bel... Sep 4, 2013 - 12:52 AM VavAlephVav this was a big help, but I wish i'd of been ... Dec 27, 2013 - 10:09 PM VavAlephVav Ill add a couple of pics to help anybody who is t... Jan 3, 2014 - 11:17 PM BonzaiCelica a video guide sure will help... https://www.youtub... May 9, 2017 - 1:22 AM msk59 One of the best write up I have seen thus far. Whe... May 9, 2017 - 8:14 AM  |
1 User(s) are reading this topic (1 Guests and 0 Anonymous Users)
0 Members:
| Lo-Fi Version | Time is now: June 11th, 2026 - 11:20 AM |