
 Sep 11, 2007 - 6:13 PM Sep 11, 2007 - 6:13 PM
|
 
|
|
Enthusiast  Joined Mar 3, '04 From Portsmouth, RI Currently Offline Reputation: 33 (100%) |
So obviously my oil problem is only getting worse, I decided it's finally time to do something about it.
so I went and picked up Defgeph's old 7A... 177,000 miles and was begining to use some oil before he swapped and it sat in the garage for 2 years. but since I was getting it for free from a friend I decided to pick it up and hope for the best... 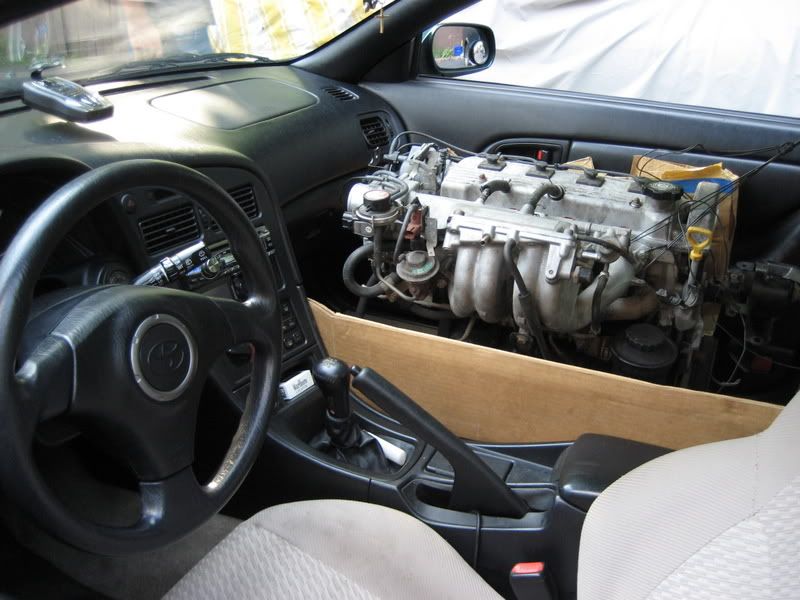 so I picked it up Fri (8/24) and the next day it came with me to work (I work at a Toyota dealer) where they unloaded it into the brake lathe room and it stayed hidden for a while. this past Saturday (9/8) me and one of the techs began tearing it apart. I was pleasantly surprised to find that it is actually in incredibly good condition for its age... I will be spending close to $500 in parts replacing every bearing, seal, gasket, etc that we can think of. What I need from you guys are your suggestions as to what I can do to make this motor a little stronger and better flowing. I'm keeping the stock pistons and considering bigger cams and having the head machined. We work for about an hour each morning before customers start coming in. Between Sat, Mon, and Tues (today) we have everything pretty much apart (except for the valves since I haven't decided to send them to the machinist with the head or not yet). This is a huge learning process for me and happy to have the oppotunity to do it. I'll add more pics and info so maybe some of you can learn some things too. This post has been edited by hurley97: Mar 6, 2008 - 9:09 PM -------------------- |


 |
Replies
(1 - 19)
|
Sep 11, 2007 - 6:26 PM
|
|
 Enthusiast Joined Apr 20, '06 From Florida Currently Offline Reputation: 44 (100%) |
My suggestion if you want some seirous power would be NOS. mos Def like a 100 or 150 shot. yeaa. nos..
maybe a couple stickers to help with the throttle response too. and def get some of those turbonator eletric turbo things from ebay, they are rated for like 30 hp!  I take it the new job is going well? Looking forward to reading this thread  (You should tuck your bay when the engine is out  ) )
This post has been edited by jcbass7: Sep 11, 2007 - 6:28 PM |
|
Sep 11, 2007 - 8:21 PM
|
|
|
Moderator Joined Oct 1, '02 From fall river, ma Currently Offline Reputation: 13 (100%) |
shave the head a bit, 3 angle valve job, MAYBE a light port, ported TB+ IM, exhaust, intake, a little SAFC tuning.. and hey, you may make 115whp or so steff.
fun project, ill be looking forward to up close updates! 
-------------------- Former Team 5SFTE pro member ;)
 13.6@108MPH, 5SFTE Powered |
|
Sep 11, 2007 - 9:11 PM
|
|
|
Enthusiast Joined Aug 23, '05 From Princeton, Minnesota Currently Offline Reputation: 7 (100%) |
OOOH BOY!! Ive been looking forward to this project. Some suggestions I have are shotpeened rods($60 is what i paid), umm i had an idea but i forgot it, im sure it will come up some other time.
Good luck on the project
-------------------- -Brian
 |
|
Sep 11, 2007 - 9:13 PM
|
|
|
Enthusiast Joined Apr 20, '06 From Florida Currently Offline Reputation: 44 (100%) |
QUOTE(presure2 @ Sep 11, 2007 - 9:21 PM) [snapback]595255[/snapback] shave the head a bit, 3 angle valve job, MAYBE a light port, ported TB+ IM, exhaust, intake, a little SAFC tuning.. and hey, you may make 115whp or so steff. fun project, ill be looking forward to up close updates! I agree, when i shaved my head i gained atleast a couple tenths in the quarter... then i shaved my legs but didn't notice as much of an increase But seriously, im excited about this thread, and i like manny's ideas above^ |
|
Sep 11, 2007 - 9:13 PM
|
|
|
Enthusiast Joined Oct 18, '06 From cincinnati Currently Offline Reputation: 10 (100%) |
turbo?
-------------------- proud =3sgte SWAPPED= '95 Celica ST owner [calling it the GT2 or half-trac]
309,000 miles n' .... |
|
Sep 11, 2007 - 9:29 PM
|
|
|
Enthusiast Joined Aug 11, '07 From Corona, CA Currently Offline Reputation: 4 (100%) |
head swap?
--------------------  Pandelica 2.0 in progress. |
|
Sep 11, 2007 - 9:54 PM
|
|
|
Enthusiast Joined Oct 7, '06 From wyomissing pennsylvania Currently Offline Reputation: 2 (100%) |
since your prolly gonna have this car as a DD i wouldn't recommend going wild with cams as it lessens the drive ability of the car, open up the head some, if you have access to or know someone who builds engines you could have them freshen up the lower end to whatever degree your looking to spend on it. if i were you, id also clean the HECK outta the engine and paint it up, maybe a flat black block and head then a dark green valve cover to match the body of the car, also do the im along with them heat shield in black too.
performance, as i stated before this company called alabama heads does some good work, you could send the one you have to them and have them do whatever work you'd like to whatever spec, and also they can put some new parts in too for longer life. get some high comp pistons, but not too crazy. also get a stronger clutch for more fun shifting. and possibly a lighter flywheel, but again for drive ability, not too light with too strong of a clutch -------------------- you know why they put sheep at the edge of a cliff.... that way they push back!
(2:27:32 AM) edit: please f*cking work, f*ck, sh*t, piss (2:28:08 AM) edit: that did the trick |
|
Sep 11, 2007 - 10:35 PM
|
|
|
Enthusiast Joined Mar 11, '06 From Way South Chicago Currently Offline Reputation: 0 (0%) |
have it all balanced, that'll make it run alot smoother and make it a more pleasant car to drive.
-------------------- |
|
Sep 12, 2007 - 9:17 AM
|
|
|
Enthusiast Joined May 22, '03 From NOVA Currently Offline Reputation: 16 (100%) |
knife edge the crank.
you wana lighten up the bottom end as much as possible, this will give better acceleration (less rotational mass) and better throttle response. and as previously stated, balance everything and have the head opened up. though i'd leave the cams alone. it wouldn't be worth the $ oh and run a thinner head gasket if you can or if there is enough combustion chamber room, have the head milled down slightly to raise the compression a bit. This post has been edited by playr158: Sep 12, 2007 - 9:20 AM |
|
Sep 12, 2007 - 9:35 AM
|
|
|
Enthusiast Joined Mar 15, '07 From Tennessee Currently Offline Reputation: 52 (100%) |
QUOTE(hurley97 @ Sep 11, 2007 - 7:13 PM) [snapback]595228[/snapback] So obviously my oil problem is only getting worse, I decided it's finally time to do something about it. so I went and picked up Defgeph's old 7A... 177,000 miles and was begining to use some oil before he swapped and it sat in the garage for 2 years. but since I was getting it for free from a friend I decided to pick it up and hope for the best... so I picked it up Fri (8/24) and the next day it came with me to work (I work at a Toyota dealer) where they unloaded it into the brake lathe room and it stayed hidden for a while. this past Saturday (9/8) me and one of the techs began tearing it apart. I was pleasantly surprised to find that it is actually in incredibly good condition for its age... I will be spending close to $500 in parts replacing every bearing, seal, gasket, etc that we can think of. What I need from you guys are your suggestions as to what I can do to make this motor a little stronger and better flowing. I'm keeping the stock pistons and considering bigger cams and having the head machined. We work for about an hour each morning before customers start coming in. Between Sat, Mon, and Tues (today) we have everything pretty much apart (except for the valves since I haven't decided to send them to the machinist with the head or not yet). This is a huge learning process for me and happy to have the oppotunity to do it. I'll add more pics and info so maybe some of you can learn some things too. love the steering wheel..... -------------------- Learned a lot in 10 years... I hardly log in anymore, last login Today Sept 6 2019, and I was forced just to clarify a post. LOL
If you PM me and I dont respond, dont fret or cry. Im alive, better post your questions in the thread below, maybe I log back in 2grfe Swapped... Why I chose the 2GR, before you ask read here... A great civilization is not conquered from without until it has destroyed itself from within. @llamaraxing in Instagram is the best way to find me. I hardly log here anymore. |
|
Sep 12, 2007 - 9:49 AM
|
|
 Enthusiast Joined Dec 16, '02 From New York Currently Offline Reputation: 4 (100%) |
Steff I'm really excited to read this thread as you do this rebuild.
My request is a pic of how clean Jeff's engine is. Also- did they figure out why his was burning oil? -------------------- Buy my Celica $2,500 - http://www.6gc.net/forums/index.php?showtopic=76562&st=0
|
|
Sep 12, 2007 - 1:07 PM
|
|
|
Enthusiast Joined Aug 11, '07 From Corona, CA Currently Offline Reputation: 4 (100%) |
wow..our engine is tiny. good grief.
good luck! i hope all these suggestions work to your favor for your celi
-------------------- Pandelica 2.0 in progress. |
|
Sep 12, 2007 - 1:57 PM
|
|
 Enthusiast Joined Dec 3, '04 From torrance, ca Currently Offline Reputation: 0 (0%) |
Awesome, the 7A actually fits in the front seats lol. Goodluck with the build, only thing I could think of is to get the engine balanced and to do a 3 or 5 angle valve job and port and polish the intake and exhaust and match that with the manifolds so it would breathe better.
|
|
Sep 12, 2007 - 3:28 PM
|
|
 Enthusiast Joined Nov 12, '02 From Webster Ma. Currently Offline Reputation: 1 (100%) |
you can do all thats listed above ^ great suggestions.
with the head shaved, and advanced timing 93 octane would be a requirement. gasket match/port everything. light weight flywheel. adjustable cam gears possible gains there, rather than aftermarket shafts. Oh and a thermal barrier intake manifold gasket. maybe add another 7a to power the rear wheels too.
This post has been edited by x_itchy_b_x: Sep 12, 2007 - 3:32 PM -------------------- |
|
Sep 12, 2007 - 3:30 PM
|
|
|
Enthusiast Joined May 22, '03 From NOVA Currently Offline Reputation: 16 (100%) |
QUOTE(x_itchy_b_x @ Sep 12, 2007 - 4:28 PM) [snapback]595484[/snapback] you can do all thats listed above ^ great suggestions. with the head shaved, and advanced timing 93 octane would be a requirement. gasket match/port everything. light weight flywheel. adjustable cam gears possible gains there, rather than aftermarket shafts. maybe add another 7a to power the rear wheels too. adjustable cam is a very gray area, since the 7afe works on a Slave cam style setup, you can't change the cam gears individually 
|
|
Sep 12, 2007 - 3:48 PM
|
|
 Moderator Joined Apr 17, '03 From Rockland NY Currently Offline Reputation: 15 (100%) |
I believe she will be building this engine for a turbo set up in the future.
Bumping up compression would not be a good idea. Rebuild, valve job, & port the head. Port match the intake & exhaust manifolds. Grind the cast markings off the head ports and combustion chambers. Lightweight flywheel with a street clutch. See if you can find someone to shave some weight off the crank. Look into new cams or regrinds. Don't bother with the gear. Put that turbo kit in, you'll have some nice results. Can't wait to see how this project unfolds! --------------------  I will return one day. |
|
Sep 12, 2007 - 4:01 PM
|
|
|
Moderator Joined Oct 1, '02 From fall river, ma Currently Offline Reputation: 13 (100%) |
QUOTE(Defgeph @ Sep 12, 2007 - 4:48 PM) [snapback]595496[/snapback] I believe she will be building this engine for a turbo set up in the future. Bumping up compression would not be a good idea. Rebuild, valve job, & port the head. Port match the intake & exhaust manifolds. Grind the cast markings off the head ports and combustion chambers. Lightweight flywheel with a street clutch. See if you can find someone to shave some weight off the crank. Look into new cams or regrinds. Don't bother with the gear. Put that turbo kit in, you'll have some nice results. Can't wait to see how this project unfolds! hehe totally forgot about the turbo down the road, jeff..lol nix the shaven head. do they make a metal headgasket for the 7a? 
-------------------- Former Team 5SFTE pro member ;)
13.6@108MPH, 5SFTE Powered |
|
Sep 12, 2007 - 4:07 PM
|
|
|
Moderator Joined Apr 17, '03 From Rockland NY Currently Offline Reputation: 15 (100%) |
We could have one made. I'd like to make one twice as thick as stock.
-------------------- I will return one day. |
|
Sep 12, 2007 - 6:13 PM
|
|
|
Enthusiast Joined Mar 3, '04 From Portsmouth, RI Currently Offline Reputation: 33 (100%) |
QUOTE(presure2 @ Sep 12, 2007 - 5:01 PM) [snapback]595500[/snapback] hehe totally forgot about the turbo down the road, jeff..lol nix the shaven head. do they make a metal headgasket for the 7a? believe it or not Manny the OEM 7A headgasket is metal anyway, I know everyone wants to see pictures... First we separated the head and the block like I said Jeff's engine is incredibly clean and I wouldn't have believed it has 177k miles on it [looking at the picture below] I want to know what I can and can't shave off/ smooth out on the head 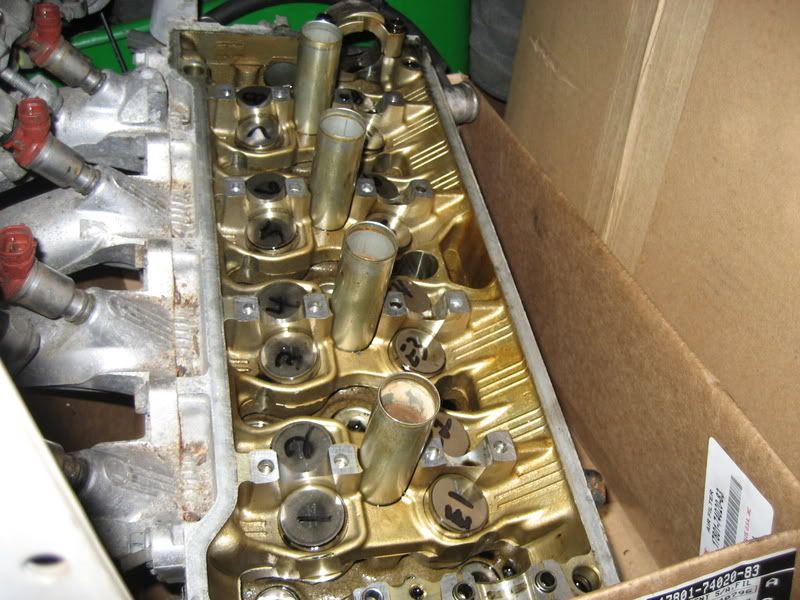 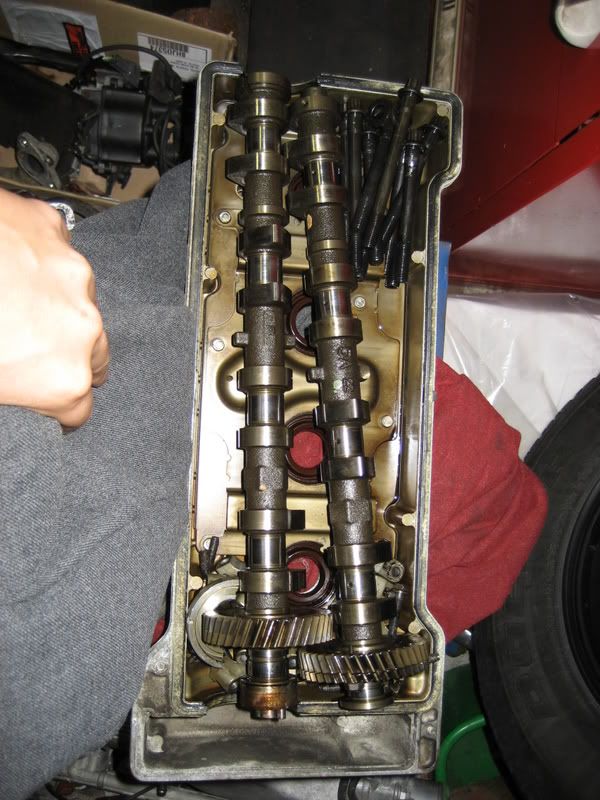 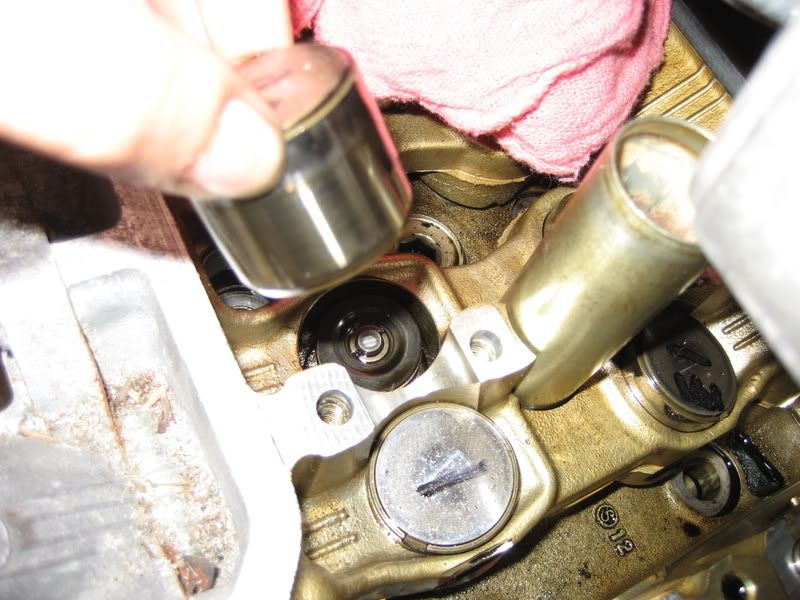 and the block 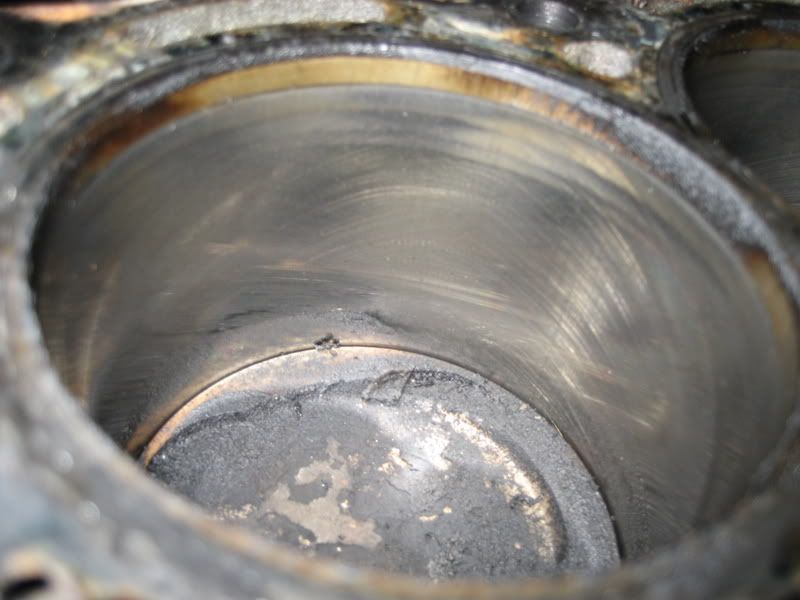 ^notice the dirty pistons above, soon there will be a picture of them cleaned up a little now with the pistons out 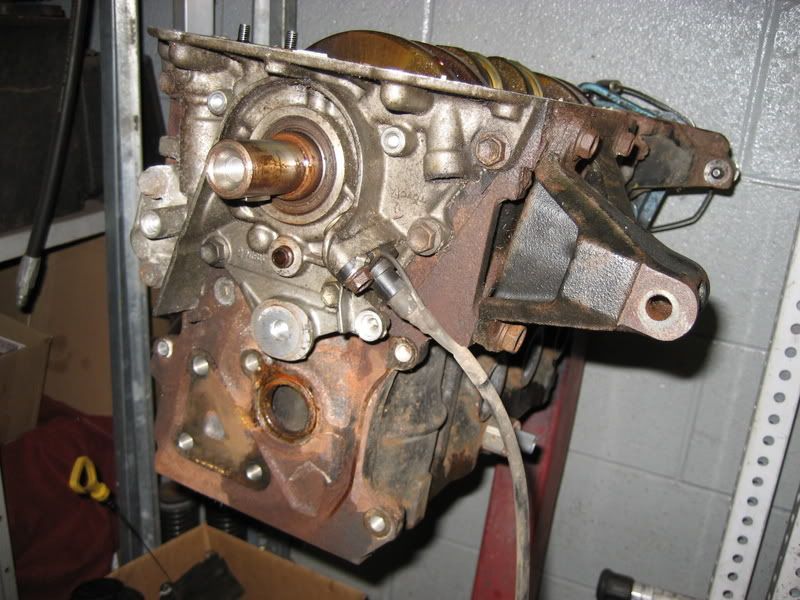 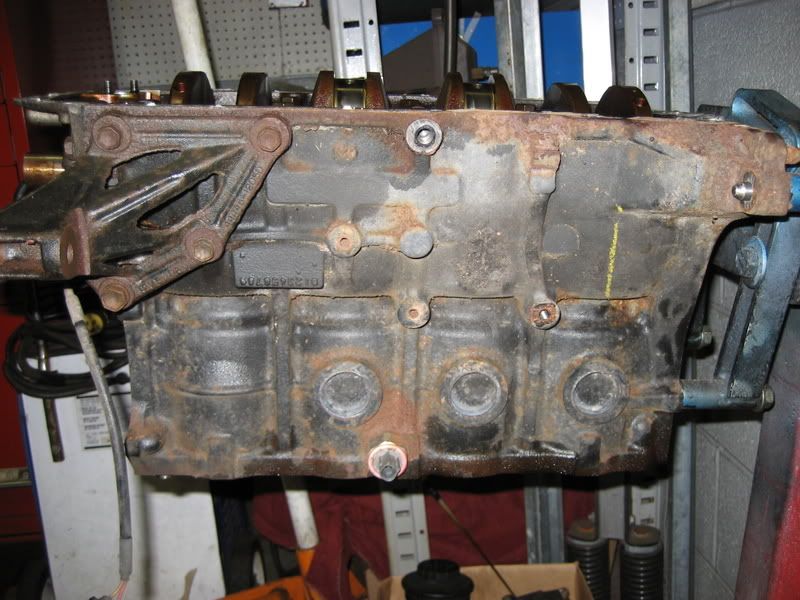 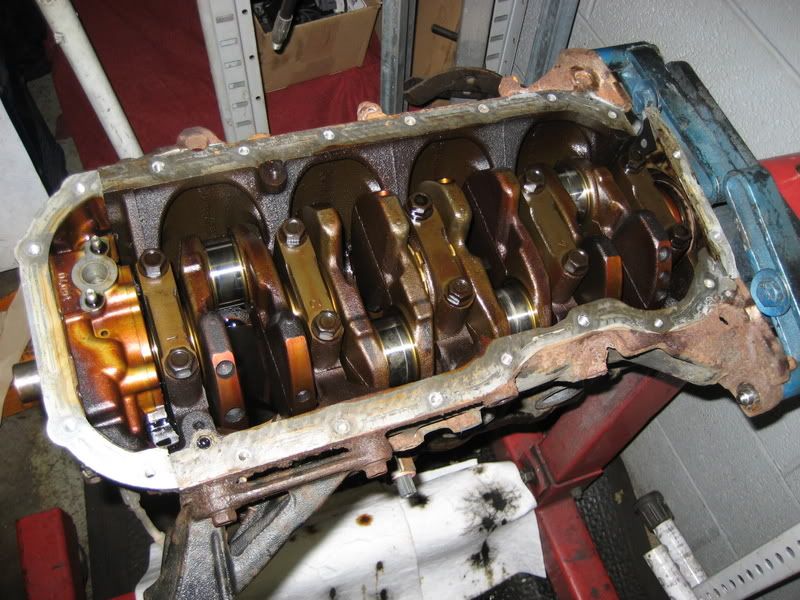 -------------------- |
 |
1 User(s) are reading this topic (1 Guests and 0 Anonymous Users)
0 Members:
| Lo-Fi Version | Time is now: June 21st, 2026 - 11:18 AM |