
 Sep 11, 2007 - 6:13 PM Sep 11, 2007 - 6:13 PM
|
 
|
|
Enthusiast  Joined Mar 3, '04 From Portsmouth, RI Currently Offline Reputation: 33 (100%) |
So obviously my oil problem is only getting worse, I decided it's finally time to do something about it.
so I went and picked up Defgeph's old 7A... 177,000 miles and was begining to use some oil before he swapped and it sat in the garage for 2 years. but since I was getting it for free from a friend I decided to pick it up and hope for the best... 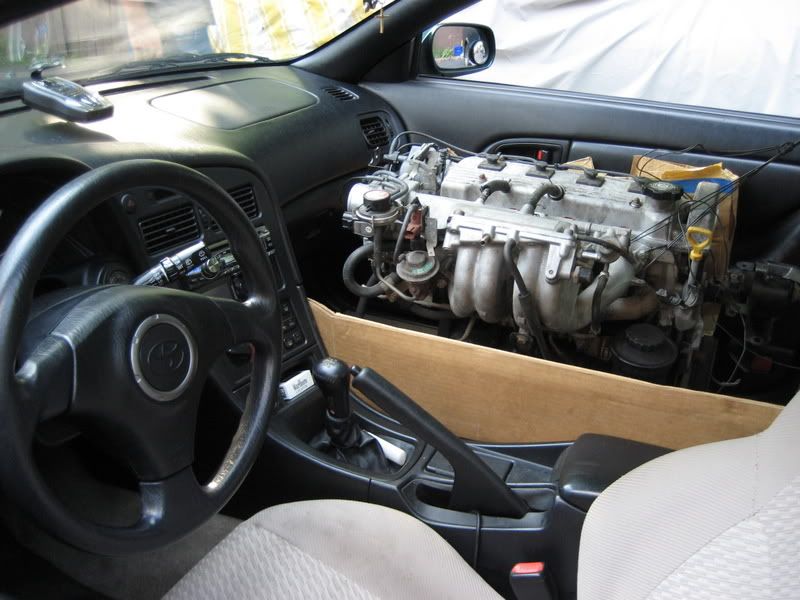 so I picked it up Fri (8/24) and the next day it came with me to work (I work at a Toyota dealer) where they unloaded it into the brake lathe room and it stayed hidden for a while. this past Saturday (9/8) me and one of the techs began tearing it apart. I was pleasantly surprised to find that it is actually in incredibly good condition for its age... I will be spending close to $500 in parts replacing every bearing, seal, gasket, etc that we can think of. What I need from you guys are your suggestions as to what I can do to make this motor a little stronger and better flowing. I'm keeping the stock pistons and considering bigger cams and having the head machined. We work for about an hour each morning before customers start coming in. Between Sat, Mon, and Tues (today) we have everything pretty much apart (except for the valves since I haven't decided to send them to the machinist with the head or not yet). This is a huge learning process for me and happy to have the oppotunity to do it. I'll add more pics and info so maybe some of you can learn some things too. This post has been edited by hurley97: Mar 6, 2008 - 9:09 PM -------------------- |


 |
Replies
|
Sep 13, 2007 - 6:08 PM
|
|
|
Enthusiast Joined Mar 3, '04 From Portsmouth, RI Currently Offline Reputation: 33 (100%) |
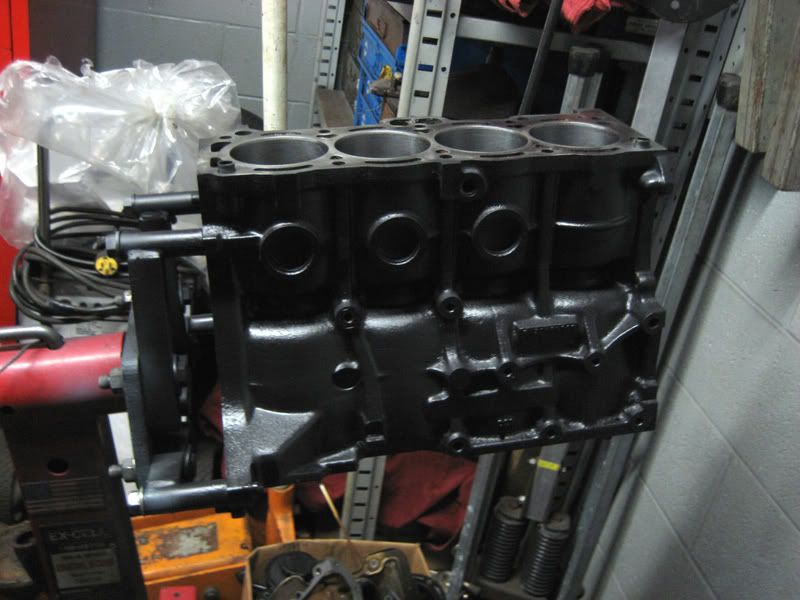
I cleaned and painted the block yesterday...
 and we honed the cylinders. I don't have a picture of the tool we used but it looks like a bunch of wire bristles with balls on the end attached to a drill. you have to break the glaze on the cylinder walls in a crosshatch kind of pattern so the oil sticks better... 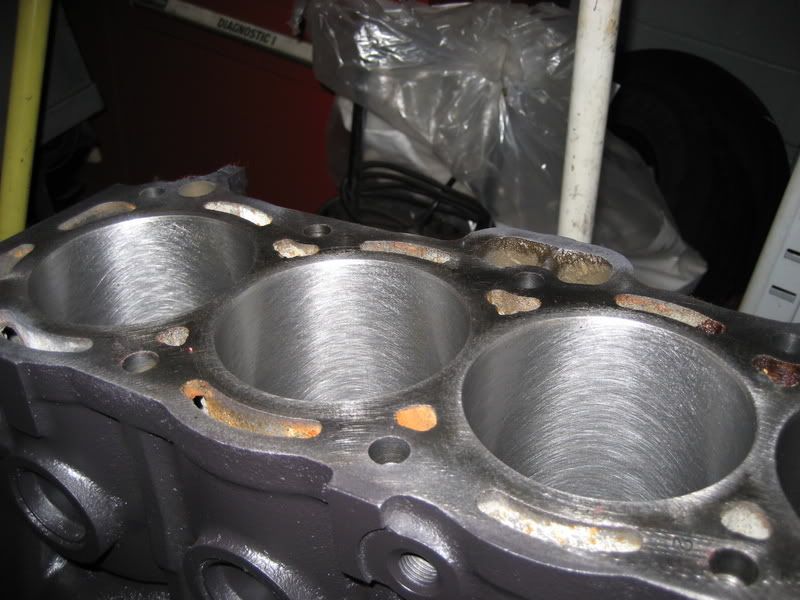 and today we just re-ringed the pistons.. 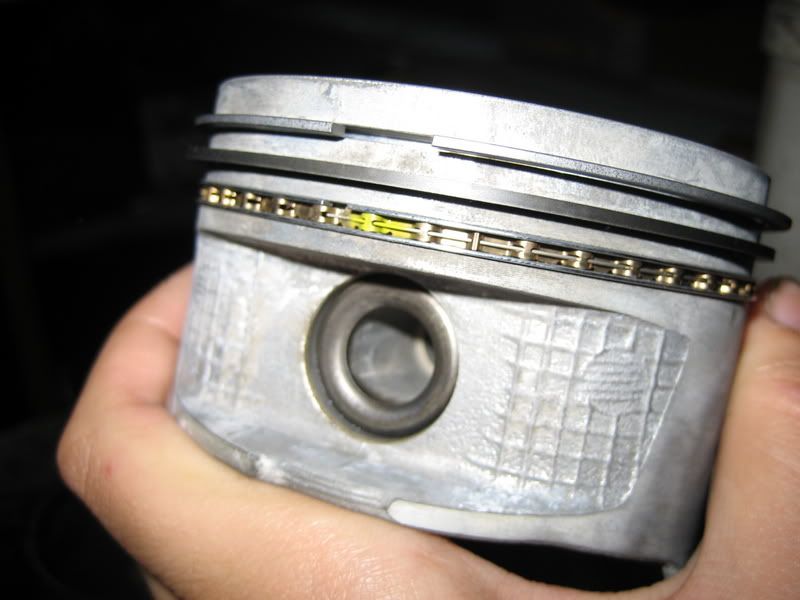 there are two thin rings that go above and below the oil control rings in the bottom groove and the top two are the compression rings. you want to place the openings in the rings on alternating sides and always right above the wrist pin since that takes the least stress. so in the picture the opening in the ring under the oil control ring is facing back, the one on top is facing forward, the first compression ring facing back (there is a "2R" written on it that should be facing up), and the top ring facing front. they fit very loose like that so as to make a tighter seal with the cylinder wall when installed. 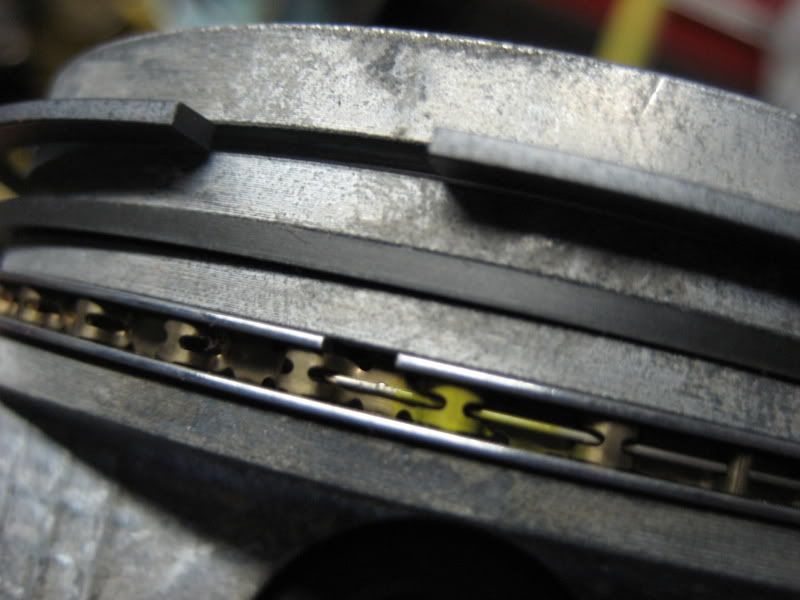 we can't do much else until the main bearings come in (probably Monday) since we need them to put the bottom end back together. we want to finish the bottom completely before starting on the head, just to keep things organized. This post has been edited by hurley97: Sep 13, 2007 - 6:10 PM -------------------- |
Posts in this topic
hurley97 Stef's 7A-FE Rebuild Sep 11, 2007 - 6:13 PM jcbass7 My suggestion if you want some seirous power would... Sep 11, 2007 - 6:26 PM presure2 shave the head a bit, 3 angle valve job, MAYBE a l... Sep 11, 2007 - 8:21 PM
 jcbass7 QUOTE(presure2 @ Sep 11, 2007 - 9:21... Sep 11, 2007 - 9:13 PM Celiracer18 OOOH BOY!! Ive been looking forward to thi... Sep 11, 2007 - 9:11 PM cjh4l22 turbo? Sep 11, 2007 - 9:13 PM xs94st head swap? Sep 11, 2007 - 9:29 PM jason since your prolly gonna have this car as a DD i wo... Sep 11, 2007 - 9:54 PM Bitter have it all balanced, that'll make it run alot... Sep 11, 2007 - 10:35 PM playr158 knife edge the crank.
you wana lighten up the bot... Sep 12, 2007 - 9:17 AM njccmd2002 QUOTE(hurley97 @ Sep 11, 2007 - 7:13... Sep 12, 2007 - 9:35 AM ILuvMyCelica95 Steff I'm really excited to read this thread a... Sep 12, 2007 - 9:49 AM hurley97 QUOTE(ILuvMyCelica95 @ Sep 12, 2007 - 10... Sep 12, 2007 - 6:28 PM alltracman78 Damn kid, looks GOOD.
You didn't mention any... Oct 2, 2007 - 7:05 PM xs94st wow..our engine is tiny. good grief.
good luck... Sep 12, 2007 - 1:07 PM hellsyphon Awesome, the 7A actually fits in the front seats l... Sep 12, 2007 - 1:57 PM x_itchy_b_x you can do all thats listed above ^ great suggesti... Sep 12, 2007 - 3:28 PM playr158 QUOTE(x_itchy_b_x @ Sep 12, 2007 - 4... Sep 12, 2007 - 3:30 PM Defgeph I believe she will be building this engine for a t... Sep 12, 2007 - 3:48 PM presure2 QUOTE(Defgeph @ Sep 12, 2007 - 4:48 ... Sep 12, 2007 - 4:01 PM hurley97 QUOTE(presure2 @ Sep 12, 2007 - 5:01... Sep 12, 2007 - 6:13 PM Defgeph We could have one made. I'd like to make one t... Sep 12, 2007 - 4:07 PM x_itchy_b_x awesome! thats a pretty big crank, i was surpr... Sep 12, 2007 - 7:02 PM Defgeph Thats awesome ! This is a project I have been ... Sep 12, 2007 - 7:45 PM lagos im going to take a guess and say you used mobil1, ... Sep 12, 2007 - 8:25 PM Defgeph ON A 7A! Are you crazy ? Just used regular s... Sep 12, 2007 - 9:06 PM 94celicadude hey, this is very interesting for me cuse i am on ... Sep 12, 2007 - 9:19 PM hurley97 QUOTE(94celicadude @ Sep 12, 2007 - 10... Sep 12, 2007 - 11:58 PM 97lestyousay I can't wait to see how this turns out. Look... Sep 12, 2007 - 10:32 PM lagos QUOTE(Defgeph @ Sep 12, 2007 - 10:06... Sep 12, 2007 - 11:29 PM lagos stef, i dont know how crazy you want to go with t... Sep 12, 2007 - 11:39 PM hurley97 QUOTE(lagos @ Sep 13, 2007 - 12:39 A... Sep 14, 2007 - 9:02 AM hurley97 to find the size of the main bearings...
for the... Sep 13, 2007 - 12:11 AM giang723 that's looks amazing, makes we wonder why i di... Sep 13, 2007 - 2:54 AM Celiracer18 if your not gonna get the pauters and want a littl... Sep 13, 2007 - 6:22 PM LewFX reminds me of rebuilding a cummins engine, same pr... Sep 13, 2007 - 6:26 PM spolski07 this has to be the most interesting thread ever... Sep 13, 2007 - 7:19 PM 97lestyousay I personally would check all parts with a micromet... Sep 13, 2007 - 7:34 PM jcbass7 Steff this thread is awesome! keep it up Sep 13, 2007 - 9:26 PM ILuvMyCelica95 Steff i love this i feel like im in class Your pi... Sep 14, 2007 - 9:12 AM playr158 4ag(z)e head gaskets will work also (i do believE) Sep 14, 2007 - 9:13 AM hurley97 yes you probably could but the 7A headgasket is me... Sep 14, 2007 - 10:13 AM Silver94CelicaOwner Stef, good to see that you're on your way with... Sep 14, 2007 - 11:10 AM Panswed QUOTEBetween a rebuilt and ported top-end, camshaf... Sep 14, 2007 - 12:09 PM Silver94CelicaOwner QUOTEas long as the stock rod bolts can take it. ... Sep 16, 2007 - 4:03 AM FortuneCookie QUOTE(Silver94CelicaOwner @ Sep 16, 2007 ... Sep 17, 2007 - 11:30 AM hurley97 QUOTE(Silver94CelicaOwner @ Sep 16, 2007 ... Sep 19, 2007 - 6:51 PM 56willysnut Nice pics! Sep 17, 2007 - 9:39 AM Bitter made sure it all turned good and smooth after the ... Sep 19, 2007 - 9:16 PM purplegt4 wow are you keeping all the receipts and costs tal... Sep 19, 2007 - 9:55 PM Defgeph Looking good. Sep 19, 2007 - 11:47 PM Coomer Looks great. I love threads like this. Sep 19, 2007 - 11:54 PM spolski07 QUOTE(Coomer @ Sep 19, 2007 - 11:54 ... Sep 19, 2007 - 11:59 PM hurley97 sorry for the delay on the progress report... that... Sep 23, 2007 - 8:05 PM Celiracer18 QUOTE(hurley97 @ Sep 23, 2007 - 8:05... Sep 24, 2007 - 9:43 AM hurley97 QUOTE(Celiracer18 @ Sep 24, 2007 - 10... Sep 24, 2007 - 4:54 PM supershannon77 Looking good, nice work.....you impress me Sep 23, 2007 - 8:13 PM stephen_lee wow. this thread amazes me.
rebuilding doesn't... Sep 23, 2007 - 8:26 PM playr158 very nice progess. Sep 23, 2007 - 9:19 PM lagos HOT!
not trying to be an internet mechanic h... Sep 23, 2007 - 9:40 PM LewFX for deisels we use gear oil to lube the bearings Sep 23, 2007 - 9:48 PM playr158 motor oil works fine for putting pistons in, its w... Sep 23, 2007 - 9:57 PM jcbass7 This is amazing steff, keep it up! I'm sur... Sep 24, 2007 - 9:23 AM jcbass7 is that a 3 stamped sideways in the middle of the ... Sep 24, 2007 - 9:47 AM Celiracer18 QUOTE(jcbass7 @ Sep 24, 2007 - 9:47 ... Sep 24, 2007 - 11:14 AM 56willysnut They look like match marks to me, so you don't... Sep 24, 2007 - 12:40 PM hurley97 now the fun part... the top end
we started by... Sep 26, 2007 - 7:02 PM Bitter going to cut the valves and seats and then lap the... Sep 26, 2007 - 8:02 PM hurley97 QUOTE(Bitter @ Sep 26, 2007 - 9:02 P... Sep 28, 2007 - 10:50 AM Defgeph So awesome. Keep it up Steff Sep 27, 2007 - 10:26 PM kerosene women with tools are hot ^^ there is no way of say... Sep 27, 2007 - 11:04 PM ILuvMyCelica95 i think when this is all said and done this should... Sep 28, 2007 - 10:38 AM x_itchy_b_x outside the car turbo setup is a great idea! h... Sep 28, 2007 - 10:58 AM playr158 so basically you are rebuilding this motor,
putti... Sep 28, 2007 - 11:03 AM devilsden97 U missed the point dan.
shes rebuilding this one,... Sep 28, 2007 - 11:36 AM playr158 QUOTE(devilsden97 @ Sep 28, 2007 - 12... Sep 28, 2007 - 12:52 PM hurley97 I plan on keeping the car for a long time. the mot... Sep 28, 2007 - 1:22 PM jgreening QUOTE(hurley97 @ Sep 28, 2007 - 1:22... Oct 2, 2007 - 5:38 PM playr158 ah word gotcha cool beans! Sep 28, 2007 - 1:34 PM hurley97 we cleaned up block and ground out the intake and ... Sep 29, 2007 - 8:55 PM presure2 that is totally bad a$$ steff. now we ne... Sep 30, 2007 - 7:09 AM celicomx are the valve seals the same in the exhaust and in... Oct 2, 2007 - 12:21 PM hurley97 no, the part numbers are different. the rubber par... Oct 2, 2007 - 2:28 PM celicomx damn cuz i put all the same valve seals in the int... Oct 2, 2007 - 4:33 PM hurley97 we re-shimmed the valves today. I have no pictures... Oct 2, 2007 - 10:16 PM 94celicadude i like the port jobs youve done on the head, it lo... Oct 3, 2007 - 6:47 PM hurley97 the head is back on the block, headgasket in place... Oct 7, 2007 - 9:51 AM 6gcSTVT steph, How much boost are you going to put this p... Oct 7, 2007 - 8:13 PM hurley97 probably only about 6-10psi
it should last a pret... Oct 7, 2007 - 10:01 PM lazzyboy121 i just read the entire thread, great work. and i l... Oct 8, 2007 - 9:33 PM Defgeph I demand pics ! Oct 9, 2007 - 10:41 PM stephen_lee ok well the mod said it. you must do it
it will a... Oct 9, 2007 - 10:53 PM hurley97 sorry, I haven't had time to upload and explai... Oct 10, 2007 - 6:46 PM hurley97 then turn the cams half a revolution (there is a l... Oct 10, 2007 - 7:01 PM 97lestyousay QUOTE(hurley97 @ Oct 10, 2007 - 4:01... Oct 10, 2007 - 7:07 PM hurley97 GETTING CLOSE!! just putting little thing... Oct 10, 2007 - 7:22 PM Valo666 looks like every things coming along great there s... Oct 10, 2007 - 9:00 PM jcbass7 good work stef, can't wait to see this in your... Oct 11, 2007 - 8:26 AM x_itchy_b_x it turns me on that you know so much. knowledge is... Oct 11, 2007 - 8:31 AM
jcbass7 QUOTE(presure2 @ Sep 11, 2007 - 9:21... Sep 11, 2007 - 9:13 PM Celiracer18 OOOH BOY!! Ive been looking forward to thi... Sep 11, 2007 - 9:11 PM cjh4l22 turbo? Sep 11, 2007 - 9:13 PM xs94st head swap? Sep 11, 2007 - 9:29 PM jason since your prolly gonna have this car as a DD i wo... Sep 11, 2007 - 9:54 PM Bitter have it all balanced, that'll make it run alot... Sep 11, 2007 - 10:35 PM playr158 knife edge the crank.
you wana lighten up the bot... Sep 12, 2007 - 9:17 AM njccmd2002 QUOTE(hurley97 @ Sep 11, 2007 - 7:13... Sep 12, 2007 - 9:35 AM ILuvMyCelica95 Steff I'm really excited to read this thread a... Sep 12, 2007 - 9:49 AM hurley97 QUOTE(ILuvMyCelica95 @ Sep 12, 2007 - 10... Sep 12, 2007 - 6:28 PM alltracman78 Damn kid, looks GOOD.
You didn't mention any... Oct 2, 2007 - 7:05 PM xs94st wow..our engine is tiny. good grief.
good luck... Sep 12, 2007 - 1:07 PM hellsyphon Awesome, the 7A actually fits in the front seats l... Sep 12, 2007 - 1:57 PM x_itchy_b_x you can do all thats listed above ^ great suggesti... Sep 12, 2007 - 3:28 PM playr158 QUOTE(x_itchy_b_x @ Sep 12, 2007 - 4... Sep 12, 2007 - 3:30 PM Defgeph I believe she will be building this engine for a t... Sep 12, 2007 - 3:48 PM presure2 QUOTE(Defgeph @ Sep 12, 2007 - 4:48 ... Sep 12, 2007 - 4:01 PM hurley97 QUOTE(presure2 @ Sep 12, 2007 - 5:01... Sep 12, 2007 - 6:13 PM Defgeph We could have one made. I'd like to make one t... Sep 12, 2007 - 4:07 PM x_itchy_b_x awesome! thats a pretty big crank, i was surpr... Sep 12, 2007 - 7:02 PM Defgeph Thats awesome ! This is a project I have been ... Sep 12, 2007 - 7:45 PM lagos im going to take a guess and say you used mobil1, ... Sep 12, 2007 - 8:25 PM Defgeph ON A 7A! Are you crazy ? Just used regular s... Sep 12, 2007 - 9:06 PM 94celicadude hey, this is very interesting for me cuse i am on ... Sep 12, 2007 - 9:19 PM hurley97 QUOTE(94celicadude @ Sep 12, 2007 - 10... Sep 12, 2007 - 11:58 PM 97lestyousay I can't wait to see how this turns out. Look... Sep 12, 2007 - 10:32 PM lagos QUOTE(Defgeph @ Sep 12, 2007 - 10:06... Sep 12, 2007 - 11:29 PM lagos stef, i dont know how crazy you want to go with t... Sep 12, 2007 - 11:39 PM hurley97 QUOTE(lagos @ Sep 13, 2007 - 12:39 A... Sep 14, 2007 - 9:02 AM hurley97 to find the size of the main bearings...
for the... Sep 13, 2007 - 12:11 AM giang723 that's looks amazing, makes we wonder why i di... Sep 13, 2007 - 2:54 AM Celiracer18 if your not gonna get the pauters and want a littl... Sep 13, 2007 - 6:22 PM LewFX reminds me of rebuilding a cummins engine, same pr... Sep 13, 2007 - 6:26 PM spolski07 this has to be the most interesting thread ever... Sep 13, 2007 - 7:19 PM 97lestyousay I personally would check all parts with a micromet... Sep 13, 2007 - 7:34 PM jcbass7 Steff this thread is awesome! keep it up Sep 13, 2007 - 9:26 PM ILuvMyCelica95 Steff i love this i feel like im in class Your pi... Sep 14, 2007 - 9:12 AM playr158 4ag(z)e head gaskets will work also (i do believE) Sep 14, 2007 - 9:13 AM hurley97 yes you probably could but the 7A headgasket is me... Sep 14, 2007 - 10:13 AM Silver94CelicaOwner Stef, good to see that you're on your way with... Sep 14, 2007 - 11:10 AM Panswed QUOTEBetween a rebuilt and ported top-end, camshaf... Sep 14, 2007 - 12:09 PM Silver94CelicaOwner QUOTEas long as the stock rod bolts can take it. ... Sep 16, 2007 - 4:03 AM FortuneCookie QUOTE(Silver94CelicaOwner @ Sep 16, 2007 ... Sep 17, 2007 - 11:30 AM hurley97 QUOTE(Silver94CelicaOwner @ Sep 16, 2007 ... Sep 19, 2007 - 6:51 PM 56willysnut Nice pics! Sep 17, 2007 - 9:39 AM Bitter made sure it all turned good and smooth after the ... Sep 19, 2007 - 9:16 PM purplegt4 wow are you keeping all the receipts and costs tal... Sep 19, 2007 - 9:55 PM Defgeph Looking good. Sep 19, 2007 - 11:47 PM Coomer Looks great. I love threads like this. Sep 19, 2007 - 11:54 PM spolski07 QUOTE(Coomer @ Sep 19, 2007 - 11:54 ... Sep 19, 2007 - 11:59 PM hurley97 sorry for the delay on the progress report... that... Sep 23, 2007 - 8:05 PM Celiracer18 QUOTE(hurley97 @ Sep 23, 2007 - 8:05... Sep 24, 2007 - 9:43 AM hurley97 QUOTE(Celiracer18 @ Sep 24, 2007 - 10... Sep 24, 2007 - 4:54 PM supershannon77 Looking good, nice work.....you impress me Sep 23, 2007 - 8:13 PM stephen_lee wow. this thread amazes me.
rebuilding doesn't... Sep 23, 2007 - 8:26 PM playr158 very nice progess. Sep 23, 2007 - 9:19 PM lagos HOT!
not trying to be an internet mechanic h... Sep 23, 2007 - 9:40 PM LewFX for deisels we use gear oil to lube the bearings Sep 23, 2007 - 9:48 PM playr158 motor oil works fine for putting pistons in, its w... Sep 23, 2007 - 9:57 PM jcbass7 This is amazing steff, keep it up! I'm sur... Sep 24, 2007 - 9:23 AM jcbass7 is that a 3 stamped sideways in the middle of the ... Sep 24, 2007 - 9:47 AM Celiracer18 QUOTE(jcbass7 @ Sep 24, 2007 - 9:47 ... Sep 24, 2007 - 11:14 AM 56willysnut They look like match marks to me, so you don't... Sep 24, 2007 - 12:40 PM hurley97 now the fun part... the top end
we started by... Sep 26, 2007 - 7:02 PM Bitter going to cut the valves and seats and then lap the... Sep 26, 2007 - 8:02 PM hurley97 QUOTE(Bitter @ Sep 26, 2007 - 9:02 P... Sep 28, 2007 - 10:50 AM Defgeph So awesome. Keep it up Steff Sep 27, 2007 - 10:26 PM kerosene women with tools are hot ^^ there is no way of say... Sep 27, 2007 - 11:04 PM ILuvMyCelica95 i think when this is all said and done this should... Sep 28, 2007 - 10:38 AM x_itchy_b_x outside the car turbo setup is a great idea! h... Sep 28, 2007 - 10:58 AM playr158 so basically you are rebuilding this motor,
putti... Sep 28, 2007 - 11:03 AM devilsden97 U missed the point dan.
shes rebuilding this one,... Sep 28, 2007 - 11:36 AM playr158 QUOTE(devilsden97 @ Sep 28, 2007 - 12... Sep 28, 2007 - 12:52 PM hurley97 I plan on keeping the car for a long time. the mot... Sep 28, 2007 - 1:22 PM jgreening QUOTE(hurley97 @ Sep 28, 2007 - 1:22... Oct 2, 2007 - 5:38 PM playr158 ah word gotcha cool beans! Sep 28, 2007 - 1:34 PM hurley97 we cleaned up block and ground out the intake and ... Sep 29, 2007 - 8:55 PM presure2 that is totally bad a$$ steff. now we ne... Sep 30, 2007 - 7:09 AM celicomx are the valve seals the same in the exhaust and in... Oct 2, 2007 - 12:21 PM hurley97 no, the part numbers are different. the rubber par... Oct 2, 2007 - 2:28 PM celicomx damn cuz i put all the same valve seals in the int... Oct 2, 2007 - 4:33 PM hurley97 we re-shimmed the valves today. I have no pictures... Oct 2, 2007 - 10:16 PM 94celicadude i like the port jobs youve done on the head, it lo... Oct 3, 2007 - 6:47 PM hurley97 the head is back on the block, headgasket in place... Oct 7, 2007 - 9:51 AM 6gcSTVT steph, How much boost are you going to put this p... Oct 7, 2007 - 8:13 PM hurley97 probably only about 6-10psi
it should last a pret... Oct 7, 2007 - 10:01 PM lazzyboy121 i just read the entire thread, great work. and i l... Oct 8, 2007 - 9:33 PM Defgeph I demand pics ! Oct 9, 2007 - 10:41 PM stephen_lee ok well the mod said it. you must do it
it will a... Oct 9, 2007 - 10:53 PM hurley97 sorry, I haven't had time to upload and explai... Oct 10, 2007 - 6:46 PM hurley97 then turn the cams half a revolution (there is a l... Oct 10, 2007 - 7:01 PM 97lestyousay QUOTE(hurley97 @ Oct 10, 2007 - 4:01... Oct 10, 2007 - 7:07 PM hurley97 GETTING CLOSE!! just putting little thing... Oct 10, 2007 - 7:22 PM Valo666 looks like every things coming along great there s... Oct 10, 2007 - 9:00 PM jcbass7 good work stef, can't wait to see this in your... Oct 11, 2007 - 8:26 AM x_itchy_b_x it turns me on that you know so much. knowledge is... Oct 11, 2007 - 8:31 AM |
1 User(s) are reading this topic (1 Guests and 0 Anonymous Users)
0 Members:
| Lo-Fi Version | Time is now: July 28th, 2026 - 1:28 PM |